Connect to and manage Salesforce in Microsoft Purview
This article outlines how to register Salesforce, and how to authenticate and interact with Salesforce in Microsoft Purview. For more information about Microsoft Purview, read the introductory article.
Supported capabilities
| Metadata Extraction | Full Scan | Incremental Scan | Scoped Scan | Classification | Labeling | Access Policy | Lineage | Data Sharing | Live view |
|---|---|---|---|---|---|---|---|---|---|
| Yes | Yes | No | Yes | No | No | No | No | No |
When scanning Salesforce source, Microsoft Purview supports extracting technical metadata including:
- Organization
- Objects including the fields, foreign keys, and unique_constraints
When setting up scan, you can choose to scan an entire Salesforce organization, or scope the scan to a subset of objects matching the given name(s) or name pattern(s).
Known limitations
When object is deleted from the data source, currently the subsequent scan won't automatically remove the corresponding asset in Microsoft Purview.
Prerequisites
- An Azure account with an active subscription. Create an account for free.
- An active Microsoft Purview account.
- You need Data Source Administrator and Data Reader permissions to register a source and manage it in the Microsoft Purview governance portal. For more information about permissions, see Access control in Microsoft Purview.
- A Salesforce connected app, which will be used to access your Salesforce information.
- If you need to create a connected app, you can follow the Salesforce documentation.
- You will need to enable OAuth for your Salesforce application.
Note
If your data store is not publicly accessible (if your data store limits access from on-premises network, private network or specific IPs, etc.), you will need to configure a self hosted integration runtime to connect to it.
- If your data store isn't publicly accessible, set up the latest self-hosted integration runtime. For more information, see the create and configure a self-hosted integration runtime guide.
- Ensure JDK 11 is installed on the machine where the self-hosted integration runtime is installed. Restart the machine after you newly install the JDK for it to take effect.
- Ensure Visual C++ Redistributable (version Visual Studio 2012 Update 4 or newer) is installed on the self-hosted integration runtime machine. If you don't have this update installed, you can download it here.
- Ensure the self-hosted integration runtime machine's IP is within the trusted IP ranges for your organization set on Salesforce.
Required permissions for scan
If users will be submitting Salesforce Documents, certain security settings must be configured to allow this access on Standard Objects and Custom Objects. To configure permissions:
- Within Salesforce, select Setup and then select Manage Users.
- Under the Manage Users tree select Profiles.
- Once the Profiles appear on the right, select which Profile you want to edit and select the Edit link next to the corresponding profile.
For Standard Objects, ensure that the "Documents" section has the Read permissions selected. For Custom Objects, ensure that the Read permissions selected for each custom objects.
Register
This section describes how to register Salesforce in Microsoft Purview using the Microsoft Purview governance portal.
Steps to register
To register a new Salesforce source in your data catalog, follow these steps:
- Navigate to your Microsoft Purview account in the Microsoft Purview governance portal.
- Select Data Map on the left navigation.
- Select Register
- On Register sources, select Salesforce. Select Continue.
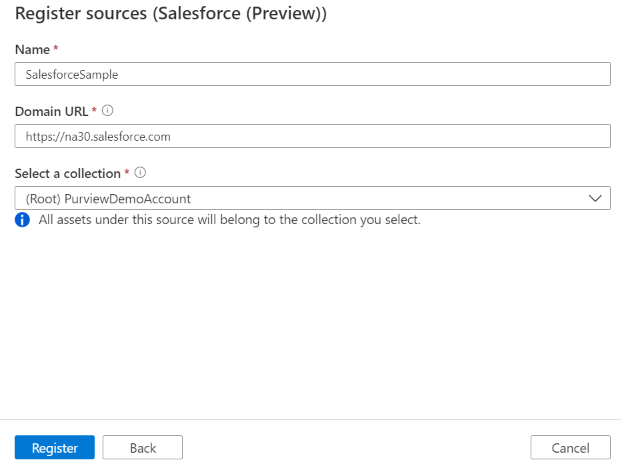
On the Register sources (Salesforce) screen, follow these steps:
Enter a Name that the data source will be listed within the Catalog.
Enter the Salesforce login endpoint URL as Domain URL. For example,
https://login.salesforce.com. You can use your company' instance URL (such ashttps://na30.salesforce.com) or My Domain URL (such ashttps://myCompanyName.my.salesforce.com/).Select a collection from the list.
Finish to register the data source.
Scan
Follow the steps below to scan Salesforce to automatically identify assets. For more information about scanning in general, see our introduction to scans and ingestion.
Microsoft Purview uses Salesforce REST API version 41.0 to extract metadata, including REST requests like 'Describe Global' URI (/v41.0/sobjects/),'sObject Basic Information' URI (/v41.0/sobjects/sObject/), and 'SOQL Query' URI (/v41.0/query?).
Authentication for a scan
The supported authentication type for a Salesforce source is Consumer key authentication.
Create and run scan
To create and run a new scan, follow these steps:
If your server is publicly accessible, skip to step two. Otherwise, you'll need to make sure your self-hosted integration runtime is configured:
- In the Microsoft Purview governance portal, got to the Management Center, and select Integration runtimes.
- Make sure a self-hosted integration runtime is available. If one isn't set up, use the steps mentioned here to set up a self-hosted integration runtime.
In the Microsoft Purview governance portal, navigate to Sources.
Select the registered Salesforce source.
Select + New scan.
Provide the below details:
Name: The name of the scan
Connect via integration runtime: Select the Azure auto-resolved integration runtime if your server is publicly accessible, or your configured self-hosted integration runtime if it isn't publicly available.
Credential: Select the credential to connect to your data source. Make sure to:
- Select Consumer key while creating a credential.
- Provide the username of the user that the connected app is imitating in the User name input field.
- Store the password of the user that the connected app is imitating in an Azure Key Vault secret.
- If your self-hosted integration runtime machine's IP is within the trusted IP ranges for your organization set on Salesforce, provide just the password of the user.
- Otherwise, concatenate the password and security token as the value of the secret. The security token is an automatically generated key that must be added to the end of the password when logging in to Salesforce from an untrusted network. Learn more about how to get or reset a security token.
- Provide the consumer key from the connected app definition. You can find it on the connected app's Manage Connected Apps page or from the connected app's definition.
- Stored the consumer secret from the connected app definition in an Azure Key Vault secret. You can find it along with consumer key.
Objects: Provide a list of object names to scope your scan. For example,
object1; object2. An empty list means retrieving all available objects. You can specify object names as a wildcard pattern. For example,topic?,*topic*, ortopic_?,*topic*.Maximum memory available (applicable when using self-hosted integration runtime): Maximum memory (in GB) available on customer's VM to be used by scanning processes. This is dependent on the size of Salesforce source to be scanned.
Note
As a rule of thumb, please provide 1GB memory for every 1000 tables
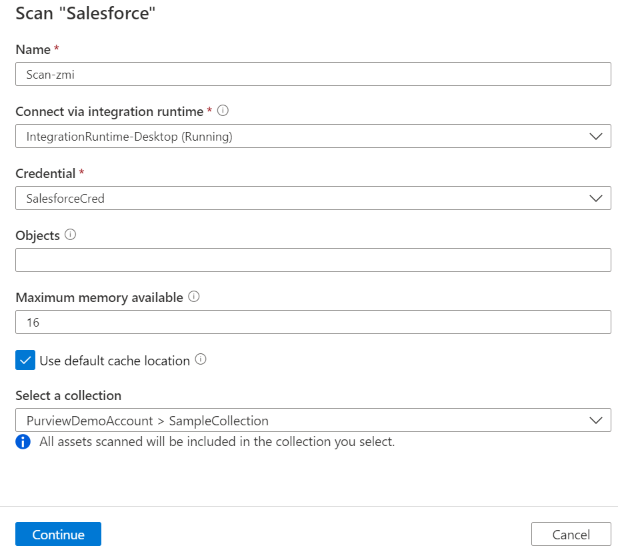
Select Test connection to validate the settings (available when using Azure Integration Runtime).
Select Continue.
Choose your scan trigger. You can set up a schedule or ran the scan once.
Review your scan and select Save and Run.
View your scans and scan runs
To view existing scans:
- Go to the Microsoft Purview portal. On the left pane, select Data map.
- Select the data source. You can view a list of existing scans on that data source under Recent scans, or you can view all scans on the Scans tab.
- Select the scan that has results you want to view. The pane shows you all the previous scan runs, along with the status and metrics for each scan run.
- Select the run ID to check the scan run details.
Manage your scans
To edit, cancel, or delete a scan:
Go to the Microsoft Purview portal. On the left pane, select Data Map.
Select the data source. You can view a list of existing scans on that data source under Recent scans, or you can view all scans on the Scans tab.
Select the scan that you want to manage. You can then:
- Edit the scan by selecting Edit scan.
- Cancel an in-progress scan by selecting Cancel scan run.
- Delete your scan by selecting Delete scan.
Note
- Deleting your scan does not delete catalog assets created from previous scans.
Next steps
Now that you've registered your source, follow the below guides to learn more about Microsoft Purview and your data.
Feedback
Coming soon: Throughout 2024 we will be phasing out GitHub Issues as the feedback mechanism for content and replacing it with a new feedback system. For more information see: https://aka.ms/ContentUserFeedback.
Submit and view feedback for