Note
Access to this page requires authorization. You can try signing in or changing directories.
Access to this page requires authorization. You can try changing directories.
In this tutorial, you learn how to:
- Secure Azure Blob Storage containing Azure Remote Rendering models
- Authenticate with Microsoft Entra ID to access your Azure Remote Rendering instance
- Use Azure credentials for Azure Remote Rendering authentication
Prerequisites
- This tutorial builds on Tutorial: Refining materials, lighting, and effects.
Why extra security is needed
The current state of the application and its access to your Azure resources looks like this:
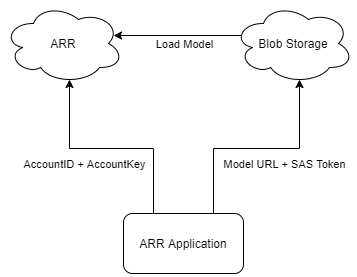
Both the "AccountID + AccountKey" and the "URL + SAS Token" are both essentially storing a username and password together. For example, if the "AccountID + AccountKey" were exposed, it would be trivial for an attacker to use your ARR resources without your permission at your expense.
Securing your content in Azure Blob Storage
Azure Remote Rendering can securely access the contents of your Azure Blob Storage with the correct configuration. See How-to: Link storage accounts to configure your Azure Remote Rendering instance with your blob storage accounts.
When using a linked blob storage, you use slightly different methods for loading models:
var loadModelParams = new LoadModelFromSasOptions(modelPath, modelEntity);
var task = ARRSessionService.CurrentActiveSession.Connection.LoadModelFromSasAsync(loadModelParams);
The above lines use the FromSas version of the params and session action. They must be converted to the non-SAS versions:
var loadModelParams = LoadModelOptions.CreateForBlobStorage(storageAccountPath, blobName, modelPath, modelEntity);
var task = ARRSessionService.CurrentActiveSession.Connection.LoadModelAsync(loadModelParams);
Let's modify RemoteRenderingCoordinator to load a custom model, from a linked blob storage account.
If you haven't already, complete the How-to: Link storage accounts to grant your ARR instance permission to access your Blob Storage instance.
Add the following modified LoadModel method to RemoteRenderingCoordinator just below the current LoadModel method:
/// <summary>
/// Loads a model from blob storage that has been linked to the ARR instance
/// </summary>
/// <param name="storageAccountName">The storage account name, this contains the blob containers </param>
/// <param name="blobName">The blob container name, i.e. arroutput</param>
/// <param name="modelPath">The relative path inside the container to the model, i.e. test/MyCustomModel.arrAsset</param>
/// <param name="parent">The parent Transform for this remote entity</param>
/// <param name="progress">A call back method that accepts a float progress value [0->1]</param>
/// <returns></returns>
public async Task<Entity> LoadModel(string storageAccountName, string blobName, string modelPath, UnityEngine.Transform parent = null, Action<float> progress = null)
{
    //Create a root object to parent a loaded model to
    var modelEntity = ARRSessionService.CurrentActiveSession.Connection.CreateEntity();

    //Get the game object representation of this entity
    var modelGameObject = modelEntity.GetOrCreateGameObject(UnityCreationMode.DoNotCreateUnityComponents);

    //Ensure the entity will sync its transform with the server
    var sync = modelGameObject.GetComponent<RemoteEntitySyncObject>();
    sync.SyncEveryFrame = true;

    //Parent the new object under the defined parent
    if (parent != null)
    {
        modelGameObject.transform.SetParent(parent, false);
        modelGameObject.name = parent.name + "_Entity";
    }

    //Load a model that will be parented to the entity
    var loadModelParams = LoadModelOptions.CreateForBlobStorage($"{storageAccountName}.blob.core.windows.net", blobName, modelPath, modelEntity);
    var loadModelAsync = ARRSessionService.CurrentActiveSession.Connection.LoadModelAsync(loadModelParams, progress);
    var result = await loadModelAsync;
    return modelEntity;
}
This code is identical to the original
LoadModelmethod, however we've replaced the SAS version of the method calls with the non-SAS versions.The extra inputs
storageAccountNameandblobNamehave also been added to the arguments. We call this new LoadModel method from another method similar to the first LoadTestModel method we created in the first tutorial.Add the following method to RemoteRenderingCoordinator just after LoadTestModel
private bool loadingLinkedCustomModel = false;

[SerializeField]
private string storageAccountName;
public string StorageAccountName {
    get => storageAccountName.Trim();
    set => storageAccountName = value;
}

[SerializeField]
private string blobContainerName;
public string BlobContainerName {
    get => blobContainerName.Trim();
    set => blobContainerName = value;
}

[SerializeField]
private string modelPath;
public string ModelPath {
    get => modelPath.Trim();
    set => modelPath = value;
}

[ContextMenu("Load Linked Custom Model")]
public async void LoadLinkedCustomModel()
{
    if (CurrentCoordinatorState != RemoteRenderingState.RuntimeConnected)
    {
        Debug.LogError("Please wait for the runtime to connect before loading the test model. Try again later.");
        return;
    }
    if (loadingLinkedCustomModel)
    {
        Debug.Log("Linked Test model already loading or loaded!");
        return;
    }
    loadingLinkedCustomModel = true;

    // Create a parent object to use for positioning
    GameObject testParent = new GameObject("LinkedCustomModel");
    testParent.transform.position = new Vector3(0f, 0f, 3f);

    await LoadModel(StorageAccountName, BlobContainerName, ModelPath, testParent.transform, (progressValue) => Debug.Log($"Loading Test Model progress: {Math.Round(progressValue * 100, 2)}%"));
}
This code adds three extra string variables to your RemoteRenderingCoordinator component.

Add your values to the RemoteRenderingCoordinator component. Having followed the Quickstart for model conversion, your values should be:
- Storage Account Name: Your storage account name, the globally unique name you choose for your storage account. In the quickstart this was arrtutorialstorage, your value is different.
- Blob Container Name: arroutput, the Blob Storage Container
- Model Path: The combination of the "outputFolderPath" and the "outputAssetFileName" defined in the arrconfig.json file. In the quickstart, this was "outputFolderPath":"converted/robot", "outputAssetFileName": "robot.arrAsset". Which would result in a Model Path value of "converted/robot/robot.arrAsset", your value is different.
Tip
If you run the Conversion.ps1 script, without the "-UseContainerSas" argument, the script will output all of the above values for your instead of the SAS token.

For the time being, remove or disable the GameObject TestModel, to make room for your custom model to load.
Play the scene and connect to a remote session.
Open the context menu on RemoteRenderingCoordinator and select Load Linked Custom Model.

These steps have increased the security of the application by removing the SAS token from the local application.
Now the current state of the application and its access to your Azure resources looks like this:
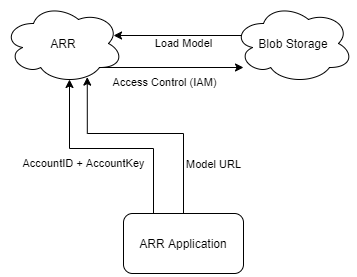
We have one more "password", the AccountKey, to remove from the local application. This can be done using Microsoft Entra authentication.
Microsoft Entra authentication
Microsoft Entra authentication allows you to determine which individuals or groups are using ARR in a more controlled way. ARR has built in support for accepting Access Tokens instead of using an Account Key. You can think of Access Tokens as a time-limited, user-specific key, that only unlocks certain parts of the specific resource it was requested for.
The RemoteRenderingCoordinator script has a delegate named ARRCredentialGetter, which holds a method that returns a SessionConfiguration object, which is used to configure the remote session management. We can assign a different method to ARRCredentialGetter, allowing us to use an Azure sign in flow, generating a SessionConfiguration object that contains an Azure Access Token. This Access Token will be specific to the user that's signing in.
Follow the How To: Configure authentication - Authentication for deployed applications, which involves registering a new Microsoft Entra application and configuring access to your ARR instance.
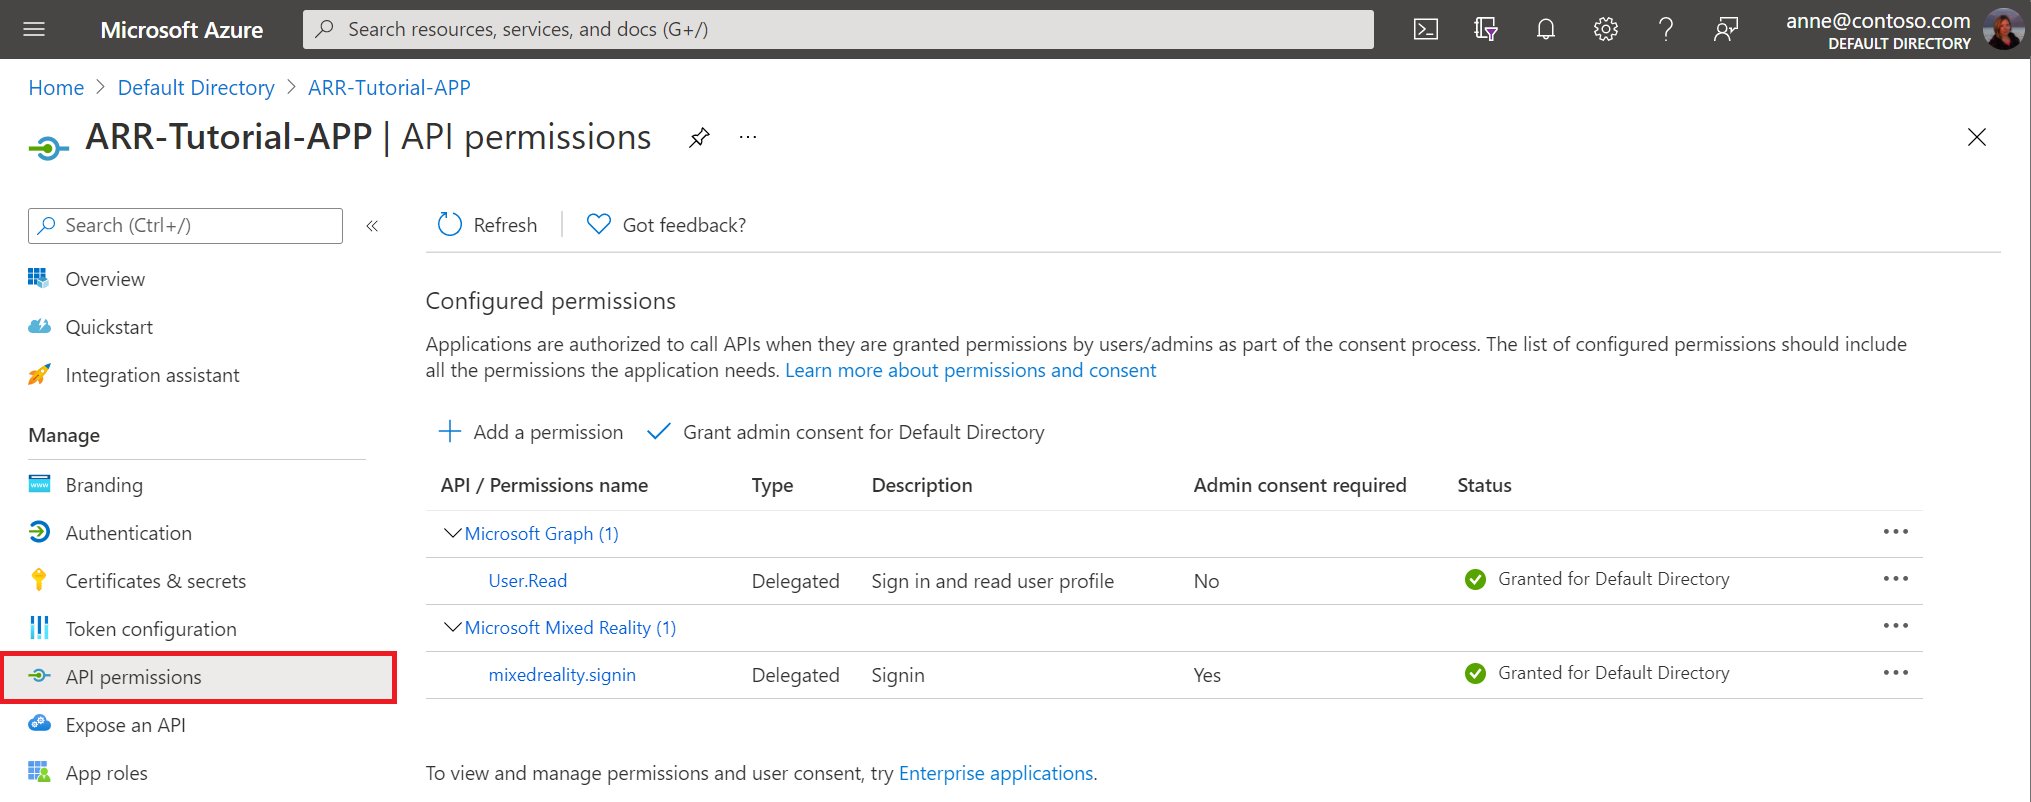
After configuring the new Microsoft Entra application, check your Microsoft Entra application looks like the following images:
Microsoft Entra Application -> Authentication

Microsoft Entra Application -> API Permissions
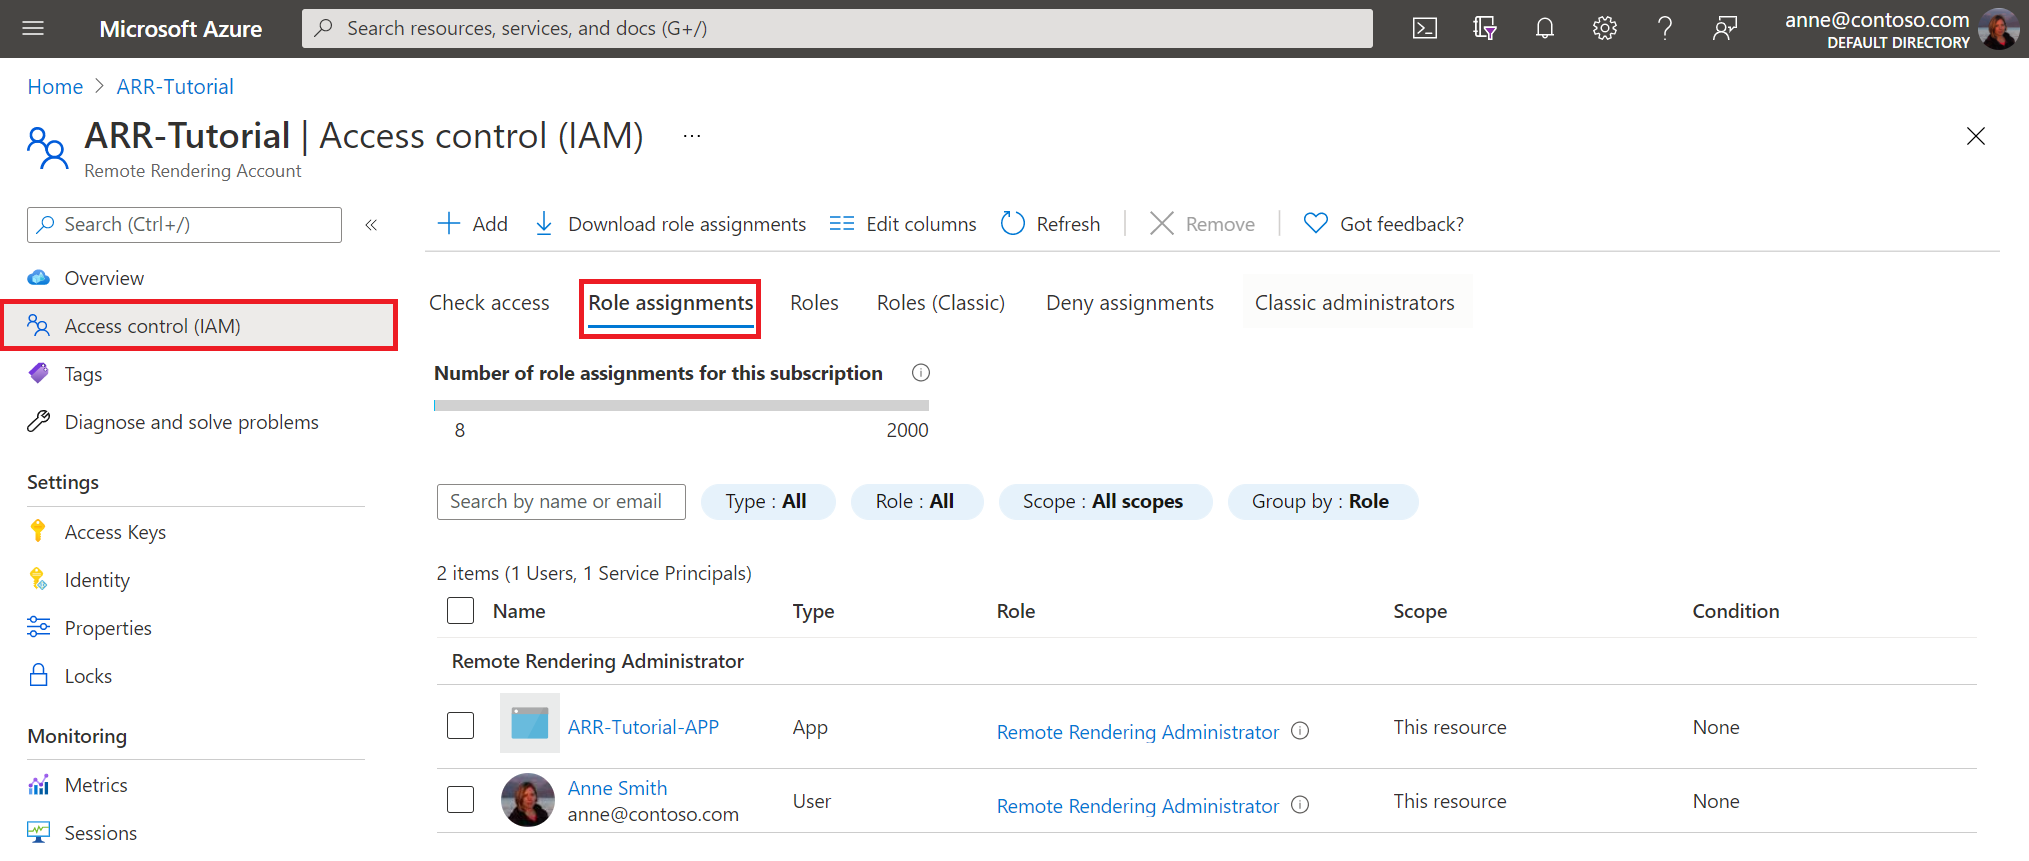
After configuring your Remote Rendering account, check your configuration looks like the following image:
ARR -> AccessControl (IAM)
Note
An Owner role is not sufficient to manage sessions via the client application. For every user you want to grant the ability to manage sessions you must provide the role Remote Rendering Client. For every user you want to manage sessions and convert models, you must provide the role Remote Rendering Administrator.
With the Azure side of things in place, we now need to modify how your code connects to the ARR service. We do that by implementing an instance of BaseARRAuthentication, which returns a new SessionConfiguration object. In this case, the account info is configured with the Azure Access Token.
Create a new script named AADAuthentication and replace its code with the following:
// Copyright (c) Microsoft Corporation. All rights reserved.
// Licensed under the MIT License. See LICENSE in the project root for license information.

using Microsoft.Azure.RemoteRendering;
using Microsoft.Identity.Client;
using System;
using System.Linq;
using System.Threading;
using System.Threading.Tasks;
using UnityEngine;

public class AADAuthentication : BaseARRAuthentication
{
    [SerializeField]
    private string activeDirectoryApplicationClientID;
    public string ActiveDirectoryApplicationClientID
    {
        get => activeDirectoryApplicationClientID.Trim();
        set => activeDirectoryApplicationClientID = value;
    }

    [SerializeField]
    private string azureTenantID;
    public string AzureTenantID
    {
        get => azureTenantID.Trim();
        set => azureTenantID = value;
    }

    [SerializeField]
    private string azureRemoteRenderingDomain;
    public string AzureRemoteRenderingDomain
    {
        get => azureRemoteRenderingDomain.Trim();
        set => azureRemoteRenderingDomain = value;
    }

    [SerializeField]
    private string azureRemoteRenderingAccountID;
    public string AzureRemoteRenderingAccountID
    {
        get => azureRemoteRenderingAccountID.Trim();
        set => azureRemoteRenderingAccountID = value;
    }

    [SerializeField]
    private string azureRemoteRenderingAccountDomain;
    public string AzureRemoteRenderingAccountDomain
    {
        get => azureRemoteRenderingAccountDomain.Trim();
        set => azureRemoteRenderingAccountDomain = value;
    }

    public override event Action<string> AuthenticationInstructions;

    string authority => "https://login.microsoftonline.com/" + AzureTenantID;

    string redirect_uri = "https://login.microsoftonline.com/common/oauth2/nativeclient";

    string[] scopes => new string[] { "https://sts.mixedreality.azure.com//.default" };

    public void OnEnable()
    {
        RemoteRenderingCoordinator.ARRCredentialGetter = GetARRCredentials;
        this.gameObject.AddComponent<ExecuteOnUnityThread>();
    }

    public async override Task<SessionConfiguration> GetARRCredentials()
    {
        var result = await TryLogin();
        if (result != null)
        {
            Debug.Log("Account signin successful " + result.Account.Username);

            var AD_Token = result.AccessToken;

            return await Task.FromResult(new SessionConfiguration(AzureRemoteRenderingAccountDomain, AzureRemoteRenderingDomain, AzureRemoteRenderingAccountID, "", AD_Token, ""));
        }
        else
        {
            Debug.LogError("Error logging in");
        }
        return default;
    }

    private Task DeviceCodeReturned(DeviceCodeResult deviceCodeDetails)
    {
        //Since everything in this task can happen on a different thread, invoke responses on the main Unity thread
        ExecuteOnUnityThread.Enqueue(() =>
        {
            // Display instructions to the user for how to authenticate in the browser
            Debug.Log(deviceCodeDetails.Message);
            AuthenticationInstructions?.Invoke(deviceCodeDetails.Message);
        });

        return Task.FromResult(0);
    }

    public override async Task<AuthenticationResult> TryLogin()
    {
        var clientApplication = PublicClientApplicationBuilder.Create(ActiveDirectoryApplicationClientID).WithAuthority(authority).WithRedirectUri(redirect_uri).Build();
        AuthenticationResult result = null;
        try
        {
            var accounts = await clientApplication.GetAccountsAsync();

            if (accounts.Any())
            {
                result = await clientApplication.AcquireTokenSilent(scopes, accounts.First()).ExecuteAsync();

                return result;
            }
            else
            {
                try
                {
                    result = await clientApplication.AcquireTokenWithDeviceCode(scopes, DeviceCodeReturned).ExecuteAsync(CancellationToken.None);
                    return result;
                }
                catch (MsalUiRequiredException ex)
                {
                    Debug.LogError("MsalUiRequiredException");
                    Debug.LogException(ex);
                }
                catch (MsalServiceException ex)
                {
                    Debug.LogError("MsalServiceException");
                    Debug.LogException(ex);
                }
                catch (MsalClientException ex)
                {
                    Debug.LogError("MsalClientException");
                    Debug.LogException(ex);
                    // Mitigation: Use interactive authentication
                }
                catch (Exception ex)
                {
                    Debug.LogError("Exception");
                    Debug.LogException(ex);
                }
            }
        }
        catch (Exception ex)
        {
            Debug.LogError("GetAccountsAsync");
            Debug.LogException(ex);
        }

        return null;
    }
}
Note
This code is by no means complete and is not ready for a commercial application. For example, at a minimum you'll likely want to add the ability to sign out too. This can be done using the Task RemoveAsync(IAccount account) method provided by the client application. This code is only intended for tutorial use, your implementation will be specific to your application.
The code first tries to get the token silently using AcquireTokenSilent. This is successful if the user has previously authenticated this application. If it's not successful, move on to a more user-involved strategy.
For this code, we're using the device code flow to obtain an Access Token. This flow allows the user to sign in to their Azure account on a computer or mobile device and have the resulting token sent back to the HoloLens application.
The most important part of this class from an ARR perspective is this line:
return await Task.FromResult(new SessionConfiguration(AzureRemoteRenderingAccountDomain, AzureRemoteRenderingDomain, AzureRemoteRenderingAccountID, "", AD_Token, ""));
Here, we create a new SessionConfiguration object using the remote rendering domain, account ID, account domain, and access token. This token is then used by the ARR service to query, create, and join remote rendering sessions as long as the user is authorized based on the role-based permissions configured earlier.
With this change, the current state of the application and its access to your Azure resources looks like this:
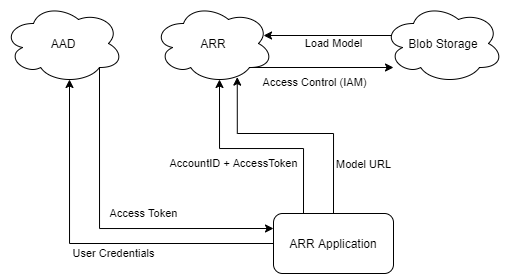
Since the User Credentials aren't stored on the device (or in this case even entered on the device), their exposure risk is low. Now the device is using a user-specific, time-limited Access Token to access ARR, which uses access control (IAM) to access the Blob Storage. These two steps have removed the "passwords" from the source code and increased security considerably. However, this isn't the most security available, moving the model and session management to a web service will improve security further. Extra security considerations are discussed in the Commercial Readiness chapter.
Testing Microsoft Entra auth
In the Unity Editor, when Microsoft Entra auth is active, you need to authenticate every time you launch the application. On device, the authentication step happens the first time and only be required again when the token expires or is invalidated.
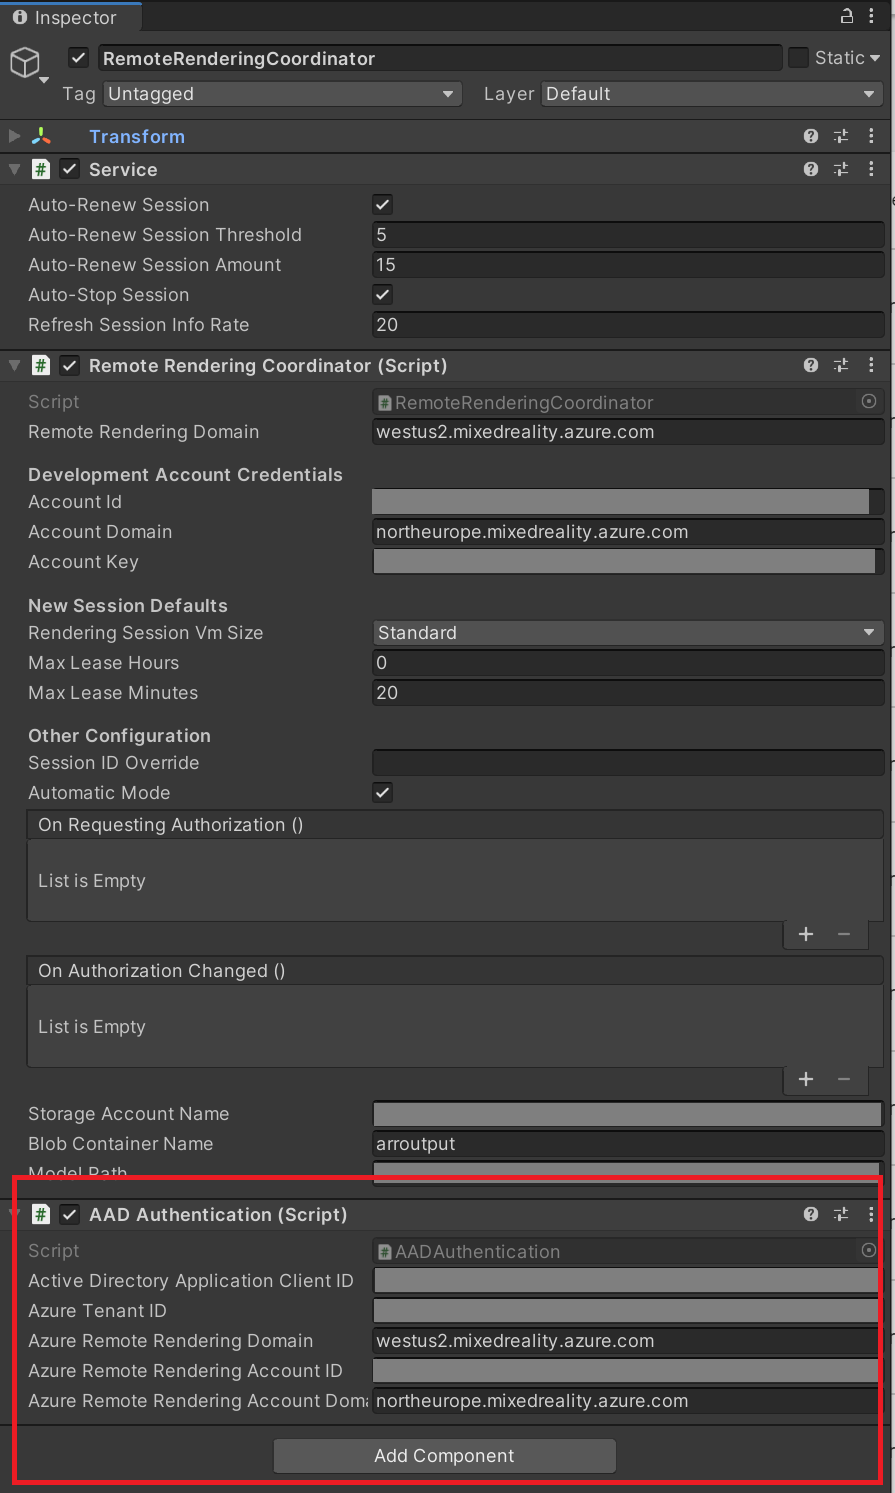
Add the Microsoft Entra authentication component to the RemoteRenderingCoordinator GameObject.
Note
If you are using the completed project from the ARR samples repository, make sure to enable the Microsoft Entra authentication component by clicking the checkbox next to its title.
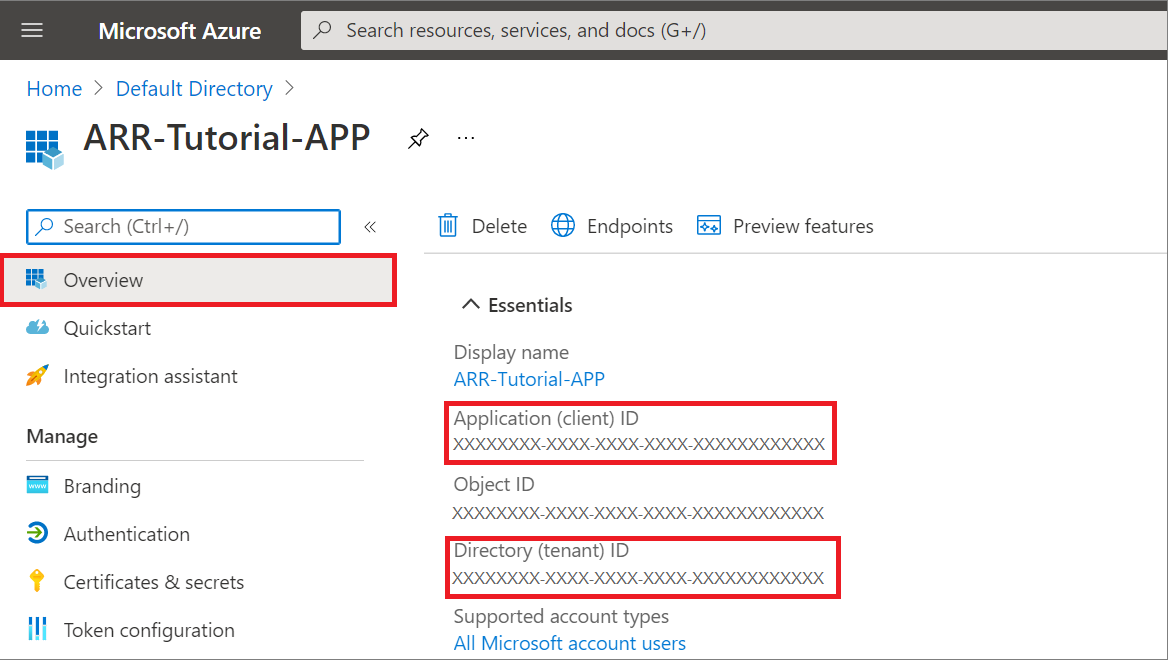
Fill in your values for the Client ID and the Tenant ID. These values can be found in your App Registration's Overview Page:
- Active Directory Application Client ID is the Application (client) ID found in your Microsoft Entra app registration (see image below).
- Azure Tenant ID is the Directory (tenant) ID found in your Microsoft Entra app registration (see image below).
- Azure Remote Rendering Domain is the same domain you've been using in the RemoteRenderingCoordinator's Remote Rendering Domain.
- Azure Remote Rendering Account ID is the same Account ID you've been using for RemoteRenderingCoordinator.
- Azure Remote Rendering Account Domain is the same Account Domain you've been using in the RemoteRenderingCoordinator.
Press Play in the Unity Editor and consent to running a session. Since the Microsoft Entra authentication component has a view controller, it's automatically hooked up to display a prompt after the session authorization modal panel.
Follow the instructions found in the panel to the right of the AppMenu. You should see something similar to this:
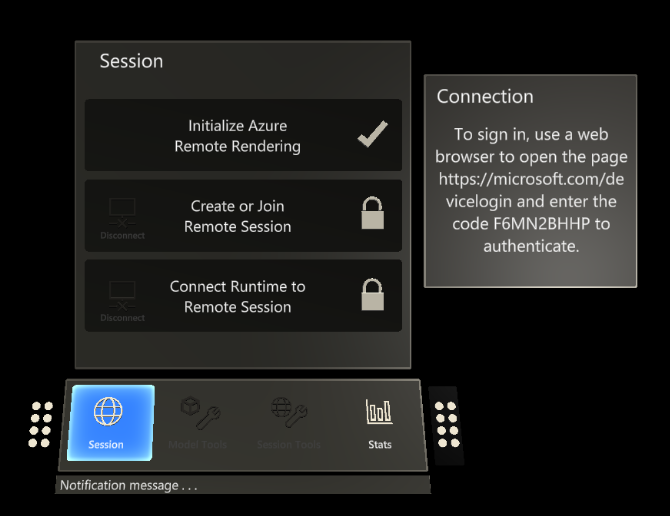
After entering the provided code on your secondary device (or browser on the same device) and logging in using your credentials, an Access Token will be returned to the requesting application, in this case, the Unity Editor.
After this point, everything in the application should proceed normally. Check the Unity Console for any errors if you're not progressing through the stages as expected.
Build to device
If you're building an application using MSAL to device, you need to include a file in your project's Assets folder. This helps the compiler build the application correctly using the Microsoft.Identity.Client.dll included in the Tutorial Assets.
Add a new file in Assets named link.xml
Add the following for to the file:
<linker>
    <assembly fullname="Microsoft.Identity.Client" preserve="all"/>
    <assembly fullname="System.Runtime.Serialization" preserve="all"/>
    <assembly fullname="System.Core">
        <type fullname="System.Linq.Expressions.Interpreter.LightLambda" preserve="all" />
    </assembly>
</linker>
Save the changes
Follow the steps found in Quickstart: Deploy Unity sample to HoloLens - Build the sample Project, to build to HoloLens.
Next steps
The remainder of this tutorial set contains conceptual articles for creating a production-ready application that uses Azure Remote Rendering.