Note
Access to this page requires authorization. You can try signing in or changing directories.
Access to this page requires authorization. You can try changing directories.
This article describes some common solutions when you exceed the limits in Azure role-based access control (Azure RBAC).
Prerequisites
- Reader role to run Azure Resource Graph queries.
- Role Based Access Control Administrator role to add or remove role assignments.
- User Access Administrator role to add role assignments, remove role assignments, or delete custom roles.
- Groups Administrator or User Administrator role to create groups.
Note
The queries used in this article only return role assignments or custom roles that you have permissions to read. For example, if you only have permissions to read role assignments at resource group scope, role assignments at subscription scope aren't returned.
Symptom - No more role assignments can be created
When you try to assign a role, you get the following error message:
No more role assignments can be created (code: RoleAssignmentLimitExceeded)
Cause
Azure supports up to 4000 role assignments per subscription. This limit includes role assignments at the subscription, resource group, and resource scopes, but not at the management group scope. Eligible role assignments and role assignments scheduled in the future do not count towards this limit. You should try to reduce the number of role assignments in the subscription.
Note
The 4000 role assignments limit per subscription is fixed and cannot be increased.
To get the number of role assignments, you can view the chart on the Access control (IAM) page in the Azure portal. You can also use the following Azure PowerShell commands:
$scope = "/subscriptions/<subscriptionId>"
$ras = Get-AzRoleAssignment -Scope $scope | Where-Object {$_.scope.StartsWith($scope)}
$ras.Count
Solution 1 - Replace principal-based role assignments with group-based role assignments
To reduce the number of role assignments in the subscription, add principals (users, service principals, and managed identities) to groups and assign roles to the groups instead. Follow these steps to identify where multiple role assignments for principals can be replaced with a single role assignment for a group.
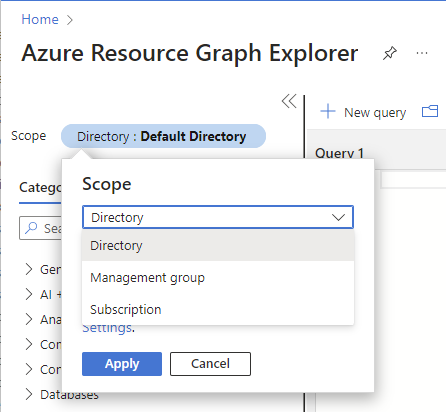
Sign in to the Azure portal and open the Azure Resource Graph Explorer.
Select Scope and set the scope for the query.
You typically set scope to Directory to query your entire tenant, but you can narrow the scope to particular subscriptions.
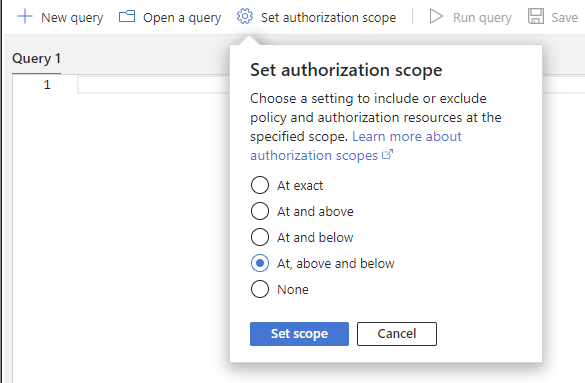
Select Set authorization scope and set the authorization scope to At, above and below to query all resources at the specified scope.
Run the following query to get the role assignments with the same role and at the same scope, but for different principals.
This query checks active role assignments and doesn't consider eligible role assignments in Microsoft Entra Privileged Identity Management. To list eligible role assignments, you can use the Microsoft Entra admin center, PowerShell, or REST API. For more information, see Get-AzRoleEligibilityScheduleInstance or Role Eligibility Schedule Instances - List For Scope.
If you are using role assignment conditions or delegating role assignment management with conditions, you should use the Conditions query. Otherwise, use the Default query.
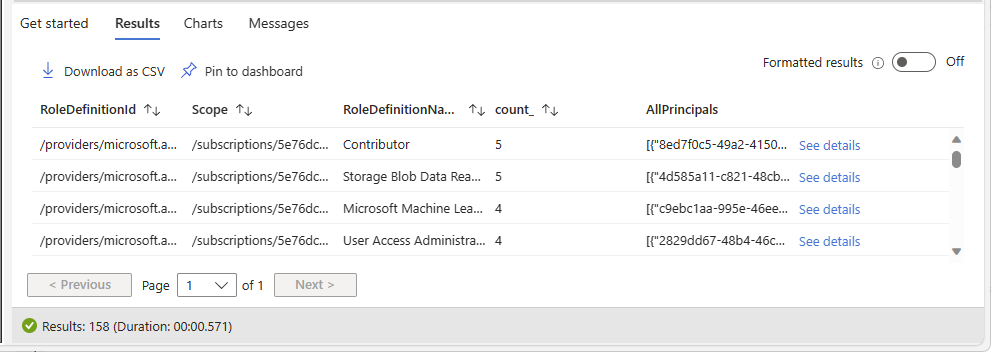
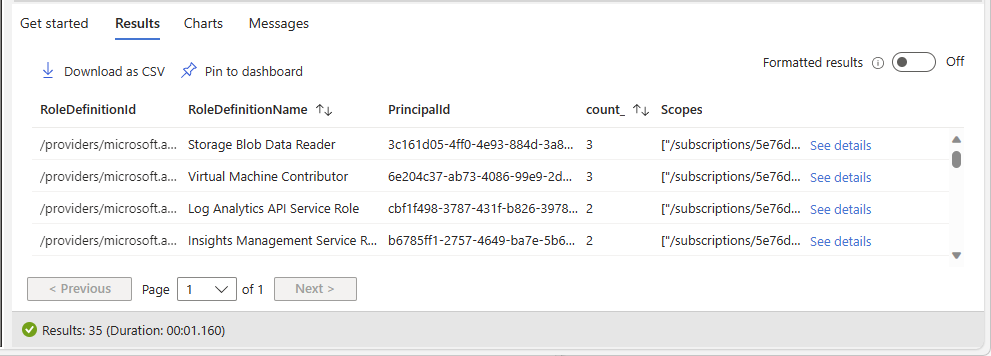
authorizationresources | where type =~ "microsoft.authorization/roleassignments" | where id startswith "/subscriptions" | extend RoleId = tolower(tostring(properties.roleDefinitionId)) | join kind = leftouter ( authorizationresources | where type =~ "microsoft.authorization/roledefinitions" | extend RoleDefinitionName = tostring(properties.roleName) | extend RoleId = tolower(id) | project RoleDefinitionName, RoleId ) on $left.RoleId == $right.RoleId | extend principalId = tostring(properties.principalId) | extend principal_to_ra = pack(principalId, id) | summarize count_ = count(), AllPrincipals = make_set(principal_to_ra) by RoleDefinitionId = RoleId, Scope = tolower(properties.scope), RoleDefinitionName | where count_ > 1 | order by count_ descThe following shows an example of the results. The count_ column is the number of principals assigned the same role and at the same scope. The count is sorted in descending order.
Identify a row where you want to replace the multiple role assignments with a single role assignment for a group.
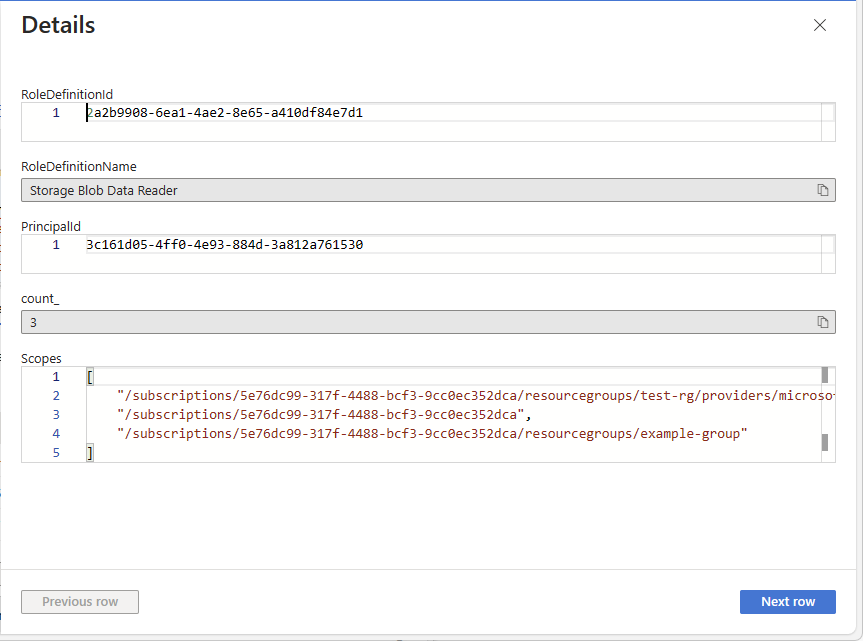
In the row, select See details to open the Details pane.

Column Description RoleDefinitionId ID of the currently assigned role. Scope Scope for the role assignment, which will be a subscription, resource group, or resource. RoleDefinitionName Name of the currently assigned role. count_ Number of principals assigned the same role and at the same scope. AllPrincipals List of principal IDs assigned the same role and at the same scope. Use RoleDefinitionId, RoleDefinitionName, and Scope to get the role and scope.
Use AllPrincipals to get the list of the principal IDs with the same role assignment.
Create a Microsoft Entra group. For more information, see Manage Microsoft Entra groups and group membership.
Add the principals from AllPrincipals to the group.
For information about how to add principals in bulk, see Bulk add group members in Microsoft Entra ID.
Assign the role to the group you created at the same scope. For more information, see Assign Azure roles using the Azure portal.
Now you can find and remove the principal-based role assignments.
Get the principal names from the principal IDs.
- To use Azure portal, see Add or update a user's profile information and settings.
- To use PowerShell, see Get-MgUser.
- To use Azure, CLI, see az ad user show.
Open the Access control (IAM) page at the same scope as the role assignments.
Select the Role assignments tab.
To filter the role assignments, select the Role filter and then select the role name.
Find the principal-based role assignments.
You should also see your group-based role assignment.
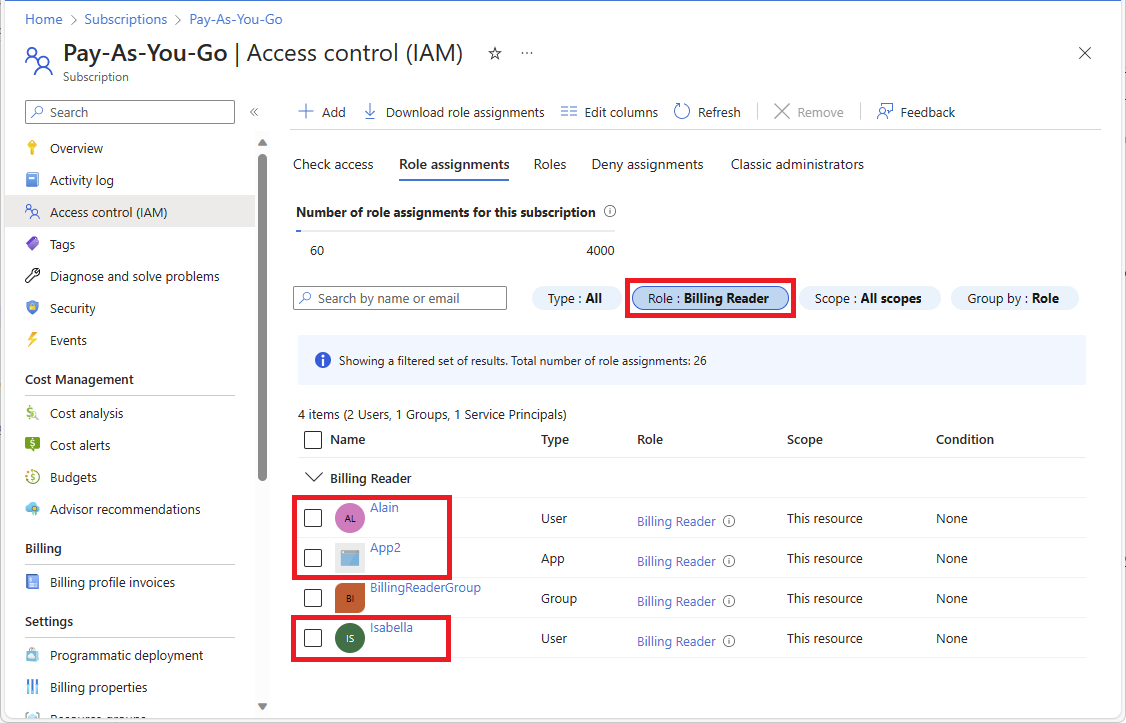
Select and remove the principal-based role assignments. For more information, see Remove Azure role assignments.


Solution 2 - Remove redundant role assignments
To reduce the number of role assignments in the subscription, remove redundant role assignments. Follow these steps to identify where redundant role assignments at a lower scope can potentially be removed since a role assignment at a higher scope already grants access.
Sign in to the Azure portal and open the Azure Resource Graph Explorer.
Select Scope and set the scope for the query.
You typically set scope to Directory to query your entire tenant, but you can narrow the scope to particular subscriptions.
Select Set authorization scope and set the authorization scope to At, above and below to query all resources at the specified scope.
Run the following query to get the role assignments with the same role and same principal, but at different scopes.
This query checks active role assignments and doesn't consider eligible role assignments in Microsoft Entra Privileged Identity Management. To list eligible role assignments, you can use the Microsoft Entra admin center, PowerShell, or REST API. For more information, see Get-AzRoleEligibilityScheduleInstance or Role Eligibility Schedule Instances - List For Scope.
If you are using role assignment conditions or delegating role assignment management with conditions, you should use the Conditions query. Otherwise, use the Default query.
authorizationresources | where type =~ "microsoft.authorization/roleassignments" | where id startswith "/subscriptions" | extend RoleDefinitionId = tolower(tostring(properties.roleDefinitionId)) | extend PrincipalId = tolower(properties.principalId) | extend RoleDefinitionId_PrincipalId = strcat(RoleDefinitionId, "_", PrincipalId) | join kind = leftouter ( authorizationresources | where type =~ "microsoft.authorization/roledefinitions" | extend RoleDefinitionName = tostring(properties.roleName) | extend rdId = tolower(id) | project RoleDefinitionName, rdId ) on $left.RoleDefinitionId == $right.rdId | summarize count_ = count(), Scopes = make_set(tolower(properties.scope)) by RoleDefinitionId_PrincipalId,RoleDefinitionName | project RoleDefinitionId = split(RoleDefinitionId_PrincipalId, "_", 0)[0], RoleDefinitionName, PrincipalId = split(RoleDefinitionId_PrincipalId, "_", 1)[0], count_, Scopes | where count_ > 1 | order by count_ descThe following shows an example of the results. The count_ column is the number of different scopes for role assignments with the same role and same principal. The count is sorted in descending order.
Column Description RoleDefinitionId ID of the currently assigned role. RoleDefinitionName Name of the currently assigned role. PrincipalId ID of the principal assigned the role. count_ Number of different scopes for role assignments with the same role and same principal. Scopes Scopes for role assignments with the same role and same principal. Identify a row where you want to remove redundant role assignments.
In a row, select See details to open the Details pane.
Use RoleDefinitionId, RoleDefinitionName, and PrincipalId to get the role and principal ID.
Use Scopes to get the list of the scopes for the same role and same principal.
Determine which scope is required for the role assignment. The other role assignments can be removed.
You should follow best practices of least privilege when determining which role assignments can be removed. The role assignment at the higher scope might be granting more access to the principal than what is needed. In that case, you should remove the role assignment with the higher scope. For example, a user might not need a Virtual Machine Contributor role assignment at subscription scope when a Virtual Machine Contributor role assignment at a lower resource group scope grants the required access.
Get the principal name from the principal ID.
- To use Azure portal, see Add or update a user's profile information and settings.
- To use PowerShell, see Get-MgUser.
- To use Azure, CLI, see az ad user show.
Open the Access control (IAM) page at the scope for a role assignment you want to remove.
Select the Role assignments tab.
To filter the role assignments, select the Role filter and then select the role name.
Find the principal.
Select and remove the role assignment. For more information, see Remove Azure role assignments.


Solution 3 - Replace multiple built-in role assignments with a custom role assignment
To reduce the number of role assignments in the subscription, replace multiple built-in role assignments with a single custom role assignment. Follow these steps to identify where multiple built-in role assignments can potentially be replaced.
Sign in to the Azure portal and open the Azure Resource Graph Explorer.
Select Scope and set the scope for the query.
You typically set scope to Directory to query your entire tenant, but you can narrow the scope to particular subscriptions.
Run the following query to get role assignments with the same principal and same scope, but with different built-in roles.
This query checks active role assignments and doesn't consider eligible role assignments in Microsoft Entra Privileged Identity Management. To list eligible role assignments, you can use the Microsoft Entra admin center, PowerShell, or REST API. For more information, see Get-AzRoleEligibilityScheduleInstance or Role Eligibility Schedule Instances - List For Scope.
If you are using role assignment conditions or delegating role assignment management with conditions, you should use the Conditions query. Otherwise, use the Default query.
authorizationresources | where type =~ "microsoft.authorization/roleassignments" | where id startswith "/subscriptions" | extend PrincipalId = tostring(properties.principalId) | extend Scope = tolower(properties.scope) | extend RoleDefinitionId = tolower(tostring(properties.roleDefinitionId)) | join kind = leftouter ( authorizationresources | where type =~ "microsoft.authorization/roledefinitions" | extend RoleName = tostring(properties.roleName) | extend RoleId = tolower(id) | extend RoleType = tostring(properties.type) | where RoleType == "BuiltInRole" | extend RoleId_RoleName = pack(RoleId, RoleName) ) on $left.RoleDefinitionId == $right.RoleId | summarize count_ = count(), AllRD = make_set(RoleId_RoleName) by PrincipalId, Scope | where count_ > 1 | order by count_ descThe following shows an example of the results. The count_ column is the number of different built-in role assignments with the same principal and same scope. The count is sorted in descending order.
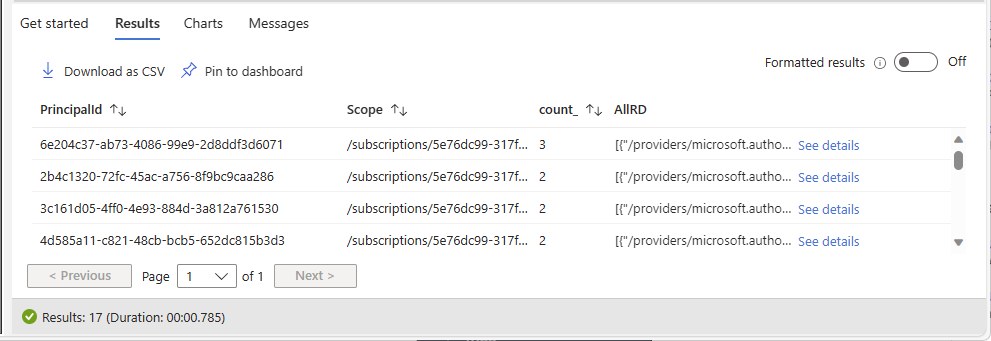
Column Description PrincipalId ID of the principal assigned the built-in roles. Scope Scope for built-in role assignments. count_ Number of built-in role assignments with the same principal and same scope. AllRD ID and name of built-in roles. In a row, select See details to open the Details pane.

Use AllRD to see the built-in roles that can potentially be combined into a custom role.
List the actions and data actions for the built-in roles. For more information, see List Azure role definitions or Azure built-in roles.
Create a custom role that includes all the actions and data actions as the built-in roles. To make it easier to create the custom role, you can start by cloning one of the built-in roles. For more information, see Create or update Azure custom roles using the Azure portal.
Get the principal name from the principal ID.
- To use Azure portal, see Add or update a user's profile information and settings.
- To use PowerShell, see Get-MgUser.
- To use Azure, CLI, see az ad user show.
Open the Access control (IAM) page at the same scope as the role assignments.
Assign the new custom role to the principal. For more information, see Assign Azure roles using the Azure portal.
Now you can remove the built-in role assignments.
On the Access control (IAM) page at the same scope, select the Role assignments tab.
Find the principal and built-in role assignments.
Remove the built-in role assignments from the principal. For more information, see Remove Azure role assignments.


Solution 4 - Make role assignments eligible
To reduce the number of role assignments in the subscription and you have Microsoft Entra ID P2, make role assignments eligible in Microsoft Entra Privileged Identity Management instead of permanently assigned.
Solution 5 - Add an additional subscription
Add an additional subscription.
Symptom - No more role assignments can be created at management group scope
You're unable to assign a role at management group scope.
Cause
Azure supports up to 500 role assignments per management group. This limit is different than the role assignments limit per subscription.
Note
The 500 role assignments limit per management group is fixed and cannot be increased.
Solution
Try to reduce the number of role assignments in the management group. For possible options, see Symptom - No more role assignments can be created. For the queries to retrieve resources at the management group level, you'll need to make the following change to the queries:
Replace
| where id startswith "/subscriptions"
With
| where id startswith "/providers/Microsoft.Management/managementGroups"
Symptom - No more role definitions can be created
When you try to create a new custom role, you get the following message:
Role definition limit exceeded. No more role definitions can be created (code: RoleDefinitionLimitExceeded)
Cause
Azure supports up to 5000 custom roles in a directory. (For Microsoft Azure operated by 21Vianet, the limit is 2000 custom roles.)
Solution
Follow these steps to find and delete unused Azure custom roles.
Sign in to the Azure portal and open the Azure Resource Graph Explorer.
Select Scope and set the scope to Directory for the query.
Run the following query to get all custom roles that don't have any role assignments:
This query checks active role assignments and doesn't consider eligible custom role assignments in Microsoft Entra Privileged Identity Management. To list eligible custom role assignments, you can use the Microsoft Entra admin center, PowerShell, or REST API. For more information, see Get-AzRoleEligibilityScheduleInstance or Role Eligibility Schedule Instances - List For Scope.
authorizationresources
| where type =~ "microsoft.authorization/roledefinitions"
| where tolower(properties.type) == "customrole"
| extend rdId = tolower(id)
| extend Scope = tolower(properties.assignableScopes)
| join kind = leftouter (
authorizationresources
  | where type =~ "microsoft.authorization/roleassignments"
  | extend RoleId = tolower(tostring(properties.roleDefinitionId))
  | summarize RoleAssignmentCount = count() by RoleId
) on $left.rdId == $right.RoleId
| where isempty(RoleAssignmentCount)
| project RoleDefinitionId = rdId, RoleDefinitionName = tostring(properties.roleName), Scope
The following shows an example of the results:

Column Description RoleDefinitionId ID of the unused custom role. RoleDefinitionName Name of the unused custom role. Scope Assignable scopes for the unused custom role. Open the scope (typically subscription) and then open the Access control (IAM) page.
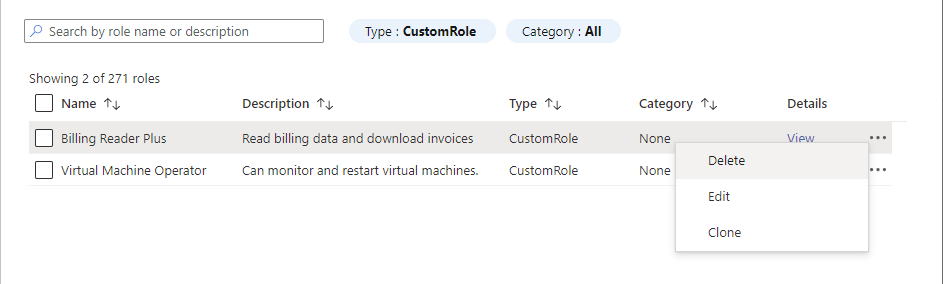
Select the Roles tab to see a list of all the built-in and custom roles.
In the Type filter, select CustomRole to just see your custom roles.
Select the ellipsis (...) for the custom role you want to delete and then select Delete.