Note
Access to this page requires authorization. You can try signing in or changing directories.
Access to this page requires authorization. You can try changing directories.
Note
Route maps for Azure Route Server are generally available in the Azure public cloud.
When Azure Route Server is in a hub virtual network and your network virtual appliance (NVA) is in a peered spoke, create a Virtual network connection in Route Server to apply a route map to that spoke. The connection provides the route-map association point. It doesn't create or replace virtual network peering.
This article shows you how to create that connection, associate an inbound route map, and verify changes to the NVA's advertised prefixes and BGP attributes. It assumes that virtual network peering and BGP peering with the spoke NVA already work.
Choose where to apply the route map
Use the NVA's location to choose the association point:
| NVA location | Where to associate the route map |
|---|---|
| In the same virtual network as Route Server | The existing BGP peering. You don't need a virtual network connection for this case. |
| In a spoke virtual network peered with Route Server's hub | A Route Server virtual network connection for that spoke. Configure the connection before associating the route map. |
This article's example shows an AS path change and prefix summarization. It doesn't demonstrate dropping a prefix. For a filtering example, see Drop inbound routes.
Prerequisites
- An Azure account with an active subscription. Create an account for free.
- An Azure Route Server in a hub virtual network and an NVA in a peered spoke virtual network.
- Working virtual network peering and BGP peering between Route Server and the spoke NVA. On the hub-to-spoke peering, enable allowGatewayTransit. On the spoke-to-hub peering, enable useRemoteGateways. Review the route-map restrictions.
- Permissions to manage route maps and virtual network connections on Route Server. See Roles and permissions.
- An NVA that advertises the example routes in the next section. If your prefixes or AS path differ, adjust the match conditions to your intended routes.
The connection-creation steps assume that Route Server doesn't already have a virtual network connection for this spoke. Check Connectivity > Virtual network connections before you begin. If a connection already exists, don't create another or replace its policy as part of this example. Review its associations with the network owner before changing it.
Using route maps incurs additional charges. Review Azure Route Server pricing before configuring the map.
Caution
A route map changes routing information and can affect connectivity. Before changing an existing association, record its inbound and outbound maps and confirm which routes the new policy should change. Use a nonproduction environment when trying this example.
If you plan to use this configuration temporarily, agree with the network owner how to handle the new virtual network connection afterward. The restoration steps in this article remove the test policy association; they leave that connection in place.
Understand the example
The following diagram distinguishes the existing network relationships from the connection where you associate the route map.
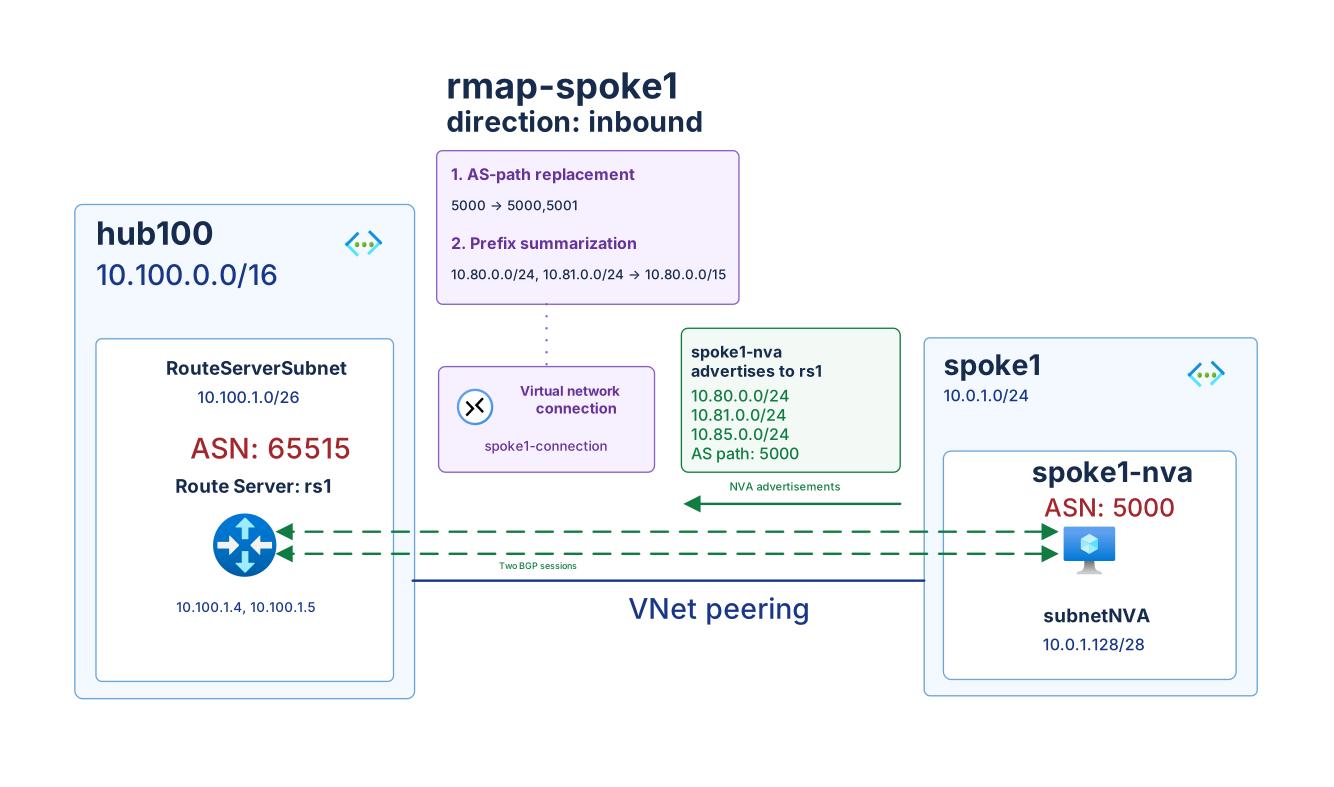
The diagram uses example resource names and prefixes. Use the connection created for your own spoke rather than entering the diagram's connection label.
The two dashed green lines represent BGP sessions. The solid green arrow shows the NVA-to-Route-Server advertisements in this example. The purple policy callout shows the changes made by the inbound map.
Route Server is in the hub, and the NVA is in the spoke named spoke1. The NVA advertises these routes with an AS path of 5000:
| Prefix advertised by the NVA | Intended change |
|---|---|
10.85.0.0/24 |
Keep the prefix and replace its AS path with 5000,5001. |
10.80.0.0/24 and 10.81.0.0/24 |
Replace both prefixes with the less-specific summary 10.80.0.0/15. |
The spoke's own virtual network address space, 10.0.1.0/24 in this example, is a separate route learned through virtual network peering. Don't confuse that local route with the prefixes advertised by the NVA.
The map has two rules. The first replaces a matching AS path. The second summarizes 10.80.0.0/24 and 10.81.0.0/24. Both rules use Continue, so a route that matches the first rule can also match the second.
Note
Route summarization removes the original AS path and BGP community attributes. The summary route 10.80.0.0/15 therefore doesn't retain the AS path replacement. See Considerations and limitations.
Before creating the map, check Effective Routes on Route Server and the NVA's advertisements. Record the three example prefixes and their AS paths. Confirm that the routes you intend to modify have an AS path of 5000, matching the first rule's Equals condition. If a prefix is absent or its AS path differs, resolve the existing configuration or adjust the example's match condition before applying the policy.
Create the route map
Create the route map before the virtual network connection. Creating the connection before at least one configured route map exists fails.
This article uses rmap-spoke1 as an example map name. If it already exists, choose a new name rather than changing an existing policy. Use your chosen name throughout the procedure.
Note
Creating the first route map on a Route Server triggers a one-time upgrade that can take up to 30 minutes. Wait for the operation to finish before continuing.
In the Azure portal, open the Route Server in the hub.
Under Routing, select Route Maps, and then select + Add Route-map.
Enter your chosen map name, such as
rmap-spoke1, and add the first rule with these settings:Setting Value Name aspath-replaceNext step Continue Match property AsPath Criterion Equals Match value 5000Action on matched routes Modify Route modification property AsPath Route modification action Replace Replacement value 5000,5001Add the rule to the map, and then add a second rule with these settings:
Setting Value Name major-netNext step Continue Match property RoutePrefix Criterion Equals Match value 10.80.0.0/24,10.81.0.0/24Action on matched routes Modify Route modification property RoutePrefix Route modification action Replace Replacement value 10.80.0.0/15Confirm that
aspath-replaceis first andmajor-netis second. Save the map.Wait until its Provisioning state is Succeeded.
If saving fails, check the rule values and ordering before continuing. For general creation and troubleshooting guidance, see Configure route maps.
Create the spoke virtual network connection
On the hub's Route Server, under Connectivity, select Virtual network connections.
Select Add connection.
Select the resource group and the spoke virtual network that contains the NVA. In this example, select
spoke1, not the hub.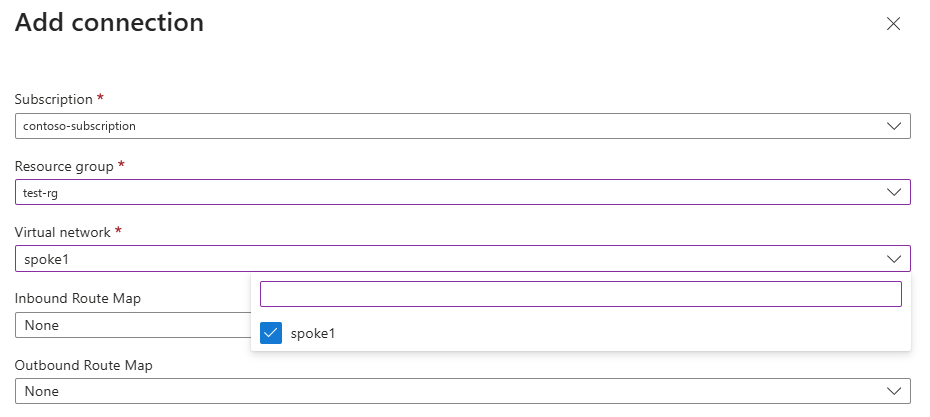
Select Create.
When deployment completes, select Refresh.
Confirm that Connection Provisioning Status is Succeeded and Peering status is Connected.
If the connection fails or the peering is disconnected, check the existing hub/spoke peering and confirm that the route map exists. Don't continue until the connection is ready.
Apply the map to the spoke connection
Under Routing, select Route Maps, and then select Apply Route-maps to connections.
For Inbound Route-map, select the map you created.
Preserve the intended Outbound Route-map setting. For a new connection with no outbound policy, leave None.
In the connections table, select only the virtual network connection for
spoke1. Use the connection name and resource group to distinguish it from the NVA's BGP peering and other connections.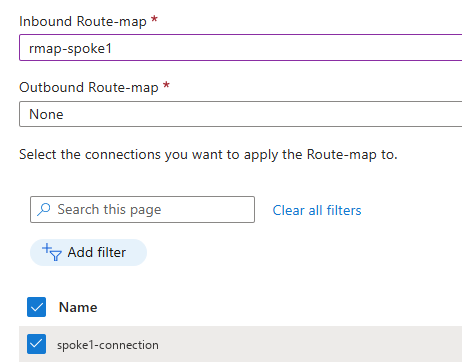
Select Save.
The screenshots use example resource labels. Select your own spoke connection and the map you created.
Inbound here means routes received by Route Server through the spoke virtual network connection. The policy modifies the spoke NVA's routes before Route Server advertises the resulting routes. It changes routing information, not data packets.
Verify the result
Reopen Apply Route-maps to connections and confirm that the intended spoke connection has the map you created associated in the inbound direction.
Under Routing, open Connections Dashboard. Select Virtual Networks and the connection for
spoke1.Select In the inbound direction and confirm that Route-map applied identifies your chosen map.
Select In the outbound direction and compare the advertised routes with the following example. If no outbound map is associated, Route-map applied shows None in this view even though the inbound map changed the routes. That value doesn't mean the inbound association is missing.
Open Effective Routes and compare the NVA routes and the separate local spoke route:
Route Expected result in this example NVA route 10.85.0.0/24Prefix unchanged; AS path contains 5000followed by5001.NVA routes 10.80.0.0/24and10.81.0.0/24Replaced by 10.80.0.0/15; the summarized route has no AS path.Spoke address space 10.0.1.0/24Remains a local route with an On-link next hop. 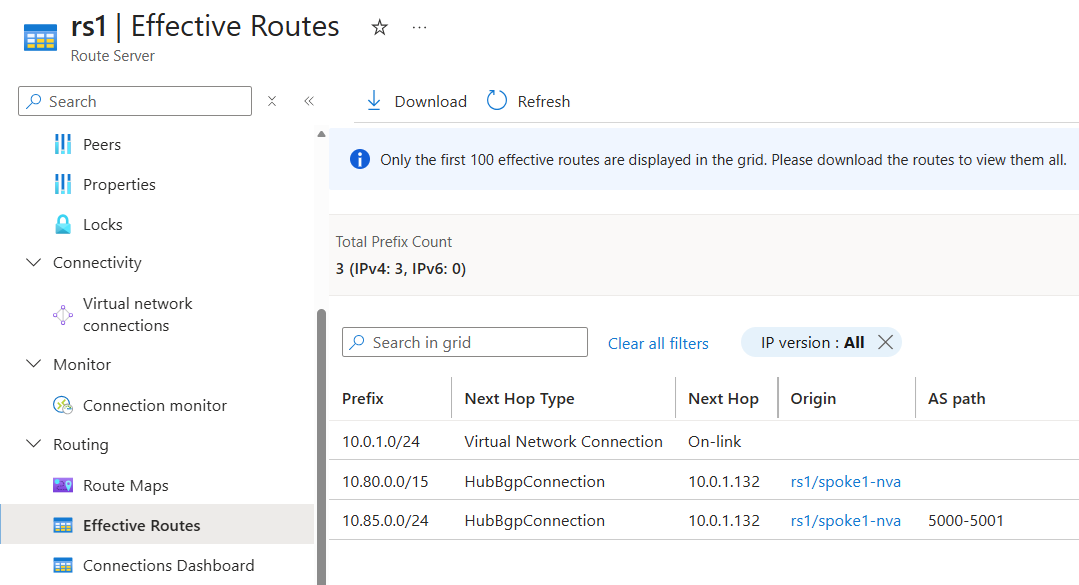
An On-link route describes the local spoke address space. It doesn't by itself prove which routes Route Server advertises to a BGP peer. If you also need to verify propagation, check the routes received by the intended peer.
If the expected changes don't appear:
- Check that the map is attached to the spoke virtual network connection, not a different connection or the same-VNet NVA case.
- Confirm that the association is inbound.
- Compare the actual advertised prefixes and AS path with the rule's Equals conditions.
- Confirm the rule order and Continue settings.
- Check the selected connection and direction in the dashboard before interpreting Route-map applied.
These checks verify routing information. They don't prove end-to-end packet delivery.
Restore the previous association after testing
If you used this configuration only as a test, restore the route map association as follows. These steps leave the virtual network connection in place; they aren't a complete environment teardown.
- Open Route Maps and select Apply Route-maps to connections.
- Select only the spoke connection you changed.
- Restore its previous inbound and outbound map settings. If it had no inbound map before the test, set Inbound Route-map to None, and save.
- Recheck the association and expected routes.
- If you created the map only for this test and no other connection uses it, remove it by following Modify or remove a route map.
Don't delete pre-existing virtual network peering, BGP peering, or NVA resources as part of this restoration.
Related content
- About route maps
- Configure route maps
- Drop inbound routes for a separate filtering example.
- View effective routes for additional route-viewing methods.