Note
Access to this page requires authorization. You can try signing in or changing directories.
Access to this page requires authorization. You can try changing directories.
Note
We recommend deploying one of the Azure first-party NFS services: NFS on Azure Files or NFS ANF volumes for storing shared data in a highly available SAP system. Be aware, that we are de-emphasizing SAP reference architectures, utilizing NFS clusters.
This article describes how to deploy the virtual machines, configure the virtual machines, install the cluster framework, and install a highly available NFS server that can be used to store the shared data of a highly available SAP system. This guide describes how to set up a highly available NFS server that is used by two SAP systems, NW1 and NW2. The names of the resources (for example virtual machines, virtual networks) in the example assume that you have used the SAP file server template with resource prefix prod.
Note
This article contains references to terms that Microsoft no longer uses. When the terms are removed from the software, we'll remove them from this article.
Read the following SAP Notes and papers first
SAP Note 1928533, which has:
- List of Azure VM sizes that are supported for the deployment of SAP software
- Important capacity information for Azure VM sizes
- Supported SAP software, and operating system (OS) and database combinations
- Required SAP kernel version for Windows and Linux on Microsoft Azure
SAP Note 2015553 lists prerequisites for SAP-supported SAP software deployments in Azure.
SAP Note 2205917 has recommended OS settings for SUSE Linux Enterprise Server for SAP Applications
SAP Note 1944799 has SAP HANA Guidelines for SUSE Linux Enterprise Server for SAP Applications
SAP Note 2178632 has detailed information about all monitoring metrics reported for SAP in Azure.
SAP Note 2191498 has the required SAP Host Agent version for Linux in Azure.
SAP Note 2243692 has information about SAP licensing on Linux in Azure.
SAP Note 1984787 has general information about SUSE Linux Enterprise Server 12.
SAP Note 1999351 has additional troubleshooting information for the Azure Enhanced Monitoring Extension for SAP.
SAP Community WIKI has all required SAP Notes for Linux.
Azure Virtual Machines planning and implementation for SAP on Linux
Azure Virtual Machines deployment for SAP on Linux (this article)
SUSE Linux Enterprise Server for SAP Applications 12 SP5 best practices guides
SUSE Linux Enterprise Server for SAP Applications 12 SP5 Release Notes
Overview
To achieve high availability, SAP NetWeaver requires an NFS server. The NFS server is configured in a separate cluster and can be used by multiple SAP systems.
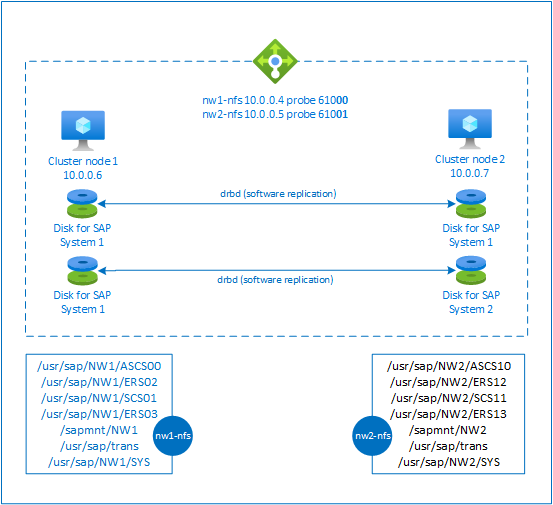
The NFS server uses a dedicated virtual hostname and virtual IP addresses for every SAP system that uses this NFS server. On Azure, a load balancer is required to use a virtual IP address. The presented configuration shows a load balancer with:
- Frontend IP address 10.0.0.4 for NW1
- Frontend IP address 10.0.0.5 for NW2
- Probe port 61000 for NW1
- Probe port 61001 for NW2
Set up a highly available NFS server
Deploy Linux manually via Azure portal
This document assumes that you've already deployed a resource group, Azure Virtual Network, and subnet.
Deploy two virtual machines for NFS servers. Choose a suitable SLES image that is supported with your SAP system. You can deploy VM in any one of the availability options - scale set, availability zone or availability set.
Configure Azure load balancer
Follow create load balancer guide to configure a standard load balancer for an NFS server high availability. During the configuration of load balancer, consider following points.
- Frontend IP Configuration: Create two frontend IP. Select the same virtual network and subnet as your NFS server.
- Backend Pool: Create backend pool and add NFS server VMs.
- Inbound rules: Create two load balancing rule, one for NW1 and another for NW2. Follow the same steps for both load balancing rules.
- Frontend IP address: Select frontend IP
- Backend pool: Select backend pool
- Check "High availability ports"
- Protocol: TCP
- Health Probe: Create health probe with below details (applies for both NW1 and NW2)
- Protocol: TCP
- Port: [for example: 61000 for NW1, 61001 for NW2]
- Interval: 5
- Probe Threshold: 2
- Idle timeout (minutes): 30
- Check "Enable Floating IP"
Note
Health probe configuration property numberOfProbes, otherwise known as "Unhealthy threshold" in Portal, isn't respected. So to control the number of successful or failed consecutive probes, set the property "probeThreshold" to 2. It is currently not possible to set this property using Azure portal, so use either the Azure CLI or PowerShell command.
Note
When VMs without public IP addresses are placed in the backend pool of internal (no public IP address) Standard Azure load balancer, there will be no outbound internet connectivity, unless additional configuration is performed to allow routing to public end points. For details on how to achieve outbound connectivity see Public endpoint connectivity for Virtual Machines using Azure Standard Load Balancer in SAP high-availability scenarios.
Important
- Don't enable TCP time stamps on Azure VMs placed behind Azure Load Balancer. Enabling TCP timestamps will cause the health probes to fail. Set the
net.ipv4.tcp_timestampsparameter to0. For details, see Load Balancer health probes. - To prevent saptune from changing the manually set
net.ipv4.tcp_timestampsvalue from0back to1, you should update saptune version to 3.1.1 or higher. For more details, see saptune 3.1.1 – Do I Need to Update?.
Create Pacemaker cluster
Follow the steps in Setting up Pacemaker on SUSE Linux Enterprise Server in Azure to create a basic Pacemaker cluster for this NFS server.
Configure NFS server
The following items are prefixed with either [A] - applicable to all nodes, [1] - only applicable to node 1 or [2] - only applicable to node 2.
[A] Setup host name resolution
You can either use a DNS server or modify the /etc/hosts on all nodes. This example shows how to use the /etc/hosts file. Replace the IP address and the hostname in the following commands
sudo vi /etc/hostsInsert the following lines to /etc/hosts. Change the IP address and hostname to match your environment
# IP address of the load balancer frontend configuration for NFS

10.0.0.4 nw1-nfs
10.0.0.5 nw2-nfs
[A] Enable NFS server
Create the root NFS export entry
sudo sh -c 'echo /srv/nfs/ *\(rw,no_root_squash,fsid=0\)>/etc/exports'

sudo mkdir /srv/nfs/
[A] Install drbd components
sudo zypper install drbd drbd-kmp-default drbd-utils[A] Create a partition for the drbd devices
List all available data disks
sudo ls /dev/disk/azure/scsi1/

# Example output
# lun0  lun1
Create partitions for every data disk
sudo sh -c 'echo -e "n\n\n\n\n\nw\n" | fdisk /dev/disk/azure/scsi1/lun0'
sudo sh -c 'echo -e "n\n\n\n\n\nw\n" | fdisk /dev/disk/azure/scsi1/lun1'
[A] Create LVM configurations
List all available partitions
ls /dev/disk/azure/scsi1/lun*-part*

# Example output
# /dev/disk/azure/scsi1/lun0-part1  /dev/disk/azure/scsi1/lun1-part1
Create LVM volumes for every partition
sudo pvcreate /dev/disk/azure/scsi1/lun0-part1
sudo vgcreate vg-NW1-NFS /dev/disk/azure/scsi1/lun0-part1
sudo lvcreate -l 100%FREE -n NW1 vg-NW1-NFS

sudo pvcreate /dev/disk/azure/scsi1/lun1-part1
sudo vgcreate vg-NW2-NFS /dev/disk/azure/scsi1/lun1-part1
sudo lvcreate -l 100%FREE -n NW2 vg-NW2-NFS
[A] Configure drbd
sudo vi /etc/drbd.confMake sure that the drbd.conf file contains the following two lines
include "drbd.d/global_common.conf";
include "drbd.d/*.res";
Change the global drbd configuration
sudo vi /etc/drbd.d/global_common.confAdd the following entries to the handler and net section.
global {
     usage-count no;
}
common {
     handlers {
          fence-peer "/usr/lib/drbd/crm-fence-peer.9.sh";
          after-resync-target "/usr/lib/drbd/crm-unfence-peer.9.sh";
          split-brain "/usr/lib/drbd/notify-split-brain.sh root";
          pri-lost-after-sb "/usr/lib/drbd/notify-pri-lost-after-sb.sh; /usr/lib/drbd/notify-emergency-reboot.sh; echo b > /proc/sysrq-trigger ; reboot -f";
     }
     startup {
          wfc-timeout 0;
     }
     options {
     }
     disk {
          md-flushes yes;
          disk-flushes yes;
          c-plan-ahead 1;
          c-min-rate 100M;
          c-fill-target 20M;
          c-max-rate 4G;
     }
     net {
          after-sb-0pri discard-younger-primary;
          after-sb-1pri discard-secondary;
          after-sb-2pri call-pri-lost-after-sb;
          protocol     C;
          tcp-cork yes;
          max-buffers 20000;
          max-epoch-size 20000;
          sndbuf-size 0;
          rcvbuf-size 0;
     }
}
[A] Create the NFS drbd devices
sudo vi /etc/drbd.d/NW1-nfs.resInsert the configuration for the new drbd device and exit
resource NW1-nfs {
     protocol     C;
     disk {
          on-io-error       detach;
     }
     net {
         fencing  resource-and-stonith;
     }
     on prod-nfs-0 {
          address   10.0.0.6:7790;
          device    /dev/drbd0;
          disk      /dev/vg-NW1-NFS/NW1;
          meta-disk internal;
     }
     on prod-nfs-1 {
          address   10.0.0.7:7790;
          device    /dev/drbd0;
          disk      /dev/vg-NW1-NFS/NW1;
          meta-disk internal;
     }
}
sudo vi /etc/drbd.d/NW2-nfs.resInsert the configuration for the new drbd device and exit
resource NW2-nfs {
     protocol     C;
     disk {
          on-io-error       detach;
     }
     net {
         fencing  resource-and-stonith;
     }
     on prod-nfs-0 {
          address   10.0.0.6:7791;
          device    /dev/drbd1;
          disk      /dev/vg-NW2-NFS/NW2;
          meta-disk internal;
     }
     on prod-nfs-1 {
          address   10.0.0.7:7791;
          device    /dev/drbd1;
          disk      /dev/vg-NW2-NFS/NW2;
          meta-disk internal;
     }
}
Create the drbd device and start it
sudo drbdadm create-md NW1-nfs
sudo drbdadm create-md NW2-nfs
sudo drbdadm up NW1-nfs
sudo drbdadm up NW2-nfs
[1] Skip initial synchronization
sudo drbdadm new-current-uuid --clear-bitmap NW1-nfs
sudo drbdadm new-current-uuid --clear-bitmap NW2-nfs
[1] Set the primary node
sudo drbdadm primary --force NW1-nfs
sudo drbdadm primary --force NW2-nfs
[1] Wait until the new drbd devices are synchronized
sudo drbdsetup wait-sync-resource NW1-nfs
sudo drbdsetup wait-sync-resource NW2-nfs
[1] Create file systems on the drbd devices
sudo mkfs.xfs /dev/drbd0
sudo mkdir /srv/nfs/NW1
sudo chattr +i /srv/nfs/NW1
sudo mount -t xfs /dev/drbd0 /srv/nfs/NW1
sudo mkdir /srv/nfs/NW1/sidsys
sudo mkdir /srv/nfs/NW1/sapmntsid
sudo mkdir /srv/nfs/NW1/trans
sudo mkdir /srv/nfs/NW1/ASCS
sudo mkdir /srv/nfs/NW1/ASCSERS
sudo mkdir /srv/nfs/NW1/SCS
sudo mkdir /srv/nfs/NW1/SCSERS
sudo umount /srv/nfs/NW1

sudo mkfs.xfs /dev/drbd1
sudo mkdir /srv/nfs/NW2
sudo chattr +i /srv/nfs/NW2
sudo mount -t xfs /dev/drbd1 /srv/nfs/NW2
sudo mkdir /srv/nfs/NW2/sidsys
sudo mkdir /srv/nfs/NW2/sapmntsid
sudo mkdir /srv/nfs/NW2/trans
sudo mkdir /srv/nfs/NW2/ASCS
sudo mkdir /srv/nfs/NW2/ASCSERS
sudo mkdir /srv/nfs/NW2/SCS
sudo mkdir /srv/nfs/NW2/SCSERS
sudo umount /srv/nfs/NW2
[A] Setup drbd split-brain detection
When using drbd to synchronize data from one host to another, a so called split brain can occur. A split brain is a scenario where both cluster nodes promoted the drbd device to be the primary and went out of sync. It might be a rare situation but you still want to handle and resolve a split brain as fast as possible. It is therefore important to be notified when a split brain happened.
Read the official drbd documentation on how to set up a split brain notification.
It is also possible to automatically recover from a split brain scenario. For more information, read Automatic split brain recovery policies
Configure Cluster Framework
[1] Add the NFS drbd devices for SAP system NW1 to the cluster configuration
Important
Recent testing revealed situations, where netcat stops responding to requests due to backlog and its limitation of handling only one connection. The netcat resource stops listening to the Azure Load balancer requests and the floating IP becomes unavailable.
For existing Pacemaker clusters, we recommended in the past replacing netcat with socat. Currently we recommend using azure-lb resource agent, which is part of package resource-agents, with the following package version requirements:- For SLES 12 SP4/SP5, the version must be at least resource-agents-4.3.018.a7fb5035-3.30.1.
- For SLES 15/15 SP1, the version must be at least resource-agents-4.3.0184.6ee15eb2-4.13.1.
Note that the change will require brief downtime.
For existing Pacemaker clusters, if the configuration was already changed to use socat as described in Azure Load-Balancer Detection Hardening, there is no requirement to switch immediately to azure-lb resource agent.sudo crm configure rsc_defaults resource-stickiness="200" # Enable maintenance mode sudo crm configure property maintenance-mode=true sudo crm configure primitive drbd_NW1_nfs \ ocf:linbit:drbd \ params drbd_resource="NW1-nfs" \ op monitor interval="15" role="Master" \ op monitor interval="30" role="Slave" sudo crm configure ms ms-drbd_NW1_nfs drbd_NW1_nfs \ meta master-max="1" master-node-max="1" clone-max="2" \ clone-node-max="1" notify="true" interleave="true" sudo crm configure primitive fs_NW1_sapmnt \ ocf:heartbeat:Filesystem \ params device=/dev/drbd0 \ directory=/srv/nfs/NW1 \ fstype=xfs \ op monitor interval="10s" sudo crm configure primitive nfsserver systemd:nfs-server \ op monitor interval="30s" sudo crm configure clone cl-nfsserver nfsserver sudo crm configure primitive exportfs_NW1 \ ocf:heartbeat:exportfs \ params directory="/srv/nfs/NW1" \ options="rw,no_root_squash,crossmnt" clientspec="*" fsid=1 wait_for_leasetime_on_stop=true op monitor interval="30s" sudo crm configure primitive vip_NW1_nfs IPaddr2 \ params ip=10.0.0.4 op monitor interval=10 timeout=20 sudo crm configure primitive nc_NW1_nfs azure-lb port=61000 \ op monitor timeout=20s interval=10 sudo crm configure group g-NW1_nfs \ fs_NW1_sapmnt exportfs_NW1 nc_NW1_nfs vip_NW1_nfs sudo crm configure order o-NW1_drbd_before_nfs inf: \ ms-drbd_NW1_nfs:promote g-NW1_nfs:start sudo crm configure colocation col-NW1_nfs_on_drbd inf: \ g-NW1_nfs ms-drbd_NW1_nfs:Master[1] Add the NFS drbd devices for SAP system NW2 to the cluster configuration
# Enable maintenance mode
sudo crm configure property maintenance-mode=true

sudo crm configure primitive drbd_NW2_nfs \
  ocf:linbit:drbd \
  params drbd_resource="NW2-nfs" \
  op monitor interval="15" role="Master" \
  op monitor interval="30" role="Slave"

sudo crm configure ms ms-drbd_NW2_nfs drbd_NW2_nfs \
  meta master-max="1" master-node-max="1" clone-max="2" \
  clone-node-max="1" notify="true" interleave="true"

sudo crm configure primitive fs_NW2_sapmnt \
  ocf:heartbeat:Filesystem \
  params device=/dev/drbd1 \
  directory=/srv/nfs/NW2  \
  fstype=xfs \
  op monitor interval="10s"

sudo crm configure primitive exportfs_NW2 \
  ocf:heartbeat:exportfs \
  params directory="/srv/nfs/NW2" \
  options="rw,no_root_squash,crossmnt" clientspec="*" fsid=2 wait_for_leasetime_on_stop=true op monitor interval="30s"

sudo crm configure primitive vip_NW2_nfs IPaddr2 \
  params ip=10.0.0.5 op monitor interval=10 timeout=20

sudo crm configure primitive nc_NW2_nfs azure-lb port=61001 \
  op monitor timeout=20s interval=10

sudo crm configure group g-NW2_nfs \
  fs_NW2_sapmnt exportfs_NW2 nc_NW2_nfs vip_NW2_nfs

sudo crm configure order o-NW2_drbd_before_nfs inf: \
  ms-drbd_NW2_nfs:promote g-NW2_nfs:start

sudo crm configure colocation col-NW2_nfs_on_drbd inf: \
  g-NW2_nfs ms-drbd_NW2_nfs:Master
The
crossmntoption in theexportfscluster resources is present in our documentation for backward compatibility with older SLES versions.[1] Disable maintenance mode
sudo crm configure property maintenance-mode=false
Next steps
- Install the SAP ASCS and database
- Azure Virtual Machines planning and implementation for SAP
- Azure Virtual Machines deployment for SAP
- Azure Virtual Machines DBMS deployment for SAP
- To learn how to establish high availability and plan for disaster recovery of SAP HANA on Azure VMs, see High Availability of SAP HANA on Azure Virtual Machines (VMs)