Note
Access to this page requires authorization. You can try signing in or changing directories.
Access to this page requires authorization. You can try changing directories.
Learn how to use Azure AI Search to index documents that were encrypted with a customer-managed key in Azure Blob Storage.
Normally, an indexer can't extract content from blobs that were encrypted using client-side encryption in the Azure Blob Storage client library. This is because the indexer doesn't have access to the customer-managed encryption key in Azure Key Vault. However, using the DecryptBlobFile custom skill and the Document Extraction skill, you can provide controlled access to the key to decrypt the files and then extract content from them. This unlocks the ability to index and enrich these documents without compromising the encryption status of your stored documents.
Starting with previously encrypted whole documents (unstructured text) such as PDF, HTML, DOCX, and PPTX in Azure Blob Storage, this tutorial uses a REST client and the Search REST APIs to:
- Define a pipeline that decrypts the documents and extracts text from them
- Define an index to store the output
- Execute the pipeline to create and load the index
- Explore results using full-text search and a rich query syntax
Prerequisites
An Azure account with an active subscription. Create an account for free.
Azure AI Search on any tier or region.
Azure Storage, Standard performance (general-purpose v2).
Blobs encrypted with a customer-managed key. To create sample data, see Tutorial: Encrypt and decrypt blobs using Azure Key Vault.
Azure Key Vault in the same subscription as Azure AI Search. The key vault must have soft-delete and purge protection enabled.
Custom skill deployment creates an Azure Function app and an Azure Storage account. These resources are created for you, so they aren't listed as a prerequisite. When you finish this tutorial, remember to clean up the resources so that you aren't billed for services you're not using.
Note
Skillsets often require attaching a Microsoft Foundry resource. As written, this skillset has no dependency on Foundry, so no key is required. If you later add enrichments that invoke built-in skills, remember to update your skillset accordingly.
Deploy the custom skill
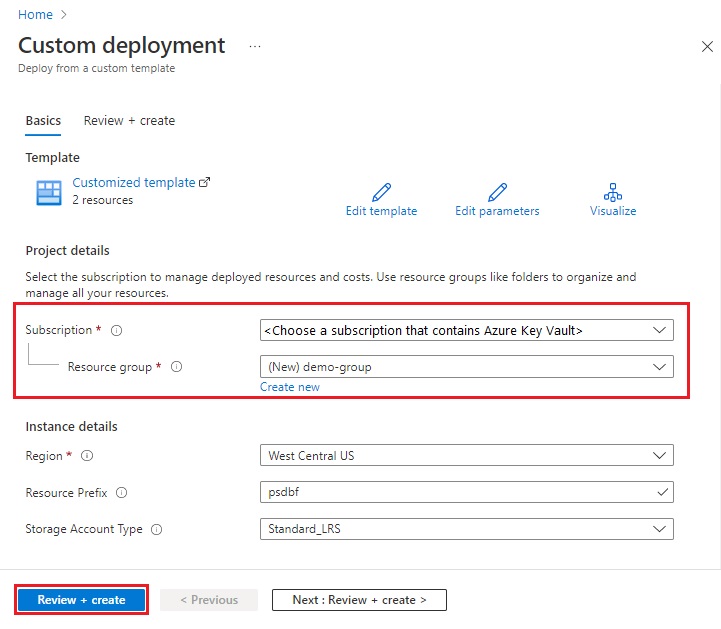
This tutorial uses the sample DecryptBlobFile project from the Azure Search Power Skills GitHub repository. In this section, you deploy the skill to an Azure Function so that it can be used in a skillset. A built-in deployment script creates an Azure Function resource with a psdbf-function-app- prefix and loads the skill. You're prompted to provide a subscription and resource group. Be sure to choose the subscription that contains your Azure Key Vault instance.
Operationally, the DecryptBlobFile skill takes the URL and SAS token for each blob as inputs. It outputs the downloaded, decrypted file using the file reference contract that Azure AI Search expects. Recall that DecryptBlobFile needs the encryption key to perform the decryption. As part of setup, you also create an access policy that grants DecryptBlobFile function access to the encryption key in Azure Key Vault.
On the DecryptBlobFile landing page, select Deploy to Azure to open the Resource Manager template in the Azure portal.
Choose the subscription where your Azure Key Vault instance exists. This tutorial doesn't work if you choose a different subscription.
Select an existing resource group or create a new one. A dedicated resource group makes cleanup easier later.
Select Review + create, agree to the terms, and then select Create to deploy the Azure Function.
Wait for the deployment to finish.
You should have an Azure Function app that contains the decryption logic and an Azure Storage resource that will store application data. In the next steps, you give the app permissions to access the key vault and collect information that you'll need for the REST calls.
Grant permissions in Azure Key Vault
Go to your Azure Key Vault service in the Azure portal. Create an access policy in the Azure Key Vault that grants key access to the custom skill.
From the left pane, select Access policies, and then select + Create to start the Create an access policy wizard.
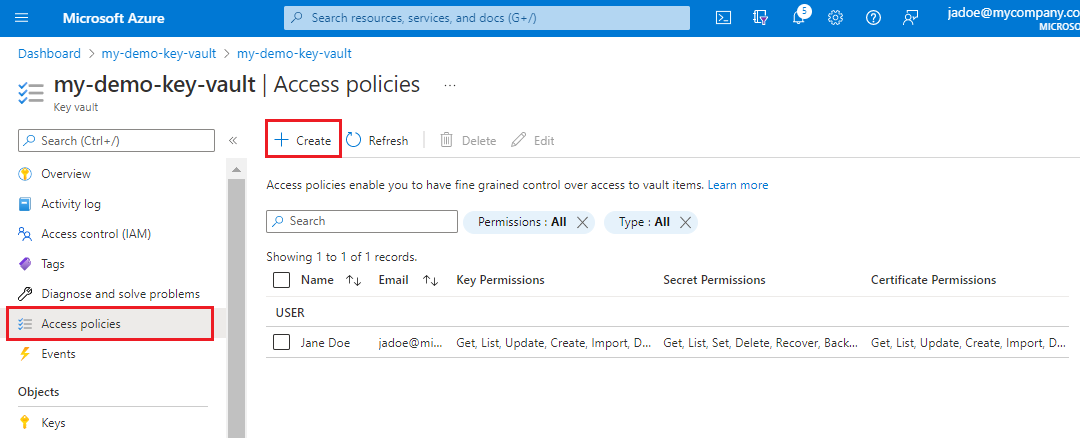
On the Permissions page, under Configure from template, select Azure Data Lake Storage or Azure Storage.
Select Next.
On the Principal page, select the Azure Function instance you deployed. You can search for it using its resource prefix, which has a default value of psdbf-function-app.
Select Next.
On Review + create, select Create.
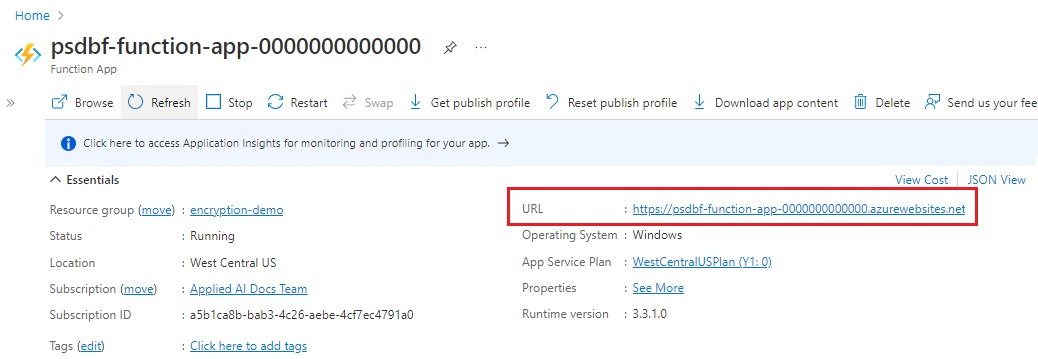
Collect app information
Go to the psdbf-function-app function in the Azure portal. Make a note of the following properties you'll need for the REST calls.
Get the function URL, which can be found under Essentials on the main page for the function.
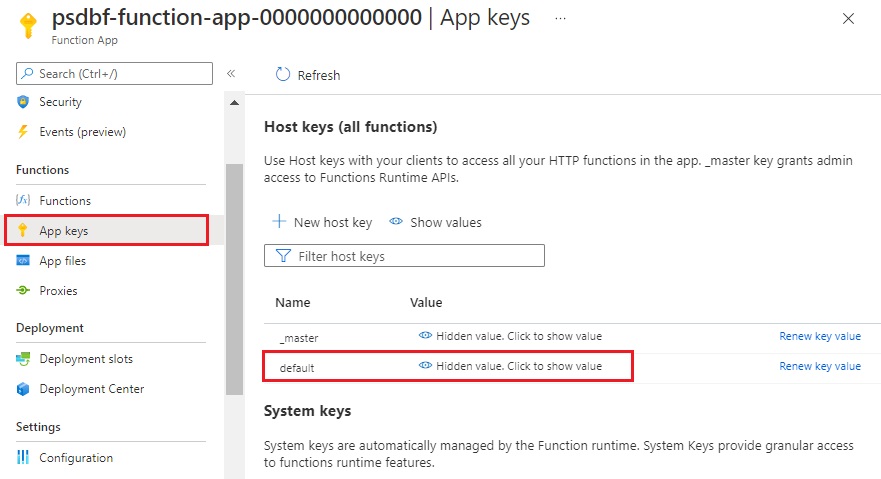
Get the host key code, which can be found by going to App keys and showing the default key, and copying the value.
Get an admin key and URL for Azure AI Search
Sign in to the Azure portal.
On your search service Overview page, get the name of your search service. You can confirm your service name by reviewing the endpoint URL. For example, if your endpoint URL is
https://mydemo.search.windows.net, your service name ismydemo.In Settings > Keys, get an admin key for full rights on the service. There are two interchangeable admin keys, provided for business continuity in case you need to roll one over. You can use either key on requests to add, modify, or delete objects.
An API key is required in the header of every request sent to your service. A valid key establishes trust, on a per-request basis, between the application sending the request and the service that handles it.
Set up a REST client
Create the following variables for endpoints and keys.
| Variable | Where to get it |
|---|---|
admin-key |
On the Keys page of the Azure AI Search service. |
search-service-name |
The name of the Azure AI Search service. The URL is https://{{search-service-name}}.search.windows.net. |
storage-connection-string |
In the storage account, on the Access Keys tab, select key1 > Connection string. |
storage-container-name |
The name of the blob container that has the encrypted files to be indexed. |
function-uri |
In the Azure Function, under Essentials on the main page. |
function-code |
In the Azure Function, by going to App keys, showing the default key, and copying the value. |
api-version |
Leave as 2020-06-30. |
datasource-name |
Leave as encrypted-blobs-ds. |
index-name |
Leave as encrypted-blobs-idx. |
skillset-name |
Leave as encrypted-blobs-ss. |
indexer-name |
Leave as encrypted-blobs-ixr. |
Review and run each request
Use the following HTTP requests to create the objects of an enrichment pipeline.
PUT request to create the index: This search index holds the data that Azure AI Search uses and returns.
POST request to create the data source: This data source specifies the connection to your storage account containing the encrypted blob files.
PUT request to create the skillset: The skillset specifies the custom skill definition for the Azure Function that will decrypt the blob file data. It also specifies a DocumentExtractionSkill to extract the text from each document after it's decrypted.
PUT request to create the indexer: Running the indexer retrieves the blobs, applies the skillset, and indexes and stores the results. You must run this request last. The custom skill in the skillset invokes the decryption logic.
Monitor indexing
Indexing and enrichment commence as soon as you submit the Create Indexer request. Depending on how many documents are in your storage account, indexing can take a while. To find out whether the indexer is still running, send a Get Indexer Status request and review the response to learn whether the indexer is running or view error and warning information.
If you're using the Free tier, expect the following message: "Could not extract content or metadata from your document. Truncated extracted text to '32768' characters". This message appears because blob indexing on the Free tier has a 32,000 limit on character extraction. You don't see this message for this data set on higher tiers.
Search your content
After indexer execution is finished, you can run queries to verify that the data is successfully decrypted and indexed. Go to your Azure AI Search service in the Azure portal and use the Search Explorer to run queries over the indexed data.
Clean up resources
When you're working in your own subscription, at the end of a project, it's a good idea to remove the resources that you no longer need. Resources left running can cost you money. You can delete resources individually or delete the resource group to delete the entire set of resources.
You can find and manage resources in the Azure portal, using the All resources or Resource groups link in the left-navigation pane.
Next steps
Now that you've indexed encrypted files, you can iterate on this pipeline by adding more skills to enrich and gain more insights into your data.
If you're working with doubly encrypted data, you might want to investigate the index encryption features available in Azure AI Search. Although the indexer needs decrypted data for indexing purposes, once the index exists, it can be encrypted in a search index using a customer-managed key. This ensures that your data is always encrypted when at rest. For more information, see Configure customer-managed keys for data encryption in Azure AI Search.