Note
Access to this page requires authorization. You can try signing in or changing directories.
Access to this page requires authorization. You can try changing directories.
This article describes how to set up an Azure AI Search indexer connection to SQL Managed Instance using a managed identity instead of providing credentials in the connection string.
You can use a system-assigned managed identity or a user-assigned managed identity (preview). Managed identities are Microsoft Entra logins and require Azure role assignments to access data in SQL Managed Instance.
Before learning more about this feature, we recommended that you understand what an indexer is and how to set up an indexer for your data source. More information can be found at the following links:
Prerequisites
Create a managed identity for your search service.
Microsoft Entra admin role on SQL Managed Instance:
To assign read permissions on SQL Managed Instance, you must be an Azure Global Admin with a SQL Managed Instance. See Configure and manage Microsoft Entra authentication with SQL Managed Instance and follow the steps to provision a Microsoft Entra admin (SQL Managed Instance).
Configure a public endpoint and network security group in SQL Managed Instance to allow connections from Azure AI Search. Connecting through a shared private link when using a managed identity isn't currently supported.
Assign permissions to read the database
Follow these steps to assign the search service system managed identity permission to read the SQL Managed database.
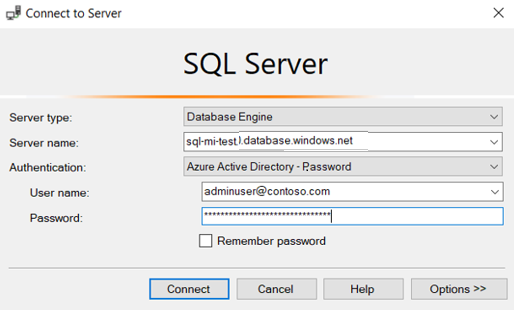
Connect to your SQL Managed Instance through SQL Server Management Studio (SSMS) by using one of the following methods:
Authenticate with your Microsoft Entra account.
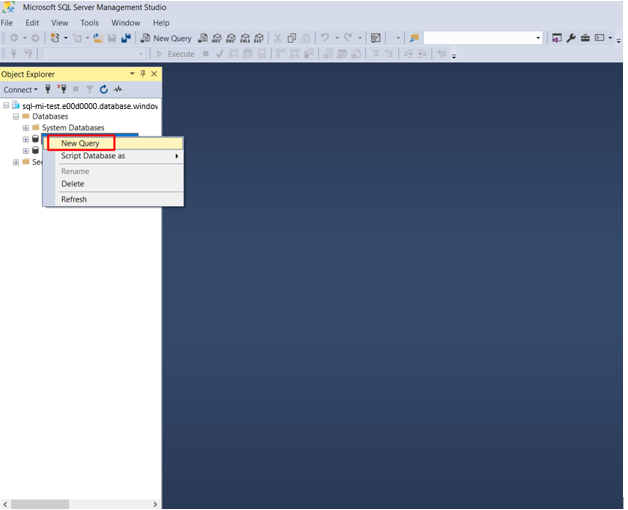
From the left pane, locate the SQL database you're using as data source for indexing and right-click it. Select New Query.
In the T-SQL window, copy the following commands and include the brackets around your search service name. Select Execute.
CREATE USER [insert your search service name here or user-assigned managed identity name] FROM EXTERNAL PROVIDER;
EXEC sp_addrolemember 'db_datareader', [insert your search service name here or user-assigned managed identity name];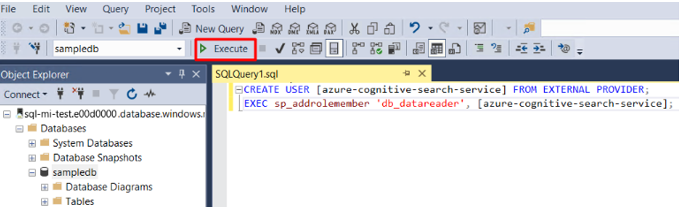
If you later change the search service system identity after assigning permissions, you must remove the role membership and remove the user in the SQL database, then repeat the permission assignment. Removing the role membership and user can be accomplished by running the following commands:
sp_droprolemember 'db_datareader', [insert your search service name or user-assigned managed identity name];

DROP USER IF EXISTS [insert your search service name or user-assigned managed identity name];
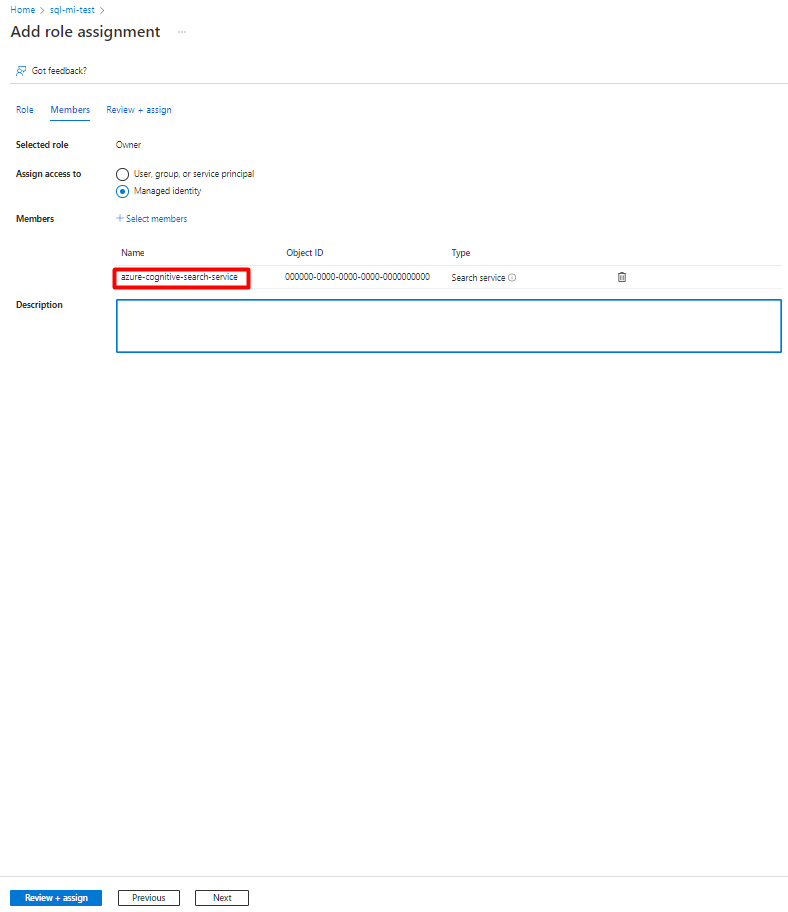
Add a role assignment
In this step, you give your Azure AI Search service permission to read data from your SQL Managed Instance.
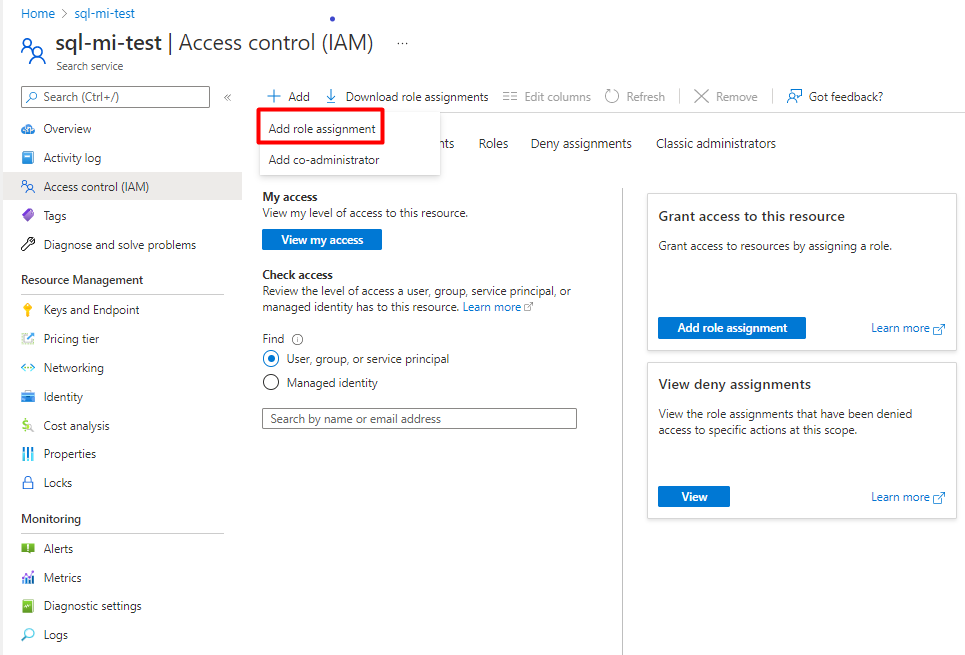
In the Azure portal, navigate to your SQL Managed Instance page.
Select Access control (IAM).
Select Add then Add role assignment.
Select Reader role.
Leave Assign access to as Microsoft Entra user, group, or service principal.
If you're using a system-assigned managed identity, search for your search service, then select it. If you're using a user-assigned managed identity, search for the name of the user-assigned managed identity, then select it. Select Save.
Example for SQL Managed Instance using a system-assigned managed identity:

Create the data source
Create the data source and provide a system-assigned managed identity.
System-assigned managed identity
The REST API, Azure portal, and the .NET SDK support system-assigned managed identity.
When you're connecting with a system-assigned managed identity, the only change to the data source definition is the format of the "credentials" property. You provide an Initial Catalog or Database name and a ResourceId that has no account key or password. The ResourceId must include the subscription ID of SQL Managed Instance, the resource group of SQL Managed instance, and the name of the SQL database.
Here's an example of how to create a data source to index data from a storage account using the Create Data Source REST API and a managed identity connection string. The managed identity connection string format is the same for the REST API, .NET SDK, and the Azure portal.
POST https://[service name].search.windows.net/datasources?api-version=2025-09-01
Content-Type: application/json
api-key: [admin key]

{
    "name" : "sql-mi-datasource",
    "type" : "azuresql",
    "credentials" : {
        "connectionString" : "Database=[SQL database name];ResourceId=/subscriptions/[subscription ID]/resourcegroups/[resource group name]/providers/Microsoft.Sql/managedInstances/[SQL Managed Instance name];Connection Timeout=100;"
    },
    "container" : {
        "name" : "my-table"
    }
}
Create the index
The index specifies the fields in a document, attributes, and other constructs that shape the search experience.
Here's a Create Index REST API call with a searchable booktitle field:
POST https://[service name].search.windows.net/indexes?api-version=2025-09-01
Content-Type: application/json
api-key: [admin key]

{
    "name" : "my-target-index",
    "fields": [
        { "name": "id", "type": "Edm.String", "key": true, "searchable": false },
        { "name": "booktitle", "type": "Edm.String", "searchable": true, "filterable": false, "sortable": false, "facetable": false }
    ]
}
Create the indexer
An indexer connects a data source with a target search index, and provides a schedule to automate the data refresh. Once the index and data source are created, you're ready to create the indexer.
Here's a Create Indexer REST API call with an Azure SQL indexer definition. The indexer runs when you submit the request.
POST https://[service name].search.windows.net/indexers?api-version=2025-09-01
Content-Type: application/json
api-key: [admin key]

{
    "name" : "sql-mi-indexer",
    "dataSourceName" : "sql-mi-datasource",
    "targetIndexName" : "my-target-index"
}
Troubleshooting
If you get an error when the indexer tries to connect to the data source that says that the client isn't allowed to access the server, see the common indexer errors.
You can also rule out any firewall issues by trying the connection with and without restrictions in place.