Note
Access to this page requires authorization. You can try signing in or changing directories.
Access to this page requires authorization. You can try changing directories.
Azure AI Search can index JSON documents and arrays in Azure Blob Storage using an indexer that knows how to read semi-structured data. Semi-structured data contains tags or markings that separate content within the data. It splits the difference between unstructured data, which must be fully indexed, and formally structured data that adheres to a data model, such as a relational database schema that can be indexed on a per-field basis.
This tutorial shows you how to index nested JSON arrays, using a REST client and the Search REST APIs to:
- Set up sample data and configure an
azureblobdata source - Create an Azure AI Search index to contain searchable content
- Create and run an indexer to read the container and extract searchable content
- Search the index you just created
Prerequisites
An Azure account with an active subscription. Create an account for free.
Azure AI Search. Create a service or find an existing service in your current subscription.
Visual Studio Code with a REST client.
Note
You can use a free search service for this tutorial. The Free tier limits you to three indexes, three indexers, and three data sources. This tutorial creates one of each. Before you start, make sure you have room on your service to accept the new resources.
Download files
Download a zip file of the sample data repository and extract the contents. Learn how.
The sample data is a single JSON file that contains a JSON array and 1,521 nested JSON elements. The data originates from the NY Philharmonic Performance History on Kaggle. We chose one JSON file to stay under the storage limits of the Free tier.
Here's the first nested JSON in the file. The remainder of the file includes 1,520 other instances of concert performances.
    {
      "id": "7358870b-65c8-43d5-ab56-514bde52db88-0.1",
      "programID": "11640",
      "orchestra": "New York Philharmonic",
      "season": "2011-12",
      "concerts": [
        {
          "eventType": "Non-Subscription",
          "Location": "Manhattan, NY",
          "Venue": "Avery Fisher Hall",
          "Date": "2011-09-07T04:00:00Z",
          "Time": "7:30PM"
        },
        {
          "eventType": "Non-Subscription",
          "Location": "Manhattan, NY",
          "Venue": "Avery Fisher Hall",
          "Date": "2011-09-08T04:00:00Z",
          "Time": "7:30PM"
        }
      ],
      "works": [
        {
          "ID": "5733*",
          "composerName": "Bernstein,  Leonard",
          "workTitle": "WEST SIDE STORY (WITH FILM)",
          "conductorName": "Newman, David",
          "soloists": []
        },
        {
          "ID": "0*",
          "interval": "Intermission",
          "soloists": []
        }
      ]
    }
Upload sample data to Azure Storage
In Azure Storage, create a new container named ny-philharmonic-free.
Get a storage connection string so that you can formulate a connection in Azure AI Search.
On the left, select Access keys.
Copy the connection string for either key one or key two. The connection string is similar to the following example:
DefaultEndpointsProtocol=https;AccountName=<your account name>;AccountKey=<your account key>;EndpointSuffix=core.windows.net
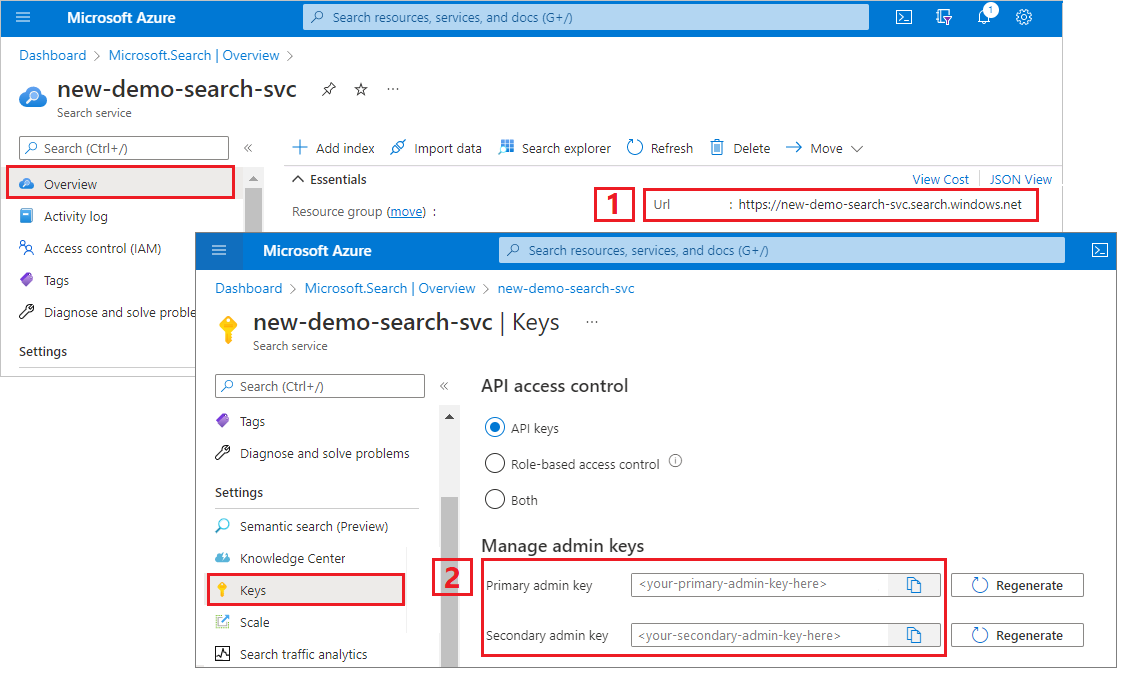
Copy a search service URL and API key
For this tutorial, connections to Azure AI Search require an endpoint and an API key. You can get these values from the Azure portal. For alternative connection methods, see Managed identities.
Go to your search service in the Azure portal.
From the left pane, select Overview and copy the endpoint. It should be in this format:
https://my-service.search.windows.netFrom the left pane, select Settings > Keys and copy an admin key for full rights on the service. There are two interchangeable admin keys, provided for business continuity in case you need to roll one over. You can use either key on requests to add, modify, or delete objects.
Set up your REST file
Start Visual Studio Code and create a new file.
Provide values for variables used in the request.
@baseUrl = PUT-YOUR-SEARCH-SERVICE-ENDPOINT-HERE
@apiKey = PUT-YOUR-ADMIN-API-KEY-HERE
@storageConnection = PUT-YOUR-STORAGE-CONNECTION-STRING-HERE
@blobContainer = PUT-YOUR-CONTAINER-NAME-HERE
Save the file using a
.restor.httpfile extension.
For help with the REST client, see Quickstart: Full-text search using REST.
Create a data source
Create Data Source (REST) creates a data source connection that specifies what data to index.
### Create a data source
POST {{baseUrl}}/datasources?api-version=2025-09-01  HTTP/1.1
  Content-Type: application/json
  api-key: {{apiKey}}

    {
        "name" : "ny-philharmonic-ds",
        "description": null,
        "type": "azureblob",
        "subtype": null,
        "credentials": {
            "connectionString": "{{storageConnection}}"
        },
        "container": {
            "name": "{{blobContainer}}",
            "query": null
        },
        "dataChangeDetectionPolicy": null,
        "dataDeletionDetectionPolicy": null
    }
Send the request. The response should look like:
HTTP/1.1 201 Created
Transfer-Encoding: chunked
Content-Type: application/json; odata.metadata=minimal; odata.streaming=true; charset=utf-8
ETag: "0x8DC43A5FDB8448F"
Location: https://<YOUR-SEARCH-SERVICE-NAME>.search.windows.net:443/datasources('ny-philharmonic-ds')?api-version=2025-09-01
Server: Microsoft-IIS/10.0
Strict-Transport-Security: max-age=2592000, max-age=15724800; includeSubDomains
Preference-Applied: odata.include-annotations="*"
OData-Version: 4.0
request-id: 7ca53f73-1054-4959-bc1f-616148a9c74a
elapsed-time: 111
Date: Wed, 13 Mar 2024 21:38:58 GMT
Connection: close

{
  "@odata.context": "https://<YOUR-SEARCH-SERVICE-NAME>.search.windows.net/$metadata#datasources/$entity",
  "@odata.etag": "\"0x8DC43A5FDB8448F\"",
  "name": "ny-philharmonic-ds",
  "description": null,
  "type": "azureblob",
  "subtype": null,
  "credentials": {
    "connectionString": null
  },
  "container": {
    "name": "ny-philharmonic-free",
    "query": null
  },
  "dataChangeDetectionPolicy": null,
  "dataDeletionDetectionPolicy": null,
  "encryptionKey": null
}
Create an index
Create Index (REST) creates a search index on your search service. An index specifies all the parameters and their attributes.
For nested JSON, the index fields must be identical to the source fields. Currently, Azure AI Search doesn't support field mappings to nested JSON, so field names and data types must match completely. The following index aligns to the JSON elements in the raw content.
### Create an index
POST {{baseUrl}}/indexes?api-version=2025-09-01  HTTP/1.1
  Content-Type: application/json
  api-key: {{apiKey}}

    {
      "name": "ny-philharmonic-index",
      "fields": [
        {"name": "programID", "type": "Edm.String", "key": true, "searchable": true, "retrievable": true, "filterable": true, "facetable": true, "sortable": true},
        {"name": "orchestra", "type": "Edm.String", "searchable": true, "retrievable": true, "filterable": true, "facetable": true, "sortable": true},
        {"name": "season", "type": "Edm.String", "searchable": true, "retrievable": true, "filterable": true, "facetable": true, "sortable": true},
        { "name": "concerts", "type": "Collection(Edm.ComplexType)",
          "fields": [
            { "name": "eventType", "type": "Edm.String", "searchable": true, "retrievable": true, "filterable": false, "sortable": false, "facetable": false},
            { "name": "Location", "type": "Edm.String", "searchable": true, "retrievable": true, "filterable": true, "sortable": false, "facetable": true },
            { "name": "Venue", "type": "Edm.String", "searchable": true, "retrievable": true, "filterable": true, "sortable": false, "facetable": true },
            { "name": "Date", "type": "Edm.String", "searchable": false, "retrievable": true, "filterable": true, "sortable": false, "facetable": true },
            { "name": "Time", "type": "Edm.String", "searchable": false, "retrievable": true, "filterable": true, "sortable": false, "facetable": true }
          ]
        },
        { "name": "works", "type": "Collection(Edm.ComplexType)",
          "fields": [
            { "name": "ID", "type": "Edm.String", "searchable": true, "retrievable": true, "filterable": false, "sortable": false, "facetable": false},
            { "name": "composerName", "type": "Edm.String", "searchable": true, "retrievable": true, "filterable": true, "sortable": false, "facetable": true },
            { "name": "workTitle", "type": "Edm.String", "searchable": true, "retrievable": true, "filterable": true, "sortable": false, "facetable": true },
            { "name": "conductorName", "type": "Edm.String", "searchable": true, "retrievable": true, "filterable": true, "sortable": false, "facetable": true },
            { "name": "soloists", "type": "Collection(Edm.String)", "searchable": true, "retrievable": true, "filterable": true, "sortable": false, "facetable": true }
          ]
        }
      ]
    }
Key points:
You can't use field mappings to reconcile differences in field names or data types. This index schema is designed to mirror the raw content.
Nested JSON is modeled as
Collection(Edm.ComplextType). In the raw content, there are multiple concerts for each season, and multiple works for each concert. To accommodate this structure, use collections for complex types.In the raw content,
DateandTimeare strings, so the corresponding data types in the index are also strings.
Create and run an indexer
Create Indexer creates an indexer on your search service. An indexer connects to the data source, loads and indexes data, and optionally provides a schedule to automate the data refresh.
The indexer configuration includes the jsonArray parsing mode and a documentRoot.
### Create and run an indexer
POST {{baseUrl}}/indexers?api-version=2025-09-01  HTTP/1.1
  Content-Type: application/json
  api-key: {{apiKey}}

    {
      "name" : "ny-philharmonic-indexer",
      "dataSourceName" : "ny-philharmonic-ds",
      "targetIndexName" : "ny-philharmonic-index",
      "parameters" : {
        "configuration" : {
          "parsingMode" : "jsonArray", "documentRoot": "/programs"}
        },
      "fieldMappings" : [
      ]
    }
Key points:
The raw content file contains a JSON array (
"programs") with 1,526 nested JSON structures. SetparsingModetojsonArrayto tell the indexer that each blob contains a JSON array. Because the nested JSON starts one level down, setdocumentRootto/programs.The indexer runs for several minutes. Wait for indexer execution to complete before running any queries.
Run queries
You can start searching as soon as the first document is loaded.
### Query the index
POST {{baseUrl}}/indexes/ny-philharmonic-index/docs/search?api-version=2025-09-01  HTTP/1.1
  Content-Type: application/json
  api-key: {{apiKey}}

  {
    "search": "*",
    "count": true
  }
Send the request. This is an unspecified full-text search query that returns all of the fields marked as retrievable in the index, along with a document count. The response should look like:
HTTP/1.1 200 OK
Transfer-Encoding: chunked
Content-Type: application/json; odata.metadata=minimal; odata.streaming=true; charset=utf-8
Content-Encoding: gzip
Vary: Accept-Encoding
Server: Microsoft-IIS/10.0
Strict-Transport-Security: max-age=2592000, max-age=15724800; includeSubDomains
Preference-Applied: odata.include-annotations="*"
OData-Version: 4.0
request-id: a95c4021-f7b4-450b-ba55-596e59ecb6ec
elapsed-time: 106
Date: Wed, 13 Mar 2024 22:09:59 GMT
Connection: close

{
  "@odata.context": "https://<YOUR-SEARCH-SERVICE-NAME>.search.windows.net/indexes('ny-philharmonic-index')/$metadata#docs(*)",
  "@odata.count": 1521,
  "@search.nextPageParameters": {
    "search": "*",
    "count": true,
    "skip": 50
  },
  "value": [
  ],
  "@odata.nextLink": "https://<YOUR-SEARCH-SERVICE-NAME>.search.windows.net/indexes/ny-philharmonic-index/docs/search?api-version=2025-09-01"
}
Add a search parameter to search on a string, a select parameter to limit the results to fewer fields, and a filter to further narrow the search.
### Query the index
POST {{baseUrl}}/indexes/ny-philharmonic-index/docs/search?api-version=2025-09-01  HTTP/1.1
  Content-Type: application/json
  api-key: {{apiKey}}

  {
    "search": "puccini",
    "count": true,
    "select": "season, concerts/Date, works/composerName, works/workTitle",
    "filter": "season gt '2015-16'"
  }
Two documents are returned in the response.
For filters, you can also use Logical operators (and, or, not) and comparison operators (eq, ne, gt, lt, ge, le). String comparisons are case -sensitive. For more information and examples, see Create a query.
Note
The $filter parameter only works on fields that were marked filterable during index creation.
Reset and rerun
Indexers can be reset to clear execution history, which allows a full rerun. The following POST requests are for reset, followed by rerun.
### Reset the indexer
POST {{baseUrl}}/indexers/ny-philharmonic-indexer/reset?api-version=2025-09-01  HTTP/1.1
  api-key: {{apiKey}}
### Run the indexer
POST {{baseUrl}}/indexers/ny-philharmonic-indexer/run?api-version=2025-09-01  HTTP/1.1
  api-key: {{apiKey}}
### Check indexer status
GET {{baseUrl}}/indexers/ny-philharmonic-indexer/status?api-version=2025-09-01  HTTP/1.1
  api-key: {{apiKey}}
Clean up resources
When you're working in your own subscription, at the end of a project, it's a good idea to remove the resources that you no longer need. Resources left running can cost you money. You can delete resources individually or delete the resource group to delete the entire set of resources.
You can use the Azure portal to delete indexes, indexers, and data sources.
Next steps
Now that you're familiar with the basics of Azure Blob indexing, take a closer look at indexer configuration for JSON blobs in Azure Storage: