Note
Access to this page requires authorization. You can try signing in or changing directories.
Access to this page requires authorization. You can try changing directories.
Learn how to implement two different paging systems, the first based on page numbers and the second on infinite scrolling. Both systems of paging are widely used, and selecting the right one depends on the user experience you would like with the results.
In this tutorial, learn how to:
- Extend your app with numbered paging
- Extend your app with infinite scrolling
Overview
This tutorial overlays a paging system into a previously created project described in the Create your first search app tutorial.
Finished versions of the code that you will develop in this tutorial can be found in the following projects:
Prerequisites
- 1-basic-search-page (GitHub) project. This project can either be your own version built from the previous tutorial or a copy from GitHub.
Extend your app with numbered paging
Numbered paging is the paging system of choice for the main commercial web search engines and many other search websites. Numbered paging typically includes a "next" and "previous" option in addition to a range of actual page numbers. Also a "first page" and "last page" option might also be available. These options certainly give a user control over navigating through page-based results.
In this tutorial, you will add a system that includes first, previous, next, and last options, along with page numbers that do not start from 1, but instead surround the current page the user is on (so, for example, if the user is looking at page 10, perhaps page numbers 8, 9, 10, 11, and 12 are displayed).
The system will be flexible enough to allow the number of visible page numbers to be set in a global variable.
The system will treat the left-most and right-most page number buttons as special, meaning they will trigger changing the range of page numbers displayed. For example, if page numbers 8, 9, 10, 11 and 12 are displayed, and the user clicks on 8, then the range of page numbers displayed changes to 6, 7, 8, 9, and 10. And there is a similar shift to the right if they selected 12.
Add paging fields to the model
Have the basic search page solution open.
Open the SearchData.cs model file.
Add global variables to support pagination. In MVC, global variables are declared in their own static class. ResultsPerPage sets the number of results per page. MaxPageRange determines the number of visible page numbers on the view. PageRangeDelta determines how many pages should be shifted left or right, when the left-most or right-most page number is selected. Typically this latter number is around half of MaxPageRange. Add the following code into the namespace.
public static class GlobalVariables
{
    public static int ResultsPerPage
    {
        get
        {
            return 3;
        }
    }
    public static int MaxPageRange
    {
        get
        {
            return 5;
        }
    }

    public static int PageRangeDelta
    {
        get
        {
            return 2;
        }
    }
}
Tip
If you are running this project on a device with a smaller screen, such as a laptop, then consider changing ResultsPerPage to 2.
Add paging properties to the SearchData class, after the searchText property.
// The current page being displayed.
public int currentPage { get; set; }

// The total number of pages of results.
public int pageCount { get; set; }

// The left-most page number to display.
public int leftMostPage { get; set; }

// The number of page numbers to display - which can be less than MaxPageRange towards the end of the results.
public int pageRange { get; set; }

// Used when page numbers, or next or prev buttons, have been selected.
public string paging { get; set; }
Add a table of paging options to the view
Open the index.cshtml file, and add the following code right before the closing </body> tag. This new code presents a table of paging options: first, previous, 1, 2, 3, 4, 5, next, last.
@if (Model != null && Model.pageCount > 1) { // If there is more than one page of results, show the paging buttons. <table> <tr> <td> @if (Model.currentPage > 0) { <p class="pageButton"> @Html.ActionLink("|<", "Page", "Home", new { paging = "0" }, null) </p> } else { <p class="pageButtonDisabled">|<</p> } </td> <td> @if (Model.currentPage > 0) { <p class="pageButton"> @Html.ActionLink("<", "PageAsync", "Home", new { paging = "prev" }, null) </p> } else { <p class="pageButtonDisabled"><</p> } </td> @for (var pn = Model.leftMostPage; pn < Model.leftMostPage + Model.pageRange; pn++) { <td> @if (Model.currentPage == pn) { // Convert displayed page numbers to 1-based and not 0-based. <p class="pageSelected">@(pn + 1)</p> } else { <p class="pageButton"> @Html.ActionLink((pn + 1).ToString(), "PageAsync", "Home", new { paging = @pn }, null) </p> } </td> } <td> @if (Model.currentPage < Model.pageCount - 1) { <p class="pageButton"> @Html.ActionLink(">", "PageAsync", "Home", new { paging = "next" }, null) </p> } else { <p class="pageButtonDisabled">></p> } </td> <td> @if (Model.currentPage < Model.pageCount - 1) { <p class="pageButton"> @Html.ActionLink(">|", "PageAsync", "Home", new { paging = Model.pageCount - 1 }, null) </p> } else { <p class="pageButtonDisabled">>|</p> } </td> </tr> </table> }We use an HTML table to align things neatly. However all the action comes from the @Html.ActionLink statements, each calling the controller with a new model created with different entries to the paging property we added earlier.
The first and last page options do not send strings such as "first" and "last", but instead send the correct page numbers.
Add paging classes to the list of HTML styles in the hotels.css file. The pageSelected class is there to identify the current page (by applying a bold format to the page number) in the list of page numbers.
.pageButton {
    border: none;
    color: darkblue;
    font-weight: normal;
    width: 50px;
}

.pageSelected {
    border: none;
    color: black;
    font-weight: bold;
    width: 50px;
}

.pageButtonDisabled {
    border: none;
    color: lightgray;
    font-weight: bold;
    width: 50px;
}
Add a Page action to the controller
Open the HomeController.cs file, and add the PageAsync action. This action responds to any of the page options selected.
public async Task<ActionResult> PageAsync(SearchData model)
{
    try
    {
        int page;

        switch (model.paging)
        {
            case "prev":
                page = (int)TempData["page"] - 1;
                break;

            case "next":
                page = (int)TempData["page"] + 1;
                break;

            default:
                page = int.Parse(model.paging);
                break;
        }

        // Recover the leftMostPage.
        int leftMostPage = (int)TempData["leftMostPage"];

        // Recover the search text and search for the data for the new page.
        model.searchText = TempData["searchfor"].ToString();

        await RunQueryAsync(model, page, leftMostPage);

        // Ensure Temp data is stored for next call, as TempData only stores for one call.
        TempData["page"] = (object)page;
        TempData["searchfor"] = model.searchText;
        TempData["leftMostPage"] = model.leftMostPage;
    }

    catch
    {
        return View("Error", new ErrorViewModel { RequestId = "2" });
    }
    return View("Index", model);
}
The RunQueryAsync method will now show a syntax error, because of the third parameter, which we will come to in a bit.
Note
The calls to TempData store a value (an object) in temporary storage, though this storage persists for only one call. If we store something in temporary data, it will be available for the next call to a controller action, but will most definitely be gone by the call after that. Because of this short lifespan, we store the search text and paging properties back in temporary storage each and every call to PageAsync.
Update the Index(model) action to store temporary variables, and to add the left-most page parameter to the RunQueryAsync call.
public async Task<ActionResult> Index(SearchData model)
{
    try
    {
        // Ensure the search string is valid.
        if (model.searchText == null)
        {
            model.searchText = "";
        }

        // Make the search call for the first page.
        await RunQueryAsync(model, 0, 0);

        // Ensure temporary data is stored for the next call.
        TempData["page"] = 0;
        TempData["leftMostPage"] = 0;
        TempData["searchfor"] = model.searchText;
    }

    catch
    {
        return View("Error", new ErrorViewModel { RequestId = "1" });
    }
    return View(model);
}
The RunQueryAsync method, introduced in the previous lesson, needs modification to resolve the syntax error. We use the Skip, Size, and IncludeTotalCount fields of the SearchOptions class to request only one page worth of results, starting at the Skip setting. We also need to calculate the paging variables for our view. Replace the entire method with the following code.
private async Task<ActionResult> RunQueryAsync(SearchData model, int page, int leftMostPage)
{
    InitSearch();

    var options = new SearchOptions
    {
        // Skip past results that have already been returned.
        Skip = page * GlobalVariables.ResultsPerPage,

        // Take only the next page worth of results.
        Size = GlobalVariables.ResultsPerPage,

        // Include the total number of results.
        IncludeTotalCount = true
    };

    // Add fields to include in the search results.
    options.Select.Add("HotelName");
    options.Select.Add("Description");

    // For efficiency, the search call should be asynchronous, so use SearchAsync rather than Search.
    model.resultList = await _searchClient.SearchAsync<Hotel>(model.searchText, options).ConfigureAwait(false);

    // This variable communicates the total number of pages to the view.
    model.pageCount = ((int)model.resultList.TotalCount + GlobalVariables.ResultsPerPage - 1) / GlobalVariables.ResultsPerPage;

    // This variable communicates the page number being displayed to the view.
    model.currentPage = page;

    // Calculate the range of page numbers to display.
    if (page == 0)
    {
        leftMostPage = 0;
    }
    else if (page <= leftMostPage)
    {
        // Trigger a switch to a lower page range.
        leftMostPage = Math.Max(page - GlobalVariables.PageRangeDelta, 0);
    }
    else if (page >= leftMostPage + GlobalVariables.MaxPageRange - 1)
    {
        // Trigger a switch to a higher page range.
        leftMostPage = Math.Min(page - GlobalVariables.PageRangeDelta, model.pageCount - GlobalVariables.MaxPageRange);
    }
    model.leftMostPage = leftMostPage;

    // Calculate the number of page numbers to display.
    model.pageRange = Math.Min(model.pageCount - leftMostPage, GlobalVariables.MaxPageRange);

    return View("Index", model);
}
Finally, make a small change to the view. The variable resultList.Results.TotalCount will now contain the number of results returned in one page (3 in our example), not the total number. Because we set the IncludeTotalCount to true, the variable resultList.TotalCount now contains the total number of results. So locate where the number of results is displayed in the view, and change it to the following code.
// Show the result count.
<p class="sampleText">
    @Model.resultList.TotalCount Results
</p>

var results = Model.resultList.GetResults().ToList();

@for (var i = 0; i < results.Count; i++)
{
    // Display the hotel name and description.
    @Html.TextAreaFor(m => results[i].Document.HotelName, new { @class = "box1" })
    @Html.TextArea($"desc{1}", results[i].Document.Description, new { @class = "box2" })
}
Note
There is a minor performance hit when setting IncludeTotalCount to true, as this total needs to be calculated by Azure Cognitive Search. With complex data sets, there is a warning that the value returned is an approximation. Because the hotel search corpus is small, it will be accurate.
Compile and run the app
Now select Start Without Debugging (or press the F5 key).
Search on a string that returns plenty of results (such as "wifi"). Can you page neatly through the results?
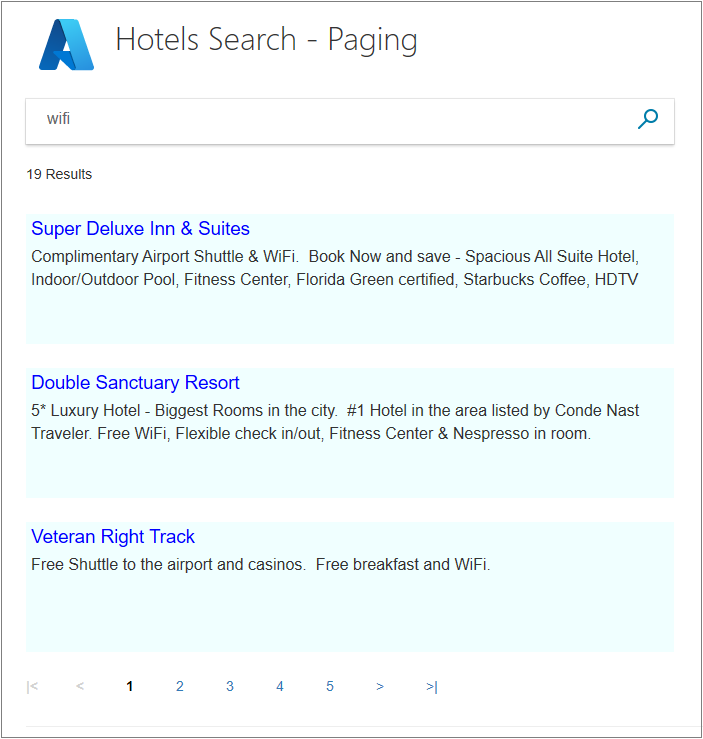
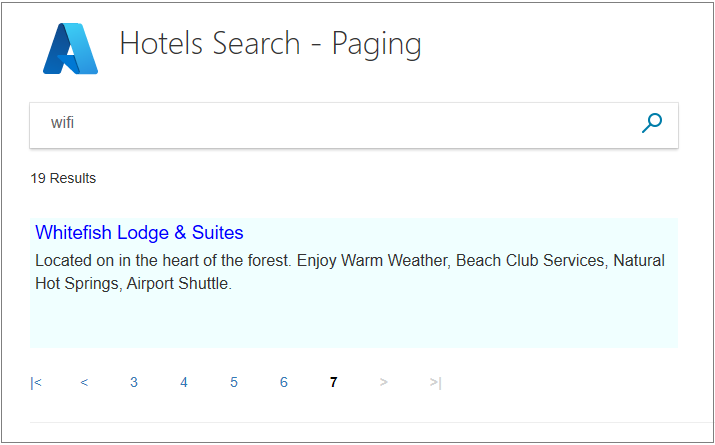
Try clicking on the right-most, and later, left-most page numbers. Do the page numbers adjust appropriately to center the page you are on?
Are the "first" and "last" options useful? Some commercial search engines use these options, and others do not.
Go to the last page of results. The last page is the only page that may contain less than ResultsPerPage results.
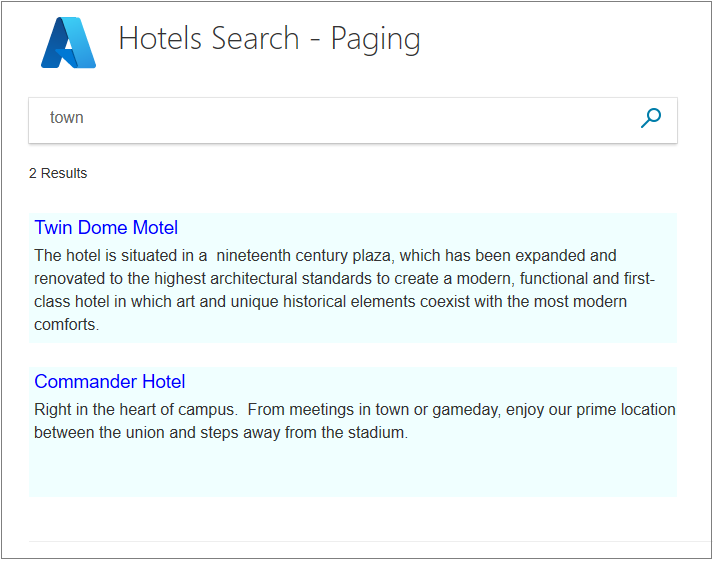
Type in "town", and click search. No paging options are displayed if the results are fewer than one page.
Save this project and continue to the next section for an alternative form of paging.
Extend your app with infinite scrolling
Infinite scrolling is triggered when a user scrolls a vertical scroll bar to the last of the results being displayed. In this event, a call to the search service is made for the next page of results. If there are no more results, nothing is returned and the vertical scroll bar does not change. If there are more results, they are appended to the current page, and the scroll bar changes to show that more results are available.
An important point to note is that the current page is not replaced, but rather extended to show the additional results. A user can always scroll back up to the first results of the search.
To implement infinite scrolling, let's start with the project before any of the page number scrolling elements were added. On GitHub, this is the FirstAzureSearchApp solution.
Add paging fields to the model
First, add a paging property to the SearchData class (in the SearchData.cs model file).
// Record if the next page is requested.
public string paging { get; set; }
This variable is a string, which holds "next" if the next page of results should be sent, or be null for the first page of a search.
In the same file, and within the namespace, add a global variable class with one property. In MVC, global variables are declared in their own static class. ResultsPerPage sets the number of results per page.
public static class GlobalVariables
{
    public static int ResultsPerPage
    {
        get
        {
            return 3;
        }
    }
}
Add a vertical scroll bar to the view
Locate the section of the index.cshtml file that displays the results (it starts with the @if (Model != null)).
Replace the section with the code below. The new <div> section is around the area that should be scrollable, and adds both an overflow-y attribute and a call to an onscroll function called "scrolled()", like so.
@if (Model != null)
{
    // Show the result count.
    <p class="sampleText">
        @Model.resultList.TotalCount Results
    </p>

    var results = Model.resultList.GetResults().ToList();

    <div id="myDiv" style="width: 800px; height: 450px; overflow-y: scroll;" onscroll="scrolled()">

        <!-- Show the hotel data. -->
        @for (var i = 0; i < results.Count; i++)
        {
            // Display the hotel name and description.
            @Html.TextAreaFor(m => results[i].Document.HotelName, new { @class = "box1" })
            @Html.TextArea($"desc{i}", results[i].Document.Description, new { @class = "box2" })
        }
Directly underneath the loop, after the </div> tag, add the scrolled function.
<script>
    function scrolled() {
        if (myDiv.offsetHeight + myDiv.scrollTop >= myDiv.scrollHeight) {
            $.getJSON("/Home/NextAsync", function (data) {
                var div = document.getElementById('myDiv');

                // Append the returned data to the current list of hotels.
                for (var i = 0; i < data.length; i += 2) {
                    div.innerHTML += '\n<textarea class="box1">' + data[i] + '</textarea>';
                    div.innerHTML += '\n<textarea class="box2">' + data[i + 1] + '</textarea>';
                }
            });
        }
    }
</script>
The if statement in the script above tests whether the user has scrolled to the bottom of the vertical scroll bar. If they have, a call to the Home controller is made to an action called NextAsync. No other information is needed by the controller, it will return the next page of data. This data is then formatted using identical HTML styles as the original page. If no results are returned, nothing is appended and things stay as they are.
Handle the Next action
There are only three actions that need to be sent to the controller: the first running of the app, which calls Index(), the first search by the user, which calls Index(model), and then the subsequent calls for more results via Next(model).
Open the home controller file and delete the RunQueryAsync method from the original tutorial.
Replace the Index(model) action with the following code. It now handles the paging field when it is null, or set to "next", and handles the call to Azure Cognitive Search.
public async Task<ActionResult> Index(SearchData model)
{
    try
    {
        InitSearch();

        int page;

        if (model.paging != null && model.paging == "next")
        {
            // Increment the page.
            page = (int)TempData["page"] + 1;

            // Recover the search text.
            model.searchText = TempData["searchfor"].ToString();
        }
        else
        {
            // First call. Check for valid text input.
            if (model.searchText == null)
            {
                model.searchText = "";
            }
            page = 0;
        }

        // Setup the search parameters.
        var options = new SearchOptions
        {
            SearchMode = SearchMode.All,

            // Skip past results that have already been returned.
            Skip = page * GlobalVariables.ResultsPerPage,

            // Take only the next page worth of results.
            Size = GlobalVariables.ResultsPerPage,

            // Include the total number of results.
            IncludeTotalCount = true
        };

        // Specify which fields to include in results.
        options.Select.Add("HotelName");
        options.Select.Add("Description");

        // For efficiency, the search call should be asynchronous, so use SearchAsync rather than Search.
        model.resultList = await _searchClient.SearchAsync<Hotel>(model.searchText, options).ConfigureAwait(false);

        // Ensure TempData is stored for the next call.
        TempData["page"] = page;
        TempData["searchfor"] = model.searchText;
    }
    catch
    {
        return View("Error", new ErrorViewModel { RequestId = "1" });
    }

    return View("Index", model);
}
Similar to the numbered paging method, we use the Skip and Size search settings to request just the data we need is returned.
Add the NextAsync action to the home controller. Notice how it returns a list, each hotel adding two elements to the list: a hotel name and a hotel description. This format is set to match the scrolled function's use of the returned data in the view.
public async Task<ActionResult> NextAsync(SearchData model)
{
    // Set the next page setting, and call the Index(model) action.
    model.paging = "next";
    await Index(model).ConfigureAwait(false);

    // Create an empty list.
    var nextHotels = new List<string>();

    // Add a hotel name, then description, to the list.
    await foreach (var searchResult in model.resultList.GetResultsAsync())
    {
        nextHotels.Add(searchResult.Document.HotelName);
        nextHotels.Add(searchResult.Document.Description);
    }

    // Rather than return a view, return the list of data.
    return new JsonResult(nextHotels);
}
If you get a syntax error on List<string>, add the following using directive to the head of the controller file.
using System.Collections.Generic;
Compile and run your project
Now select Start Without Debugging (or press the F5 key).
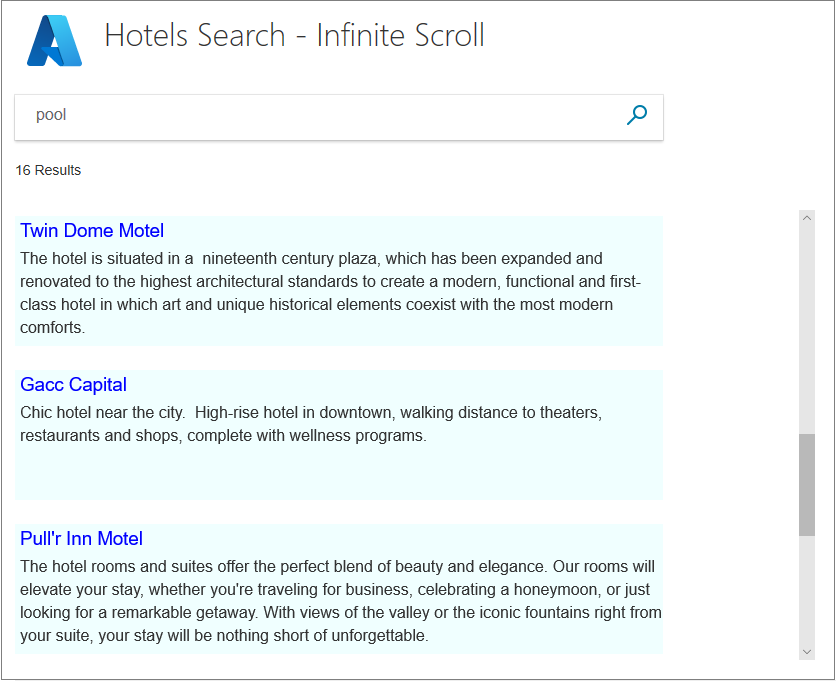
Enter a term that will give plenty of results (such as "pool") and then test the vertical scroll bar. Does it trigger a new page of results?
Tip
To ensure that a scroll bar appears on the first page, the first page of results must slightly exceed the height of the area they are being displayed in. In our example .box1 has a height of 30 pixels, .box2 has a height of 100 pixels and a bottom margin of 24 pixels. So each entry uses 154 pixels. Three entries will take up 3 x 154 = 462 pixels. To ensure that a vertical scroll bar appears, a height to the display area must be set that is smaller than 462 pixels, even 461 works. This issue only occurs on the first page, after that a scroll bar is sure to appear. The line to update is: <div id="myDiv" style="width: 800px; height: 450px; overflow-y: scroll;" onscroll="scrolled()">.
Scroll down all the way to the bottom of the results. Notice how all information is now on the one view page. You can scroll all the way back to the top without triggering any server calls.
More sophisticated infinite scrolling systems might use the mouse wheel, or similar other mechanism, to trigger the loading of a new page of results. We will not be taking infinite scrolling any further in these tutorials, but it has a certain charm to it as it avoids extra mouse clicks, and you might want to investigate other options further.
Takeaways
Consider the following takeaways from this project:
- Numbered paging is useful for searches where the order of the results is somewhat arbitrary, meaning there may well be something of interest to your users on the later pages.
- Infinite scrolling is useful when the order of results is particularly important. For example, if the results are ordered on the distance from the center of a destination city.
- Numbered paging allows for better navigation. For example, a user can remember that an interesting result was on page 6, whereas no such easy reference exists in infinite scrolling.
- Infinite scrolling has an easy appeal, scrolling up and down with no page numbers to click on.
- A key feature of infinite scrolling is that results are appended to an existing page, not replacing that page, which is efficient.
- Temporary storage persists for only one call, and needs to be reset to survive additional calls.
Next steps
Paging is fundamental to a search experience. With paging well covered, the next step is to improve the user experience further by adding type-ahead searches.