Ingest Google Cloud Platform log data into Microsoft Sentinel
Organizations are increasingly moving to multicloud architectures, whether by design or due to ongoing requirements. A growing number of these organizations use applications and store data on multiple public clouds, including the Google Cloud Platform (GCP).
This article describes how to ingest GCP data into Microsoft Sentinel to get full security coverage and analyze and detect attacks in your multicloud environment.
With the GCP Pub/Sub connectors, based on our Codeless Connector Platform (CCP), you can ingest logs from your GCP environment using the GCP Pub/Sub capability:
The Google Cloud Platform (GCP) Pub/Sub Audit Logs connector collects audit trails of access to GCP resources. Analysts can monitor these logs to track resource access attempts and detect potential threats across the GCP environment.
The Google Cloud Platform (GCP) Security Command Center connector collects findings from Google Security Command Center, a robust security and risk management platform for Google Cloud. Analysts can view these findings to gain insights into the organization's security posture, including asset inventory and discovery, detections of vulnerabilities and threats, and risk mitigation and remediation.
Important
The GCP Pub/Sub connectors are currently in PREVIEW. The Azure Preview Supplemental Terms include additional legal terms that apply to Azure features that are in beta, preview, or otherwise not yet released into general availability.
Prerequisites
Before you begin, verify that you have the following:
- The Microsoft Sentinel solution is enabled.
- A defined Microsoft Sentinel workspace exists.
- A GCP environment exists and contains resources producing one of the following log type you want to ingest:
- GCP audit logs
- Google Security Command Center findings
- Your Azure user has the Microsoft Sentinel Contributor role.
- Your GCP user has access to create and edit resources in the GCP project.
- The GCP Identity and Access Management (IAM) API and the GCP Cloud Resource Manager API are both enabled.
Set up GCP environment
There are two things you need to set up in your GCP environment:
Set up Microsoft Sentinel authentication in GCP by creating the following resources in the GCP IAM service:
- Workload identity pool
- Workload identity provider
- Service account
- Role
Set up log collection in GCP and ingestion into Microsoft Sentinel by creating the following resources in the GCP Pub/Sub service:
- Topic
- Subscription for the topic
You can set up the environment in one of two ways:
Create GCP resources via the Terraform API: Terraform provides APIs for resource creation and for Identity and Access Management (see Prerequisites). Microsoft Sentinel provides Terraform scripts that issue the necessary commands to the APIs.
Set up GCP environment manually, creating the resources yourself in the GCP console.
Note
There is no Terraform script available for creating GCP Pub/Sub resources for log collection from Security Command Center. You must create these resources manually. You can still use the Terraform script to create the GCP IAM resources for authentication.
Important
If you're creating resources manually, you must create all the authentication (IAM) resources in the same GCP project, otherwise it won't work. (Pub/Sub resources can be in a different project.)
GCP Authentication Setup
Open GCP Cloud Shell.
Select the project you want to work with, by typing the following command in the editor:
gcloud config set project {projectId}Copy the Terraform authentication script provided by Microsoft Sentinel from the Sentinel GitHub repository into your GCP Cloud Shell environment.
Open the Terraform GCPInitialAuthenticationSetup script file and copy its contents.
Note
For ingesting GCP data into an Azure Government cloud, use this authentication setup script instead.
Create a directory in your Cloud Shell environment, enter it, and create a new blank file.
mkdir {directory-name} && cd {directory-name} && touch initauth.tfOpen initauth.tf in the Cloud Shell editor and paste the contents of the script file into it.
Initialize Terraform in the directory you created by typing the following command in the terminal:
terraform initWhen you receive the confirmation message that Terraform was initialized, run the script by typing the following command in the terminal:
terraform applyWhen the script prompts for your Microsoft tenant ID, copy and paste it into the terminal.
Note
You can find and copy your tenant ID on the GCP Pub/Sub Audit Logs connector page in the Microsoft Sentinel portal, or in the Portal settings screen (accessible anywhere in the Azure portal by selecting the gear icon along the top of the screen), in the Directory ID column.

When asked if a workload Identity Pool has already been created for Azure, answer yes or no accordingly.
When asked if you want to create the resources listed, type yes.

When the output from the script is displayed, save the resources parameters for later use.
GCP Audit Logs Setup
The instructions in this section are for using the Microsoft Sentinel GCP Pub/Sub Audit Logs connector.
See the instructions in the next section for using the Microsoft Sentinel GCP Pub/Sub Security Command Center connector.
Copy the Terraform audit log setup script provided by Microsoft Sentinel from the Sentinel GitHub repository into a different folder in your GCP Cloud Shell environment.
Open the Terraform GCPAuditLogsSetup script file and copy its contents.
Note
For ingesting GCP data into an Azure Government cloud, use this audit log setup script instead.
Create another directory in your Cloud Shell environment, enter it, and create a new blank file.
mkdir {other-directory-name} && cd {other-directory-name} && touch auditlog.tfOpen auditlog.tf in the Cloud Shell editor and paste the contents of the script file into it.
Initialize Terraform in the new directory by typing the following command in the terminal:
terraform initWhen you receive the confirmation message that Terraform was initialized, run the script by typing the following command in the terminal:
terraform applyTo ingest logs from an entire organization using a single Pub/Sub, type:
terraform apply -var="organization-id= {organizationId} "When asked if you want to create the resources listed, type yes.
When the output from the script is displayed, save the resources parameters for later use.
Wait five minutes before moving to the next step.
If you're also setting up the GCP Pub/Sub Security Command Center connector, continue with the next section.
Otherwise, skip to Set up the GCP Pub/Sub connector in Microsoft Sentinel.
GCP Security Command Center setup
The instructions in this section are for using the Microsoft Sentinel GCP Pub/Sub Security Command Center connector.
See the instructions in the previous section for using the Microsoft Sentinel GCP Pub/Sub Audit Logs connector.
Configure continuous export of findings
Follow the instructions in the Google Cloud documentation to configure Pub/Sub exports of future SCC findings to the GCP Pub/Sub service.
When asked to select a project for your export, select a project you created for this purpose, or create a new project.
When asked to select a Pub/Sub topic where you want to export your findings, follow the instructions above to create a new topic.
Set up the GCP Pub/Sub connector in Microsoft Sentinel
Open the Azure portal and navigate to the Microsoft Sentinel service.
In the Content hub, in the search bar, type Google Cloud Platform Audit Logs.
Install the Google Cloud Platform Audit Logs solution.
Select Data connectors, and in the search bar, type GCP Pub/Sub Audit Logs.
Select the GCP Pub/Sub Audit Logs (Preview) connector.
In the details pane, select Open connector page.
In the Configuration area, select Add new collector.

In the Connect a new collector panel, type the resource parameters you created when you created the GCP resources.
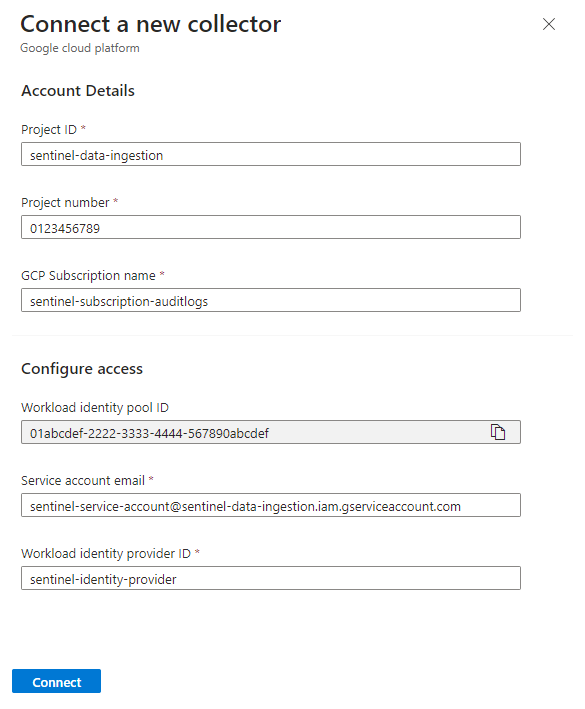
Make sure that the values in all the fields match their counterparts in your GCP project (the values in the screenshot are samples, not literals), and select Connect.

Verify that the GCP data is in the Microsoft Sentinel environment
To ensure that the GCP logs were successfully ingested into Microsoft Sentinel, run the following query 30 minutes after you finish to set up the connector.
GCPAuditLogs | take 10Enable the health feature for data connectors.
Next steps
In this article, you learned how to ingest GCP data into Microsoft Sentinel using the GCP Pub/Sub connectors. To learn more about Microsoft Sentinel, see the following articles:
- Learn how to get visibility into your data, and potential threats.
- Get started detecting threats with Microsoft Sentinel.
- Use workbooks to monitor your data.
Feedback
Coming soon: Throughout 2024 we will be phasing out GitHub Issues as the feedback mechanism for content and replacing it with a new feedback system. For more information see: https://aka.ms/ContentUserFeedback.
Submit and view feedback for