Note
Access to this page requires authorization. You can try signing in or changing directories.
Access to this page requires authorization. You can try changing directories.
This article provides step-by-step instructions on how to enable network security on the storage resources integrated with your Azure Storage connector. Azure network security perimeter (NSP) is an Azure-native feature that creates a logical isolation boundary for your PaaS resources. By associating resources like storage accounts or databases with an NSP, you can centrally manage network access using a simplified rule set. For more information, see Network security perimeter concepts.
Prerequisites
Before enabling network security, create your connector resources. See Set up your Azure Storage Connector to stream logs to Microsoft Sentinel, including the Event Grid system topic used to stream blob creation events to the Azure Storage queue.
To complete this setup, ensure you have the following permissions:
- Subscription Owner or Contributor to create network security perimeter resources.
- Storage Account Contributor to associate the storage account with the NSP.
- Storage Account User Access Administrator or Owner to assign RBAC roles to the Event Grid managed identity.
- Event Grid Contributor to enable managed identity and manage event subscriptions.
Enable Network Security
To enable network security on the storage resources integrated with your Azure Storage connector, create a Network Security Perimeter (NSP), associate the storage account with it, and configure the rules to allow traffic from Event Grid and other required sources while blocking unauthorized access. Use the following steps to complete the configuration.
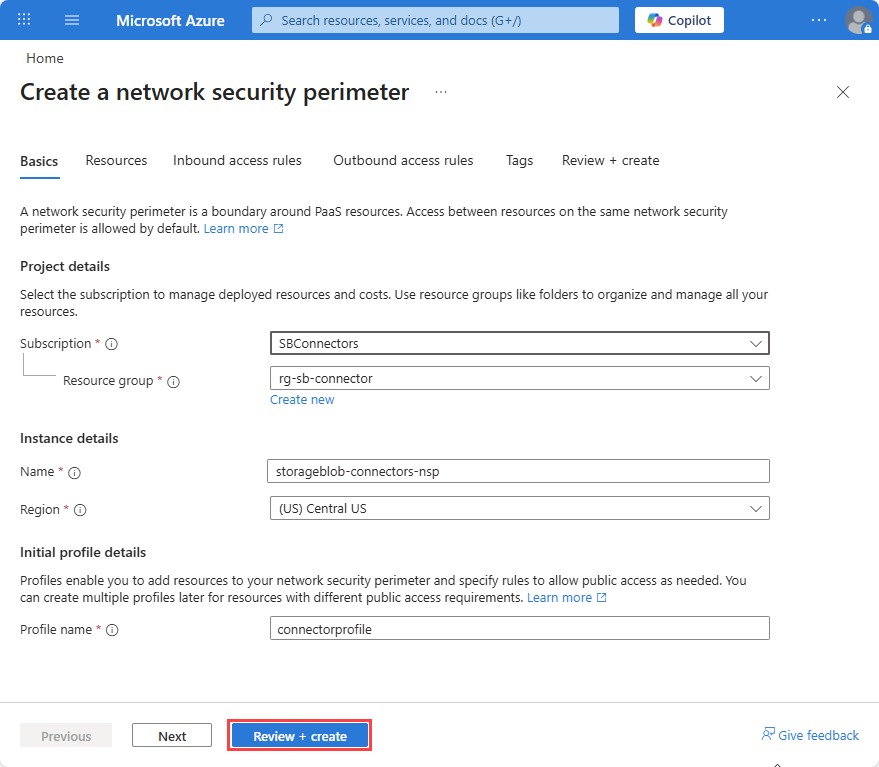
Create a Network Security Perimeter
In the Azure portal, search for Network Security Perimeters
Select Create.
Select a Subscription and Resource group.
Enter Name, for example
storageblob-connectors-nspSelect a Region. The region must be the same region as the storage account.
Enter a Profile name or accept the default. The profile defines the set of rules that are applied to associated resources. You can have multiple profiles within a single NSP to apply different rules to different resources if required.
Select Review + create and then Create.

Associate the Storage Account with the Network Security Perimeter
Open your newly created Network Security Perimeter resource in the Azure portal.
Select Profiles, then select the profile name you used when creating the NSP resource.
Select Associated resources.
Select Add.
Search for and add your storage account, then select Select.
Select Associate.
The access mode is set to Transition by default, allowing you to validate the configuration before enforcing restrictions.

Enable System-Assigned Identity on Event Grid System Topic
From your storage account, navigate to the Events tab.
Select the System Topic used to stream blob creation events to the storage queue.
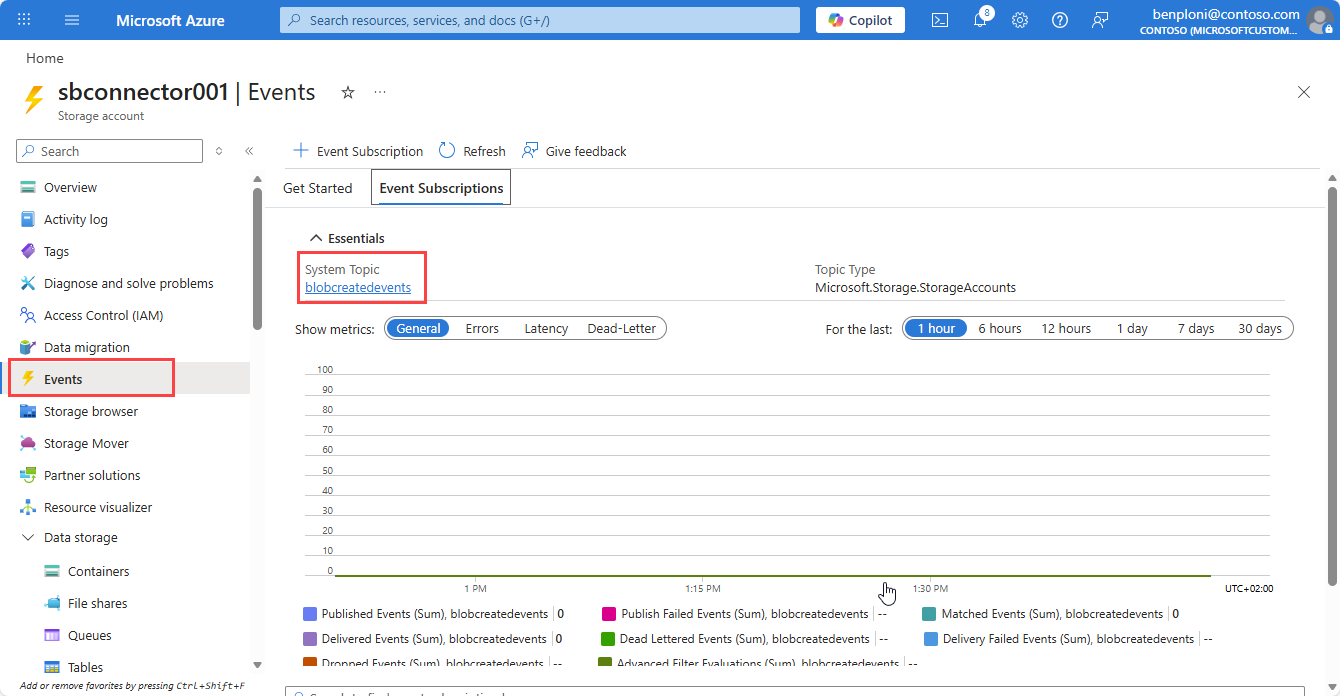
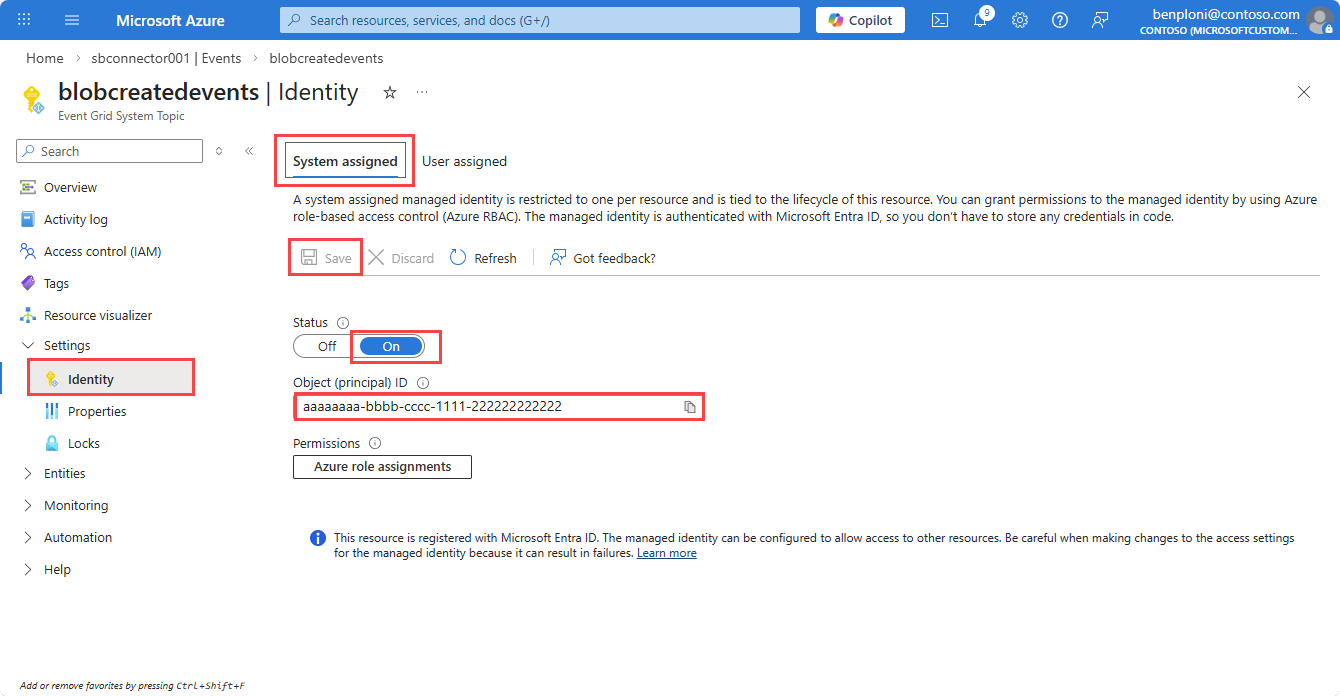
Select Identity.
On the System assigned tab, set the Status to On.
Select Save, then copy the Object ID of the managed identity for later use.


Grant RBAC permissions on the Storage Queue
Navigate to your Storage Account.
Select Access Control (IAM).
Select Add.
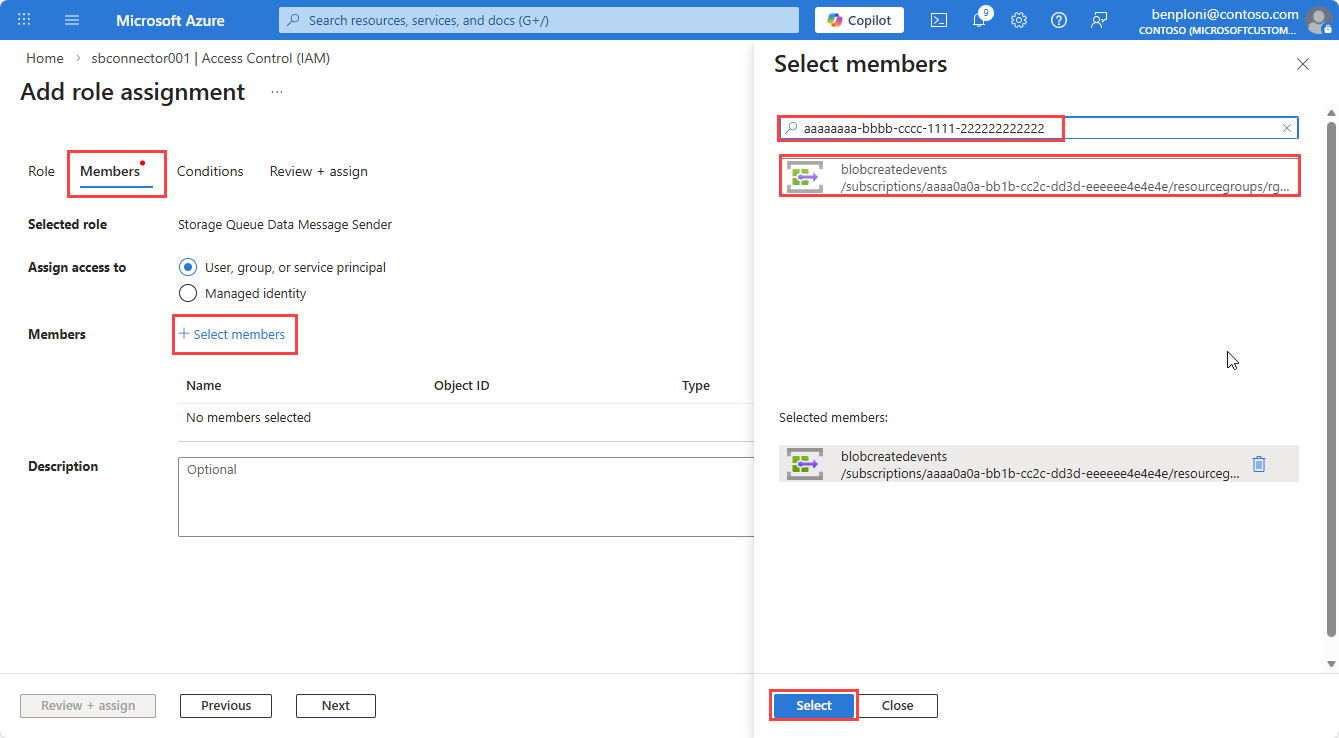
Search for and select the Storage Queue Data Message Sender role (scope: the storage account).
Select the Members tab and then Select members.
In the Select members pane, paste the Object ID for the Event Grid system topic managed identity created in the previous step.
Select the managed identity and then select Select.
Select Review + assign to complete the role assignment.

Enable Managed Identity on the event subscription
Open the Event Grid System Topic.
Select the event subscription that targets the queue.
Select the Additional settings tab.
Set Managed identity type to System-assigned.
Select Save.
Review the Event Grid subscription metrics to validate messages are successfully published to the storage queue after this update.

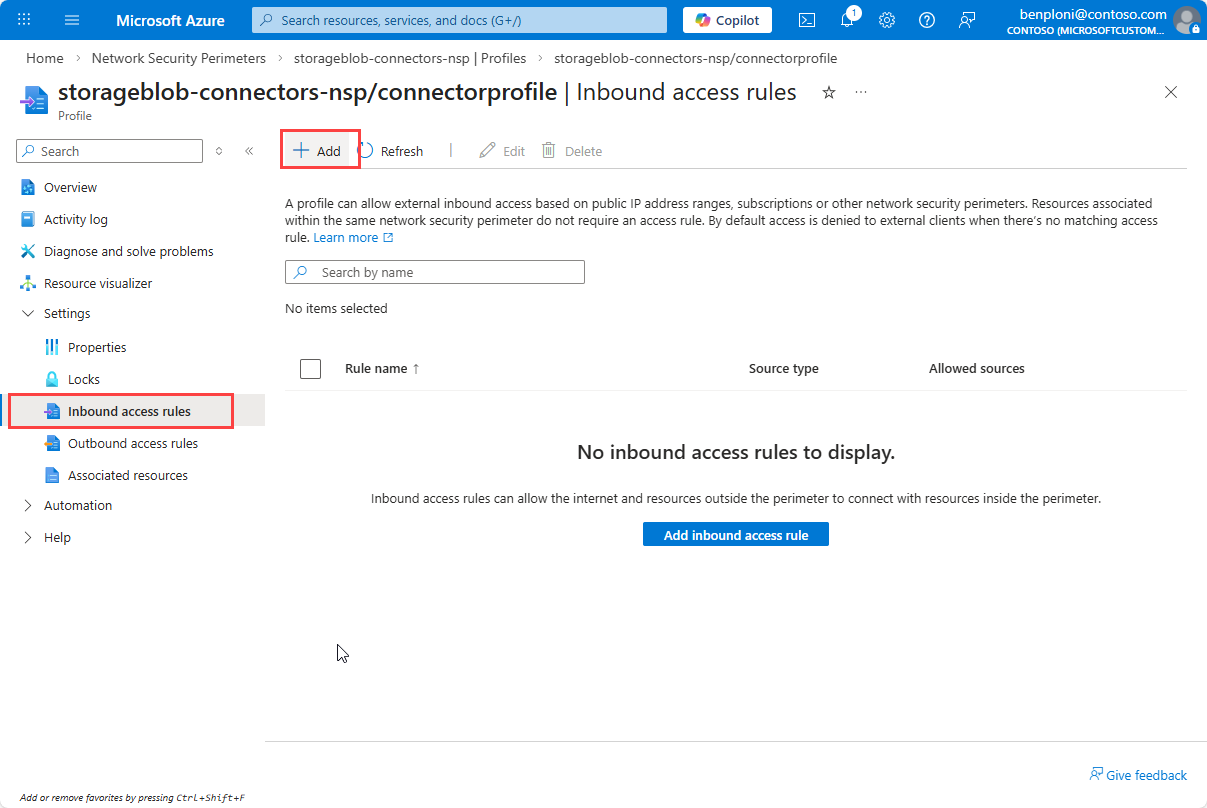
Configure Inbound Access rules on the Network Security Perimeter profile
The following rules are required to allow Event Grid to deliver messages to the storage account while blocking unauthorized access. Depending on the system sending data to the storage account or accessing the storage resources, you may need to add additional inbound rules. Review your scenario and traffic patterns to safely apply the necessary rules, and allow time for rule propagation.
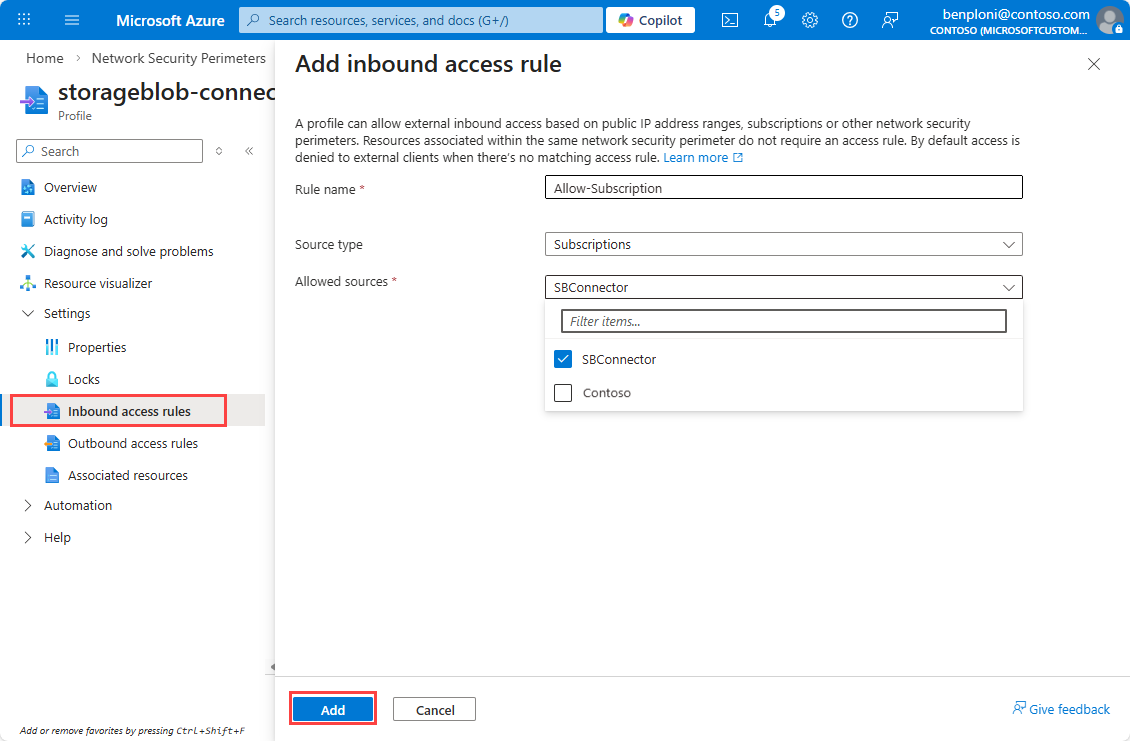
Rule 1: Allow the Subscription (Event Grid Delivery)
Event Grid delivery doesn't originate from fixed public IPs. The NSP validates delivery using subscription identity.
Navigate to Network Security Perimeter and select your NSP.
Select Profiles and then select the profile associated with your storage account.
Select Inbound access rules and then select Add.
Enter a Rule name, for example
Allow-Subscription.Select Subscription from the Source type drop-down.
Select your subscription from the Allowed Sources drop-down.
Select Add to create the rule.


Note
Rules can take a few minutes to appear in the list after creation.
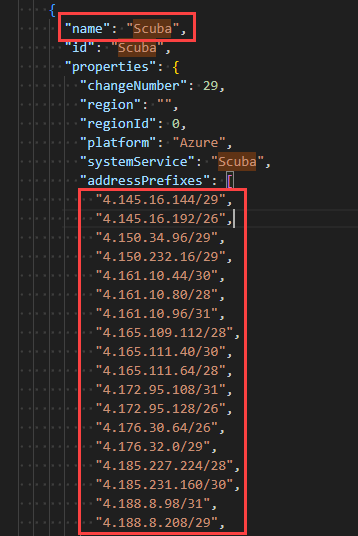
Rule 2: Allow Scuba service IP ranges
Create a second Inbound access rules.
Enter a Rule name, for example
Allow-Scuba.Select IP address ranges from the Source type drop-down.
Open the service tag download page.
Select your cloud, for example Azure Public.
Select the Download button and open the downloaded file to get the list of IP ranges.
Find the
Scubaservice tag and copy the associated IPv4 ranges.Paste the IPv4 ranges into the Allowed Sources field after removing any quotes and trailing commas.
Select Add to create the rule.
Important
Remove the quotes from the IP ranges and ensure that there's no trailing comma on the last entry before pasting them into the Allowed Sources field. Service tag ranges update over time; refresh regularly to keep rules current.

Validate and enforce
After configuring the rules, monitor the diagnostic logs for the Network Security Perimeter to validate that legitimate traffic is allowed and there are no disruptions. Once you have confirmed that the rules are correctly allowing necessary traffic, you can switch from Transition mode to Enforced mode to block unauthorized access.
Transition mode
Enable Network Security Perimeter diagnostic logs and review collected telemetry to validate communication patterns before enforcement. For more information, see Diagnostic logs for Network Security Perimeter.
Apply Enforcement mode
Once validation is successful, set the access mode to Enforced as follows:
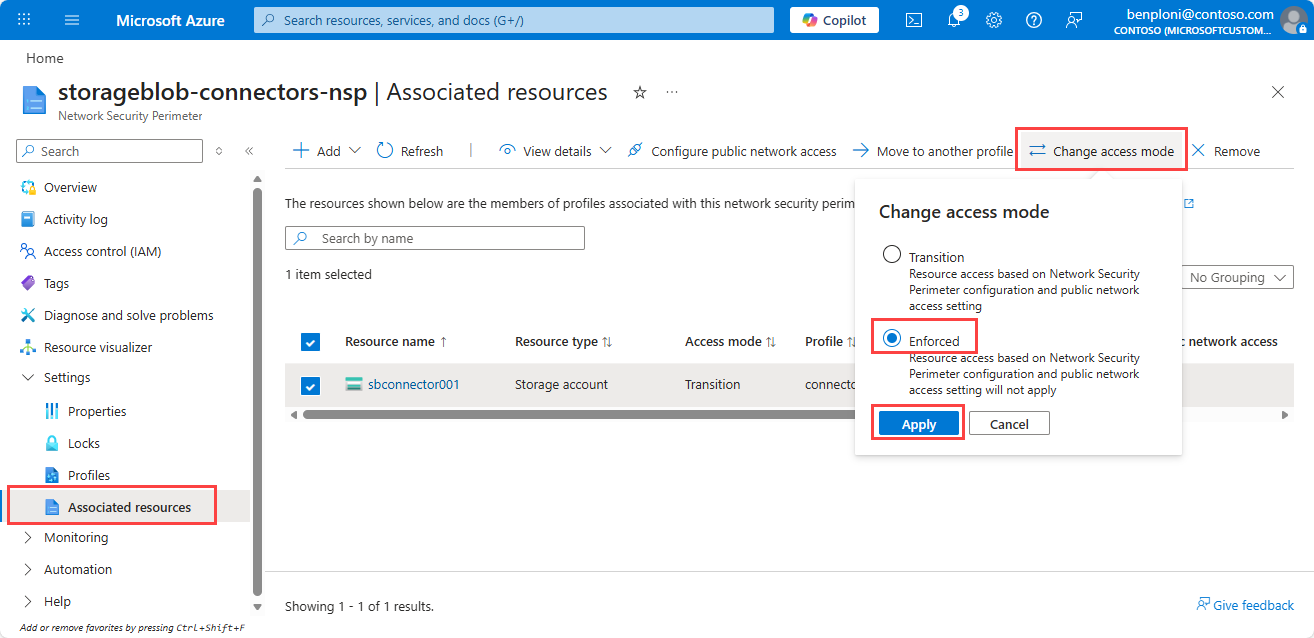
From the Network Security Perimeter page, under Settings, select Associated resources.
Select the storage account.
Select Change access mode.
Select Enforced and then Save.

Post-enforcement validation
Following enforcement, monitor the environment closely for any blocked traffic that may indicate misconfigurations. Validate the Event Grid configuration isn't impacted by reviewing the Event Grid system topic subscription metrics.
Use the diagnostic logs to investigate and resolve any issues that arise. Review the metrics on the storage account (queue ingress and errors) and Event Grid (delivery success) to validate for any errors. Roll back to Transition Mode if you experience any disruption and repeat investigation using the diagnostic logs.
Set Secured by Perimeter on the Storage Account (Optional)
Setting the storage account to Secured by Perimeter ensures that all traffic to the storage account is evaluated against the Network Security Perimeter rules and blocks public network access.
Navigate to your Storage Account.
Under Security + networking, select Networking.
Under Public network access, select Manage.
Set Secured by Perimeter (Most restricted).
Select Save.

Next steps
In this article, you learned how to enable network security on the storage resources integrated with your Azure Storage connector. For more information, see the Network Security Perimeter articles.
- Review data-connection rules in
data-connection-rules-reference-azure-storage.md. - Troubleshoot connector networking issues in
azure-storage-blob-connector-troubleshoot.md.