Note
Access to this page requires authorization. You can try signing in or changing directories.
Access to this page requires authorization. You can try changing directories.
NServiceBus is a commercial messaging framework provided by Particular Software. It's built on top of Azure Service Bus and helps developers focus on business logic by abstracting infrastructure concerns. In this guide, we'll build a solution that exchanges messages between two services. We'll also show how to automatically retry failing messages and review options for hosting these services in Azure.
Note
The code for this tutorial is available on the Particular Software Docs web site.
Prerequisites
The sample assumes you've created an Azure Service Bus namespace.
Important
NServiceBus requires at least the Standard tier. The Basic tier won't work.
Download and prepare the solution
Download the code from the Particular Software Docs web site. The solution
SendReceiveWithNservicebus.slnconsists of three projects:- Sender: a console application that sends messages
- Receiver: a console application that receives messages from the sender and replies back
- Shared: a class library containing the message contracts shared between the sender and receiver
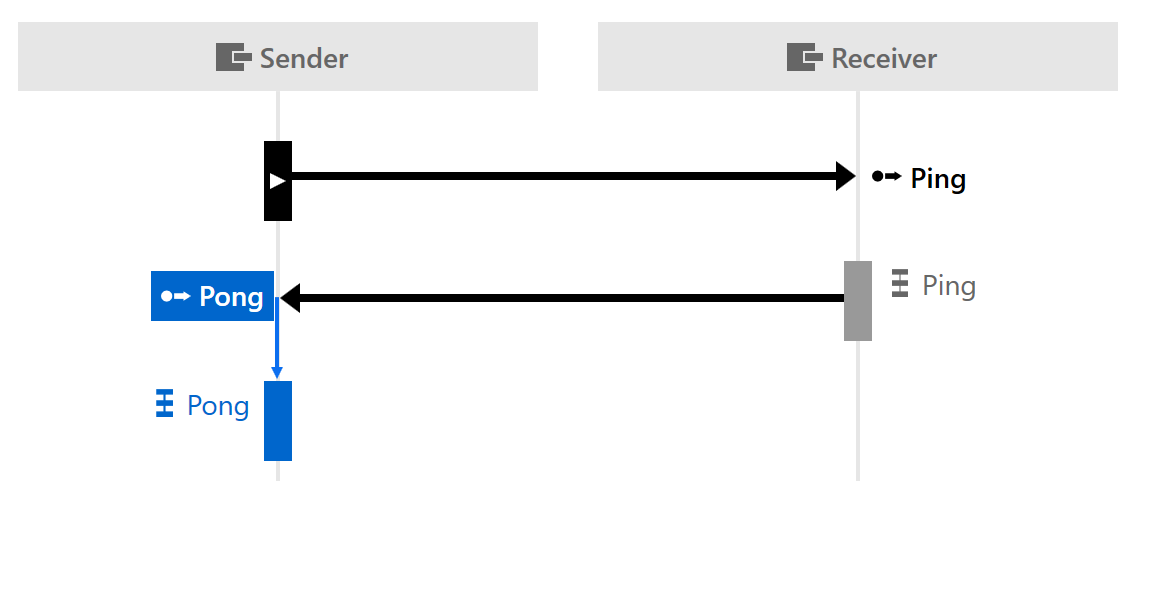
The following diagram, generated by ServiceInsight, a visualization and debugging tool from Particular Software, shows the message flow:
Open
SendReceiveWithNservicebus.slnin your favorite code editor (For example, Visual Studio 2022).Open
appsettings.jsonin both the Receiver and Sender projects and setAzureServiceBusConnectionStringto the connection string for your Azure Service Bus namespace.- This can be found in the Azure portal under Service Bus Namespace > Settings > Shared access policies > RootManageSharedAccessKey > Primary Connection String .
- The
AzureServiceBusTransportalso has a constructor that accepts a namespace and token credential, which in a production environment will be more secure, however for the purposes of this tutorial the shared access key connection string will be used.
Define the shared message contracts
The Shared class library is where you define the contracts used to send our messages. It includes a reference to the NServiceBus NuGet package, which contains interfaces you can use to identify our messages. The interfaces aren't required, but they give us some extra validation from NServiceBus and allow the code to be self-documenting.
First we'll review the Ping.cs class
public class Ping : NServiceBus.ICommand
{
    public int Round { get; set; }
}
The Ping class defines a message that the Sender sends to the Receiver. It's a simple C# class that implements NServiceBus.ICommand, an interface from the NServiceBus package. This message is a signal to the reader and to NServiceBus that it's a command, although there are other ways to identify messages without using interfaces.
The other message class in the Shared projects is Pong.cs:
public class Pong : NServiceBus.IMessage
{
    public string Acknowledgement { get; set; }
}
Pong is also a simple C# object though this one implements NServiceBus.IMessage. The IMessage interface represents a generic message that is neither a command nor an event, and is commonly used for replies. In our sample, it's a reply that the Receiver sends back to the Sender to indicate that a message was received.
The Ping and Pong are the two message types you'll use. The next step is to configure the Sender to use Azure Service Bus and to send a Ping message.
Set up the sender
The Sender is an endpoint that sends our Ping message. Here, you configure the Sender to use Azure Service Bus as the transport mechanism, then construct a Ping instance and send it.
In the Main method of Program.cs, you configure the Sender endpoint:
var host = Host.CreateDefaultBuilder(args)
    // Configure a host for the endpoint
    .ConfigureLogging((context, logging) =>
    {
        logging.AddConfiguration(context.Configuration.GetSection("Logging"));

        logging.AddConsole();
    })
    .UseConsoleLifetime()
    .UseNServiceBus(context =>
    {
        // Configure the NServiceBus endpoint
        var endpointConfiguration = new EndpointConfiguration("Sender");

        var connectionString = context.Configuration.GetConnectionString("AzureServiceBusConnectionString");
        // If token credentials are to be used, the overload constructor for AzureServiceBusTransport would be used here
        var routing = endpointConfiguration.UseTransport(new AzureServiceBusTransport(connectionString));
        endpointConfiguration.UseSerialization<SystemJsonSerializer>();

        endpointConfiguration.AuditProcessedMessagesTo("audit");
        routing.RouteToEndpoint(typeof(Ping), "Receiver");

        endpointConfiguration.EnableInstallers();

        return endpointConfiguration;
    })
    .ConfigureServices(services => services.AddHostedService<SenderWorker>())
    .Build();

await host.RunAsync();
There's a lot to unpack here so we'll review it step by step.
Configure a host for the endpoint
Hosting and logging are configured using standard Microsoft Generic Host options. For now, the endpoint is configured to run as a console application but it can be modified to run in Azure Functions with minimal changes, which we'll discuss later in this article.
Configure the NServiceBus endpoint
Next, you tell the host to use NServiceBus with the .UseNServiceBus(…) extension method. The method takes a callback function that returns an endpoint that will be started when the host runs.
In the endpoint configuration, you specify AzureServiceBus for our transport, providing a connection string from appsettings.json. Next, you'll set up the routing so that messages of type Ping are sent to an endpoint named "Receiver". It allows NServiceBus to automate the process of dispatching the message to the destination without requiring the receiver's address.
The call to EnableInstallers will set up our topology in the Azure Service Bus namespace when the endpoint is launched, creating the required queues where necessary. In production environments, operational scripting is another option to create the topology.
Set up background service to send messages
The final piece of the sender is SenderWorker, a background service that is configured to send a Ping message every second.
public class SenderWorker : BackgroundService
{
    private readonly IMessageSession messageSession;
    private readonly ILogger<SenderWorker> logger;

    public SenderWorker(IMessageSession messageSession, ILogger<SenderWorker> logger)
    {
        this.messageSession = messageSession;
        this.logger = logger;
    }

    protected override async Task ExecuteAsync(CancellationToken stoppingToken)
    {
        try
        {
            var round = 0;
            while (!stoppingToken.IsCancellationRequested)
            {
                await messageSession.Send(new Ping { Round = round++ });

                logger.LogInformation($"Message #{round}");

                await Task.Delay(1_000, stoppingToken);
            }
        }
        catch (OperationCanceledException)
        {
            // graceful shutdown
        }
    }
}
The IMessageSession used in ExecuteAsync is injected into SenderWorker and allows us to send messages using NServiceBus outside of a message handler. The routing you configured in Sender specifies the destination of the Ping messages. It keeps the topology of the system (which messages are routed to which addresses) as a separate concern from the business code.
The Sender application also contains a PongHandler. You'll get back to it after we've discussed the Receiver, which we'll do next.
Set up the receiver
The Receiver is an endpoint that listens for a Ping message, logs when a message is received, and replies back to the sender. In this section, we'll quickly review the endpoint configuration, which is similar to the Sender, and then turn our attention to the message handler.
Like the sender, set up the receiver as a console application using the Microsoft Generic Host. It uses the same logging and endpoint configuration (with Azure Service Bus as the message transport) but with a different name, to distinguish it from the sender:
var endpointConfiguration = new EndpointConfiguration("Receiver");
Since this endpoint only replies to its originator and doesn't start new conversations, no routing configuration is required. It also doesn't need a background worker like the Sender does, since it only replies when it receives a message.
The Ping message handler
The Receiver project contains a message handler named PingHandler:
public class PingHandler : NServiceBus.IHandleMessages<Ping>
{
    private readonly ILogger<PingHandler> logger;

    public PingHandler(ILogger<PingHandler> logger)
    {
        this.logger = logger;
    }

    public async Task Handle(Ping message, IMessageHandlerContext context)
    {
        logger.LogInformation($"Processing Ping message #{message.Round}");

        // throw new Exception("BOOM");

        var reply = new Pong { Acknowledgement = $"Ping #{message.Round} processed at {DateTimeOffset.UtcNow:s}" };

        await context.Reply(reply);
    }
}
Let's ignore the commented code for now; we'll get back to it later when we talk about recovering from failure.
The class implements IHandleMessages<Ping>, which defines one method: Handle. This interface tells NServiceBus that when the endpoint receives a message of type Ping, it should be processed by the Handle method in this handler. The Handle method takes the message itself as a parameter, and an IMessageHandlerContext, which allows further messaging operations, such as replying, sending commands, or publishing events.
Our PingHandler is straightforward: when a Ping message is received, log the message details and reply back to the sender with a new Pong message, which is subsequently handled in the Sender's PongHandler.
Note
In the Sender's configuration, you specified that Ping messages should be routed to the Receiver. NServiceBus adds metadata to the messages indicating, among other things, the origin of the message. This is why you don't need to specify any routing data for the Pong reply message; it's automatically routed back to its origin: the Sender.
With the Sender and Receiver both properly configured, you can now run the solution.
Run the solution
To launch the solution, you need to run both the Sender and the Receiver. If you're using Visual Studio Code, launch the "Debug All" configuration. If you're using Visual Studio, configure the solution to launch both the Sender and Receiver projects:
- Right-click the solution in Solution Explorer
- Select "Set Startup Projects..."
- Select Multiple startup projects
- For both the Sender and the Receiver, select "Start" in the dropdown list
Launch the solution. Two console applications will appear, one for the Sender and one for the Receiver.
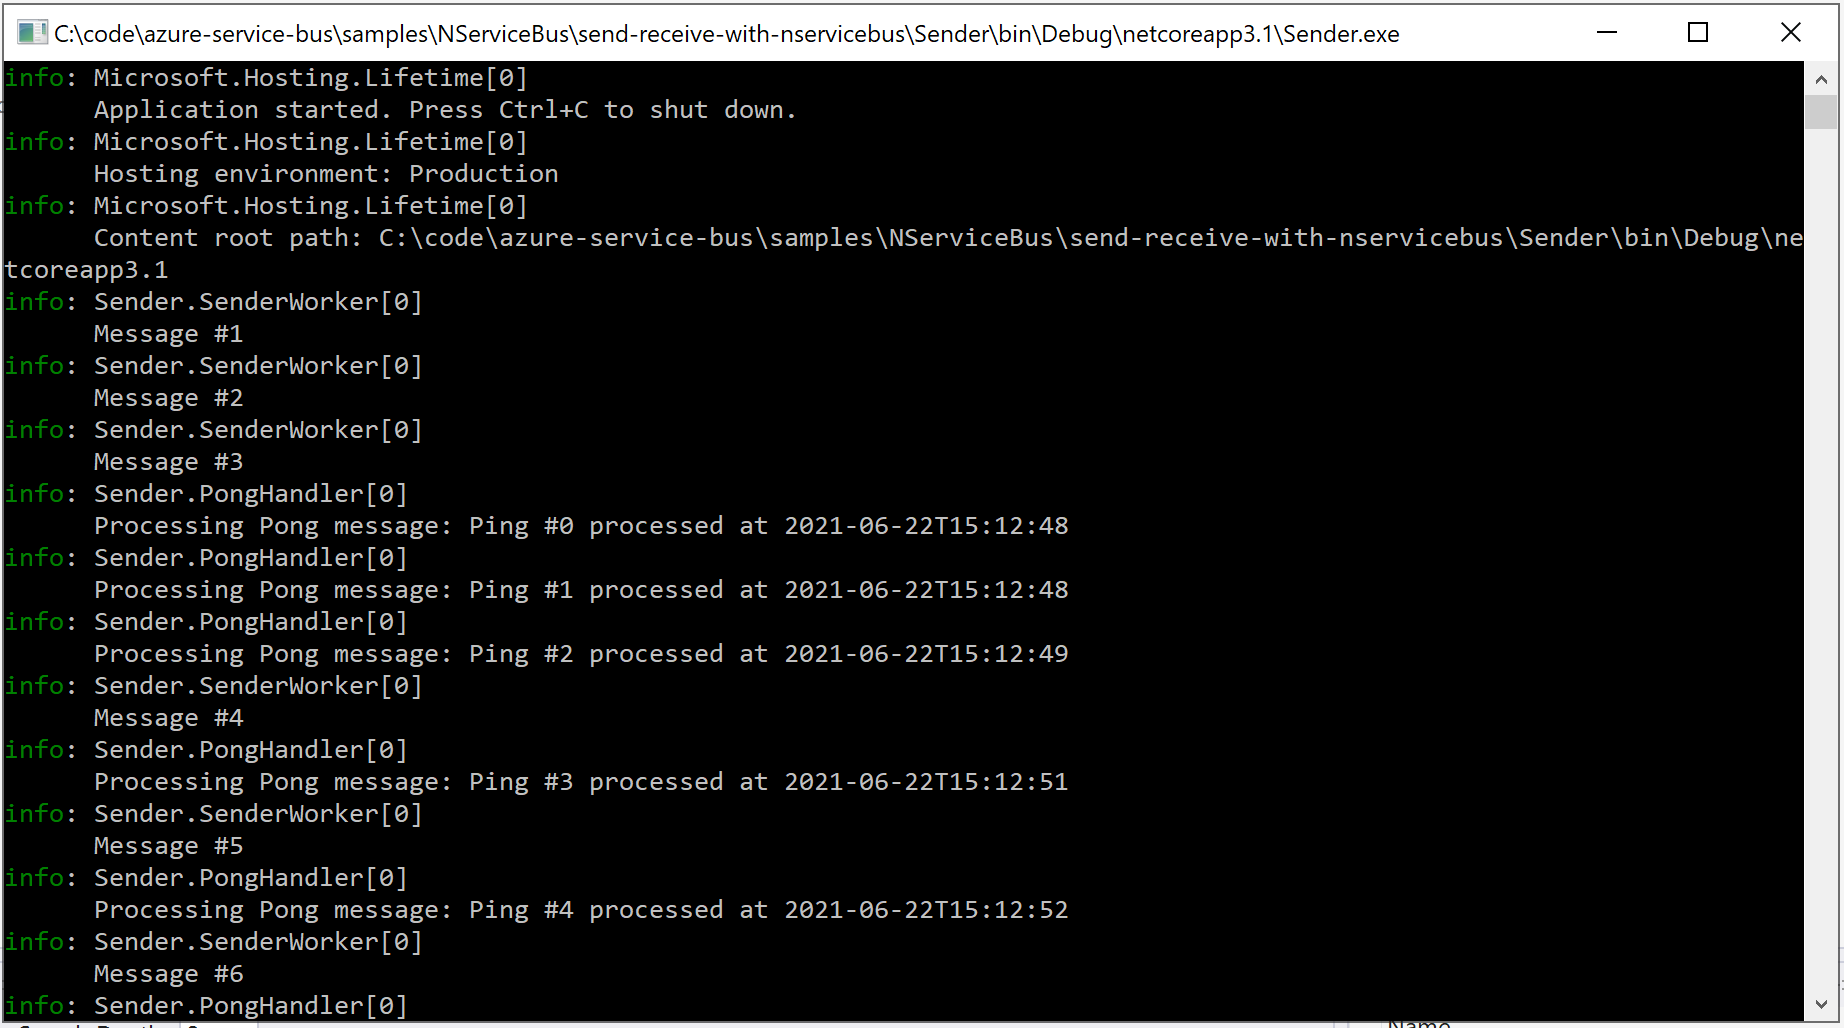
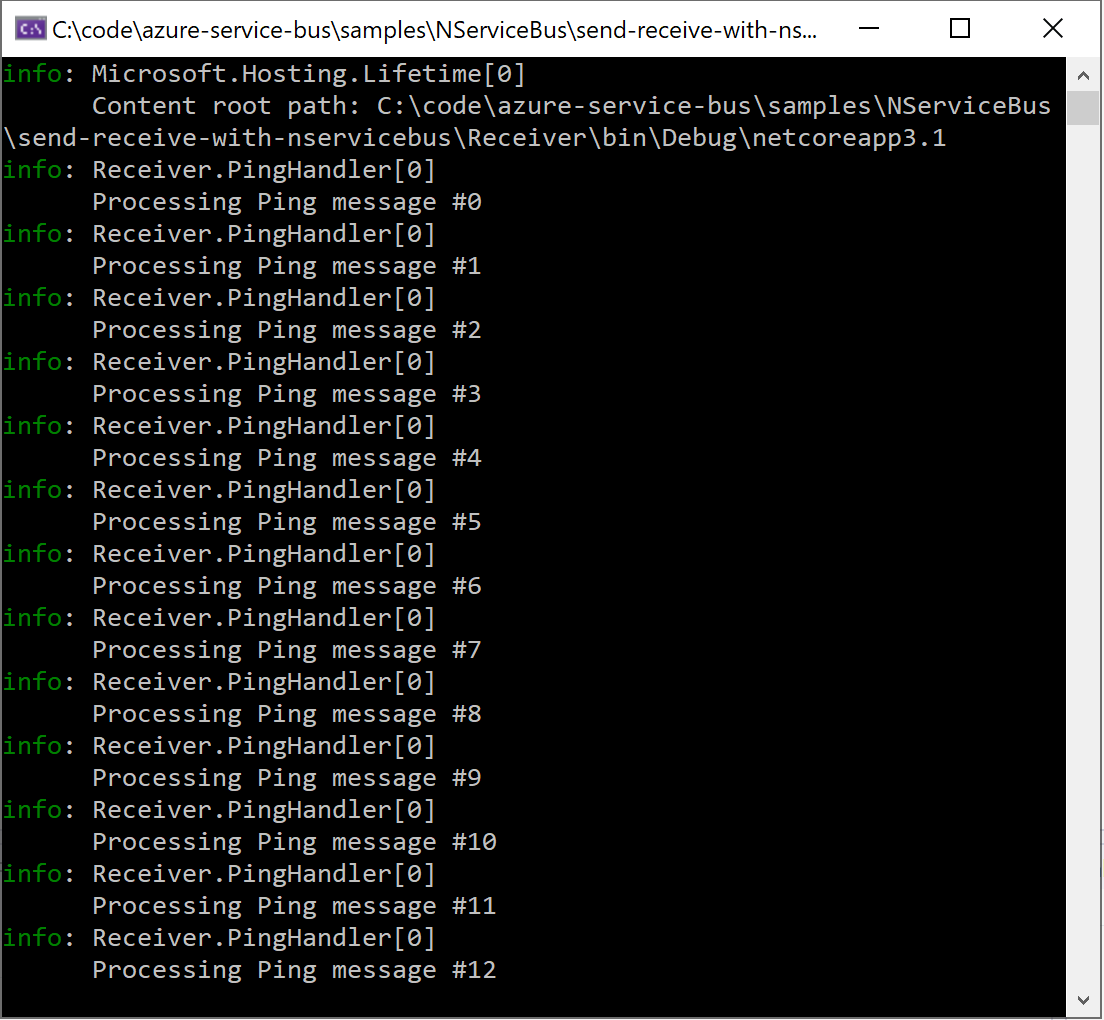
In the Sender, notice that a Ping message is dispatched every second, thanks to the SenderWorker background job. The Receiver displays the details of each Ping message it receives and the Sender logs the details of each Pong message it receives in reply.
Now that you have everything working, let's break it.
Resilience in action
Errors are a fact of life in software systems. It's inevitable that code will fail and it can do so for various reasons, such as network failures, database locks, changes in a third-party API, and plain old coding errors.
NServiceBus has robust recoverability features for handling failures. When a message handler fails, messages are automatically retried based on a predefined policy. There are two types of retry policy: immediate retries and delayed retries. The best way to describe how they work is to see them in action. Let's add a retry policy to our Receiver endpoint:
- Open
Program.csin the Sender project - After the
.EnableInstallersline, add the following code:
endpointConfiguration.SendFailedMessagesTo("error");
var recoverability = endpointConfiguration.Recoverability();
recoverability.Immediate(
    immediate =>
    {
        immediate.NumberOfRetries(3);
    });
recoverability.Delayed(
    delayed =>
    {
        delayed.NumberOfRetries(2);
        delayed.TimeIncrease(TimeSpan.FromSeconds(5));
    });
Before we discuss how this policy works, let's see it in action. Before you test the recoverability policy, you need to simulate an error. Open the PingHandler code in the Receiver project and uncomment this line:
throw new Exception("BOOM");
Now, when the Receiver handles a Ping message, it will fail. Launch the solution again and let's see what happens in the Receiver.
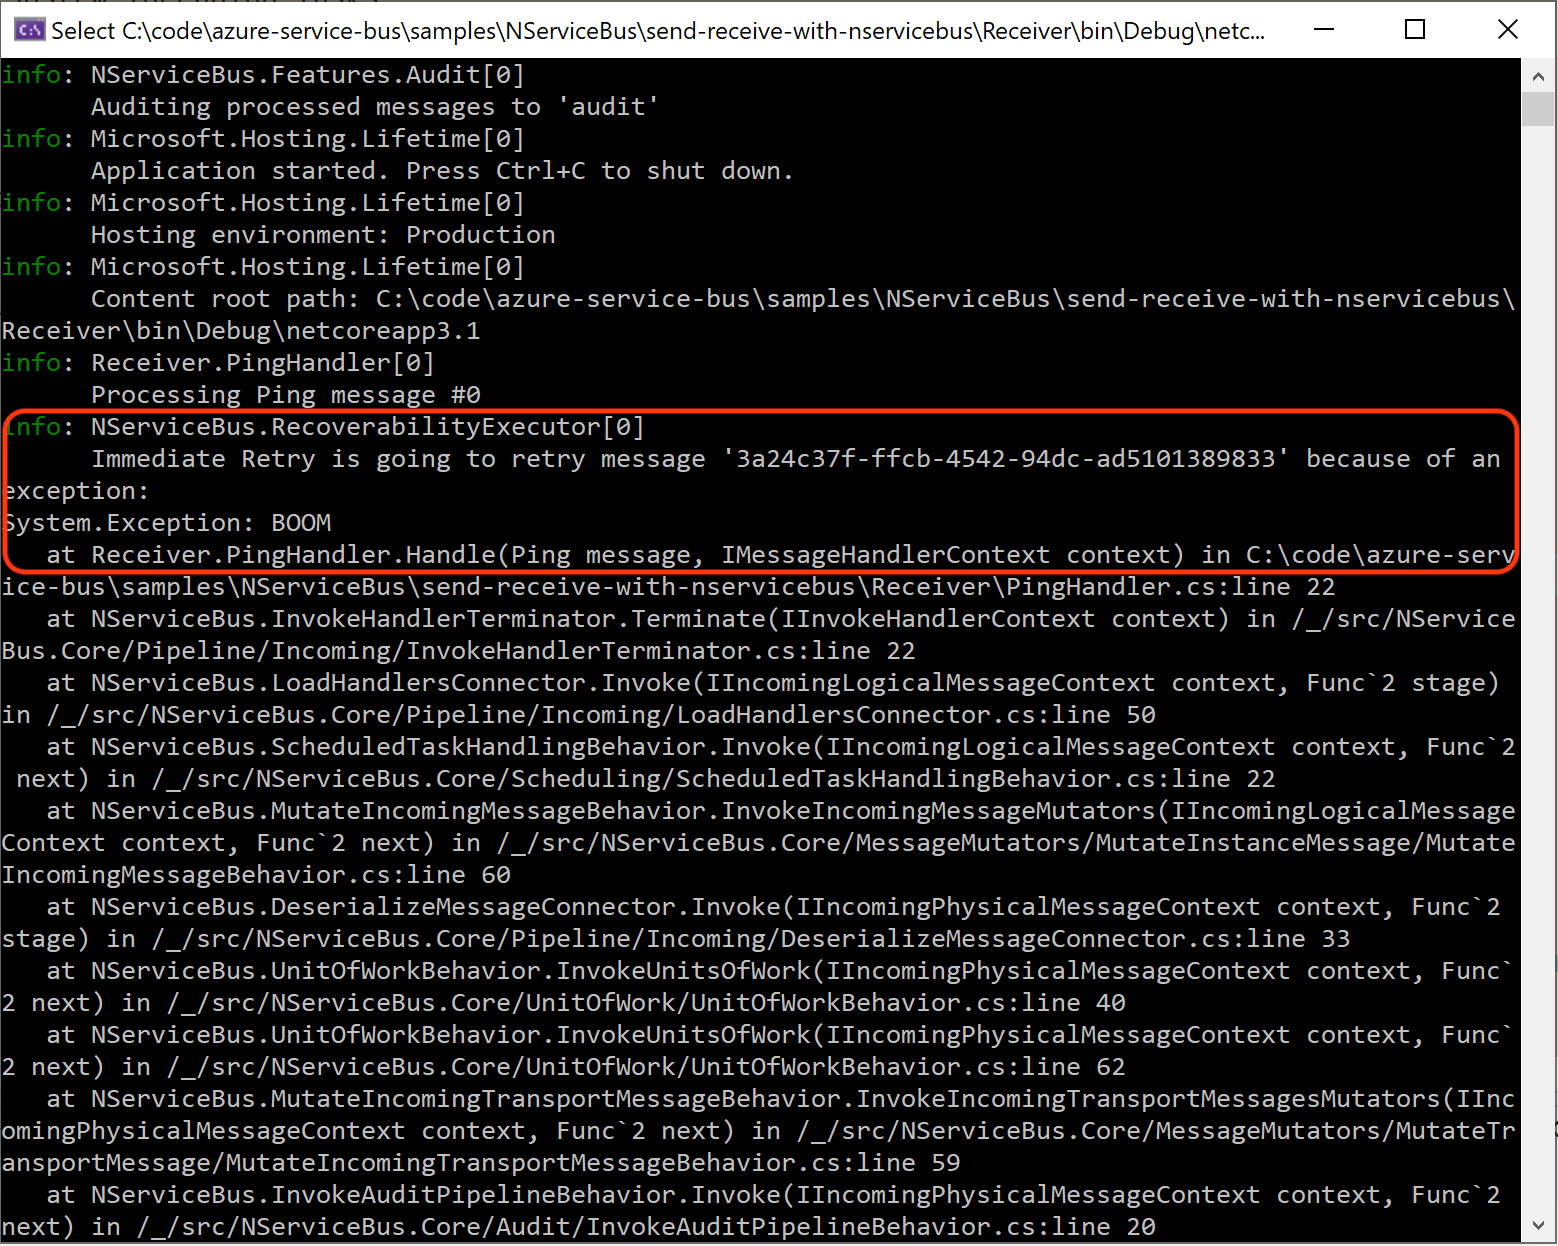
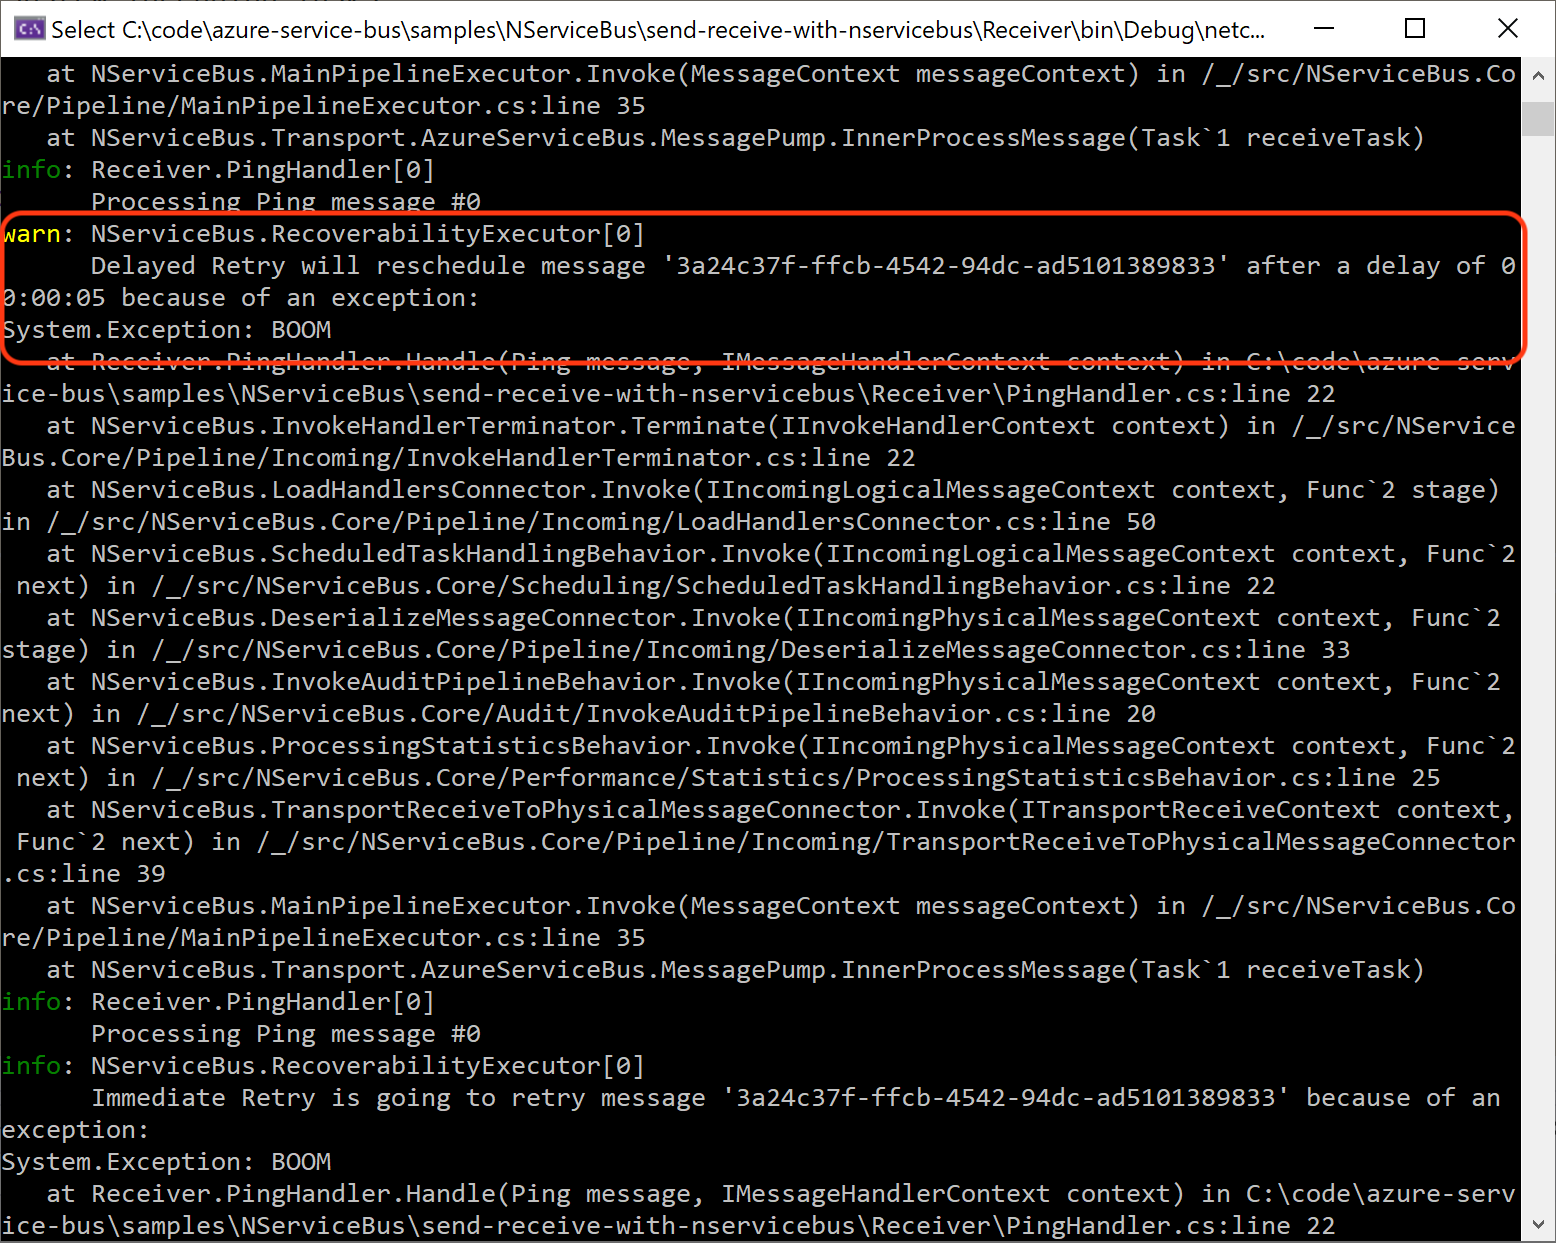
With our less reliable PingHandler, all of our messages fail. You can see the retry policy kicking in for those messages. The first time a message fails, it's immediately retried up to three times:
Of course, it will continue to fail so when the three immediate retries are used up, the delayed retry policy kicks in and the message is delayed for 5 seconds:
After those 5 seconds have passed, the message is retried again another three times (that is, another iteration of the immediate retry policy). These will also fail and NServiceBus will delay the message again, this time for 10 seconds, before trying again.
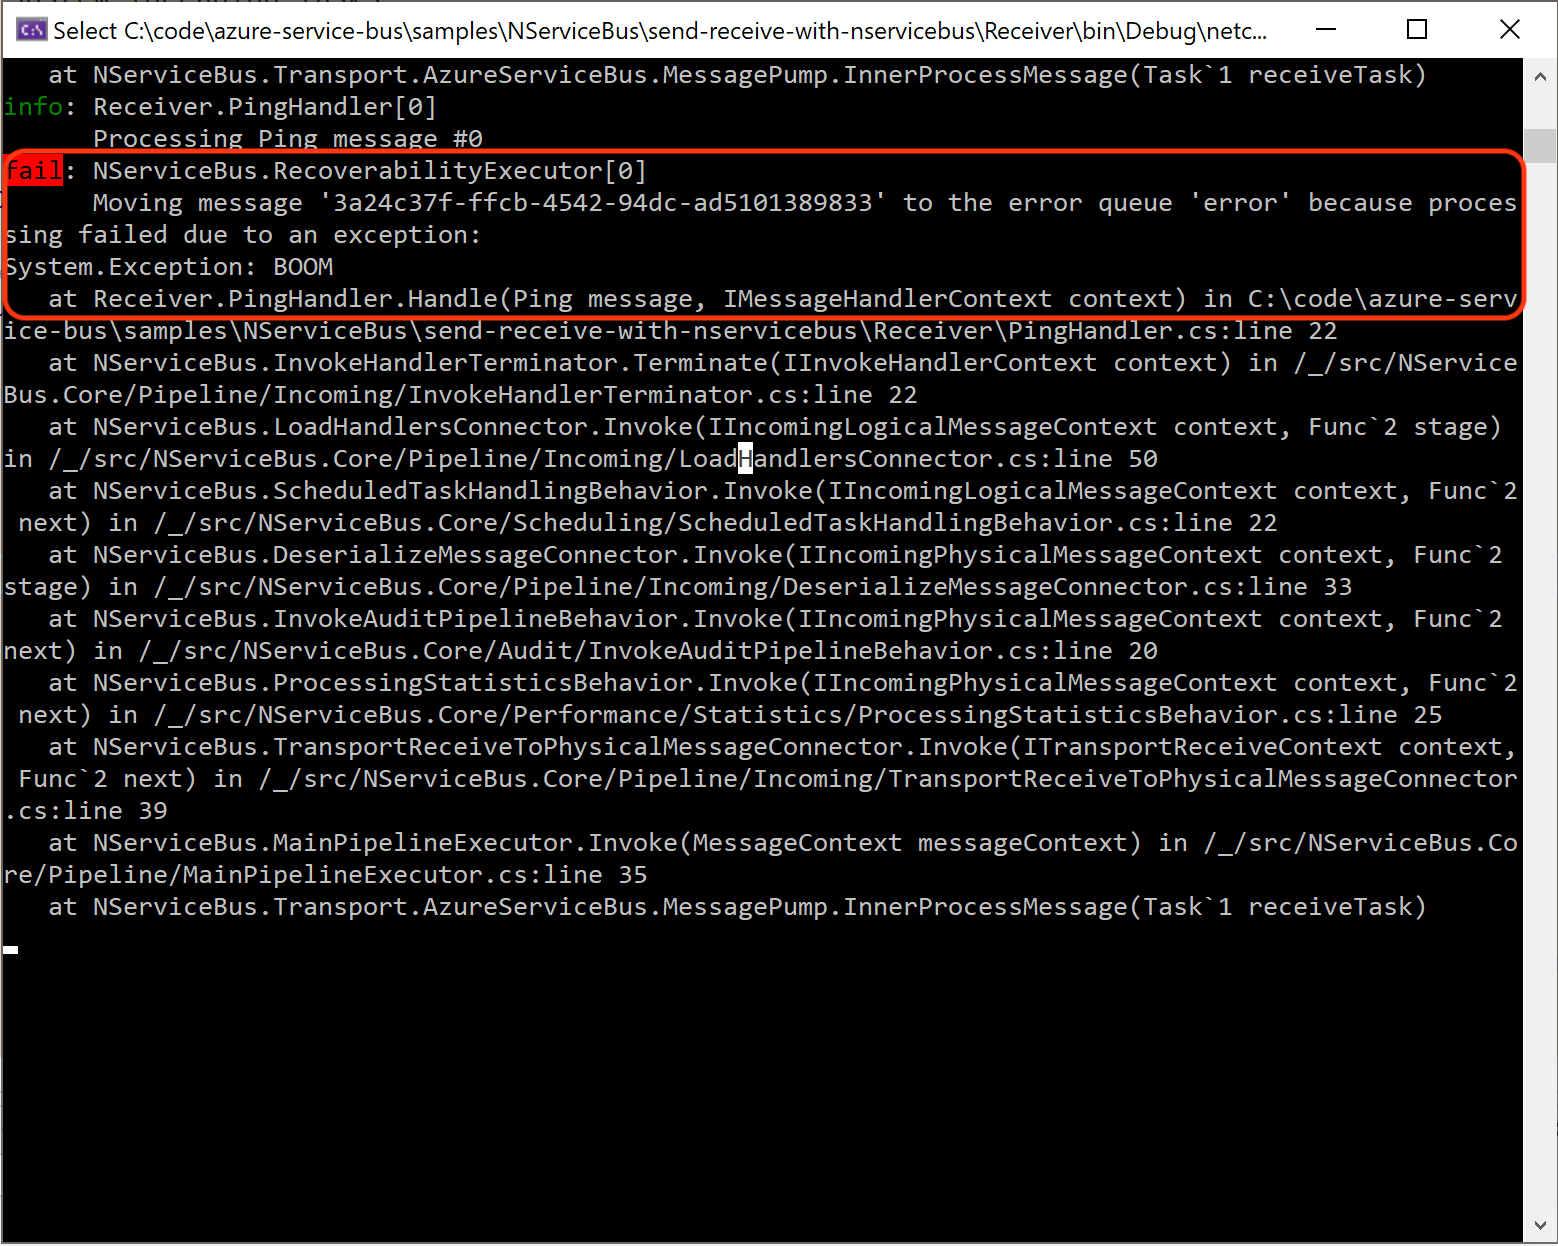
If PingHandler still doesn't succeed after running through the full retry policy, the message is placed in a centralized error queue, named error, as defined by the call to SendFailedMessagesTo.
The concept of a centralized error queue differs from the dead-lettering mechanism in Azure Service Bus, which has a dead-letter queue for each processing queue. With NServiceBus, the dead-letter queues in Azure Service Bus act as true poison message queues, whereas messages that end up in the centralized error queue can be reprocessed at a later time, if necessary.
The retry policy helps to address several types of errors that are often transient or semi-transient in nature. That is, errors that are temporary and often go away if the message is simply reprocessed after a short delay. Examples include network failures, database locks, and third-party API outages.
Once a message is in the error queue, you can examine the message details in the tool of your choice, then decide what to do with it. For example, using ServicePulse, a monitoring tool by Particular Software, we can view the message details and the reason for the failure:
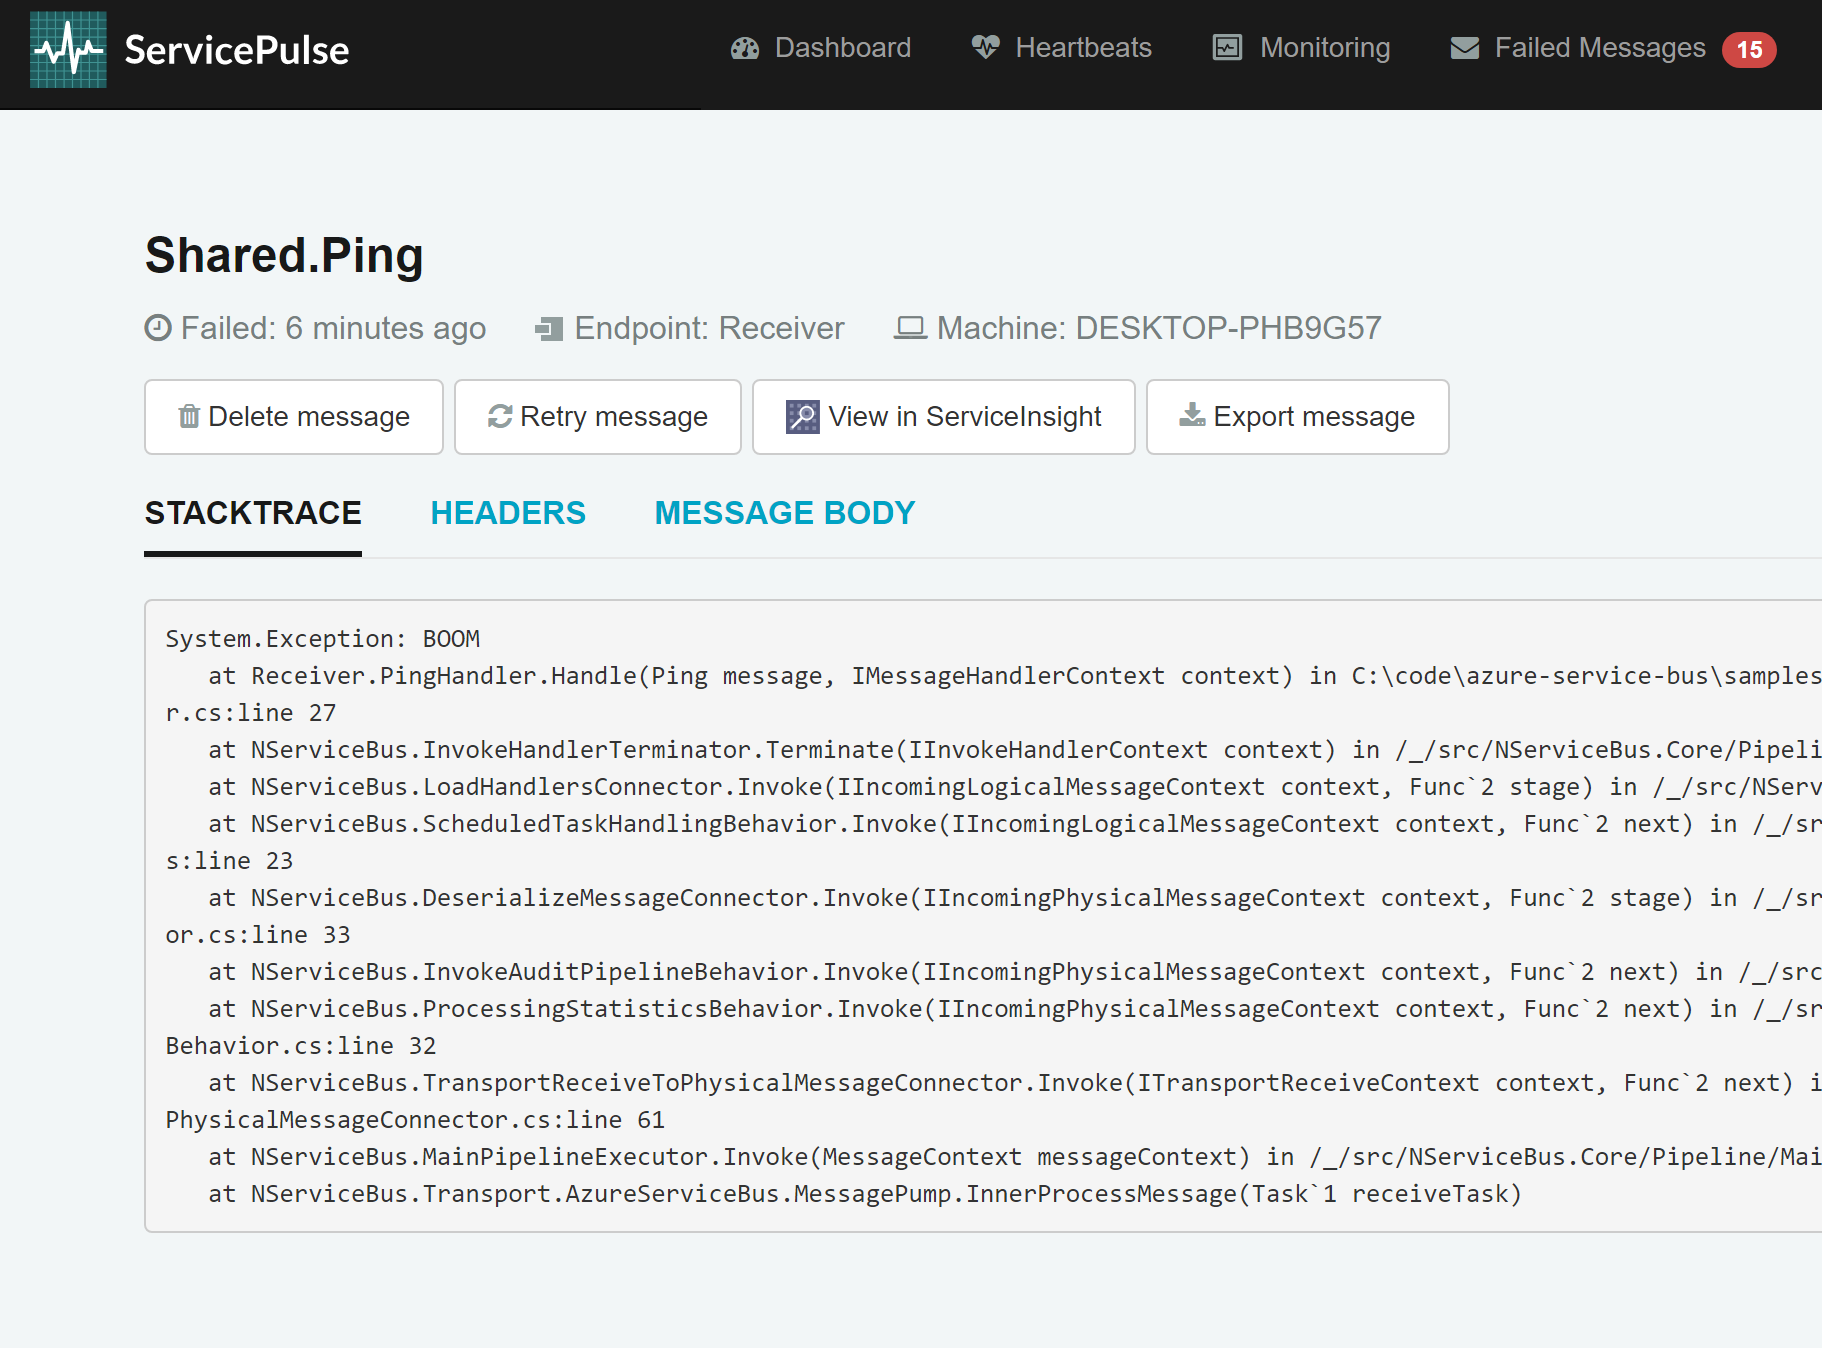
After examining the details, you can send the message back to its original queue for processing. You can also edit the message before doing so. If there are multiple messages in the error queue, which failed for the same reason, they can all be sent back to their original destinations as a batch.
Next, it's time to figure out where to deploy our solution in Azure.
Where to host the services in Azure
In this sample, the Sender and Receiver endpoints are configured to run as console applications. They can also be hosted in various Azure services including Azure Functions, Azure App Services, Azure Container Instances, Azure Kubernetes Services, and Azure VMs. For example, here's how the Sender endpoint can be configured to run as an Azure Function:
[assembly: NServiceBusTriggerFunction("Sender")]
public class Program
{
    public static async Task Main()
    {
        var host = new HostBuilder()
            .ConfigureFunctionsWorkerDefaults()
            .UseNServiceBus(configuration =>
            {
                configuration.Routing().RouteToEndpoint(typeof(Ping), "Receiver");
            })
            .Build();

        await host.RunAsync();
    }
}
For more information about using NServiceBus with Functions, see Azure Functions with Azure Service Bus in the NServiceBus documentation.
Next steps
For more information about using NServiceBus with Azure services, see the following articles: