Note
Access to this page requires authorization. You can try signing in or changing directories.
Access to this page requires authorization. You can try changing directories.
It's recommended that you familiarize yourself with how Service Fabric uses X.509 certificates and be familiar with the Cluster security scenarios. You must understand what a cluster certificate is and what is used for, before you proceed further.
Azure Service Fabrics SDK's default certificate load behavior is to deploy and use the defined certificate with expiry date furthest into the future; regardless of their primary or secondary configuration definition. Falling back to the classic behavior is a not recommended advanced action, and requires setting the "UseSecondaryIfNewer" setting parameter value to false within your Fabric.Code configuration.
Service fabric lets you specify two cluster certificates, a primary and a secondary, when you configure certificate security during cluster creation, in addition to client certificates. Refer to creating an Azure cluster via portal or creating an Azure cluster via Azure Resource Manager for details on setting them up at create time. If you specify only one cluster certificate at create time, then that is used as the primary certificate. After cluster creation, you can add a new certificate as a secondary.
Note
For a secure cluster, you will always need at least one valid (not revoked and not expired) cluster certificate (primary or secondary) deployed (if not, the cluster stops functioning). 90 days before all valid certificates reach expiration, the system generates a warning trace and a warning health event on the node. These are currently the only notifications Service Fabric sends regarding certificate expiration.
Note
We recommend that you use the Azure Az PowerShell module to interact with Azure. To get started, see Install Azure PowerShell. To learn how to migrate to the Az PowerShell module, see Migrate Azure PowerShell from AzureRM to Az.
Add a secondary cluster certificate using the portal
Secondary cluster certificate can't be added through the Azure portal; use Azure Resource Manager.
Remove a cluster certificate using the portal
For a secure cluster, you'll always need at least one valid (not revoked and not expired) certificate. The certificate deployed with the furthest into the future expiring date will be in use, and removing it makes your cluster stop functioning; ensure to only remove the certificate that is expired, or an unused certificate that expires the soonest.
To remove an unused cluster security certificate, Navigate to the Security section and select the 'Delete' option from the context menu on the unused certificate.
If your intent is to remove the certificate that is marked primary, then you need to deploy a secondary certificate with an expiring date further into the future than the primary certificate, enabling the auto rollover behavior; delete the primary certificate after the auto rollover has completed.
Add a secondary certificate using Azure Resource Manager
These steps assume you're familiar with how Resource Manager works and have deployed at least one Service Fabric cluster using a Resource Manager template, and have the template that you used to set up the cluster handy. It's also assumed that you're comfortable using JSON.
Note
If you are looking for a sample template and parameters that you can use to follow along or as a starting point, then download it from this git-repo.
Edit your Resource Manager template
For ease of following along, sample 5-VM-1-NodeTypes-Secure_Step2.JSON contains all the edits we make. The sample is available at git-repo.
Make sure to follow all the steps
Open up the Resource Manager template you used to deploy your Cluster. (If you have downloaded the sample from the preceding repo, then use 5-VM-1-NodeTypes-Secure_Step1.JSON to deploy a secure cluster and then open up that template).
Add two new parameters "secCertificateThumbprint" and "secCertificateUrlValue" of type "string" to the parameter section of your template. You can copy the following code snippet and add it to the template. Depending on the source of your template, you may already have these defined, if so move to the next step.
   "secCertificateThumbprint": {
      "type": "string",
      "metadata": {
        "description": "Certificate Thumbprint"
      }
    },
    "secCertificateUrlValue": {
      "type": "string",
      "metadata": {
        "description": "Refers to the location URL in your key vault where the certificate was uploaded, it is should be in the format of https://<name of the vault>.vault.azure.net:443/secrets/<exact location>"
      }
    },
Make changes to the Microsoft.ServiceFabric/clusters resource - Locate the "Microsoft.ServiceFabric/clusters" resource definition in your template. Under properties of that definition, you'll find "Certificate" JSON tag, which should look something like the following JSON snippet:
      "properties": {
        "certificate": {
          "thumbprint": "[parameters('certificateThumbprint')]",
          "x509StoreName": "[parameters('certificateStoreValue')]"
     }
Add a new tag "thumbprintSecondary" and give it a value "[parameters('secCertificateThumbprint')]".
So now the resource definition should look like the following (depending on your source of the template, it may not be exactly like the snippet below).
      "properties": {
        "certificate": {
          "thumbprint": "[parameters('certificateThumbprint')]",
          "thumbprintSecondary": "[parameters('secCertificateThumbprint')]",
          "x509StoreName": "[parameters('certificateStoreValue')]"
     }
If you want to roll over the cert, then specify the new cert as primary and moving the current primary as secondary. This results in the rollover of your current primary certificate to the new certificate in one deployment step.
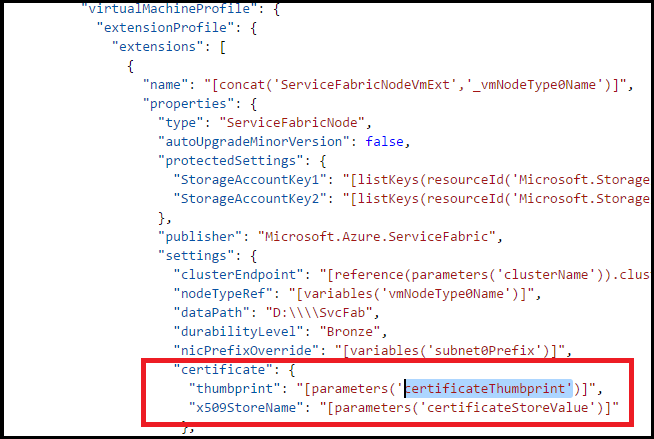
      "properties": {
        "certificate": {
          "thumbprint": "[parameters('secCertificateThumbprint')]",
          "thumbprintSecondary": "[parameters('certificateThumbprint')]",
          "x509StoreName": "[parameters('certificateStoreValue')]"
     }
Make changes to all the Microsoft.Compute/virtualMachineScaleSets resource definitions - Locate the Microsoft.Compute/virtualMachineScaleSets resource definition. Scroll to the "publisher": "Microsoft.Azure.ServiceFabric", under "virtualMachineProfile".
In the Service Fabric publisher settings, you should see something like this.
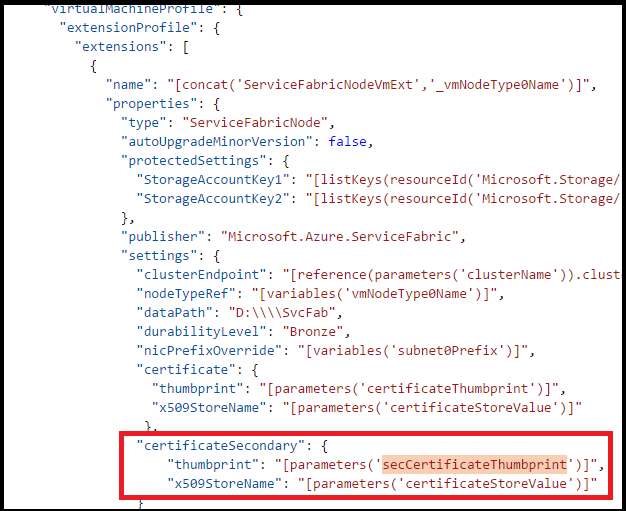
Add the new cert entries to it
               "certificateSecondary": {
                    "thumbprint": "[parameters('secCertificateThumbprint')]",
                    "x509StoreName": "[parameters('certificateStoreValue')]"
                    }
                  },
The properties should now look like this
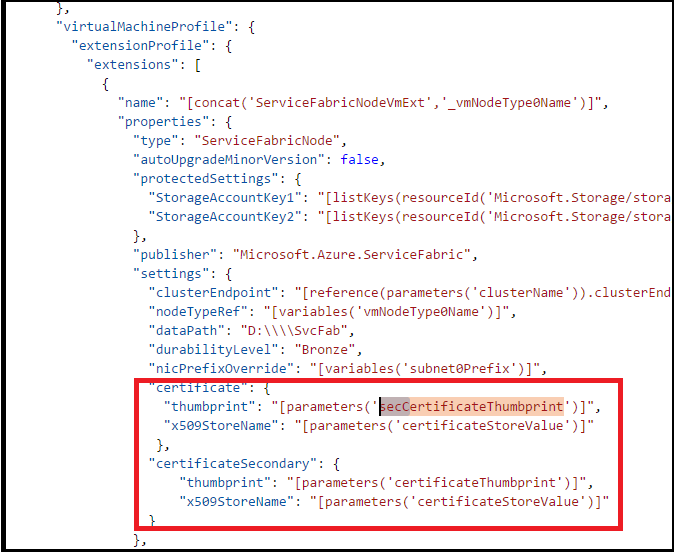
If you want to roll over the cert, then specify the new cert as primary and moving the current primary as secondary. This results in the rollover of your current certificate to the new certificate in one deployment step.
               "certificate": {
                   "thumbprint": "[parameters('secCertificateThumbprint')]",
                   "x509StoreName": "[parameters('certificateStoreValue')]"
                     },
               "certificateSecondary": {
                    "thumbprint": "[parameters('certificateThumbprint')]",
                    "x509StoreName": "[parameters('certificateStoreValue')]"
                    }
                  },
The properties should now look like this
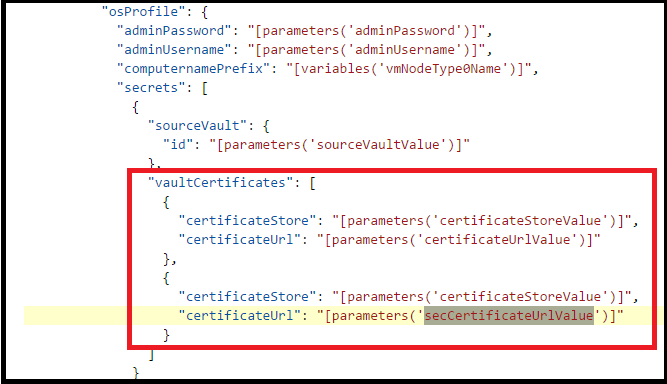
Make Changes to all the Microsoft.Compute/virtualMachineScaleSets resource definitions - Locate the Microsoft.Compute/virtualMachineScaleSets resource definition. Scroll to the "vaultCertificates": , under "OSProfile". it should look something like this.
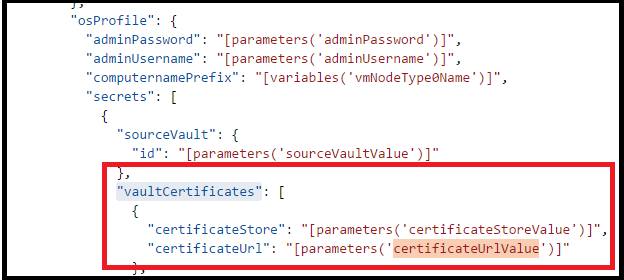
Add the secCertificateUrlValue to it. use the following snippet:
                  {
                    "certificateStore": "[parameters('certificateStoreValue')]",
                    "certificateUrl": "[parameters('secCertificateUrlValue')]"
                  }
Now the resulting Json should look something like this.
Note
Make sure that you have repeated steps 4 and 5 for all the Nodetypes/Microsoft.Compute/virtualMachineScaleSets resource definitions in your template. If you miss one of them, the certificate will not get installed on that virtual machine scale set and you will have unpredictable results in your cluster, including the cluster going down (if you end up with no valid certificates that the cluster can use for security. So double check, before proceeding further.
Edit your template file to reflect the new parameters you added above
If you're using the sample from the git-repo to follow along, you can start to make changes in The sample 5-VM-1-NodeTypes-Secure.parameters_Step2.JSON
Edit your Resource Manager Template parameter File, add the two new parameters for secCertificateThumbprint and secCertificateUrlValue.
    "secCertificateThumbprint": {
      "value": "thumbprint value"
    },
    "secCertificateUrlValue": {
      "value": "Refers to the location URL in your key vault where the certificate was uploaded, it is should be in the format of https://<name of the vault>.vault.azure.net:443/secrets/<exact location>"
     },
Deploy the template to Azure
- You're now ready to deploy your template to Azure. Open an Azure PowerShell version 1+ command prompt.
- Sign in to your Azure Account and select the specific Azure subscription. This is an important step for folks who have access to more than one Azure subscription.
Connect-AzAccount
Select-AzSubscription -SubscriptionId <Subscription ID>
Test the template prior to deploying it. Use the same Resource Group that your cluster is currently deployed to.
Test-AzResourceGroupDeployment -ResourceGroupName <Resource Group that your cluster is currently deployed to> -TemplateFile <PathToTemplate>
Deploy the template to your resource group. Use the same Resource Group that your cluster is currently deployed to. Run the New-AzResourceGroupDeployment command. You don't need to specify the mode, since the default value is incremental.
Note
If you set Mode to Complete, you can inadvertently delete resources that are not in your template. So do not use it in this scenario.
New-AzResourceGroupDeployment -Name ExampleDeployment -ResourceGroupName <Resource Group that your cluster is currently deployed to> -TemplateFile <PathToTemplate>
Here's a filled out example of the same PowerShell.
$ResourceGroup2 = "chackosecure5"
$TemplateFile = "C:\GitHub\Service-Fabric\ARM Templates\Cert Rollover Sample\5-VM-1-NodeTypes-Secure_Step2.json"
$TemplateParmFile = "C:\GitHub\Service-Fabric\ARM Templates\Cert Rollover Sample\5-VM-1-NodeTypes-Secure.parameters_Step2.json"

New-AzResourceGroupDeployment -ResourceGroupName $ResourceGroup2 -TemplateParameterFile $TemplateParmFile -TemplateUri $TemplateFile -clusterName $ResourceGroup2
Once the deployment is complete, connect to your cluster using the new Certificate and perform some queries. If you're able to do. Then you can delete the old certificate.
If you're using a self-signed certificate, don't forget to import them into your local TrustedPeople cert store.
######## Set up the certs on your local box
Import-PfxCertificate -Exportable -CertStoreLocation Cert:\CurrentUser\TrustedPeople -FilePath c:\Mycertificates\chackdanTestCertificate9.pfx -Password (ConvertTo-SecureString -String abcd123 -AsPlainText -Force)
Import-PfxCertificate -Exportable -CertStoreLocation Cert:\CurrentUser\My -FilePath c:\Mycertificates\chackdanTestCertificate9.pfx -Password (ConvertTo-SecureString -String abcd123 -AsPlainText -Force)
For quick reference here's the command to connect to a secure cluster
$ClusterName= "chackosecure5.westus.cloudapp.azure.com:19000"
$CertThumbprint= "AA11BB22CC33DD44EE55FF66AA77BB88CC99DD00"

Connect-serviceFabricCluster -ConnectionEndpoint $ClusterName -KeepAliveIntervalInSec 10 `
    -X509Credential `
    -ServerCertThumbprint $CertThumbprint  `
    -FindType FindByThumbprint `
    -FindValue $CertThumbprint `
    -StoreLocation CurrentUser `
    -StoreName My
For quick reference here's the command to get cluster health
Get-ServiceFabricClusterHealth
Deploying client certificates to the cluster.
You can use the same steps as outlined in the preceding Steps 5 to have the certificates deployed from a keyvault to the Nodes. You just need define and use different parameters.
Adding or removing Client certificates
In addition to the cluster certificates, you can add client certificates to perform management operations on a Service Fabric cluster.
You can add two kinds of client certificates - Admin or Read-only. These then can be used to control access to the admin operations and Query operations on the cluster. By default, the cluster certificates are added to the allowed Admin certificates list.
You can specify any number of client certificates. Each addition/deletion results in a configuration update to the Service Fabric cluster.
Adding client certificates - Admin or Read-Only via portal
- Navigate to the Security section, and select the '+ Authentication' button on top of the security section.
- On the 'Add Authentication' section, choose the 'Authentication Type' - 'Read-only client' or 'Admin client'
- Now choose the Authorization method. This indicates to Service Fabric whether it should look up this certificate by using the subject name or the thumbprint. In general, it isn't a good security practice to use the authorization method of subject name.
Deletion of Client Certificates - Admin or Read-Only using the portal
To remove a secondary certificate from being used for cluster security, Navigate to the Security section and select the 'Delete' option from the context menu on the specific certificate.
Adding application certificates to a virtual machine scale set
To deploy a certificate you use for your applications to your cluster, see this sample PowerShell script.
Next steps
Read these articles for more information on cluster management: