Create a Service Fabric cluster in Azure using the Azure portal
Article
This article is a step-by-step guide that walks you through the steps of setting up a Service Fabric cluster (Linux or Windows) in Azure using the Azure portal. This guide walks you through the following steps:
Create a cluster in Azure through the Azure portal.
Certificates are used in Service Fabric to provide authentication and encryption to secure various aspects of a cluster and its applications. For more information on how certificates are used in Service Fabric, see Service Fabric cluster security scenarios.
If this is the first time you're creating a service fabric cluster or are deploying a cluster for test workloads, you can skip to the next section (Create cluster in the Azure portal) and have the system generate certificates needed for your clusters that run test workloads. If you're setting up a cluster for production workloads, then continue reading.
Cluster and server certificate (required)
This certificate is required to secure a cluster and prevent unauthorized access to it. It provides cluster security in a couple ways:
Cluster authentication: Authenticates node-to-node communication for cluster federation. Only nodes that can prove their identity with this certificate can join the cluster.
Server authentication: Authenticates the cluster management endpoints to a management client, so that the management client knows it's talking to the real cluster. This certificate also provides TLS for the HTTPS management API and for Service Fabric Explorer over HTTPS.
To serve these purposes, the certificate must meet the following requirements:
The certificate must contain a private key.
The certificate must be created for key exchange, exportable to a Personal Information Exchange (.pfx) file.
The certificate's subject name must match the domain used to access the Service Fabric cluster. This is required to provide TLS for the cluster's HTTPS management endpoints and Service Fabric Explorer. You can't obtain a TLS/SSL certificate from a certificate authority (CA) for the .cloudapp.azure.com domain. Acquire a custom domain name for your cluster. When you request a certificate from a CA the certificate's subject name must match the custom domain name used for your cluster.
The certificate's list of DNS names must include the Fully Qualified Domain Name (FQDN) of the cluster.
Client authentication certificates
Extra client certificates authenticate administrators for cluster management tasks. Service Fabric has two access levels: admin and read-only user. At minimum, a single certificate for administrative access should be used. For extra user-level access, a separate certificate must be provided. For more information on access roles, see role-based access control for Service Fabric clients.
You don't need to upload Client authentication certificates to Key Vault to work with Service Fabric. These certificates only need to be provided to users who are authorized for cluster management.
Note
Microsoft Entra ID is the recommended way to authenticate clients for cluster management operations. To use Microsoft Entra ID, you must create a cluster using Azure Resource Manager.
Application certificates (optional)
Any number of extra certificates can be installed on a cluster for application security purposes. Before creating your cluster, consider the application security scenarios that require a certificate to be installed on the nodes, such as:
Encryption and decryption of application configuration values
Encryption of data across nodes during replication
Application certificates can't be configured when creating a cluster through the Azure portal. To configure application certificates at cluster setup time, you must create a cluster using Azure Resource Manager. You can also add application certificates to the cluster after it's created.
Create cluster in the Azure portal
Creating a production cluster to meet your application needs involves some planning, to help you with that, it's recommended that you read and understand the Service Fabric Cluster planning considerations document.
Search for the Service Fabric cluster resource
Sign in to the Azure portal.
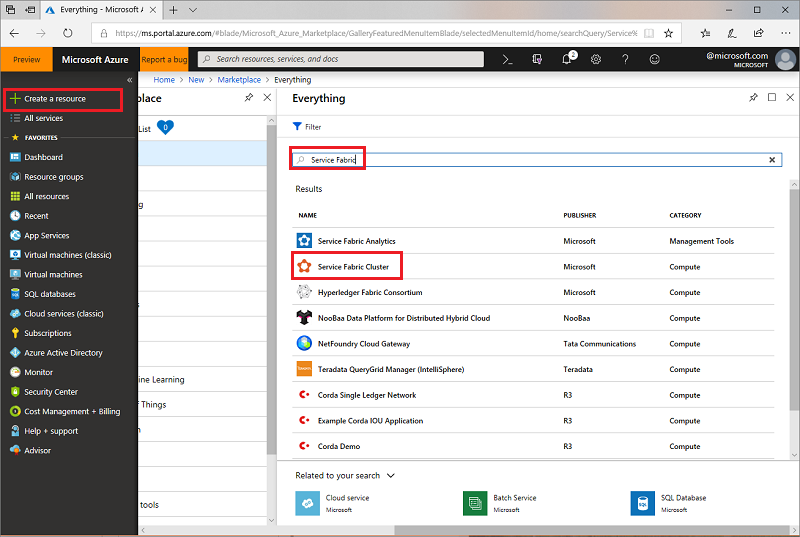
Click Create a resource to add a new resource template. Search for the Service Fabric Cluster template in the Marketplace under Everything.
Select Service Fabric Cluster from the list.
Navigate to the Service Fabric Cluster blade, and click Create.
The Create Service Fabric cluster blade has the following four steps:
1. Basics
In the Basics blade, you need to provide the basic details for your cluster.
Enter the name of your cluster.
Enter a User name and Password for Remote Desktop for the VMs.
Make sure to select the Subscription that you want your cluster to be deployed to, especially if you have multiple subscriptions.
Create a new Resource group. It's best to give it the same name as the cluster, since it helps in finding them later, especially when you're trying to make changes to your deployment or delete your cluster.
Note
Although you can decide to use an existing resource group, it is a good practice to create a new resource group. This makes it easy to delete clusters and all the resources it uses.
Select the Location in which you want to create the cluster. If you're planning to use an existing certificate that you have already uploaded to a key vault, You must use the same region that your Key vault is in.
2. Cluster configuration
Configure your cluster nodes. Node types define the VM sizes, the number of VMs, and their properties. Your cluster can have more than one node type, but the primary node type (the first one that you define on the portal) must have at least five VMs, as this is the node type where Service Fabric system services are placed. Don't configure Placement Properties because a default placement property of "NodeTypeName" is added automatically.
Note
A common scenario for multiple node types is an application that contains a front-end service and a back-end service. You want to put the front-end service on smaller VMs (VM sizes like D2_V2) with ports open to the Internet, and put the back-end service on larger VMs (with VM sizes like D3_V2, D6_V2, D15_V2, and so on) with no Internet-facing ports open.
Choose a name for your node type (1 to 12 characters containing only letters and numbers).
The minimum size of VMs for the primary node type is driven by the Durability tier you choose for the cluster. The default for the durability tier is bronze. For more information on durability, see how to choose the Service Fabric cluster durability.
Select the Virtual machine size. D-series VMs have SSD drives and are highly recommended for stateful applications. Don't use any VM SKU that has partial cores or have less than 10 GB of available disk capacity. Refer to service fabric cluster planning consideration document for help with selecting the VM size.
Single node cluster and three node clusters are meant for test use only. They aren't supported for any running production workloads.
Choose the Initial virtual machine scale set capacity for the node type. You can scale in or out the number of VMs in a node type later on, but on the primary node type, the minimum is five for production workloads. Other node types can have a minimum of one VM. The minimum number of VMs for the primary node type drives the reliability of your cluster.
Configure Custom endpoints. This field allows you to enter a comma-separated list of ports that you want to expose through the Azure Load Balancer to the public Internet for your applications. For example, if you plan to deploy a web application to your cluster, enter "80" here to allow traffic on port 80 into your cluster. For more information on endpoints, see communicating with applications.
Enable reverse proxy. The Service Fabric reverse proxy helps microservices running in a Service Fabric cluster discover and communicate with other services that have http endpoints.
Back in the Cluster configuration blade, under +Show optional settings, configure cluster diagnostics. By default, diagnostics are enabled on your cluster to assist with troubleshooting issues. If you want to disable diagnostics change the Status toggle to Off. Turning off diagnostics is not recommended. If you already have Application Insights project created, then give its key, so that the application traces are routed to it.
Include DNS service. The DNS service an optional service that enables you to find other services using the DNS protocol.
Select the Fabric upgrade mode you want set your cluster to. Select Automatic, if you want the system to automatically pick up the latest available version and try to upgrade your cluster to it. Set the mode to Manual, if you want to choose a supported version. For more information on the Fabric upgrade mode, see the Service Fabric Cluster Upgrade document..
Note
We support only clusters that are running supported versions of Service Fabric. By selecting the Manual mode, you are taking on the responsibility to upgrade your cluster to a supported version.
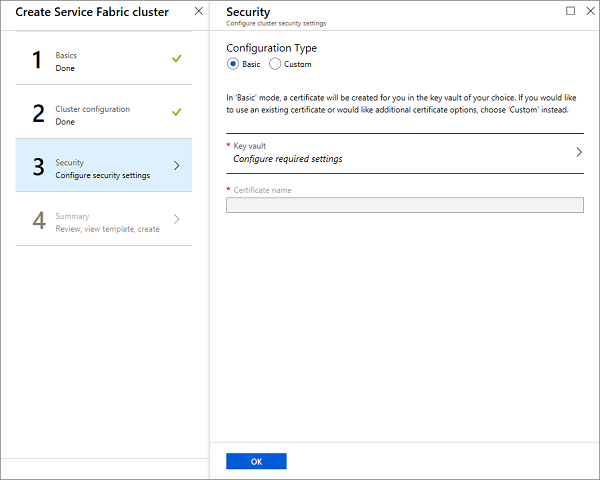
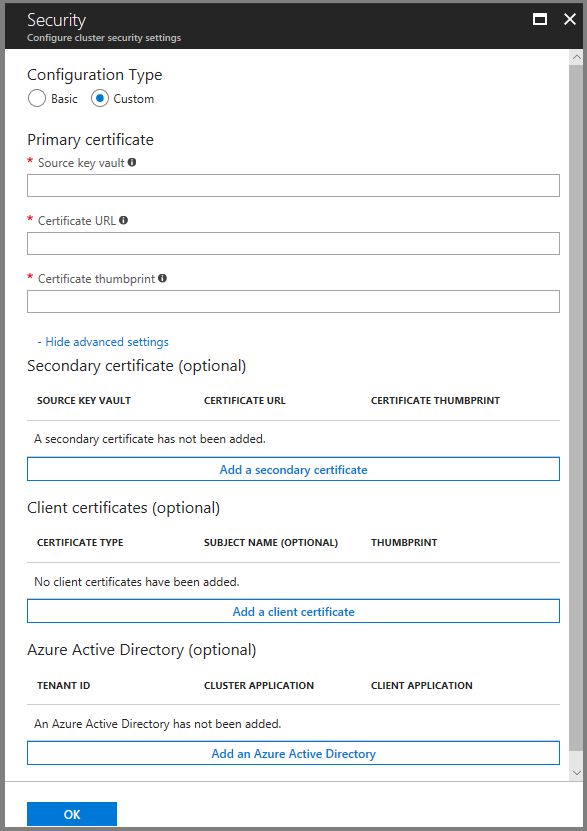
3. Security
To make setting up a secure test cluster easy for you, we provide the Basic option. If you already have a certificate and have uploaded it to your key vault (and enabled the key vault for deployment), then use the Custom option.
Basic Option
Follow the screens to add or reuse an existing key vault and add a certificate. The addition of the certificate is a synchronous process and so you'll have to wait for the certificate to be created.
Resist the temptation of navigating away from the screen until the preceding process is completed.
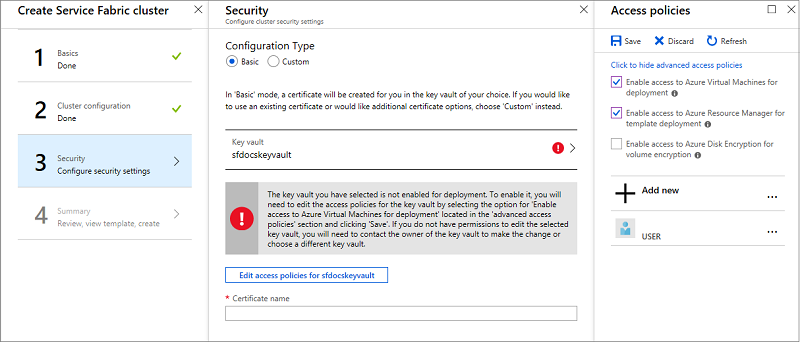
Now that the key vault is created, edit the access policies for your key vault.
Click on the Edit access policies, then Show advanced access policies and enable access to Azure Virtual Machines for deployment. It's recommended that you enable the template deployment as well. Once you have made your selections, don't forget to click the Save button and close out of the Access policies pane.
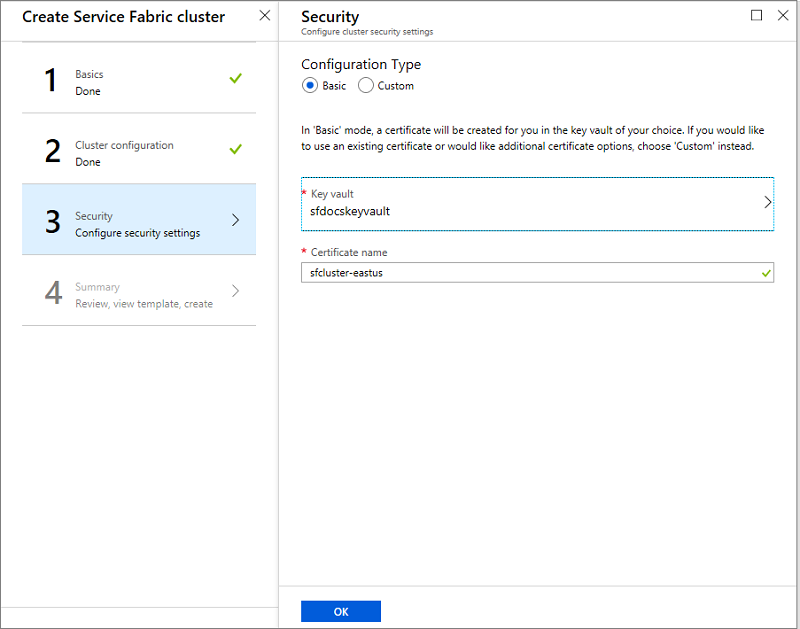
Enter the name of the certificate and click OK.
Custom Option
Skip this section, if you have already performed the steps in the Basic Option.
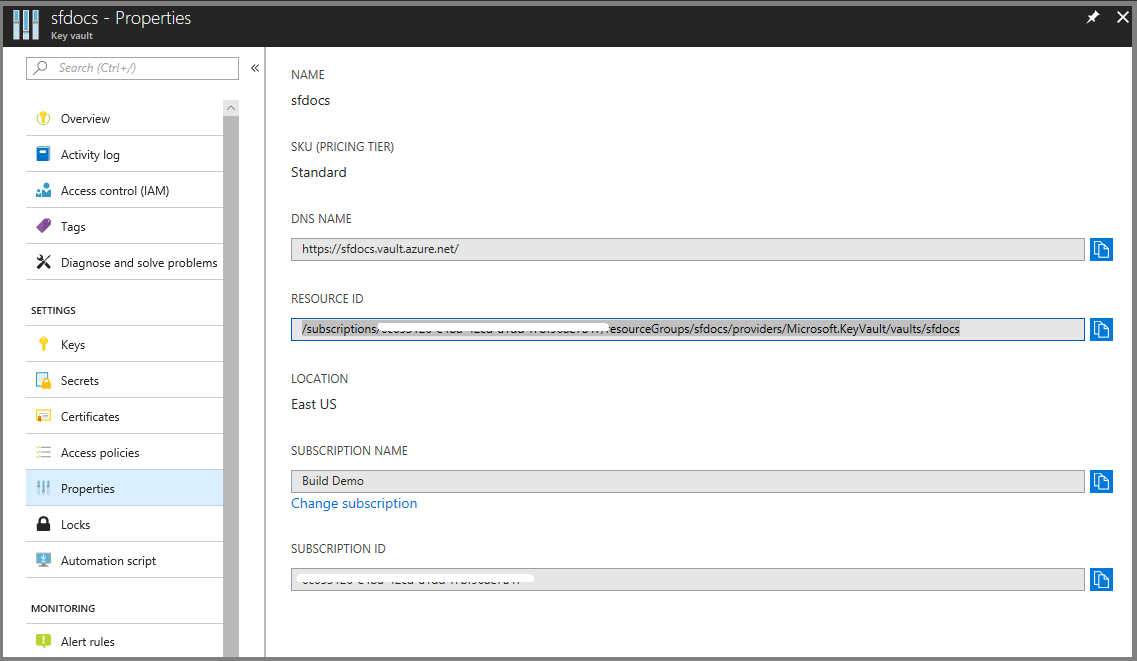
You need the Source key vault, Certificate URL, and Certificate thumbprint information to complete the security page. If you don't have it handy, open up another browser window and in the Azure portal do the following:
Navigate to your key vault service.
Select the "Properties" tab and copy the 'RESOURCE ID' to "Source key vault" on the other browser window.
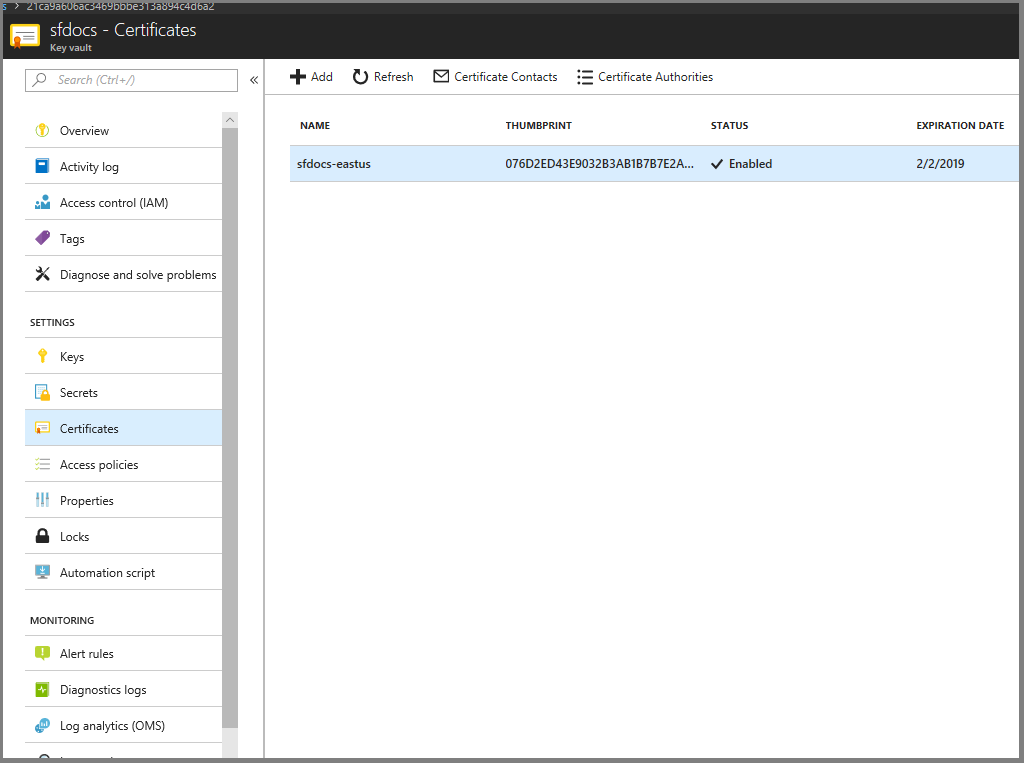
Now, select the "Certificates" tab.
Click on certificate thumbprint, which takes you to the Versions page.
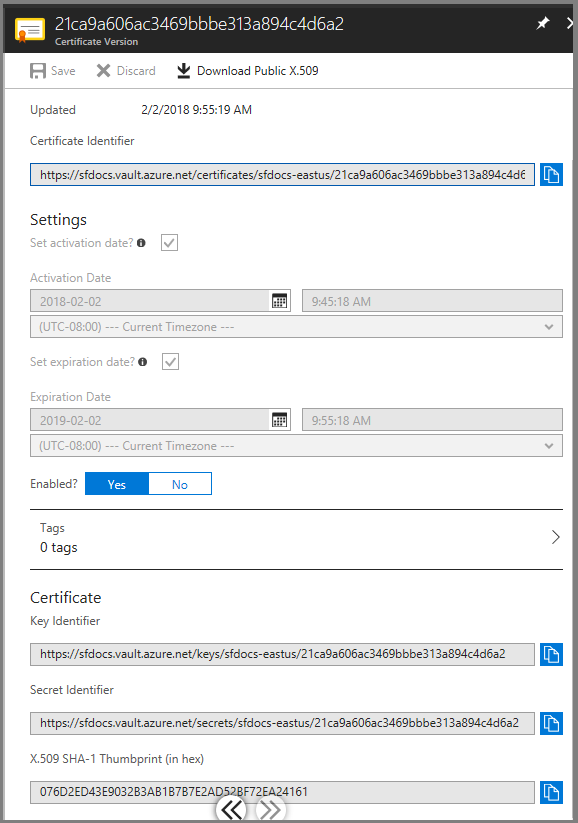
Click on the GUIDs you see under the current Version.
You should now be on the screen like below. Copy the hexadecimal SHA-1 Thumbprint to "Certificate thumbprint" on the other browser window.
Copy the 'Secret Identifier' to the "Certificate URL" on other browser window.
Check the Configure advanced settings box to enter client certificates for admin client and read-only client. In these fields, enter the thumbprint of your admin client certificate and the thumbprint of your read-only user client certificate, if applicable. When administrators attempt to connect to the cluster, they're granted access only if they have a certificate with a thumbprint that matches the thumbprint values entered here.
4. Summary
Now you're ready to deploy the cluster. Before you do that, download the certificate, look inside the large blue informational box for the link. Make sure to keep the cert in a safe place, you need it to connect to your cluster. Since the certificate you downloaded doesn't have a password, it's advised that you add one.
To complete the cluster creation, click Create. You can optionally download the template.
You can see the creation progress in the notifications. (Click the "Bell" icon near the status bar at the upper right of your screen.) If you clicked Pin to Startboard while creating the cluster, you see Deploying Service Fabric Cluster pinned to the Start board. This process takes some time.
In order to perform management operations on your cluster using PowerShell or CLI, you need to connect to your cluster, read more on how to at connecting to your cluster.
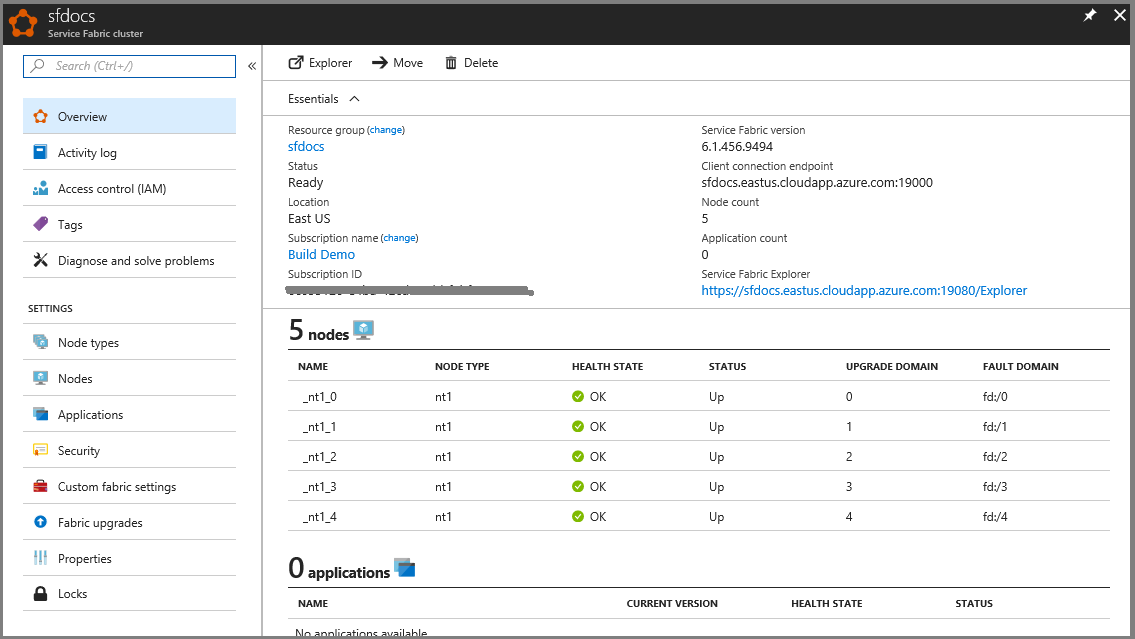
View your cluster status
Once your cluster is created, you can inspect your cluster in the portal:
Go to Browse and click Service Fabric Clusters.
Locate your cluster and click it.
You can now see the details of your cluster in the dashboard, including the cluster's public endpoint and a link to Service Fabric Explorer.
The Node Monitor section on the cluster's dashboard blade indicates the number of VMs that are healthy and not healthy. You can find more details about the cluster's health at Service Fabric health model introduction.
Note
Service Fabric clusters require a certain number of nodes to be up always to maintain availability and preserve state - referred to as "maintaining quorum". Therefore, it is typically not safe to shut down all machines in the cluster unless you have first performed a full backup of your state.
Remote connect to a Virtual Machine Scale Set instance or a cluster node
Each of the NodeTypes you specify in your cluster results in a Virtual Machine Scale Set getting set-up.
Azure HPC is a purpose-built cloud capability for HPC & AI workload, using leading-edge processors and HPC-class InfiniBand interconnect, to deliver the best application performance, scalability, and value. Azure HPC enables users to unlock innovation, productivity, and business agility, through a highly available range of HPC & AI technologies that can be dynamically allocated as your business and technical needs change. This learning path is a series of modules that help you get started on Azure HPC - you