Use Azure Policy to set up Azure Site Recovery
This article describes how to set up Azure Site Recovery for your resources by using Azure Policy. Azure Policy helps enforce certain business rules on your Azure resources and assess compliance of those resources.
Disaster recovery with Azure Policy
Site Recovery helps you keep your applications up and running in the event of planned or unplanned zonal/regional outages. Enabling Site Recovery on your machines at scale through the Azure portal can be challenging. Azure Policy can help you enable replication at scale without resorting to any scripting.
With built-in Azure Policy capabilities, you have a way to enable Site Recovery en masse on specific subscriptions or resource groups through the portal. After you create a disaster recovery (DR) policy for subscriptions or resource groups, all the new virtual machines (VMs) that are added to those subscriptions or resource groups will get Site Recovery enabled for them automatically. For all the virtual machines already present in the resource group, you can enable Site Recovery through a process called remediation (details later in this article).
Note
A scope determines the resources or the grouping of resources where the policy assignment is enforced. The scope of this policy can be at a subscription level or a resource group level.
Prerequisites
Learn more about the architecture of Azure-to-Azure disaster recovery.
Review the following support matrix for Azure Site Recovery policy support:
Scenario Support statement Managed disks Supported. The OS disk should be 1 GB to 4 TB in size. Data disks should be 1 GB to 32 TB in size. Unmanaged disks Not supported Multiple disks Supported for up to 100 disks per VM Ephemeral disks Not supported Ultra disks Not supported Availability sets Supported Availability zones Supported Azure Disk Encryption enabled VMs Not supported Proximity placement groups (PPGs) Supported. If the source VM is inside a PPG, the policy will create a PPG by appending -asr on the source PPG and use it for failover to the DR/secondary region. VMs in both PPGs and availability sets Not supported Customer-managed key (CMK) enabled disks Not supported Storage Spaces Direct (S2D) clusters Not supported Virtual machine scale sets Not supported VM with image as Azure Site Recovery configuration server Not supported Powered-off VMs Not supported. The VM must be powered on for the policy to work on it. Azure Resource Manager deployment model Supported Classic deployment model Not supported Zone-to-zone DR Supported Interoperability with other policies applied as default by Azure (if any) Supported Private endpoint Not supported Cross-subscription Not supported
Note
Site Recovery won't be enabled if an unsupported VM is created within the scope of the policy.
Create a policy assignment
To create a policy assignment for the built-in Azure Site Recovery policy that enables replication for all newly created VMs in a subscription or resource group:
In the Azure portal, go to Azure Policy.
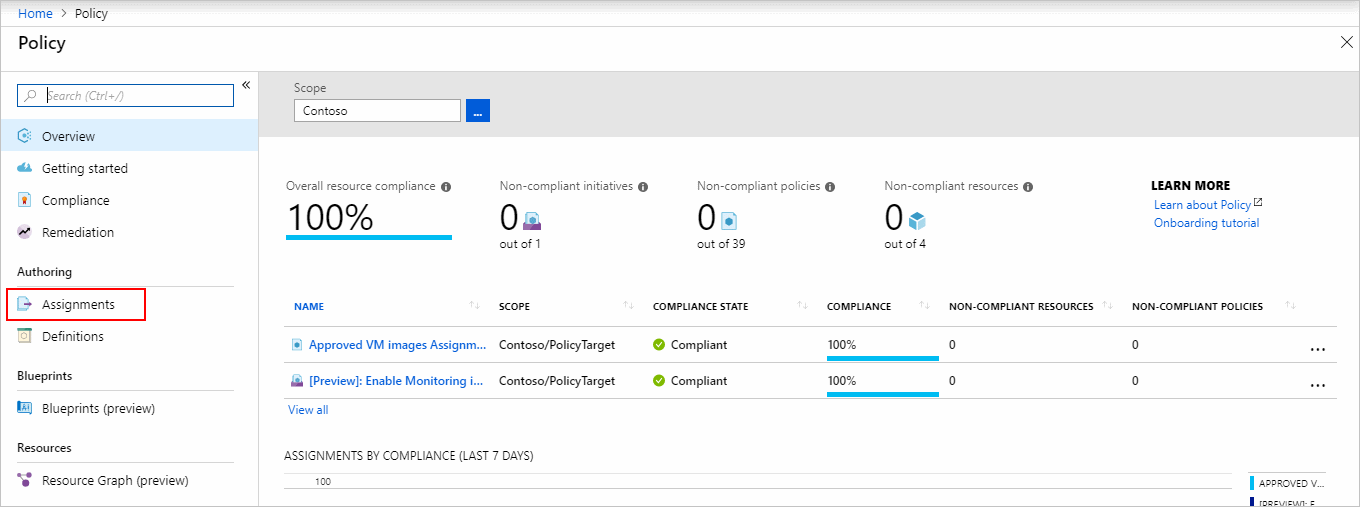
Select Assignments on the left side of the Azure Policy page. An assignment is a policy that has been assigned to run on a specific scope.

Select Assign policy from the top of the Policy - Assignments page.

On the Assign Policy page, set the Scope information by selecting the ellipsis, selecting a subscription, and then optionally selecting a resource group. Then use the Select button at the bottom of the Scope page.
Note
You can also choose to exclude a few resource groups from assignment of the policy by selecting them under Exclusions. This ability is useful when you want to assign the policy to all but a few resource groups in a subscription.
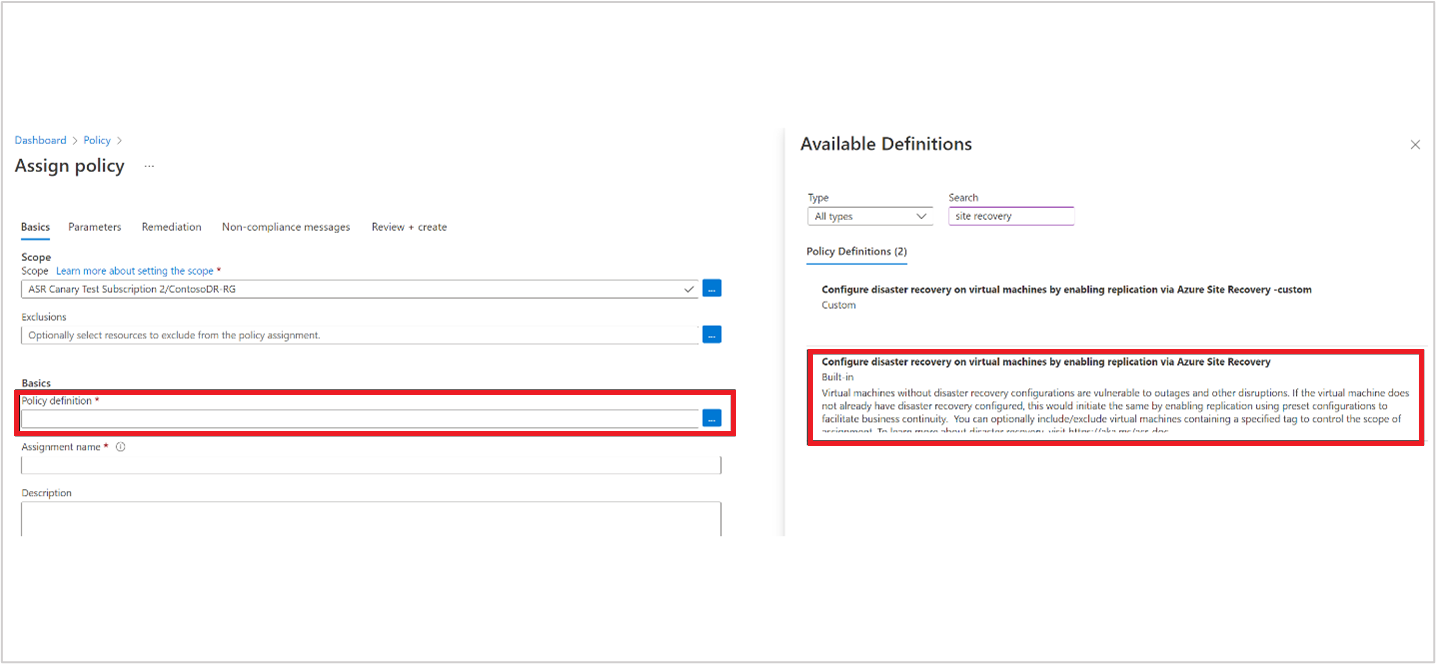
Open the policy definition picker by selecting the ellipses next to Policy definition. Search for disaster recovery or site recovery. You'll find a built-in policy titled Configure disaster recovery on virtual machines by enabling replication via Azure Site Recovery. Select it and click Select.

Assignment name is automatically populated with the policy name that you selected, but you can change it. It might be helpful if you plan to assign multiple Azure Site Recovery policies to the same scope.
Select Next to configure Azure Site Recovery properties for the policy.
Configure target settings and properties
You're on your way to creating a policy that enables Azure Site Recovery. Now, configure the target settings and properties:
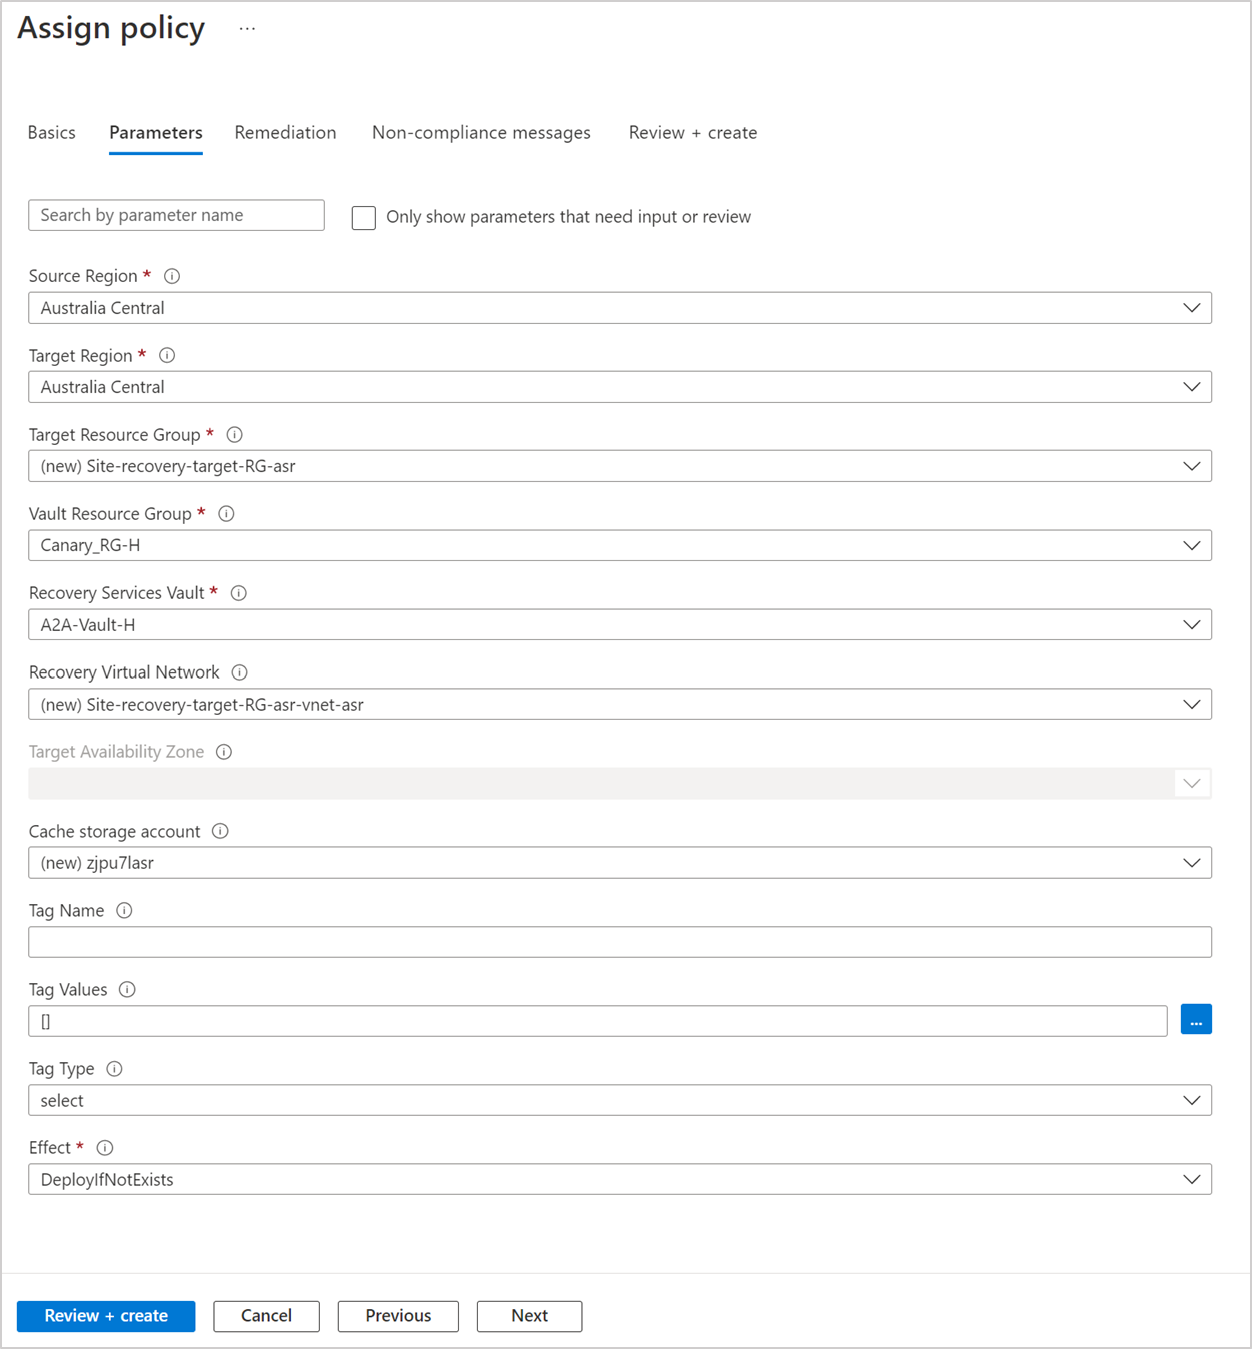
Go to the Parameters tab in the Assign policy workflow. Clear Only show parameters that need input or review. The parameters look as follows:

Select appropriate values for these parameters:
Source Region: Enter the source region of the virtual machines for which the policy will apply.
Note
The policy will apply to all the virtual machines that belong to the source region in the scope of the policy. Virtual machines not present in the source region won't be included.
Target Region: Enter the location where your source virtual machine data will be replicated. Site Recovery provides the list of target regions that the customer can replicate to. If you want to enable zone-to-zone replication within a region, select the same region as the Source Region value.
Target Resource Group: Enter the resource group to which all your replicated virtual machines belong. By default, Site Recovery creates a new resource group in the target region.
Vault Resource Group: Enter the resource group in which the Recovery Services vault exists.
Recovery Services Vault: This is the vault in which all the VMs of the scope will be protected. The policy can create a new vault on your behalf, if required.
Recovery Virtual Network (optional): Choose an existing virtual network in the target region to be used for the recovery virtual machine. The policy can create a new virtual network for you, if required.
Target Availability Zone (optional): Enter the availability zone of the target region where the virtual machine will fail over. If some of the virtual machines in your resource group are already in the target availability zone, the policy won't be applied to them in case you're setting up zone-to-zone DR.
Cache storage account (optional): Azure Site Recovery makes use of a storage account for caching replicated data in the source region. Select an account of your choice. You can choose the default cache storage account if you don't have any special considerations.
Note
Before you choose a cache storage account, check the cache storage account limits in the support matrix.
Tag name (optional): You can apply tags to your replicated VMs to logically organize them into a taxonomy. Each tag consists of a name/value pair. For example, enter Environment.
Tag values (optional): You can use this field to enter a tag value. For example, enter Production.
Tag type (optional): You can use tags to include VMs as part of the policy assignment by selecting Tag type = Inclusion. This type ensures that only the VMs that have the tag (provided via Tag name and Tag values fields) are included in the policy assignment.
Alternatively, you can choose Tag type = Exclusion. This type ensures that the VMs that have the tag (provided via Tag name and Tag values fields) are excluded from the policy assignment.
If no tags are selected, the entire resource group and/or subscription is selected for the policy assignment.
Effect: Enable or disable the execution of the policy. Select DeployIfNotExists to enable the policy as soon as it's created.
Select Next to decide on remediation tasks.
Configure remediation and other properties
You've configured the target properties for Azure Site Recovery. However, this policy will take effect only for newly created virtual machines in the scope of the policy. Replication on pre-existing VMs isn't enabled automatically in the scope of the policy. You can solve this by creating a remediation task after the policy is assigned.
To create a remediation task and set other properties:
On the Remediation tab in the Assign policy workflow, select the Create a Remediation Task checkbox.
Azure Policy will create a managed identity, which will have owner permissions to enable Azure Site Recovery for the resources in the scope.
You can configure a custom non-compliance message for the policy on the Non-compliance messages tab.
Select Next at the bottom of the page or the Review + Create tab at the top of the page to move to the next segment of the assignment wizard.
Review the selected options, and then select Create at the bottom of the page.
Check the protection status of VMs after policy assignment
After you assign the policy, wait for up to 1 hour for replication to be enabled. After that, go to the Recovery Services vault that you chose during policy assignment and look for replication jobs. You should be able to find all VMs for which Site Recovery was enabled via policy in this vault.
If the VMs don't show up in the vault as protected, you can go back to the policy assignment and try to remediate.
If the VMs show up as noncompliant, it might be because policy evaluation happened before the VM was completely up and running. You can choose to either remediate or wait for up to 24 hours for the policy to evaluate the subscription/resource group and remediate automatically.
Next steps
- Learn more about running a test failover.