Note
Access to this page requires authorization. You can try signing in or changing directories.
Access to this page requires authorization. You can try changing directories.
The Azure Storage Mover service utilizes agents to perform the migration jobs you configure in the service. An agent is a virtual machine-based migration appliance that runs on a virtualization host. Ideally, your virtualization host is located as near as possible to the source storage to be migrated. Storage Mover can support multiple agents.
Because an agent is essentially a migration appliance, you interact with it through an agent-local administrative shell. The shell limits the operations you can perform on this machine, though network configuration and troubleshooting tasks are accessible.
Use of the agent in migrations is managed through Azure. Both Azure PowerShell and CLI are supported, and graphical interaction is available within the Azure portal. The agent is made available as a disk image compatible with either new Windows Hyper-V or VMware virtual machines (VMs).
This article guides you through the steps necessary to successfully deploy a Storage Mover agent VM.
Prerequisites
- The following Storage Mover and Arc endpoints must have access to HTTPS traffic:
mcr.microsoft.com<region>.agentgateway.prd.azsm.azure.comevhns-sm-ur-prd-<region>.servicebus.windows.net*.his.arc.azure.com*.guestconfiguration.azure.comlogin.microsoftonline.compas.windows.netmanagement.azure.com
- A capable Windows Hyper-V or VMware host on which to run the agent VM.
See the Recommended compute and memory resources section in this article for details about resource requirements for the agent VM.
Note
Currently, Windows Hyper-V and VMware are the only supported virtualization environments for your agent VM. Other virtualization environments aren't tested and are therefore not supported.
Determine required resources for the VM
Like every VM, the agent requires available compute, memory, network, and storage space resources on the host. Although overall data size might affect the time required to complete a migration, it's generally the number of files and folders that drives resource requirements.
Network resources
The agent requires unrestricted internet connectivity.
Although no single network configuration option works for every environment, the simplest configuration involves the deployment of an external virtual switch. The external switch type is connected to a physical adapter and allows your host operating system (OS) to share its connection with all your virtual machines (VMs). This switch allows communication between your physical network, the management operating system, and the virtual adapters on your virtual machines. This approach might be acceptable for a test environment, but is likely not sufficient for a production server.
After the switch is created, ensure that both the management and agent VMs are on the same switch. On the WAN link firewall, outbound TCP port 443 must be open. Keep in mind that connectivity interruptions are to be expected when changing network configurations.
You can get help with creating a virtual switch for Hyper-V virtual machines in the Windows Server documentation. Consult the VMware support website for detailed guidance on creating a virtual switch for VMware-hosted VMs.
Recommended compute and memory resources
| Migration scale* | Memory (RAM) | Virtual processor count cores (at 2 GHz min.) |
|---|---|---|
| 1 million items | 8 GiB | 4 virtual cores |
| 10 million items | 8 GiB | 4 virtual cores |
| 30 million items | 12 GiB | 6 virtual cores |
| 50 million items | 16 GiB | 8 virtual cores |
| 100 million items | 16 GiB | 8 virtual cores |
Number of items refers to the total number of files and folders in the source.
Important
While agent VMs below minimal specs might work for your migration, performance is suboptimal and therefore not supported.
The Performance targets article contains test results from different source namespaces and VM resources.
Local storage capacity
At a minimum, the agent image needs 20 GiB of local storage. The amount required might increase if a large number of small files are cached during a migration.
Download the agent VM image
Images for agent VMs are hosted on Microsoft Download Center as a zip file. Download the file at https://aka.ms/StorageMover/agent and extract the agent virtual hard disk (VHD) image to your virtualization host.
Create the agent VM
The following steps describe the process for creating a VM using Microsoft Hyper-V. Consult the VMware support website for detailed guidance on creating a VMware-based VM.
Create a new VM on which to host the agent. Open Hyper-V Manager. In the Actions pane, select New and Virtual Machine... to launch the New Virtual Machine Wizard.
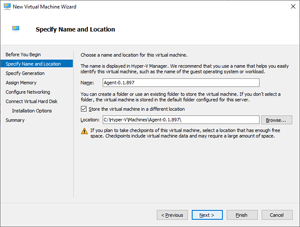
Within the Specify Name and Location pane, provide values for the agent VM's Name and Location fields. The location should match the folder where the VHD is stored, if possible. Select Next.
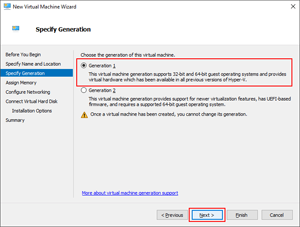
Within the Specify Generation pane, select the Generation 1 option.
Important
Only Generation 1 VMs are supported. This Linux image doesn't boot as a Generation 2 VM.
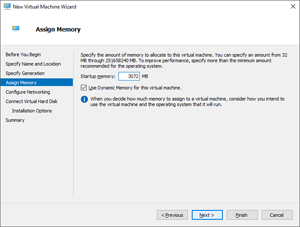
If you haven't already, determine the amount of memory you need for your VM. Enter this amount in the Assign Memory pane, noting that you need to enter the value in MiB. 1 GiB = 1024 MiB. Using the Dynamic Memory feature is fine.
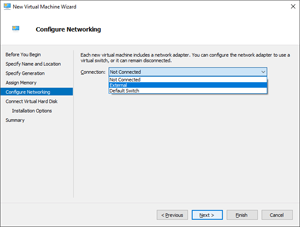
Within the Configure Networking pane, select the Connection drop-down. From the list, choose the virtual switch that provides the agent with internet connectivity and select Next. For more information, see the Hyper-V virtual networking documentation for details.
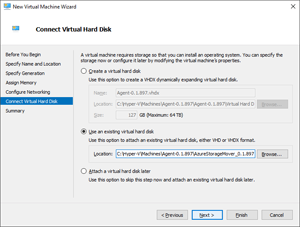
Within the Connect Virtual Hard Disk pane, select the Use an existing Virtual Hard Disk option. In the Location field, select Browse and navigate to the VHD file that was extracted in the previous steps. Select Next.
Within the Summary pane, select Finish to create the agent VM.
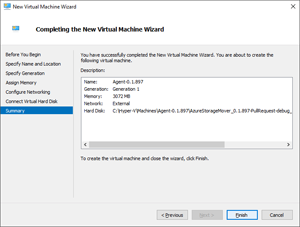
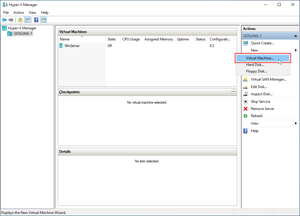
After the new agent is successfully created, it will appear in the Virtual Machines pane within the Hyper-V Manager.


Change the default password
The agent is delivered with a default user account and password. Connect to the newly created agent and change the default password immediately after the agent is deployed and started.
From a machine on the same subnet as the agent, run an ssh command:
ssh <AgentIpAddress> -l admin
Important
A newly deployed Storage Mover agent has a default password:
Local user: admin
Default password: admin
You're prompted to change the default password immediately after you first connect to a newly deployed agent. Note down the new password, there's no process to recover it. Losing your password locks you out from the administrative shell. Cloud management doesn't require this local admin password. If the agent was previously registered, you can still use it for migration jobs. Agents are disposable. They hold little value beyond the current migration job they're executing. You can always deploy a new agent and use that instead to run the next migration job.
Bandwidth throttling
Take time to consider the amount of bandwidth a new machine uses before you deploy it to your network. An Azure Storage Mover agent communicates with a source share using the local network, and the Azure Storage service on the wide area network (WAN) link. In both cases, the agent is designed to make full use of the network's bandwidth by default. However, you can now set bandwidth management schedules for your Storage Mover agents.
Alternatively, you can create a local virtual network with an internet connection and configure quality of service (QoS) settings. This approach allows you to expose the agent through the virtual network and to locally configure an unauthenticated network proxy server on the agent if needed.
Decommissioning an agent
When you no longer need a specific storage mover agent, you can decommission it. Decommissioning is a two-step process:
- Unregister the agent from the storage mover resource.
- Stop the agent VM on your virtualization host and then delete it.
Decommissioning an agent starts with unregistering the agent. There are three options to start the unregistration process:
You can unregister an agent using the administrative shell of the agent VM. The agent must be connected to the service and showing online both locally and through Azure portal and either Azure PowerShell or Azure CLI.
From a machine on the same subnet as the agent, run an ssh command:
ssh <AgentIpAddress> -l admin
Important
A newly deployed Storage Mover agent has a default password:
Local user: admin
Default password: admin
You're prompted to change the default password immediately after you first connect to a newly deployed agent. Note down the new password, there's no process to recover it. Losing your password locks you out from the administrative shell. Cloud management doesn't require this local admin password. If the agent was previously registered, you can still use it for migration jobs. Agents are disposable. They hold little value beyond the current migration job they're executing. You can always deploy a new agent and use that instead to run the next migration job.
1) System configuration
2) Network configuration
3) Service and job status
4) Unregister
5) Collect support bundle
6) Restart agent
7) Disk Cleanup
8) Exit

xdmsh> 4
Select the option 4) Unregister. You're prompted for confirmation.
Warning
Unregistration stops any running migration job on the agent and permanently removes the agent from the pool of available migration agents. Re-registration of a previously registered agent VM isn't supported. If you need a new agent you should register a new, previously unregistered agent VM. Don't reuse a previously unregistered agent VM.
Several things take place during the unregistration process:
The agent is removed from the storage mover resource. You can no longer see the agent in the Registered agents tab in the portal or select it for new migration jobs.
The agent is also removed from the Azure ARC service. This removal deletes the hybrid compute resource of type Server - Azure Arc that represented the agent with the Azure ARC service in the same resource group as your storage mover resource.
Unregistration removes the managed identity of the agent from Microsoft Entra ID. The associated service principal is automatically removed, invalidating any permissions this agent might have on other Azure resources. If you check the role-based access control (RBAC) role assignments, for instance of a target storage container the agent previously had permissions to, you no longer find the service principal of the agent, because it was deleted. The assignment itself is still visible as "Unknown service principal" but this assignment no longer connects to an identity and can never be reconnected. It's simply a sign that a role assignment used to be here, of a service principal that no longer exists.
This behavior is standard, and not specific to Azure Storage Mover. You can observe the same behavior if you remove a different service principal from Microsoft Entra ID and then check a former role assignment.
Warning
Unregistration of an offline agent is supported, but the agent's Azure ARC resource isn't automatically deleted. Instead, you'll need to manually delete the resource after unregistering an offline agent. The lifecycle of the agent's managed identity is tied to this resource. Removing it removes the managed identity and service principal, as previously described.
You can check that the unregistration process is complete when the agent disappears from the Azure portal and either Azure PowerShell or Azure CLI. You also need to confirm that the hybrid compute resource of type Server - Azure Arc is gone from the resource group.
You can also use the agent's administrative shell to check that the agent is unregistered. To verify unregistration, navigate to any submenu and then return to the top-level menu. If unregistration was successful, you see the menu option toggle from Unregister to Register. As previously mentioned, re-registering isn't supported.
You can stop the agent VM on your virtualization host after the unregistration is complete. It's best to delete the agent VM image since it was previously registered, retains some state, and must not be used again. If you need a new agent, deploy a new VM with a new agent image, never before registered.
Next steps
After you deploy your agent, started it, and changed the default password of the local account: