Note
Access to this page requires authorization. You can try signing in or changing directories.
Access to this page requires authorization. You can try changing directories.
In this article, you learn how to set bandwidth management schedules for your Storage Mover agents.
When migrating your files and folders to Azure, you need to carefully consider the upload bandwidth you want to make available to each of your Storage Mover agents. Other workloads may also depend on having sufficient bandwidth available. To make your Storage Mover agents a good neighbor to other workloads in your network, you can schedule limits for each agent.
Prerequisites
Before you can set a bandwidth schedule, you first need to deploy a Storage Mover resource in one of your resource groups, and then register an agent. Bandwidth limit schedules are set and stored per registered agent.
Understanding the basic concept of bandwidth management
A schedule is an attribute of a registered agent. In the portal, you can set and change this schedule on the registered agents page, found in your Storage Mover resource.
A bandwidth management schedule describes time windows throughout a week, during which you can set a limit on how much upload bandwidth a Storage Mover agent is allowed to use.

This schedule looks a lot like a calendar in outlook, but there are a few important differences:
- The schedule is repeating itself. It has the seven weekdays and at the end of the week, the schedule repeats.
- An entry in the schedule is a designated limit the agent shall not exceed. Clear time stretches on a day designate no limitation, allowing the agent to use as much bandwidth as needed.
- You can't schedule a limit for a specific date, but for repeating weekdays. As an example, you can say: "Limit the agent's bandwidth to no more than x during my cloud backup window on Sundays."
- The schedule doesn't store a timezone. When you set a limit that starts for instance at 9am, then that means agent-local time. You can see what timezone is configured for the agent. Pay close attention, the agent's timezone may be different from the timezone of your site where the agent is deployed.
Tip
You can set the timezone of a Storage Mover agent to where it is deployed.
1. Connect to the agent console and login
2. Select menu option: 1) System configuration
3. Select menu option: 3) Change timezone and follow the prompts to make your selection.
Enabling or changing a bandwidth management schedule
Using the Azure portal, you can enable a bandwidth schedule on a registered agent resource.
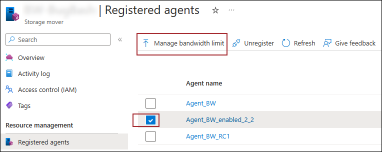
- With the portal showing your Storage Mover resource, select "Registered agents" in the menu on the left.
- You now have two options to set or view a schedule. You can find the column "Bandwidth management" and click on the link for your selected agent. Or, you can select the checkbox in front of your agent. That enables and a command button above the list of agents, labeled "Manage bandwidth limit".
- The bandwidth management window opens and displays the schedule currently in effect for the agent. When an empty schedule is shown, there are no bandwidth limitations defined for this agent.

Setting a bandwidth limit
Open the bandwidth scheduling window. (see previous section)
Here you can create a custom schedule for this selected agent, or you can reuse a schedule that was previously created for another agent.
- To create a custom schedule, select the "Add limit" command. A dialog opens, allowing you to define a time slice during which you want to set the maximum bandwidth on your WAN link, that the agent is allowed to use.
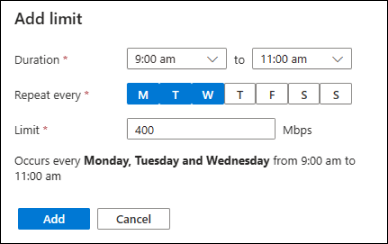
The dialog requires you to set a start and an end-time during which you want to apply an uplink limit for the agent. You can then pick on which days of the week you like to apply your new limit. Select all weekdays during which you like to apply the same limit. You then need to specify the limit in Mbps (Megabits per second). Overlapping times aren't allowed. Any limit you set, applies at the displayed time in the agent's timezone. You can find the agent's timezone displayed at the top of the bandwidth management window. You may need to offset your schedule or adjust the agent's timezone. - To "reuse a schedule from another agent", follow the link to an upcoming section.
- To apply your changes to this agent, select the "Save" button at the bottom of the "Bandwidth management" window.
Note
Only the migration data stream an agent establishes to your target storage in Azure is controlled by this schedule. In addition to this data stream, there is control plane traffic from the agent to Azure. Control messages, progress telemetry, and copy logs generally require only a small amount of bandwidth. To ensure proper functionality of the agent throughout your migration, the control plane of the agent is not governed by the schedule you set. In an extreme case the agent may exceed the limits you defined by a small amount.
Tip
You can set the timezone of a Storage Mover agent to where it is deployed.
1. Connect to the agent console and login
2. Select menu option: 1) System configuration
3. Select menu option: 3) Change timezone and follow the prompts to make your selection.
Changing or deleting a bandwidth limit
Open the bandwidth management schedule for your selected agent. (see previous section)
If you like to edit or delete a specific limit, select the limit and the "Edit limit" dialog opens. You can adjust the time slot or delete the limit. There are no bulk-editing options, so you must edit every limit on every weekday individually.
If your goal is to disable bandwidth management altogether for the agent, select the "Clear all limits" command.
Don't forget to apply your changes to this agent. Select the "Save" button at the bottom of the "Bandwidth management" window.
Reusing a schedule from another agent
You can reuse the bandwidth limit schedule from another agent.
- Open the bandwidth management schedule for your selected agent. See the previous paragraph.
- Select the command "Import limits from other agents" and select the agent you like to copy the schedule from. If there are no agents in the list, then there are no other agents with enabled bandwidth limits.
Warning
Using this option will overwrite the currently configured schedule for this agent. You cannot restore any unsaved changes you may have made prior to importing a schedule.
- Optionally, you can now modify this copied schedule.
- To apply your changes to this agent, select the "Save" button at the bottom of the "Bandwidth management" window.
Important
Schedules are stored free of a timezone. That enables them to be reused on other agents. A scheduled limit will be in effect during this time in whatever the agent's timezone is. You need to ensure that you offset your bandwidth management schedule if the agent's timezone is different to the one used in the location you've deployed the agent in. For example, if the agent's timezone is UTC but your agent is actually deployed in the Pacific timezone (PST), you need to offset your schedule by -7 hours. Alternatively, you can adjust the agent's timezone to the correct one for the location. Doing this removes the need to offset your schedule and also enables your schedule to automatically adjust to Daylight Savings, should your timezone observe that.
Tip
You can set the timezone of a Storage Mover agent to where it is deployed.
1. Connect to the agent console and login
2. Select menu option: 1) System configuration
3. Select menu option: 3) Change timezone and follow the prompts to make your selection.
Use PowerShell to configure a bandwidth limit schedule
Managing this feature is possible when using the latest version of the Azure PowerShell module.
Prepare your Azure PowerShell environment
- If you choose to use Azure PowerShell locally:
- Install the latest version of the Az PowerShell module.
- Connect to your Azure account using the Connect-AzAccount cmdlet.
- If you choose to use Azure Cloud Shell:
- See Overview of Azure Cloud Shell for more information.
You need the Az.StorageMover module:
## Ensure you are running the latest version of PowerShell 7
$PSVersionTable.PSVersion

## Your local execution policy must be set to at least remote signed or less restrictive
Set-ExecutionPolicy -ExecutionPolicy RemoteSigned -Scope CurrentUser

## If you don't have the general Az PowerShell module, install it first
Install-Module -Name Az -Scope CurrentUser -Repository PSGallery -Force

## Lastly, the Az.StorageMover module is not installed by default and must be manually requested.
Install-Module -Name Az.StorageMover -Scope CurrentUser -Repository PSGallery -Force
Manage a bandwidth limit schedule
## Set variables
$subscriptionID        = "Your subscription ID"
$resourceGroupName     = "Your resource group name"
$storageMoverName      = "Your storage mover resource name"
$registeredAgentName   = "Name of the agent, registered to your storage mover resource"

## Log into Azure with your Azure credentials
Connect-AzAccount -SubscriptionId $subscriptionID # -DeviceLogin #Leverage DeviceLogin if you need to authenticate your PowerShell session from another machine. # -TenantID #In some environments you may you need to specify the EntraID tenant to authenticate against.

#------------
# GET the schedule configured on an agent:
$schedule = @(Get-AzStorageMoverAgent -ResourceGroupName $resourceGroupName -StorageMoverName $storageMoverName -AgentName $registeredAgentName).UploadLimitScheduleWeeklyRecurrence
# $schedule then contains a JSON structure with elements for each configured time windows and the upload limit in Mbps that applies during this window.

# Output the entire schedule
$schedule

# Schedule elements can be addressed like an array.
$schedule[0]
Add a new bandwidth limitation
$newLimit = New-AzStorageMoverUploadLimitWeeklyRecurrenceObject `
    -Day "Monday", "Tuesday" ` # Mandatory. An array, limited to the English names of all 7 days, Monday through Sunday in any order.
    -LimitInMbps 900 ` # Mandatory. Limit in "Mega bits per second"
    -StartTimeHour 5 ` # Mandatory. 24-hour clock: 5  = 5am
    -EndTimeHour 17 `  # Mandatory. 24-hour clock: 17 = 5pm
    -EndTimeMinute 30  # Optional. Time blocks are precise to 30 Minutes. -EndTimeMinute 0 is equivalent to omitting the parameter. The only other acceptable value is the half hour mark: 30.

$schedule += $newLimit # Appends the new limit to the exiting schedule. The JSON structure does not need to be ordered by days or time.

# Updates the bandwidth limit schedule for the selected agent by adding the defined "time block" to the schedule.
# Ensure that the new limit does not overlap with an already configured limit in the schedule, otherwise the operation will fail.
Update-AzStorageMoverAgent `
    -ResourceGroupName $resourceGroupName `
    -StorageMoverName $storageMoverName `
    -AgentName $registeredAgentName `
    -UploadLimitScheduleWeeklyRecurrence $schedule
    # This command sets and overwrites a bandwidth limit schedule for the selected agent. Be sure to preserve an existing schedule if you want to only add a new limit. If you are building an entirely new schedule, you can form all your limit objects and then supply a comma-separated list of your new limits here.
    # Ensure the new limit's time span is not overlapping any existing limits. Otherwise, the operation will fail.
Disable bandwidth limitation for an agent
Update-AzStorageMoverAgent `
    -ResourceGroupName $resourceGroupName `
    -StorageMoverName $storageMoverName `
    -AgentName $registeredAgentName `
    -UploadLimitScheduleWeeklyRecurrence @() # Supply an empty array to remove all previously configured limits. This operation cannot be undone. You have to build and supply a new schedule if you want to enable bandwidth limitations for this agent again.
Change an existing bandwidth limitation
You can combine the previously described management actions to selectively update an existing bandwidth limitation to a new limit or updated time span.
# Step 1: define the new limit object you want to use to replace an existing limit:
$limit = New-AzStorageMoverUploadLimitWeeklyRecurrenceObject `
    -Day "Monday", "Tuesday" ` # Mandatory. An array, limited to the English names of all 7 days, Monday through Sunday in any order.
    -LimitInMbps 900 ` # Mandatory. limit in "Mega bits per second"
    -StartTimeHour 5 ` # Mandatory. 24-hour clock: 5  = 5am
    -EndTimeHour 17 `  # Mandatory. 24-hour clock: 17 = 5pm
    -EndTimeMinute 30  # Optional. Time blocks are precise to 30 Minutes. -EndTimeMinute 0 is equivalent to omitting the parameter. The only other acceptable value is the half hour mark: 30.

# Step 2: Find the bandwidth limitation window you want to change:
$schedule = @(Get-AzStorageMoverAgent -ResourceGroupName $resourceGroupName -StorageMoverName $storageMoverName -AgentName $registeredAgentName).UploadLimitScheduleWeeklyRecurrence

$schedule[<n>] = $limit # Replace the limit (start count at zero) with your newly defined limit.

#Step 3: Update the bandwidth limit schedule for the selected agent:
Update-AzStorageMoverAgent `
    -ResourceGroupName $resourceGroupName `
    -StorageMoverName $storageMoverName `
    -AgentName $registeredAgentName `
    -UploadLimitScheduleWeeklyRecurrence $schedule # Apply your entire, updated schedule. Performing this step on an agent with other limits already configured will override them with this new schedule. Ensure there are no overlapping time spans, otherwise the operation will fail.
Understanding the JSON schema of a bandwidth limit schedule
The bandwidth limit schedule is stored as a JSON construct in the property UploadLimitScheduleWeeklyRecurrence of a registered agent.
The previous PowerShell section shows an example of how you can form and update this agent property by using Azure PowerShell. You can, however, manually form that JSON and directly supply it as an argument for the property. The following section can help you understand the bandwidth schedule elements of this JSON construct.
Important
The schedule consists of one or more time spans during which a bandwidth limit applies that the agent is not to exceed. These time spans must not be overlapping. At any given time, only one limit may apply. A JSON specifying a schedule with overlapping times is considered malformed and cannot be applied to the agent.
The following two representations of a bandwidth limit schedule are equivalent:

{
  {
    "startTime":
    {
      "hour": 7,
      "minute": 0
    },
    "endTime":
    {
      "hour": 9,
      "minute": 0
    }
    "days": ["Monday"],
    "limitInMbps": 500
  },
  {
    "startTime":
    {
      "hour": 9,
      "minute": 0
    },
    "endTime":
    {
      "hour": 12,
      "minute": 0
    }
    "days": ["Monday", "Tuesday", "Wednesday"],
    "limitInMbps": 200
  }
}
Note
Time spans not covered by an entry in the schedule allow the agent to utilize available bandwidth. During these times, it is likely that an agent doesn't utilize all available bandwidth. You can find more details about that in the performance article, section: "Why migration performance varies".
Next steps
Advance to one of the next articles to learn how to deploy a Storage Mover agent or create a migration project.