Note
Access to this page requires authorization. You can try signing in or changing directories.
Access to this page requires authorization. You can try changing directories.
Object replication asynchronously copies block blobs between a source storage account and a destination account. When you configure object replication, you create a replication policy that specifies the source storage account and the destination account. A replication policy includes one or more rules that specify a source container and a destination container and indicate which block blobs in the source container will be replicated. For more information about object replication, see Object replication for block blobs.
This article describes how to configure an object replication policy by using the Azure portal, PowerShell, or Azure CLI. You can also use one of the Azure Storage resource provider client libraries to configure object replication.
Prerequisites
Before you configure object replication, create the source and destination storage accounts if they don't already exist. The source and destination accounts can be either general-purpose v2 storage accounts or premium block blob accounts. For more information, see Create an Azure Storage account.
Object replication requires that blob versioning is enabled for both the source and destination account, and that blob change feed is enabled for the source account. To learn more about blob versioning, see Blob versioning. To learn more about change feed, see Change feed support in Azure Blob Storage. Keep in mind that enabling these features can result in additional costs.
To configure an object replication policy for a storage account, you must be assigned the Azure Resource Manager Contributor role, scoped to the level of the storage account or higher. For more information, see Azure built-in roles in the Azure role-based access control (Azure RBAC) documentation.
Object replication is not yet supported in accounts that have a hierarchical namespace enabled.
Configure object replication with access to both storage accounts
If you have access to both the source and destination storage accounts, then you can configure the object replication policy on both accounts. The following examples show how to configure object replication with the Azure portal, PowerShell, or Azure CLI.
When you configure object replication in the Azure portal, you only need to configure the policy on the source account. The Azure portal automatically creates the policy on the destination account after you configure it for the source account.
To create a replication policy in the Azure portal, follow these steps:
Navigate to the source storage account in the Azure portal.
Under Data management, select Object replication.
Select Create replication rules.
Select the destination subscription and storage account.
In the Container pair details section, select a source container from the source account, and a destination container from the destination account. You can create up to 10 container pairs per replication policy from the Azure portal. To configure more than 10 container pairs (up to 1000), see Configure object replication using a JSON file.
The following image shows a set of replication rules.
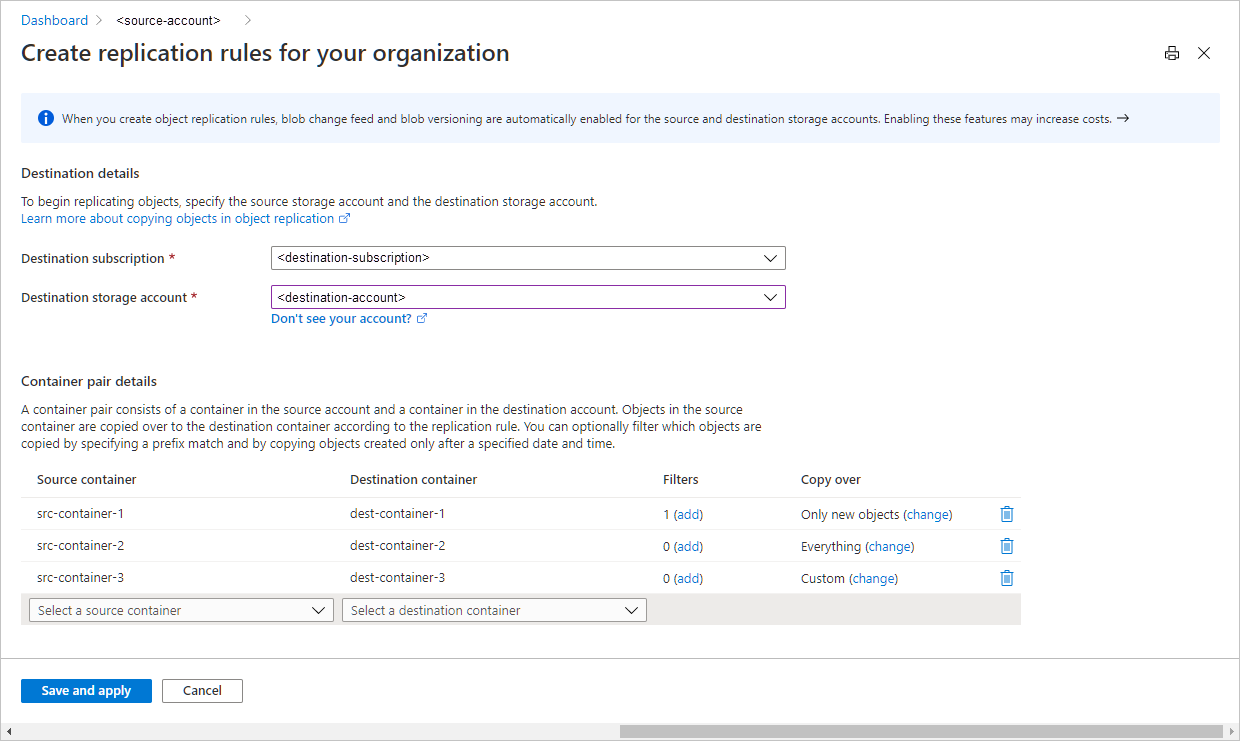
If desired, specify one or more filters to copy only blobs that match a prefix pattern. For example, if you specify a prefix
b, only blobs whose name begin with that letter are replicated. You can specify a virtual directory as part of the prefix. You can add a maximum of up to five prefix matches. The prefix string doesn't support wildcard characters.The following image shows filters that restrict which blobs are copied as part of a replication rule.

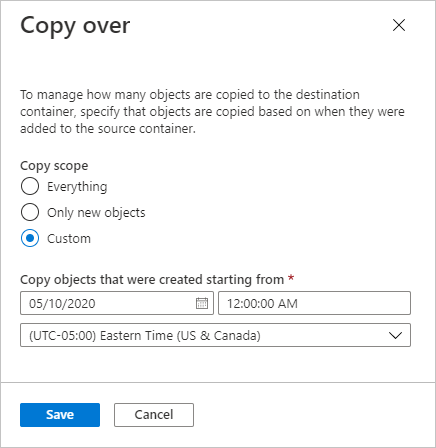
By default, the copy scope is set to copy only new objects. To copy all objects in the container or to copy objects starting from a custom date and time, select the change link and configure the copy scope for the container pair.
The following image shows a custom copy scope that copies objects from a specified date and time onward.
Select Save and apply to create the replication policy and start replicating data.
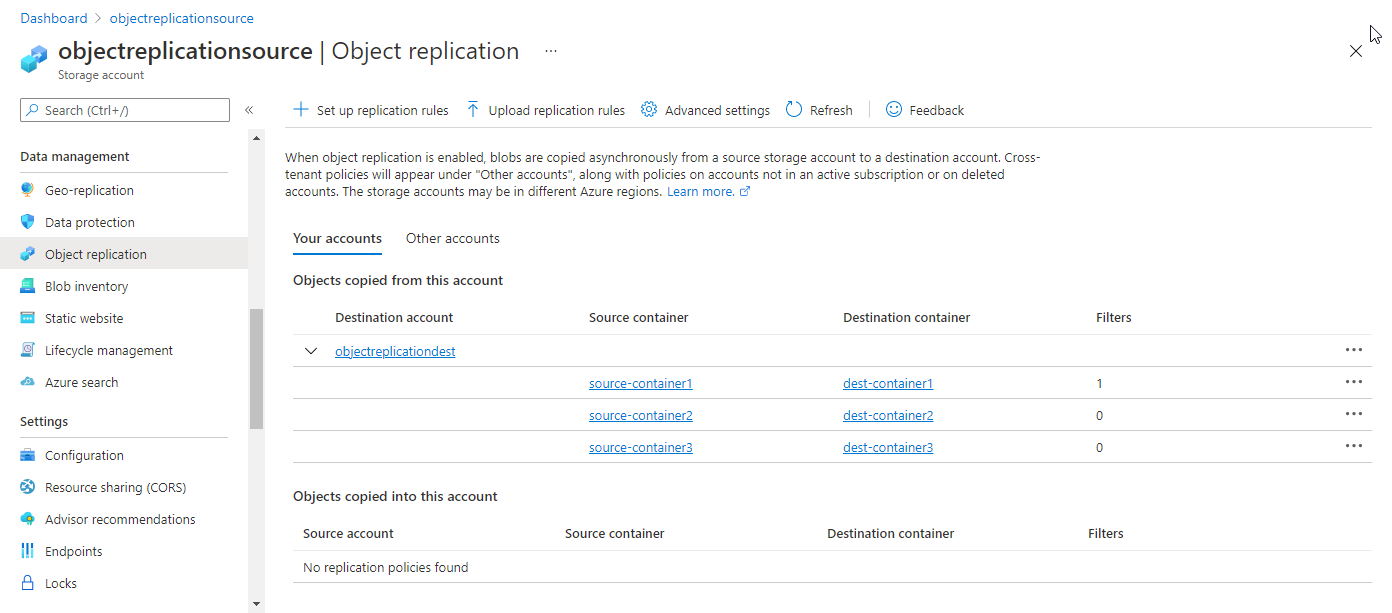
After you have configured object replication, the Azure portal displays the replication policy and rules, as shown in the following image.
Configure object replication using a JSON file
If you don't have permissions to the source storage account or if you want to use more than 10 container pairs, then you can configure object replication on the destination account and provide a JSON file that contains the policy definition to another user to create the same policy on the source account. For example, if the source account is in a different Microsoft Entra tenant from the destination account, then you can use this approach to configure object replication.
For information about how to author a JSON file that contains the policy definition, see Policy definition file.
Note
Cross-tenant object replication is permitted by default for a storage account. To prevent replication across tenants, you can set the AllowCrossTenantReplication property to disallow cross-tenant object replication for your storage accounts. For more information, see Prevent object replication across Microsoft Entra tenants.
The examples in this section show how to configure the object replication policy on the destination account, and then get the JSON file for that policy that another user can use to configure the policy on the source account.
To configure object replication on the destination account with a JSON file in the Azure portal, follow these steps:
Create a local JSON file that defines the replication policy on the destination account. Set the policyId field to default so that Azure Storage will define the policy ID.
An easy way to create a JSON file that defines a replication policy is to first create a test replication policy between two storage accounts in the Azure portal. You can then download the replication rules and modify the JSON file as needed.
Navigate to the Object replication settings for the destination account in the Azure portal.
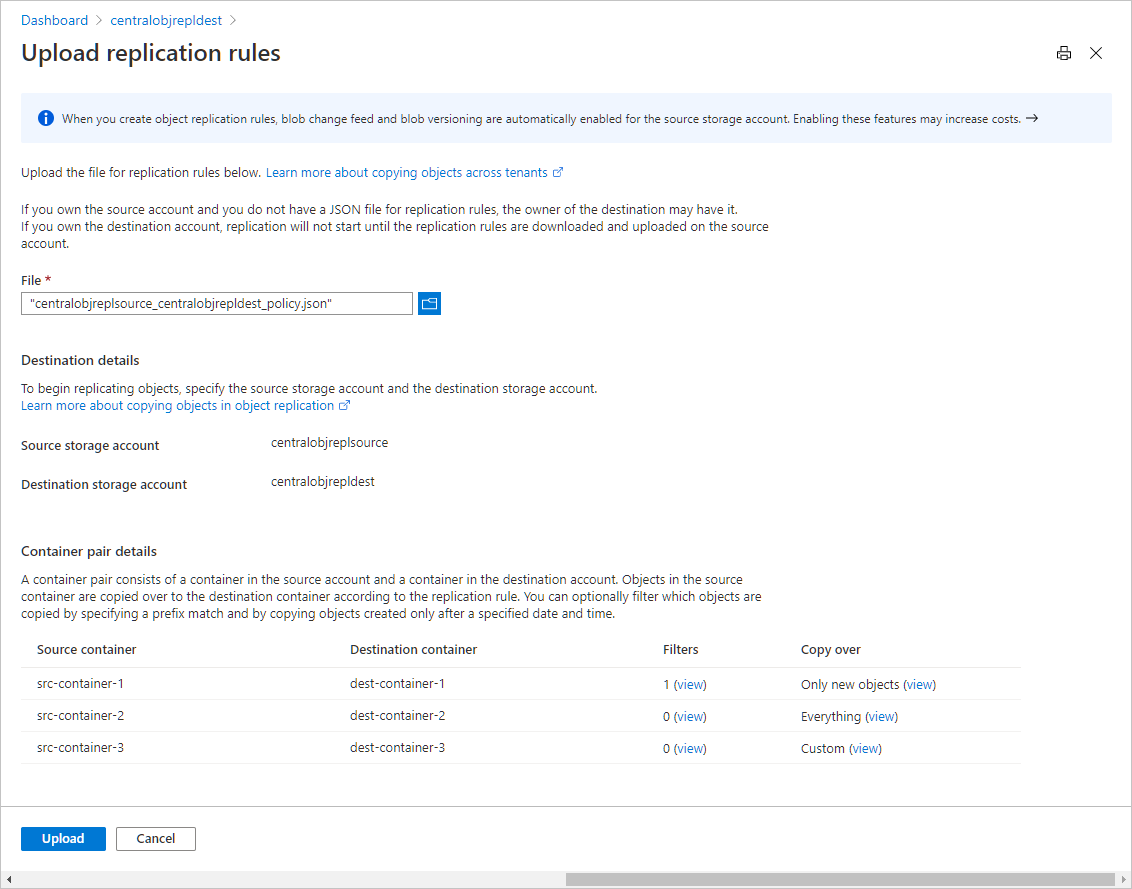
Select Upload replication rules.
Upload the JSON file. The Azure portal displays the policy and rules that will be created, as shown in the following image.
Select Upload to create the replication policy on the destination account.
You can then download a JSON file containing the policy definition that you can provide to another user to configure the source account. To download this JSON file, follow these steps:
Navigate to the Object replication settings for the destination account in the Azure portal.
Select the More button next to the policy that you wish to download, then select Download rules, as shown in the following image.

Save the JSON file to your local computer to share with another user to configure the policy on the source account.
The downloaded JSON file includes the policy ID that Azure Storage created for the policy on the destination account. You must use the same policy ID to configure object replication on the source account.
Keep in mind that uploading a JSON file to create a replication policy for the destination account via the Azure portal doesn't automatically create the same policy in the source account. Another user must create the policy on the source account before Azure Storage begins replicating objects.
Configure blob index tags replication (preview)
Object replication now supports copying index tags from source blobs to destination blobs. You can configure this capability as part of a new or existing replication rule.
Important
Tag replication is currently in PREVIEW. See the Supplemental Terms of Use for Microsoft Azure Previews for legal terms that apply to Azure features that are in beta, preview, or otherwise not yet released into general availability.
Prerequisites
The source storage account must be registered for the EnableObjectReplicationTags preview feature before tag replication can be enabled. Register the preview feature in the Azure portal by following the steps in the Azure Resource Manager preview features documentation.
Enable Tags replication
Tags replication can be enabled on both new and existing object replication policies. Any change to a source blob or it's index tags will trigger replication of tags.
Enable tags replication from the Object Replication blade when creating a rule or update existing rules using the Tags replication column.
To configure replicating blob index tags when creating a new rule, follow these steps:
- Navigate to the source storage account in the Azure portal.
- Under Data management, select Object replication.
- Select Create replication rules.
- Select Enable tags replication and finally select Save and apply to configure replicating blob index tags.
To configure replicating blob index tags for exsiting rules, follow these steps:
- Navigate to Your accounts tab in Object replication page
- Select Enable option under Tags replication column in Objects copied from this account table and select OK.
- Status of Tags replication column against a rule now shows Enabled.
To disable replicating blob index tags for exsiting rules, follow these steps:
- Navigate to Your accounts tab in Object replication page
- Select an exsiting rule and select Edit rules from the '…' menu
- Unselect Enable tags replication option and finally select Save and apply to disable replicating blob index tags.
Configure replication metrics
Enable replication metrics
You can enable replication metrics on both new and existing object replication policies. It might take a few minutes to start observing the metrics.
You can enable metrics using Object Replication blade from the new Metrics column or by editing the Edit Rules section of a policy from "…" on the OR policy row.
If you enable metrics on a policy that is configured to copy over existing data, you might observe an increasing amount at the beginning while the policy works on initial phase of listing. Once this is completed, the replication will start.
View replication metrics
You can click the View link from Metrics column to view monitoring metrics
To further view metrics in Azure Monitor, click on chart of a metric. This will direct you to Azure Monitor Metrics view with more filtering capabilities.
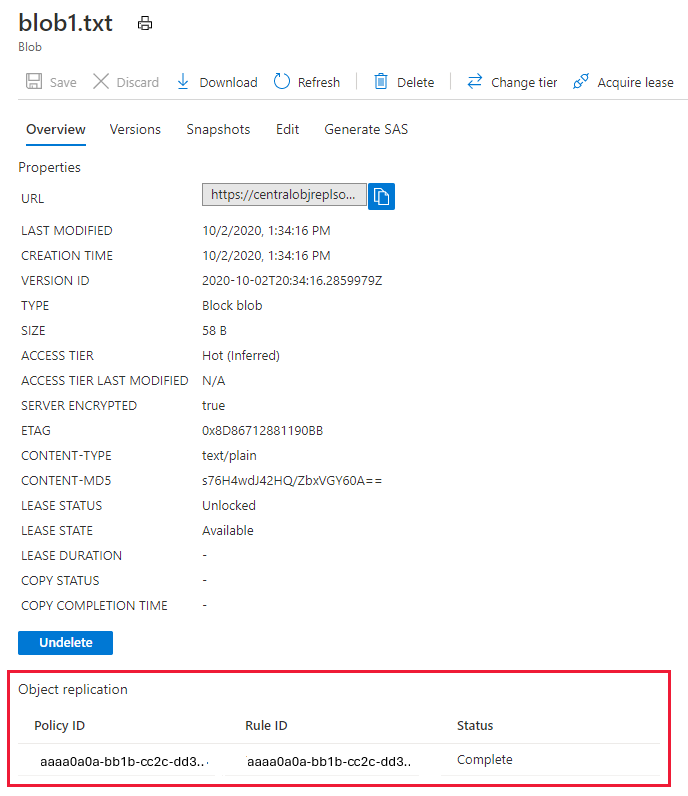
Check the replication status of a blob
You can check the replication status for a blob in the source account using the Azure portal, PowerShell, or Azure CLI. Object replication properties aren't populated until replication has either completed or failed.
To check the replication status for a blob in the source account in the Azure portal, follow these steps:
- Navigate to the source account in the Azure portal.
- Locate the container that includes the source blob.
- Select the blob to display its properties. If the blob has been replicated successfully, you'll see in the Object replication section that the status is set to Complete. The replication policy ID and the ID for the rule governing object replication for this container are also listed.
Remove a replication policy
To remove a replication policy and its associated rules, use Azure portal, PowerShell, or CLI.
To remove a replication policy in the Azure portal, follow these steps:
- Navigate to the source storage account in the Azure portal.
- Under Settings, select Object replication.
- Select the More button next to the policy name.
- Select Delete Rules.
Behavior when re-creating an object replication policy
When an object replication policy is deleted and re‑created on the same source and destination container pair, Azure treats the new policy as an entirely separate replication relationship. The following behavior applies:
A new policy ID is generated for the re‑created policy.
Any replication tasks associated with the previous policy are terminated.
The destination container is assigned a new replication lock tied to the new policy ID.
Replication state from the previous policy is not reused.
Replication behavior after re‑creating an object replication policy
After the policy is re‑created, Azure attempts replication again for eligible blobs, and the outcome depends on the availability of blob version history on the source account:
If a source blob has no previous versions available on the destination: Azure determines that the blob has already been copied under a prior policy. Re‑replication of that blob does not succeed. Only new blob writes (or new versions created after the policy is re‑created) replicate successfully.
If a source blob has previous versions available on the destination: Azure is able to re‑replicate the blob. The blob is copied again to the destination as a new version. This enables successful re‑replication of existing blobs without data inconsistency.