Configure customer-managed keys in the same tenant for a new storage account
Azure Storage encrypts all data in a storage account at rest. By default, data is encrypted with Microsoft-managed keys. For additional control over encryption keys, you can manage your own keys. Customer-managed keys must be stored in an Azure Key Vault or in an Azure Key Vault Managed Hardware Security Model (HSM).
This article shows how to configure encryption with customer-managed keys at the time that you create a new storage account. The customer-managed keys are stored in a key vault.
To learn how to configure customer-managed keys for an existing storage account, see Configure customer-managed keys in an Azure key vault for an existing storage account.
Note
Azure Key Vault and Azure Key Vault Managed HSM support the same APIs and management interfaces for configuration of customer-managed keys. Any action that is supported for Azure Key Vault is also supported for Azure Key Vault Managed HSM.
Configure the key vault
You can use a new or existing key vault to store customer-managed keys. The storage account and key vault may be in different regions or subscriptions in the same tenant. To learn more about Azure Key Vault, see Azure Key Vault Overview and What is Azure Key Vault?.
Using customer-managed keys with Azure Storage encryption requires that both soft delete and purge protection be enabled for the key vault. Soft delete is enabled by default when you create a new key vault and cannot be disabled. You can enable purge protection either when you create the key vault or after it is created.
Azure Key Vault supports authorization with Azure RBAC via an Azure RBAC permission model. Microsoft recommends using the Azure RBAC permission model over key vault access policies. For more information, see Grant permission to applications to access an Azure key vault using Azure RBAC.
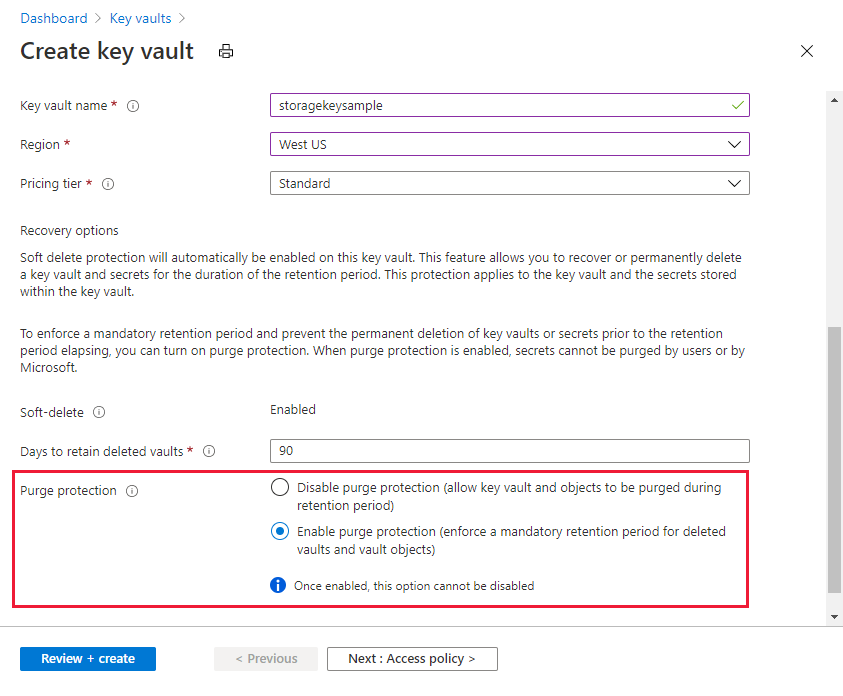
To learn how to create a key vault with the Azure portal, see Quickstart: Create a key vault using the Azure portal. When you create the key vault, select Enable purge protection, as shown in the following image.
To enable purge protection on an existing key vault, follow these steps:
- Navigate to your key vault in the Azure portal.
- Under Settings, choose Properties.
- In the Purge protection section, choose Enable purge protection.
Add a key
Next, add a key to the key vault. Before you add the key, make sure that you have assigned to yourself the Key Vault Crypto Officer role.
Azure Storage encryption supports RSA and RSA-HSM keys of sizes 2048, 3072 and 4096. For more information about supported key types, see About keys.
To learn how to add a key with the Azure portal, see Quickstart: Set and retrieve a key from Azure Key Vault using the Azure portal.
Use a user-assigned managed identity to authorize access to the key vault
When you enable customer-managed keys for a new storage account, you must specify a user-assigned managed identity. An existing storage account supports using either a user-assigned managed identity or a system-assigned managed identity to configure customer-managed keys.
When you configure customer-managed keys with a user-assigned managed identity, the user-assigned managed identity is used to authorize access to the key vault that contains the key. You must create the user-assigned identity before you configure customer-managed keys.
A user-assigned managed identity is a standalone Azure resource. To learn more about user-assigned managed identities, see Managed identity types. To learn how to create and manage a user-assigned managed identity, see Manage user-assigned managed identities.
The user-assigned managed identity must have permissions to access the key in the key vault. Assign the Key Vault Crypto Service Encryption User role to the user-assigned managed identity with key vault scope to grant these permissions.
Before you can configure customer-managed keys with a user-assigned managed identity, you must assign the Key Vault Crypto Service Encryption User role to the user-assigned managed identity, scoped to the key vault. This role grants the user-assigned managed identity permissions to access the key in the key vault. For more information on assigning Azure RBAC roles with the Azure portal, see Assign Azure roles using the Azure portal.
When you configure customer-managed keys with the Azure portal, you can select an existing user-assigned identity through the portal user interface.
Configure customer-managed keys for a new storage account
When you configure encryption with customer-managed keys for a new storage account, you can choose to automatically update the key version used for Azure Storage encryption whenever a new version is available in the associated key vault. Alternately, you can explicitly specify a key version to be used for encryption until the key version is manually updated.
You must use an existing user-assigned managed identity to authorize access to the key vault when you configure customer-managed keys while creating the storage account. The user-assigned managed identity must have appropriate permissions to access the key vault. For more information, see Authenticate to Azure Key Vault.
Configure encryption for automatic updating of key versions
Azure Storage can automatically update the customer-managed key that is used for encryption to use the latest key version from the key vault. Azure Storage checks the key vault daily for a new version of the key. When a new version becomes available, then Azure Storage automatically begins using the latest version of the key for encryption.
Important
Azure Storage checks the key vault for a new key version only once daily. When you rotate a key, be sure to wait 24 hours before disabling the older version.
To configure customer-managed keys for a new storage account with automatic updating of the key version, follow these steps:
In the Azure portal, navigate to the Storage accounts page, and select the Create button to create a new account.
Follow the steps outlined in Create a storage account to fill out the fields on the Basics, Advanced, Networking, and Data Protection tabs.
On the Encryption tab, indicate for which services you want to enable support for customer-managed keys in the Enable support for customer-managed keys field.
In the Encryption type field, select Customer-managed keys (CMK).
In the Encryption key field, choose Select a key vault and key, and specify the key vault and key.
For the User-assigned identity field, select an existing user-assigned managed identity.
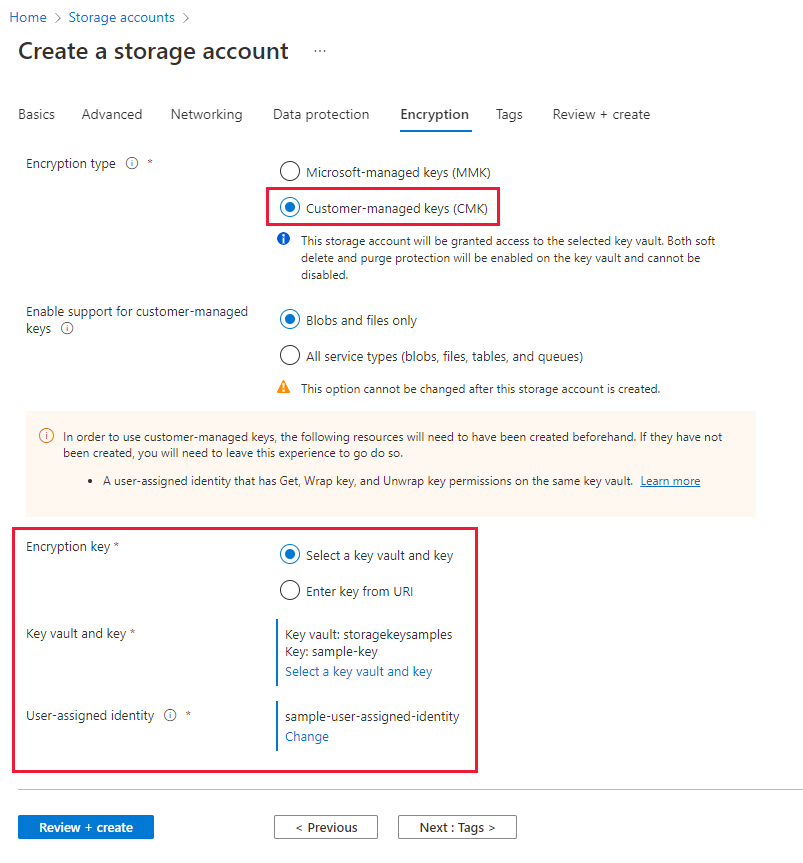
Select the Review button to validate and create the account.
You can also configure customer-managed keys with manual updating of the key version when you create a new storage account. Follow the steps described in Configure encryption for manual updating of key versions.
Configure encryption for manual updating of key versions
If you prefer to manually update the key version, then explicitly specify the version when you configure encryption with customer-managed keys while creating the storage account. In this case, Azure Storage won't automatically update the key version when a new version is created in the key vault. To use a new key version, you must manually update the version used for Azure Storage encryption.
You must use an existing user-assigned managed identity to authorize access to the key vault when you configure customer-managed keys while creating the storage account. The user-assigned managed identity must have appropriate permissions to access the key vault. For more information, see Authenticate to Azure Key Vault.
To configure customer-managed keys with manual updating of the key version in the Azure portal, specify the key URI, including the version, while creating the storage account. To specify a key as a URI, follow these steps:
In the Azure portal, navigate to the Storage accounts page, and select the Create button to create a new account.
Follow the steps outlined in Create a storage account to fill out the fields on the Basics, Advanced, Networking, and Data Protection tabs.
On the Encryption tab, indicate for which services you want to enable support for customer-managed keys in the Enable support for customer-managed keys field.
In the Encryption type field, select Customer-managed keys (CMK).
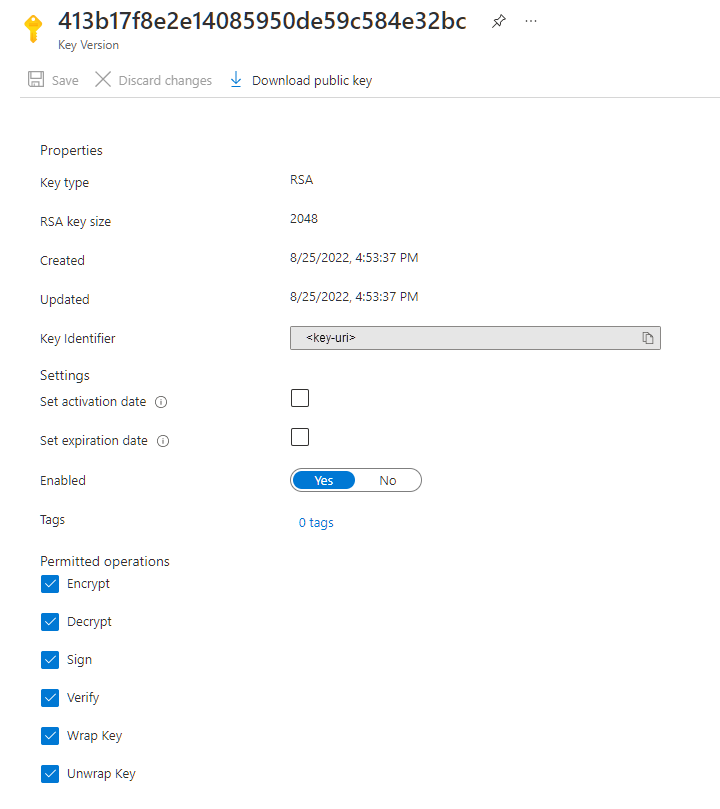
To locate the key URI in the Azure portal, navigate to your key vault, and select the Keys setting. Select the desired key, then select the key to view its versions. Select a key version to view the settings for that version.
Copy the value of the Key Identifier field, which provides the URI.
In the Encryption key settings for your storage account, choose the Enter key URI option.
Paste the URI that you copied into the Key URI field. Include the key version on the URI to configure manual updating of the key version.
Specify a user-assigned managed identity by choosing the Select an identity link.
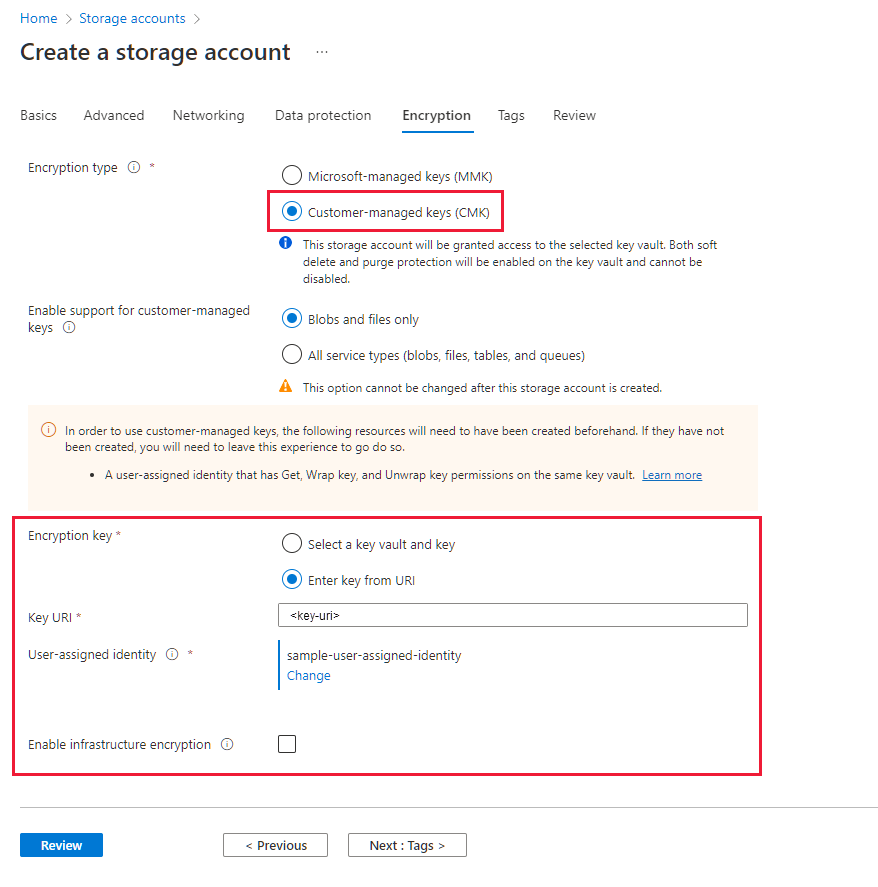
Select the Review button to validate and create the account.
Change the key
You can change the key that you are using for Azure Storage encryption at any time.
Note
When you change the key or key version, the protection of the root encryption key changes, but the data in your Azure Storage account remains encrypted at all times. There is no additional action required on your part to ensure that your data is protected. Changing the key or rotating the key version doesn't impact performance. There is no downtime associated with changing the key or rotating the key version.
To change the key with the Azure portal, follow these steps:
- Navigate to your storage account and display the Encryption settings.
- Select the key vault and choose a new key.
- Save your changes.
If the new key is in a different key vault, you must grant the managed identity access to the key in the new vault. If you choose manual updating of the key version, you will also need to update the key vault URI.
Revoke access to a storage account that uses customer-managed keys
To temporarily revoke access to a storage account that is using customer-managed keys, disable the key currently being used in the key vault. There is no performance impact or downtime associated with disabling and reenabling the key.
After the key has been disabled, clients can't call operations that read from or write to a blob or its metadata. For information about which operations will fail, see Revoke access to a storage account that uses customer-managed keys.
Caution
When you disable the key in the key vault, the data in your Azure Storage account remains encrypted, but it becomes inaccessible until you reenable the key.
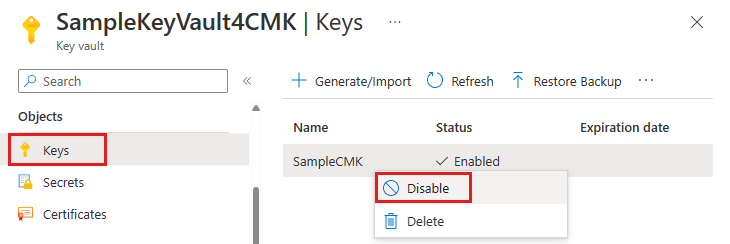
To disable a customer-managed key with the Azure portal, follow these steps:
Navigate to the key vault that contains the key.
Under Objects, select Keys.
Right-click the key and select Disable.
Disabling the key will cause attempts to access data in the storage account to fail with error code 403 (Forbidden). For a list of storage account operations that will be affected by disabling the key, see Revoke access to a storage account that uses customer-managed keys.
Switch back to Microsoft-managed keys
You can switch from customer-managed keys back to Microsoft-managed keys at any time, using the Azure portal, PowerShell, or the Azure CLI.
To switch from customer-managed keys back to Microsoft-managed keys in the Azure portal, follow these steps:
Navigate to your storage account.
Under Security + networking, select Encryption.
Change Encryption type to Microsoft-managed keys.
