Deploy hybrid data infrastructure with Tiger Bridge and Azure Blob Storage
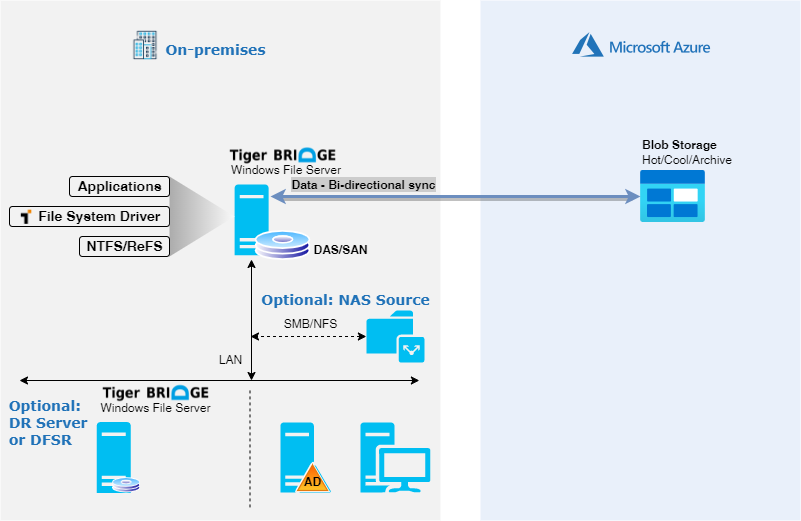
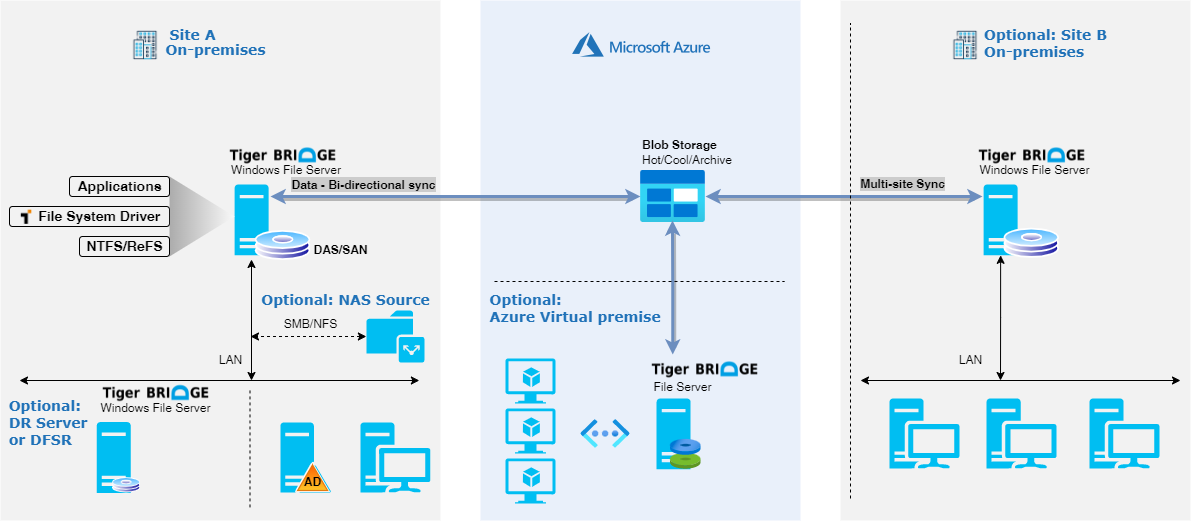
This article describes how to set up Tiger Bridge data management system with Azure Blob Storage. Tiger Bridge is fully integrated with NTFS, or ReFS file systems on windows platform. It can also manage volumes via SMB/NFS. Tiger Bridge is a connector that creates a single name-space between different sources, and Azure Blob Storage. It allows replication, tiering, and collaboration of unstructured data with file-locking capabilities between different file systems. Data is stored in Azure Blob Storage in native format, which makes it open to Azure, and third-party services (like AI/ML). Tiger Bridge can be deployed on physical or virtual infrastructure, and can easily be integrated within existing environment. Main features of the solution are:
- Data replication
- Space reclamation
- Data archiving
- Data synchronization
- Lifecycle management and versioning
Optional analytics component helps in assessing data sets, and recommends Azure Blob storage tiers.
Common use cases for Tiger Bridge
- Gain insights on your existing data sets, and access patterns to select the proper tier for Azure Blob (hot, cool, or archive).
- Policy-based tiering for transparent access of less-frequently used data to Azure Blob storage, based on last access or last modification times.
- Providing disaster recovery capabilities for cluster-based setups and existing infrastructure, including working with Microsoft DFS/DFS-R
- Intelligent, policy-based data archiving based on age, size, or available storage capacity.
- Collaboration capabilities between several file systems, including file-locking, using Azure Blob storage
- Providing Continuous Data Protection with retention policies, integrating Azure Versions, Soft delete with MS explorer shell extension for transparent control.
- Migration between different file systems and Azure Blob.
Reference architecture
Tiger Bridge can be deployed in two configurations:
Standalone hybrid configuration
Multi-site configuration
- NTFS/ReFS represent a local file system (local to the host as local drive, SAN disk, or similar). Tiger Bridge runs on the Microsoft Windows Server, and creates a single namespace with Azure Blob Storage.
- NAS source represents any NAS (network attached storage) managed by external operating system that can export the storage via SMB, CIFS, or NFS. In this scenario, Tiger Bridge runs as a gateway providing the management of the data.
Before you begin
Upfront planning will help in seamless deploy for Tiger Bridge.
Get started with Azure
Microsoft offers a framework to follow to get you started with Azure. The Cloud Adoption Framework (CAF) is a detailed approach to enterprise digital transformation and comprehensive guide to planning a production grade cloud adoption. The CAF includes a step-by-step Azure setup guide to help you get up and running quickly and securely. You can find an interactive version in the Azure portal. You'll find sample architectures, specific best practices for deploying applications, and free training resources to put you on the path to Azure expertise.
Considerations for deployment in hybrid scenario
Several aspects are important when considering hybrid deployment with Tiger Bridge on-premises.
Most important aspect is available network bandwidth. You will require enough network bandwidth to support initial replication, and any incremental change without impacting production applications. This section outlines the tools and techniques that are available to assess your network needs.
Determine unutilized internet bandwidth
It's important to know how much typically unutilized bandwidth (or headroom) you have available on a day-to-day basis. To help you assess whether you can meet your goals for:
- Initial time for replication when you're not using Azure Data Box for offline method
- Time required to do incremental resync
Use the following methods to identify the bandwidth headroom to Azure that is free to consume.
- If you're an existing Azure ExpressRoute customer, view your circuit usage in the Azure portal.
- Contact your ISP and request reports to show your existing daily and monthly utilization.
- There are several tools that can measure utilization by monitoring your network traffic at the router/switch level:
Deployment guide
Before you begin the deployment, we recommend you plan your Tiger Bridge use case:
- Consider running Tiger Technology Storage Assessment. This step will provide insights on your existing data, including last access, and modification times (access patterns), file types, size, and so on.
- Understand the existing storage capacity to make proposer selection for retention policies.
- Consider long-term planning for your future data workflows to allow proper selection for defining policies (reclamation, replication, archiving, and snapshot policies.)
Prepare Azure Blob Storage
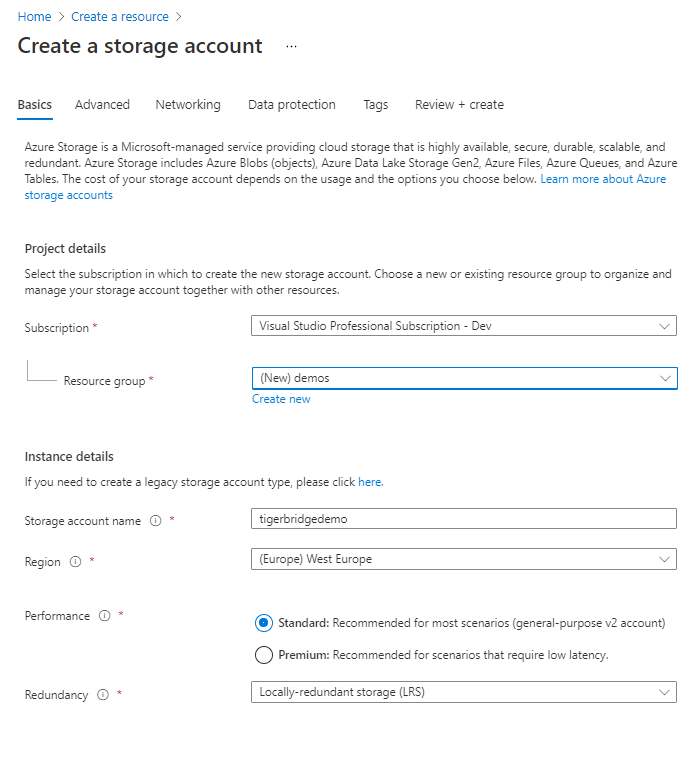
Before Tiger Bridge can be deployed, you need to create a Storage Account. Storage account will be used as a repository for data that is tiered, or replicated from Tiger Bridge solution. Tiger Bridge supports all Azure Storage services, including Archive Tier for Azure Storage Block blobs. That support allows to store less frequently data in cost-effective way but still access it through the well-known pane of glass. For additional information on Tiger Bridge, visit our comparison of ISV solutions.
Create a storage account
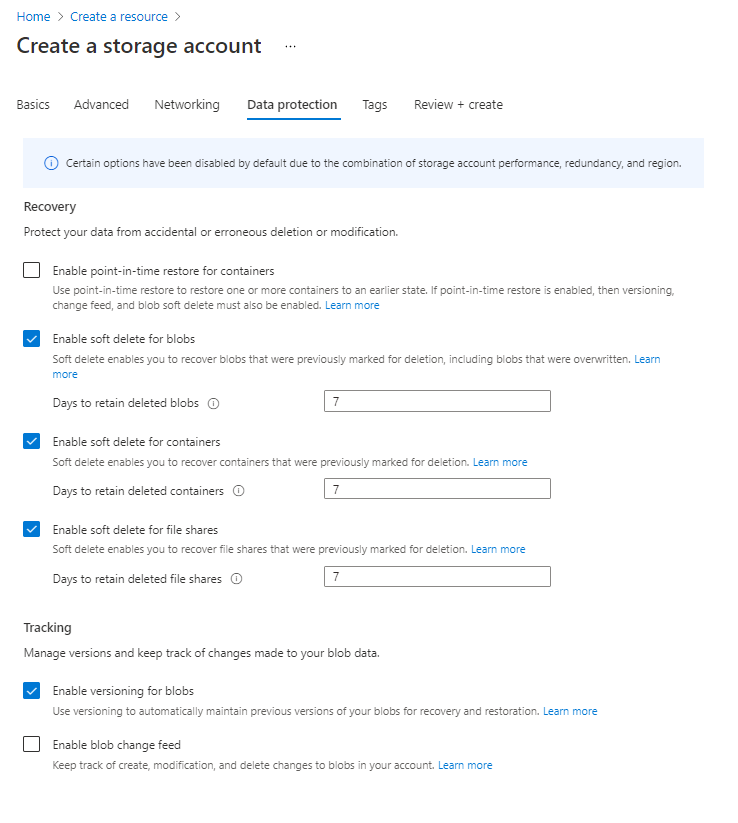
Choose data protection for the storage account
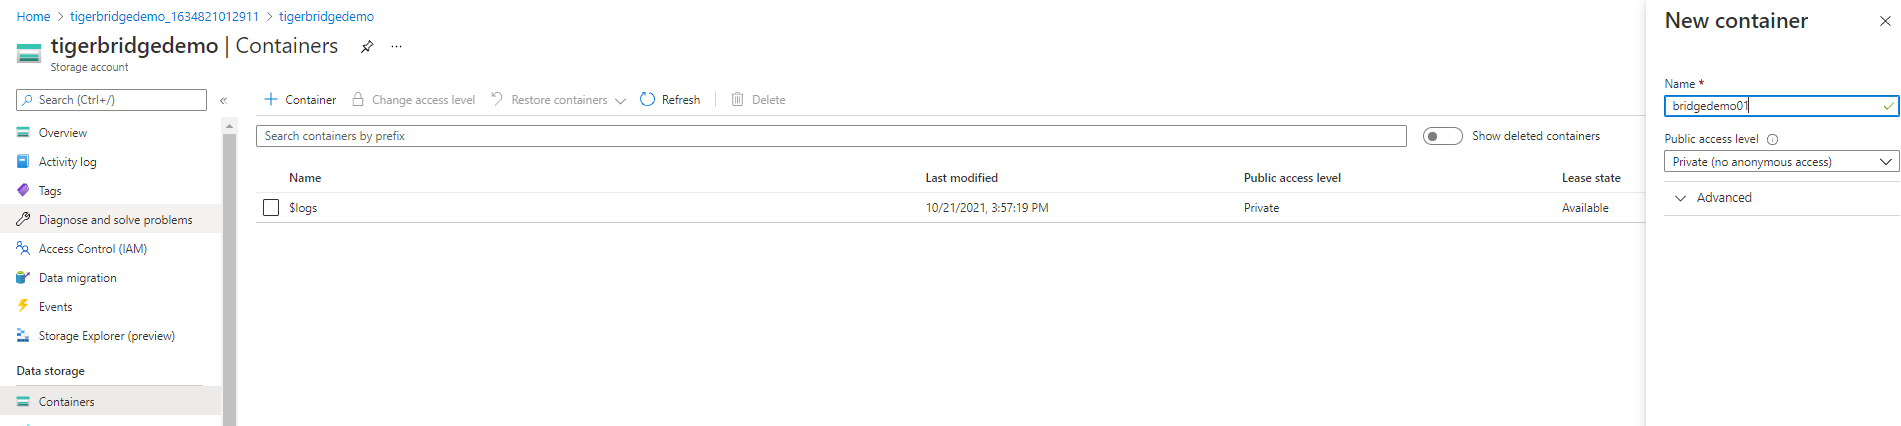
Create a container within storage account
Deploy Tiger Bridge
Before you can install Tiger Bridge, you need to have a Windows file server installed and fully configured. Windows server must have access to a storage account prepared in previous step.
Deploy standalone hybrid configuration
- Install Tiger Bridge on your windows server. Installation is done by running the Tiger Bridge installation file, and following the wizard. During installation, you can select two components:
- Tiger Bridge installs the product, GUI, and command-line interface.
- Shell Extension provides integration with Windows Explorer. Allows manual management of the data through the Windows Explorer context menu.
- In Tiger Bridge Configuration, add a local volume source:
- Select Tiger Bridge in the left pane
- Select Add Source
- Select root of a drive, or browse to a folder you want to use for storing data. Select a folder and press OK. In this example, we will use C:\AzureSource.
- Pair the local source with Microsoft Azure target:
- In the Tiger Bridge target dialog, select Azure, and press OK.
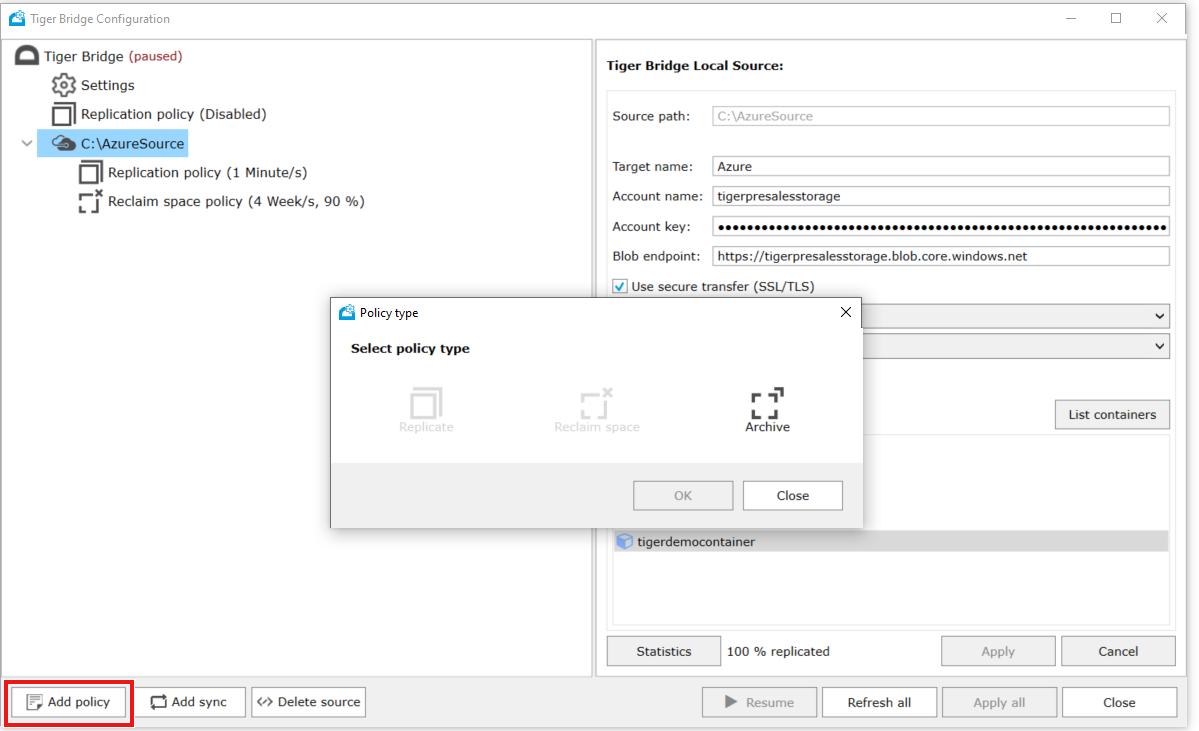
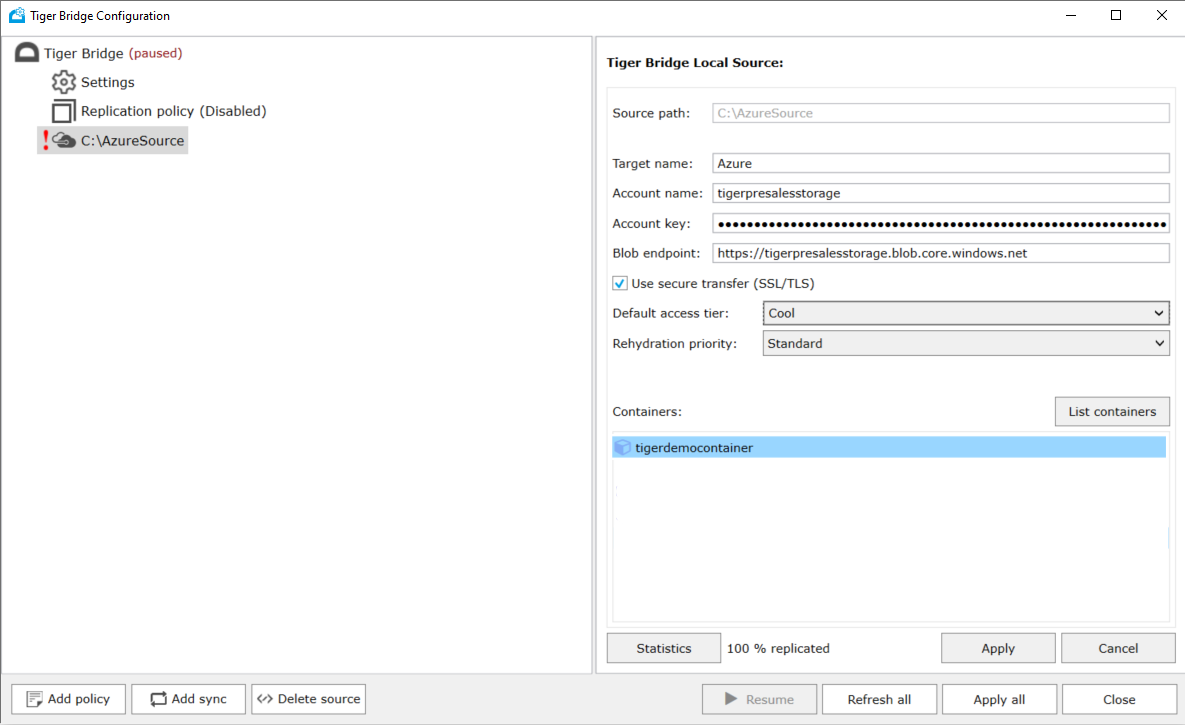
C:\AzureSource in the screenshot is a folder selected in the previous step.
- Enter a name for the target.
- Enter the account name and key and the Blob endpoint in the respective fields. Use the storage account name created in prepare Azure Blob storage step.
- Choose whether to access the target using the secure transfer (SSL/TLS) by selecting, or clearing the check box. Secure transfer is recommended for production workloads. If disabled, make sure that you disabled Secure transfer required option in the storage account Configuration option.
- In the Default access tier, select whether to use the Hot, Cool, or Archive tier of Azure Storage. This tier will be used for any data that doesn't have a tier set. Learn more on Hot, Cool, and Archive access tiers for blob data
- In Rehydration priority, select whether offline files should be rehydrated using the Standard, or the High option. Learn more on Blob rehydration from the Archive tier
- Select List containers to display the list of containers available for the account you have specified, and then select the container on the target, which will be paired with the selected source.
- In the next step, select what to do with data already in the container, and then press OK.
- In the Tiger Bridge target dialog, select Azure, and press OK.
- Create a policy by selecting Add policy. Select the policy based on the needs:
- Replicate copies all data from local source to Azure Blob Storage. Automatic replication is performed based on user-defined criteria.
- Reclaim Space copies all data from local source to Azure Blob Storage, and replaces the data with a stub file. Stub file looks exactly like the actual file, but doesn't contain any data (doesn't take any space).
- Archive moves the data from Azure Storage Hot or Cool tier to Azure Storage Archive tier for long-term retention. It replaces the file with an offline file. Offline file is same as stub file with an offline flag.
Deploy multi-site configuration
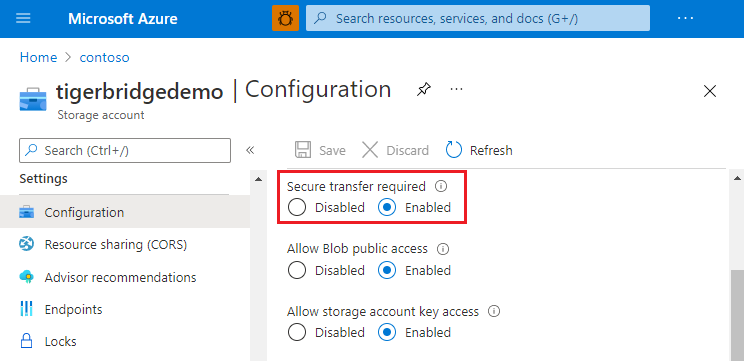
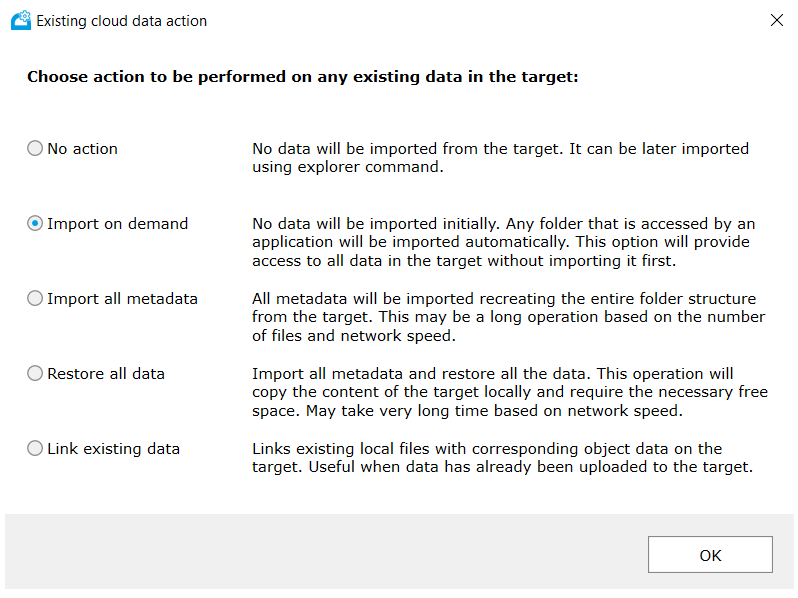
To deploy Tiger Bridge in multi-site configuration, follow the steps from deploying standalone hybrid configuration. These steps must be run on all Tiger Bridge servers you want to use in multi-site configuration. Servers must use the same storage accounts and same containers. Once done, do the following extra steps on all Tiger Bridge servers
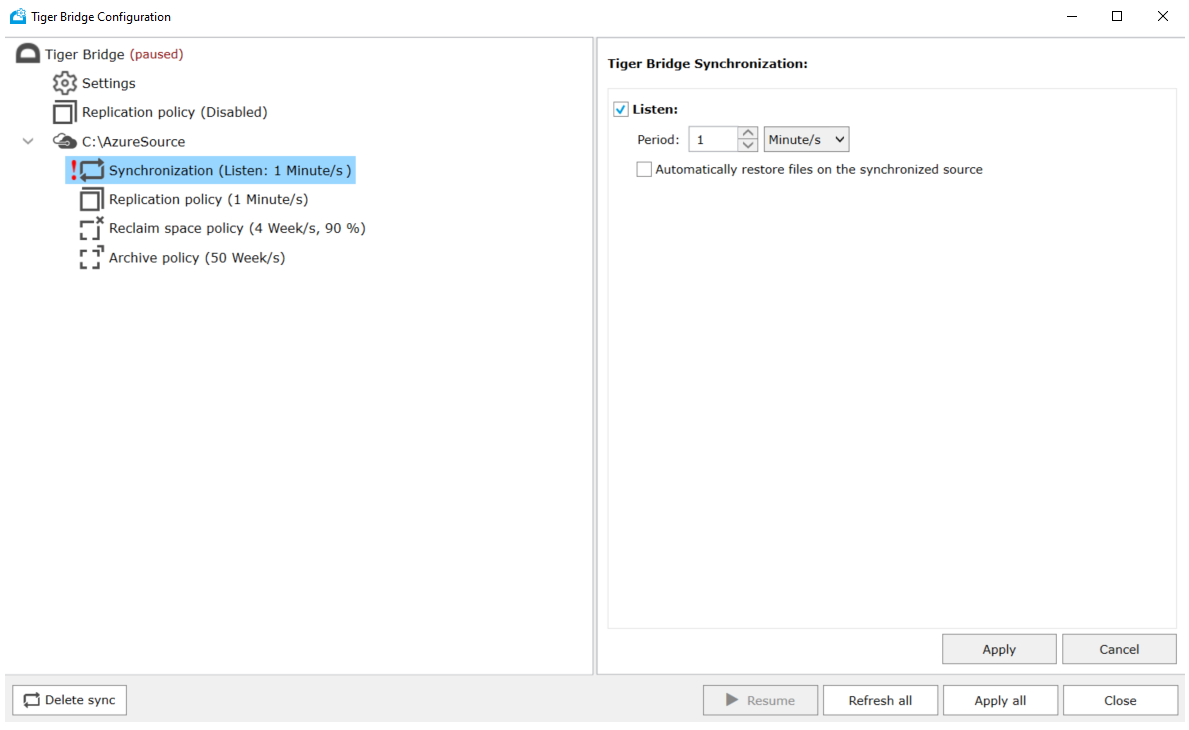
- Select Add sync on the defined local source, and define the synchronization policy:
- Listen defines the time interval at which the Tiger Bridge server will check for changes from other Tiger Bridge servers.
- (optional) Select the Automatically restore files on the synchronized source if you want to retrieve the files immediately after changes have been synchronized.
- Press Apply.
Tip
Tiger Bridge Policies and Synchronization can be defined as global (applied to all Tiger Bridge servers), or can be defined per Tiger Bridge server.
Support
How to open a case with Azure
In the Azure portal search for support in the search bar at the top. Select Help + support -> New Support Request.
Engaging Tiger Bridge support
Tiger Technology provides 365x24x7 support for Tiger Bridge. To contact support, create a support ticket.
Next steps
Feedback
Submit and view feedback for