Note
Access to this page requires authorization. You can try signing in or changing directories.
Access to this page requires authorization. You can try changing directories.
In this tutorial, you learn how to enable the Synapse Studio connector that's built in to Log Analytics. You can then collect and send Apache Spark application metrics and logs to your Log Analytics workspace. Finally, you can use an Azure Monitor workbook to visualize the metrics and logs.
Configure workspace information
Follow these steps to configure the necessary information in Synapse Studio.
Step 1: Create a Log Analytics workspace
Consult one of the following resources to create this workspace:
- Create a workspace in the Azure portal.
- Create a workspace with Azure CLI.
- Create and configure a workspace in Azure Monitor by using PowerShell.
Step 2: Gather configuration information
Use any of the following options to prepare the configuration.
Option 1: Configure with Log Analytics workspace ID and key
Gather the following values for the spark configuration:
<LOG_ANALYTICS_WORKSPACE_ID>: Log Analytics workspace ID.<LOG_ANALYTICS_WORKSPACE_KEY>: Log Analytics key. To find this, in the Azure portal, go to Azure Log Analytics workspace > Agents > Primary key.
spark.synapse.logAnalytics.enabled true
spark.synapse.logAnalytics.workspaceId <LOG_ANALYTICS_WORKSPACE_ID>
spark.synapse.logAnalytics.secret <LOG_ANALYTICS_WORKSPACE_KEY>
Alternatively, use the following properties:
spark.synapse.diagnostic.emitters: LA
spark.synapse.diagnostic.emitter.LA.type: "AzureLogAnalytics"
spark.synapse.diagnostic.emitter.LA.categories: "Log,EventLog,Metrics"
spark.synapse.diagnostic.emitter.LA.workspaceId: <LOG_ANALYTICS_WORKSPACE_ID>
spark.synapse.diagnostic.emitter.LA.secret: <LOG_ANALYTICS_WORKSPACE_KEY>
Option 2: Configure with Azure Key Vault
Note
You need to grant read secret permission to the users who submit Apache Spark applications. For more information, see Provide access to Key Vault keys, certificates, and secrets with an Azure role-based access control. When you enable this feature in a Synapse pipeline, you need to use Option 3. This is necessary to obtain the secret from Azure Key Vault with workspace managed identity.
To configure Azure Key Vault to store the workspace key, follow these steps:
Create and go to your key vault in the Azure portal.
Grant the right permission to the users or workspace managed identities.
On the settings page for the key vault, select Secrets.
Select Generate/Import.
On the Create a secret screen, choose the following values:
- Name: Enter a name for the secret. For the default, enter
SparkLogAnalyticsSecret. - Value: Enter the
<LOG_ANALYTICS_WORKSPACE_KEY>for the secret. - Leave the other values to their defaults. Then select Create.
- Name: Enter a name for the secret. For the default, enter
Gather the following values for the spark configuration:
<LOG_ANALYTICS_WORKSPACE_ID>: The Log Analytics workspace ID.<AZURE_KEY_VAULT_NAME>: The key vault name that you configured.<AZURE_KEY_VAULT_SECRET_KEY_NAME>(optional): The secret name in the key vault for the workspace key. The default isSparkLogAnalyticsSecret.
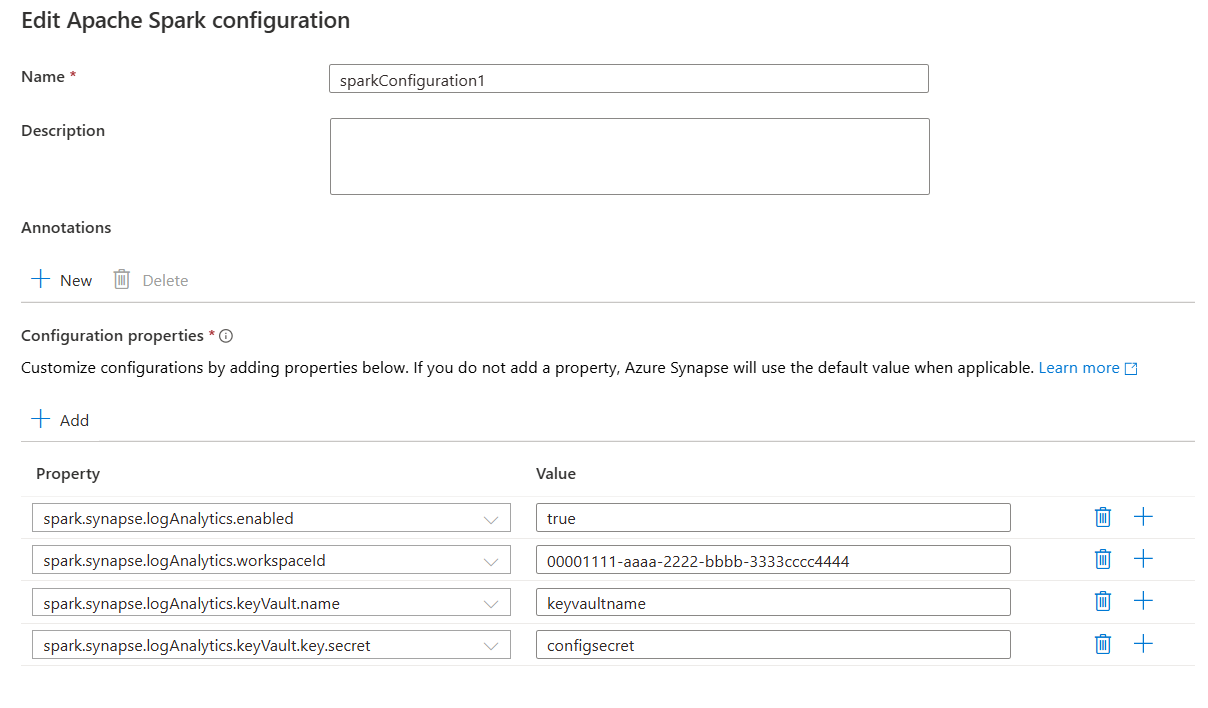
spark.synapse.logAnalytics.enabled true
spark.synapse.logAnalytics.workspaceId <LOG_ANALYTICS_WORKSPACE_ID>
spark.synapse.logAnalytics.keyVault.name <AZURE_KEY_VAULT_NAME>
spark.synapse.logAnalytics.keyVault.key.secret <AZURE_KEY_VAULT_SECRET_KEY_NAME>
Alternatively, use the following properties:
spark.synapse.diagnostic.emitters LA
spark.synapse.diagnostic.emitter.LA.type: "AzureLogAnalytics"
spark.synapse.diagnostic.emitter.LA.categories: "Log,EventLog,Metrics"
spark.synapse.diagnostic.emitter.LA.workspaceId: <LOG_ANALYTICS_WORKSPACE_ID>
spark.synapse.diagnostic.emitter.LA.secret.keyVault: <AZURE_KEY_VAULT_NAME>
spark.synapse.diagnostic.emitter.LA.secret.keyVault.secretName: <AZURE_KEY_VAULT_SECRET_KEY_NAME>
Note
You can also store the workspace ID in Key Vault. Refer to the preceding steps, and store the workspace ID with the secret name SparkLogAnalyticsWorkspaceId. Alternatively, you can use the configuration spark.synapse.logAnalytics.keyVault.key.workspaceId to specify the workspace ID secret name in Key Vault.
Option 3. Configure with a linked service
Note
In this option, you need to grant read secret permission to workspace managed identity. For more information, see Provide access to Key Vault keys, certificates, and secrets with an Azure role-based access control.
To configure a Key Vault linked service in Synapse Studio to store the workspace key, follow these steps:
Follow all the steps in the preceding section, "Option 2."
Create a Key Vault linked service in Synapse Studio:
a. Go to Synapse Studio > Manage > Linked services, and then select New.
b. In the search box, search for Azure Key Vault.
c. Enter a name for the linked service.
d. Choose your key vault, and select Create.
Add a
spark.synapse.logAnalytics.keyVault.linkedServiceNameitem to the Apache Spark configuration.
spark.synapse.logAnalytics.enabled true
spark.synapse.logAnalytics.workspaceId <LOG_ANALYTICS_WORKSPACE_ID>
spark.synapse.logAnalytics.keyVault.name <AZURE_KEY_VAULT_NAME>
spark.synapse.logAnalytics.keyVault.key.secret <AZURE_KEY_VAULT_SECRET_KEY_NAME>
spark.synapse.logAnalytics.keyVault.linkedServiceName <LINKED_SERVICE_NAME>
Alternatively, use the following properties:
spark.synapse.diagnostic.emitters LA
spark.synapse.diagnostic.emitter.LA.type: "AzureLogAnalytics"
spark.synapse.diagnostic.emitter.LA.categories: "Log,EventLog,Metrics"
spark.synapse.diagnostic.emitter.LA.workspaceId: <LOG_ANALYTICS_WORKSPACE_ID>
spark.synapse.diagnostic.emitter.LA.secret.keyVault: <AZURE_KEY_VAULT_NAME>
spark.synapse.diagnostic.emitter.LA.secret.keyVault.secretName: <AZURE_KEY_VAULT_SECRET_KEY_NAME>
spark.synapse.diagnostic.emitter.LA.secret.keyVault.linkedService: <AZURE_KEY_VAULT_LINKED_SERVICE>
For a list of Apache Spark configurations, see Available Apache Spark configurations
Step 3: Create an Apache Spark Configuration
You can create an Apache Spark Configuration to your workspace, and when you create Notebook or Apache spark job definition you can select the Apache Spark configuration that you want to use with your Apache Spark pool. When you select it, the details of the configuration are displayed.
Select Manage > Apache Spark configurations.
Select New button to create a new Apache Spark configuration.
New Apache Spark configuration page will be opened after you select New button.
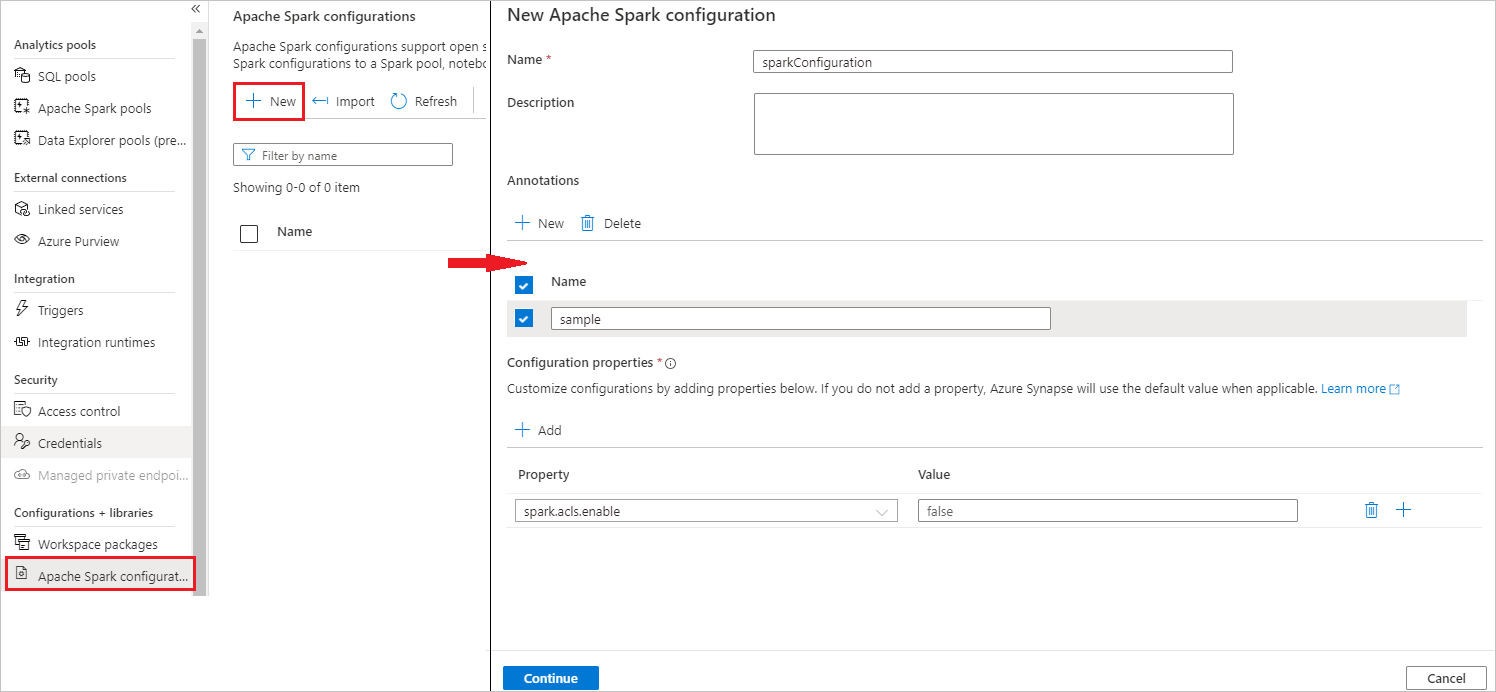
For Name, you can enter your preferred and valid name.
For Description, you can input some description in it.
For Annotations, you can add annotations by clicking the New button, and also you can delete existing annotations by selecting and clicking Delete button.
For Configuration properties, add all the properties from the configuration option you chose by selecting the Add button. For Property add the property name as listed, and for Value use the value you gathered during step 2. If you don't add a property, Azure Synapse will use the default value when applicable.
Submit an Apache Spark application and view the logs and metrics
Here's how:
Submit an Apache Spark application to the Apache Spark pool configured in the previous step. You can use any of the following ways to do so:
- Run a notebook in Synapse Studio.
- In Synapse Studio, submit an Apache Spark batch job through an Apache Spark job definition.
- Run a pipeline that contains Apache Spark activity.
Go to the specified Log Analytics workspace, and then view the application metrics and logs when the Apache Spark application starts to run.
Write custom application logs
You can use the Apache Log4j library to write custom logs.
Example for Scala:
%%spark
val logger = org.apache.log4j.LogManager.getLogger("com.contoso.LoggerExample")
logger.info("info message")
logger.warn("warn message")
logger.error("error message")
//log exception
try {
      1/0
 } catch {
      case e:Exception =>logger.warn("Exception", e)
}
// run job for task level metrics
val data = sc.parallelize(Seq(1,2,3,4)).toDF().count()
Example for PySpark:
%%pyspark
logger = sc._jvm.org.apache.log4j.LogManager.getLogger("com.contoso.PythonLoggerExample")
logger.info("info message")
logger.warn("warn message")
logger.error("error message")
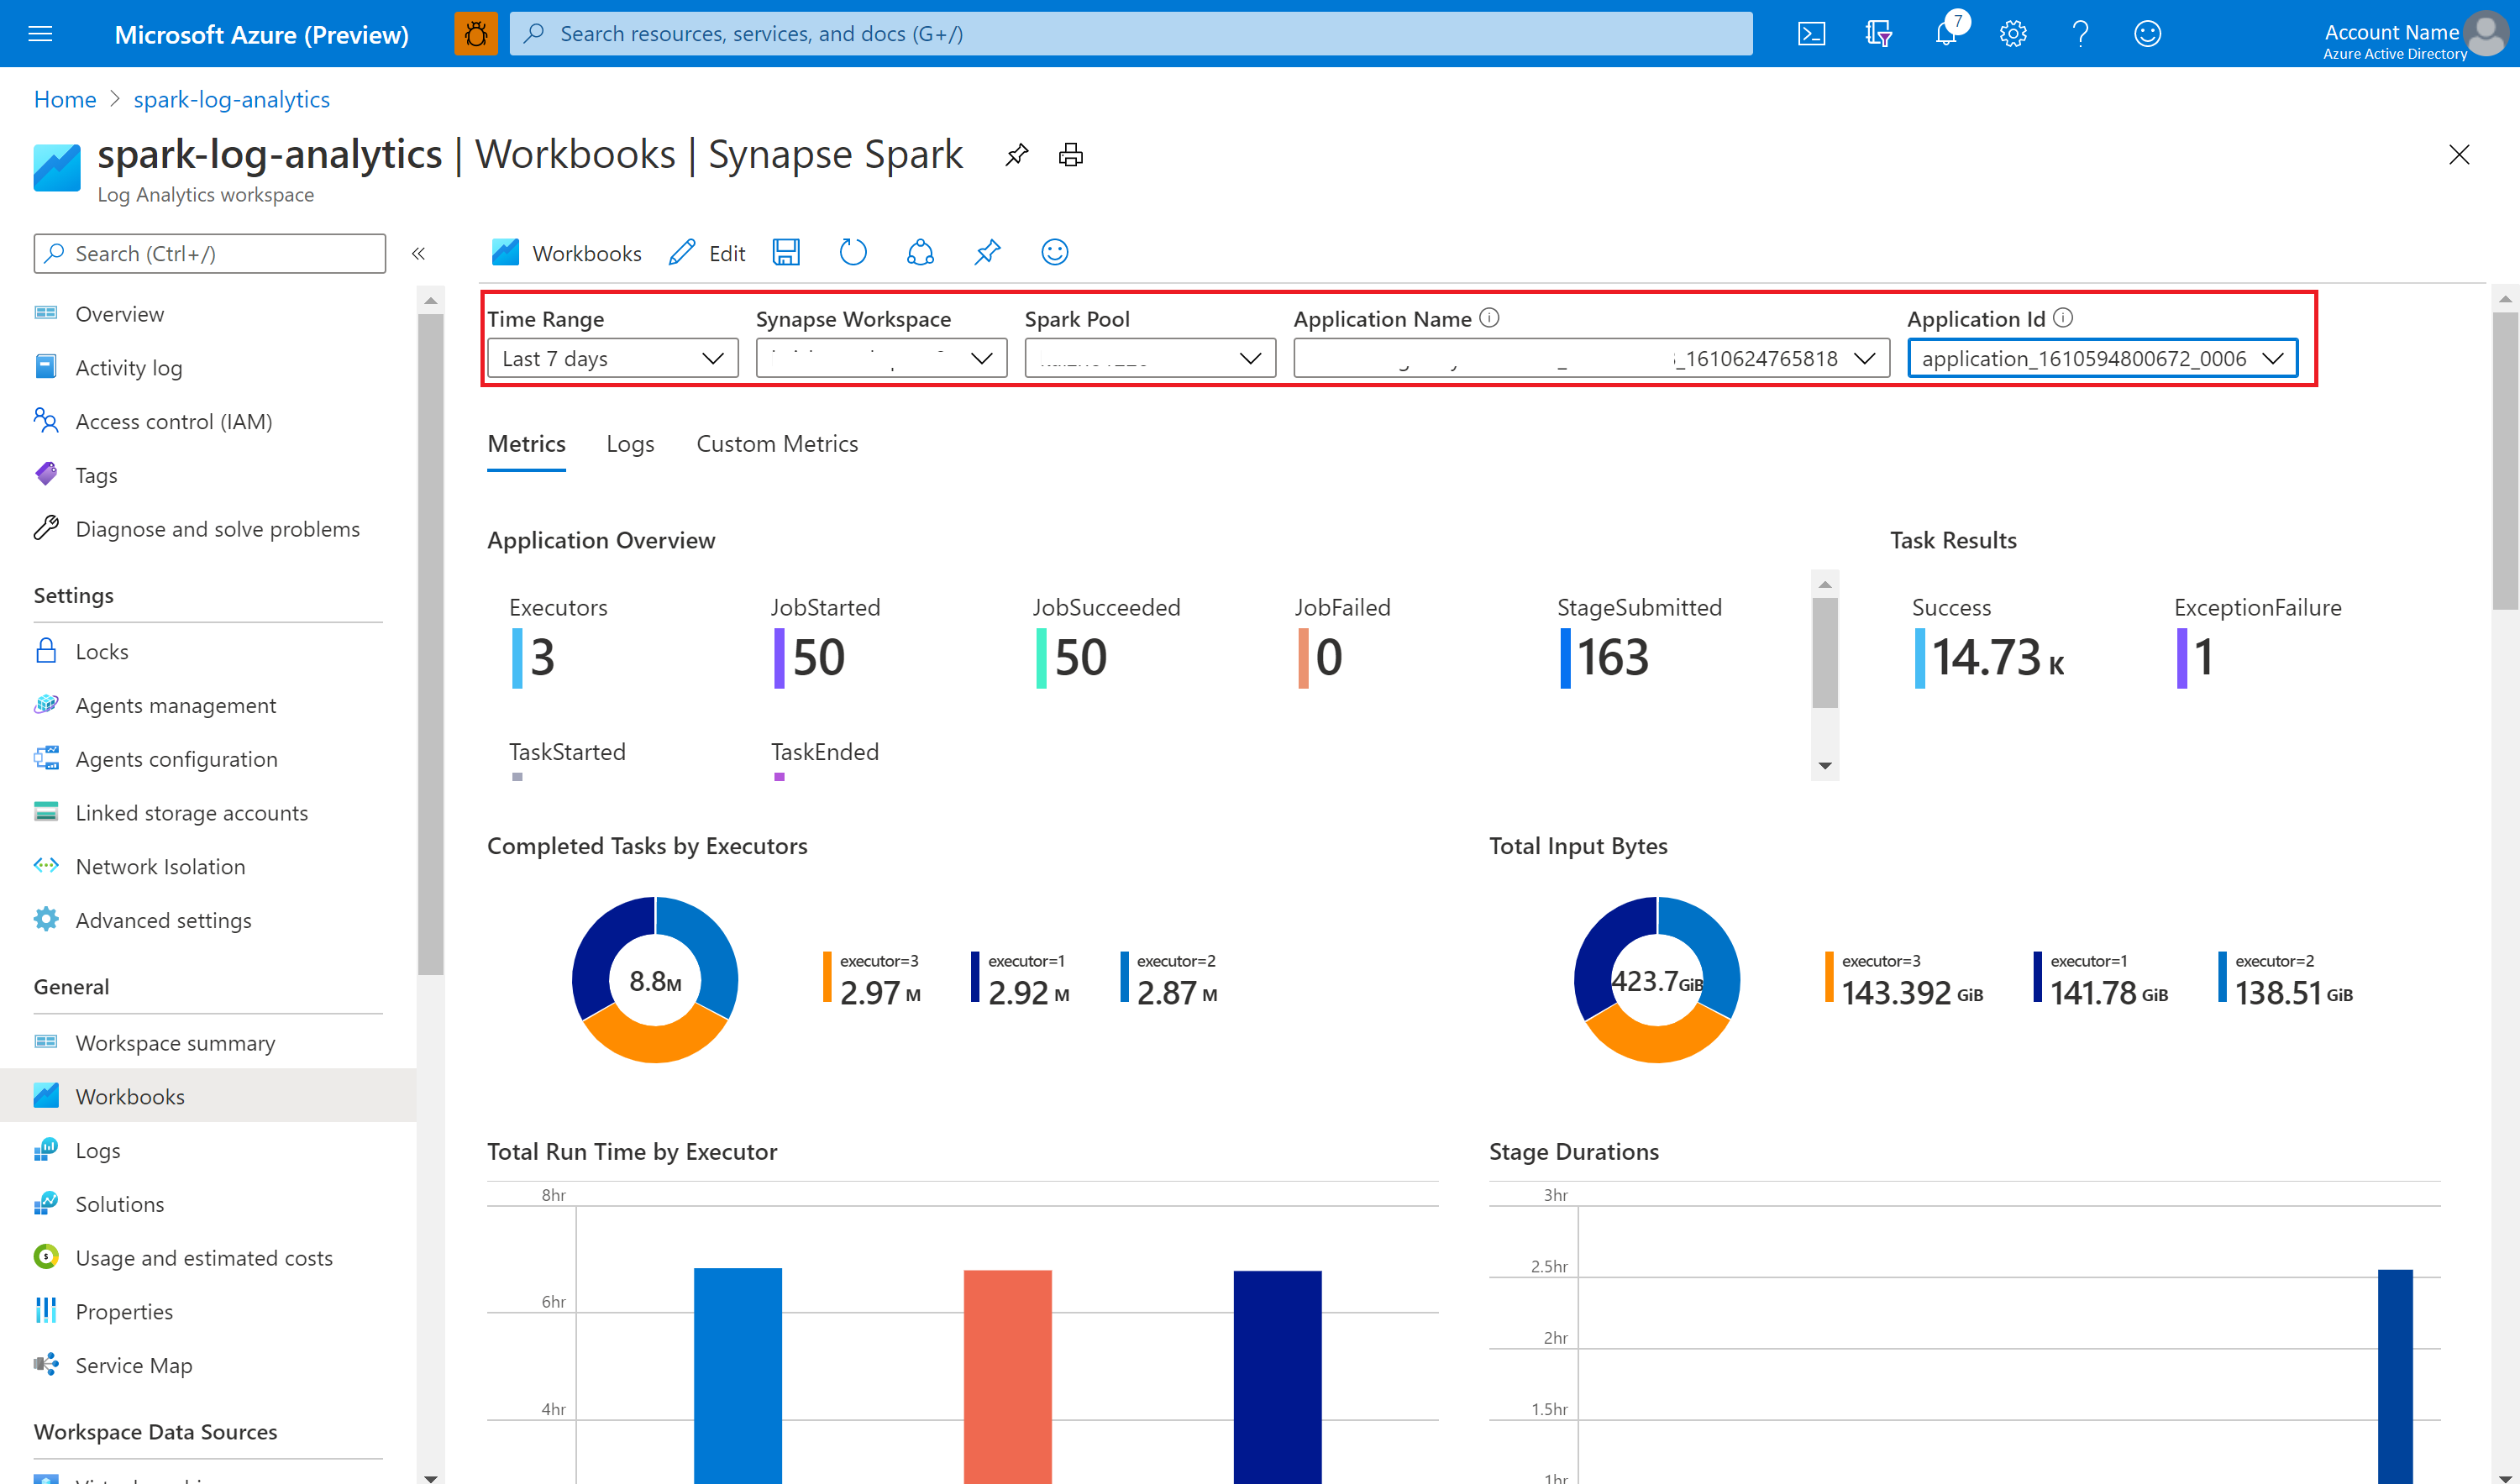
Use the sample workbook to visualize the metrics and logs
Open and copy the workbook file content.
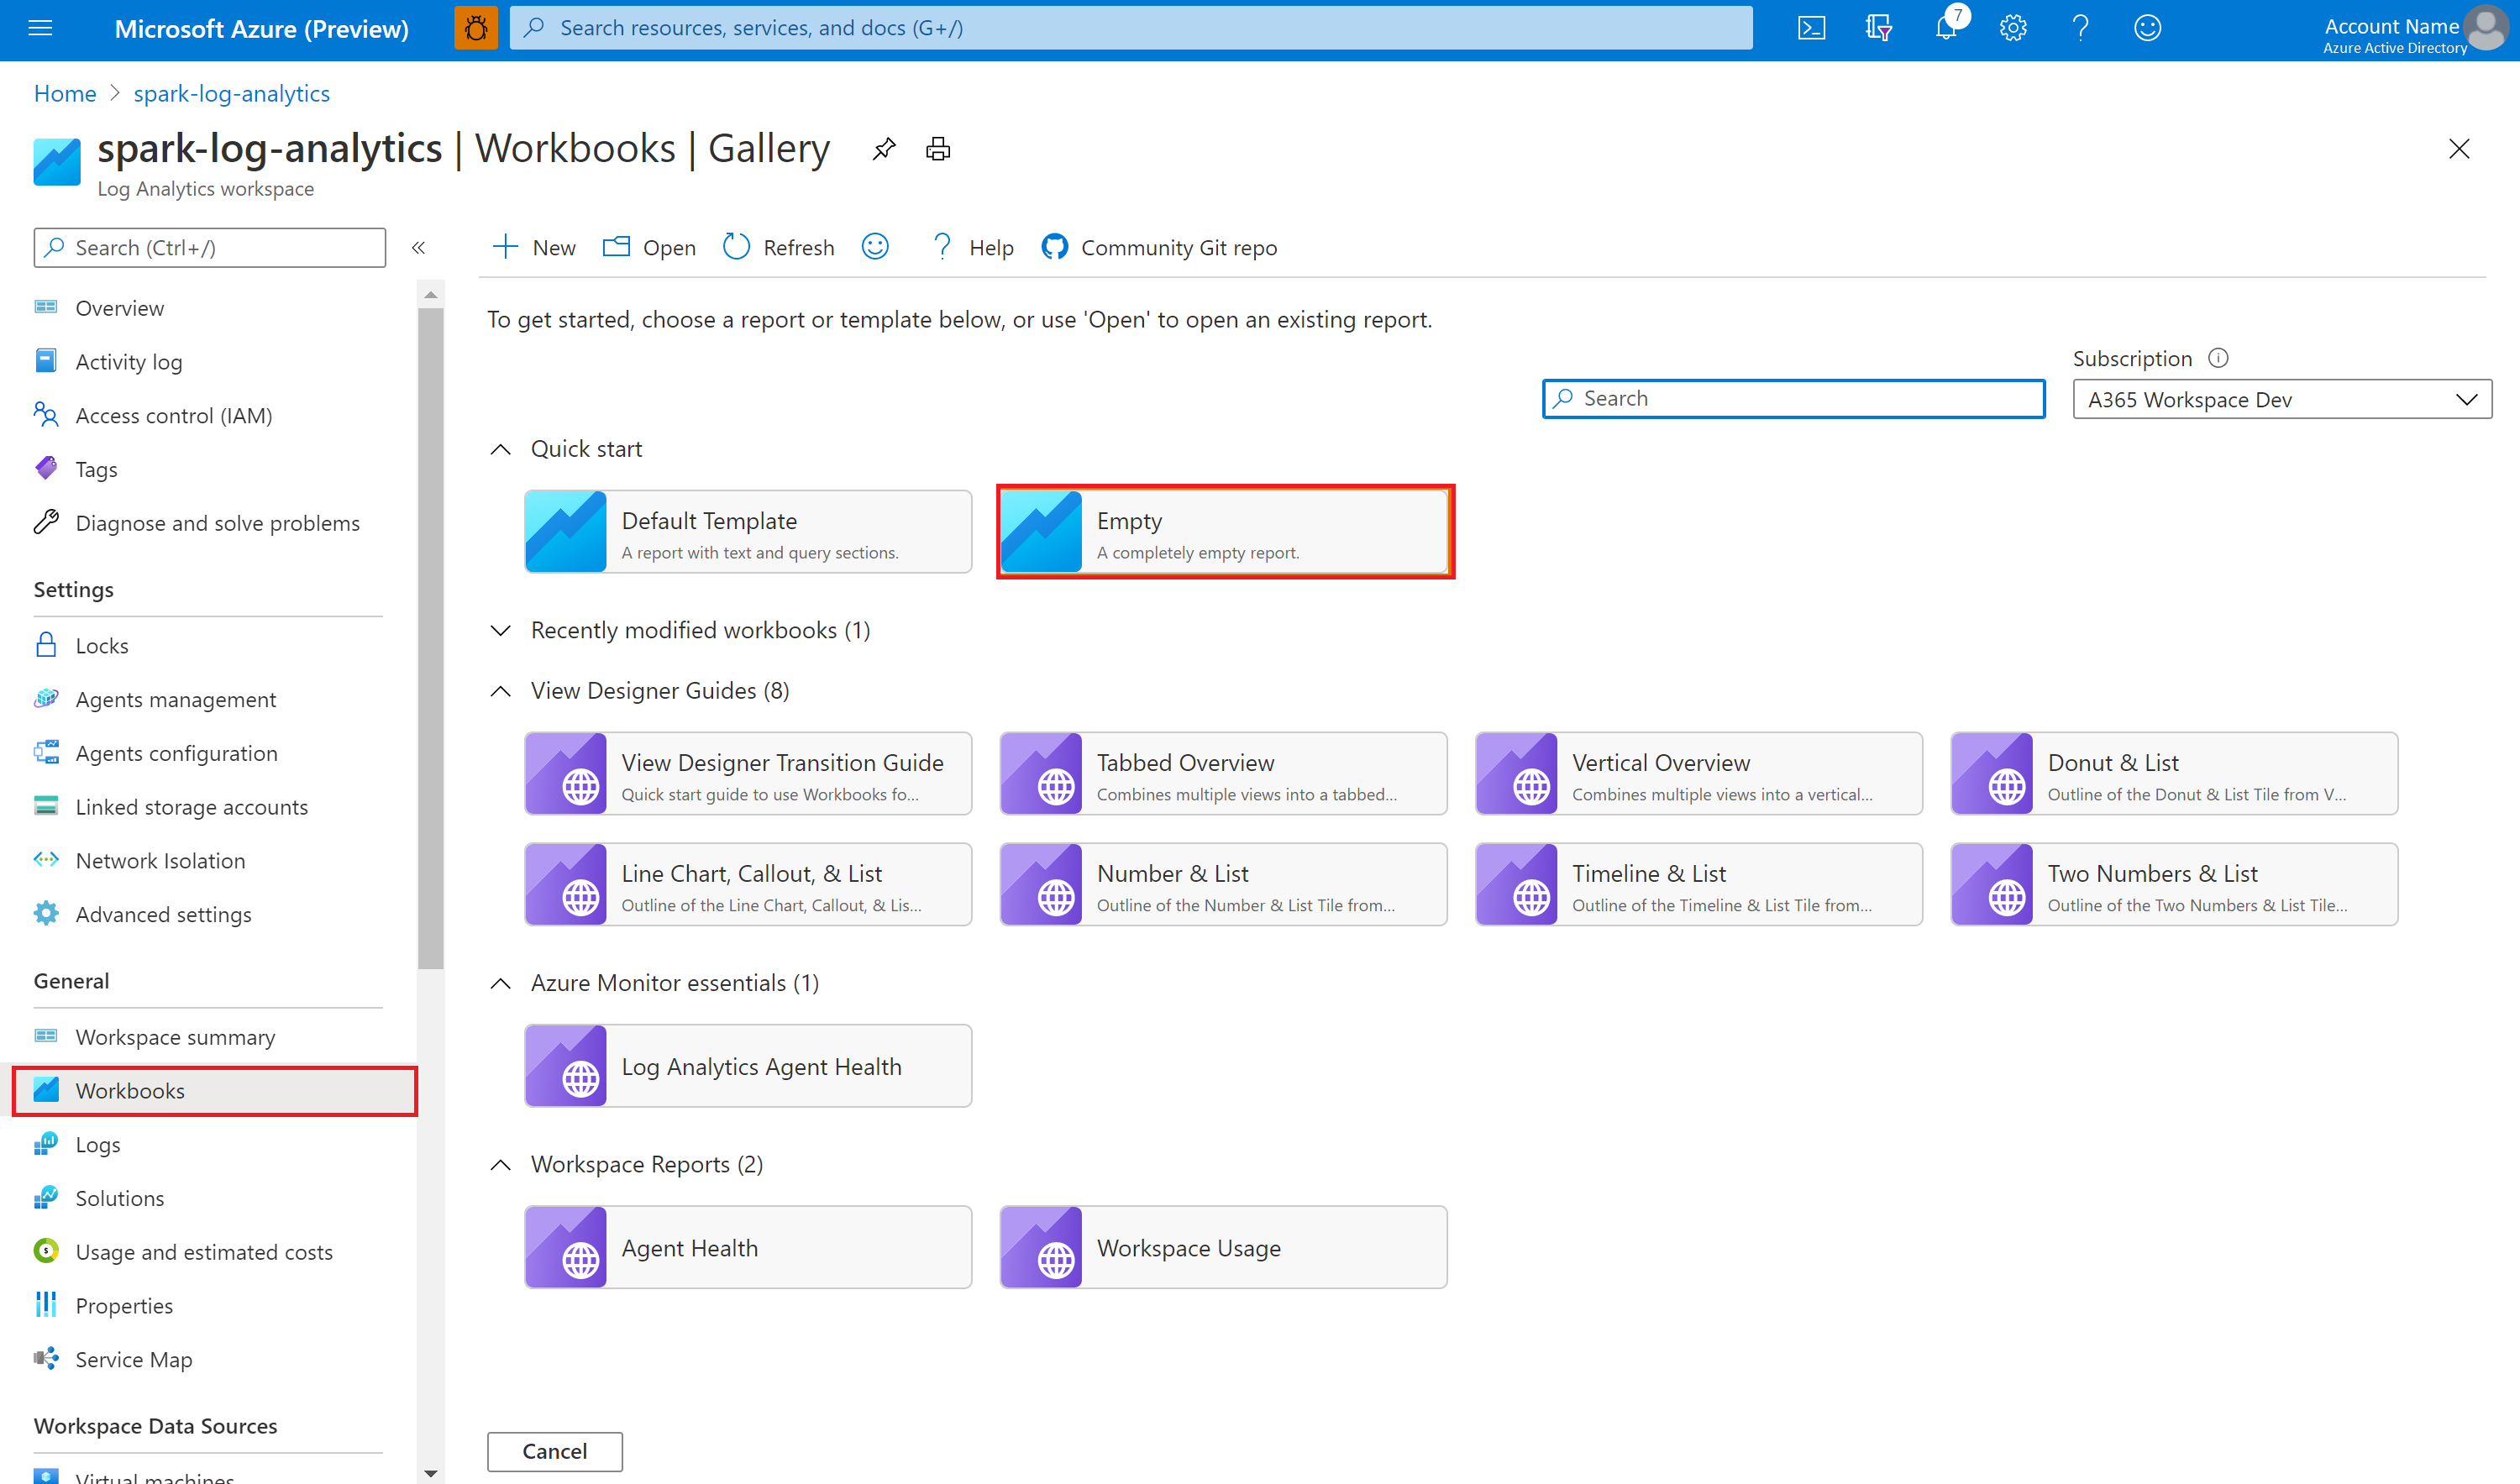
In the Azure portal, select Log Analytics workspace > Workbooks.
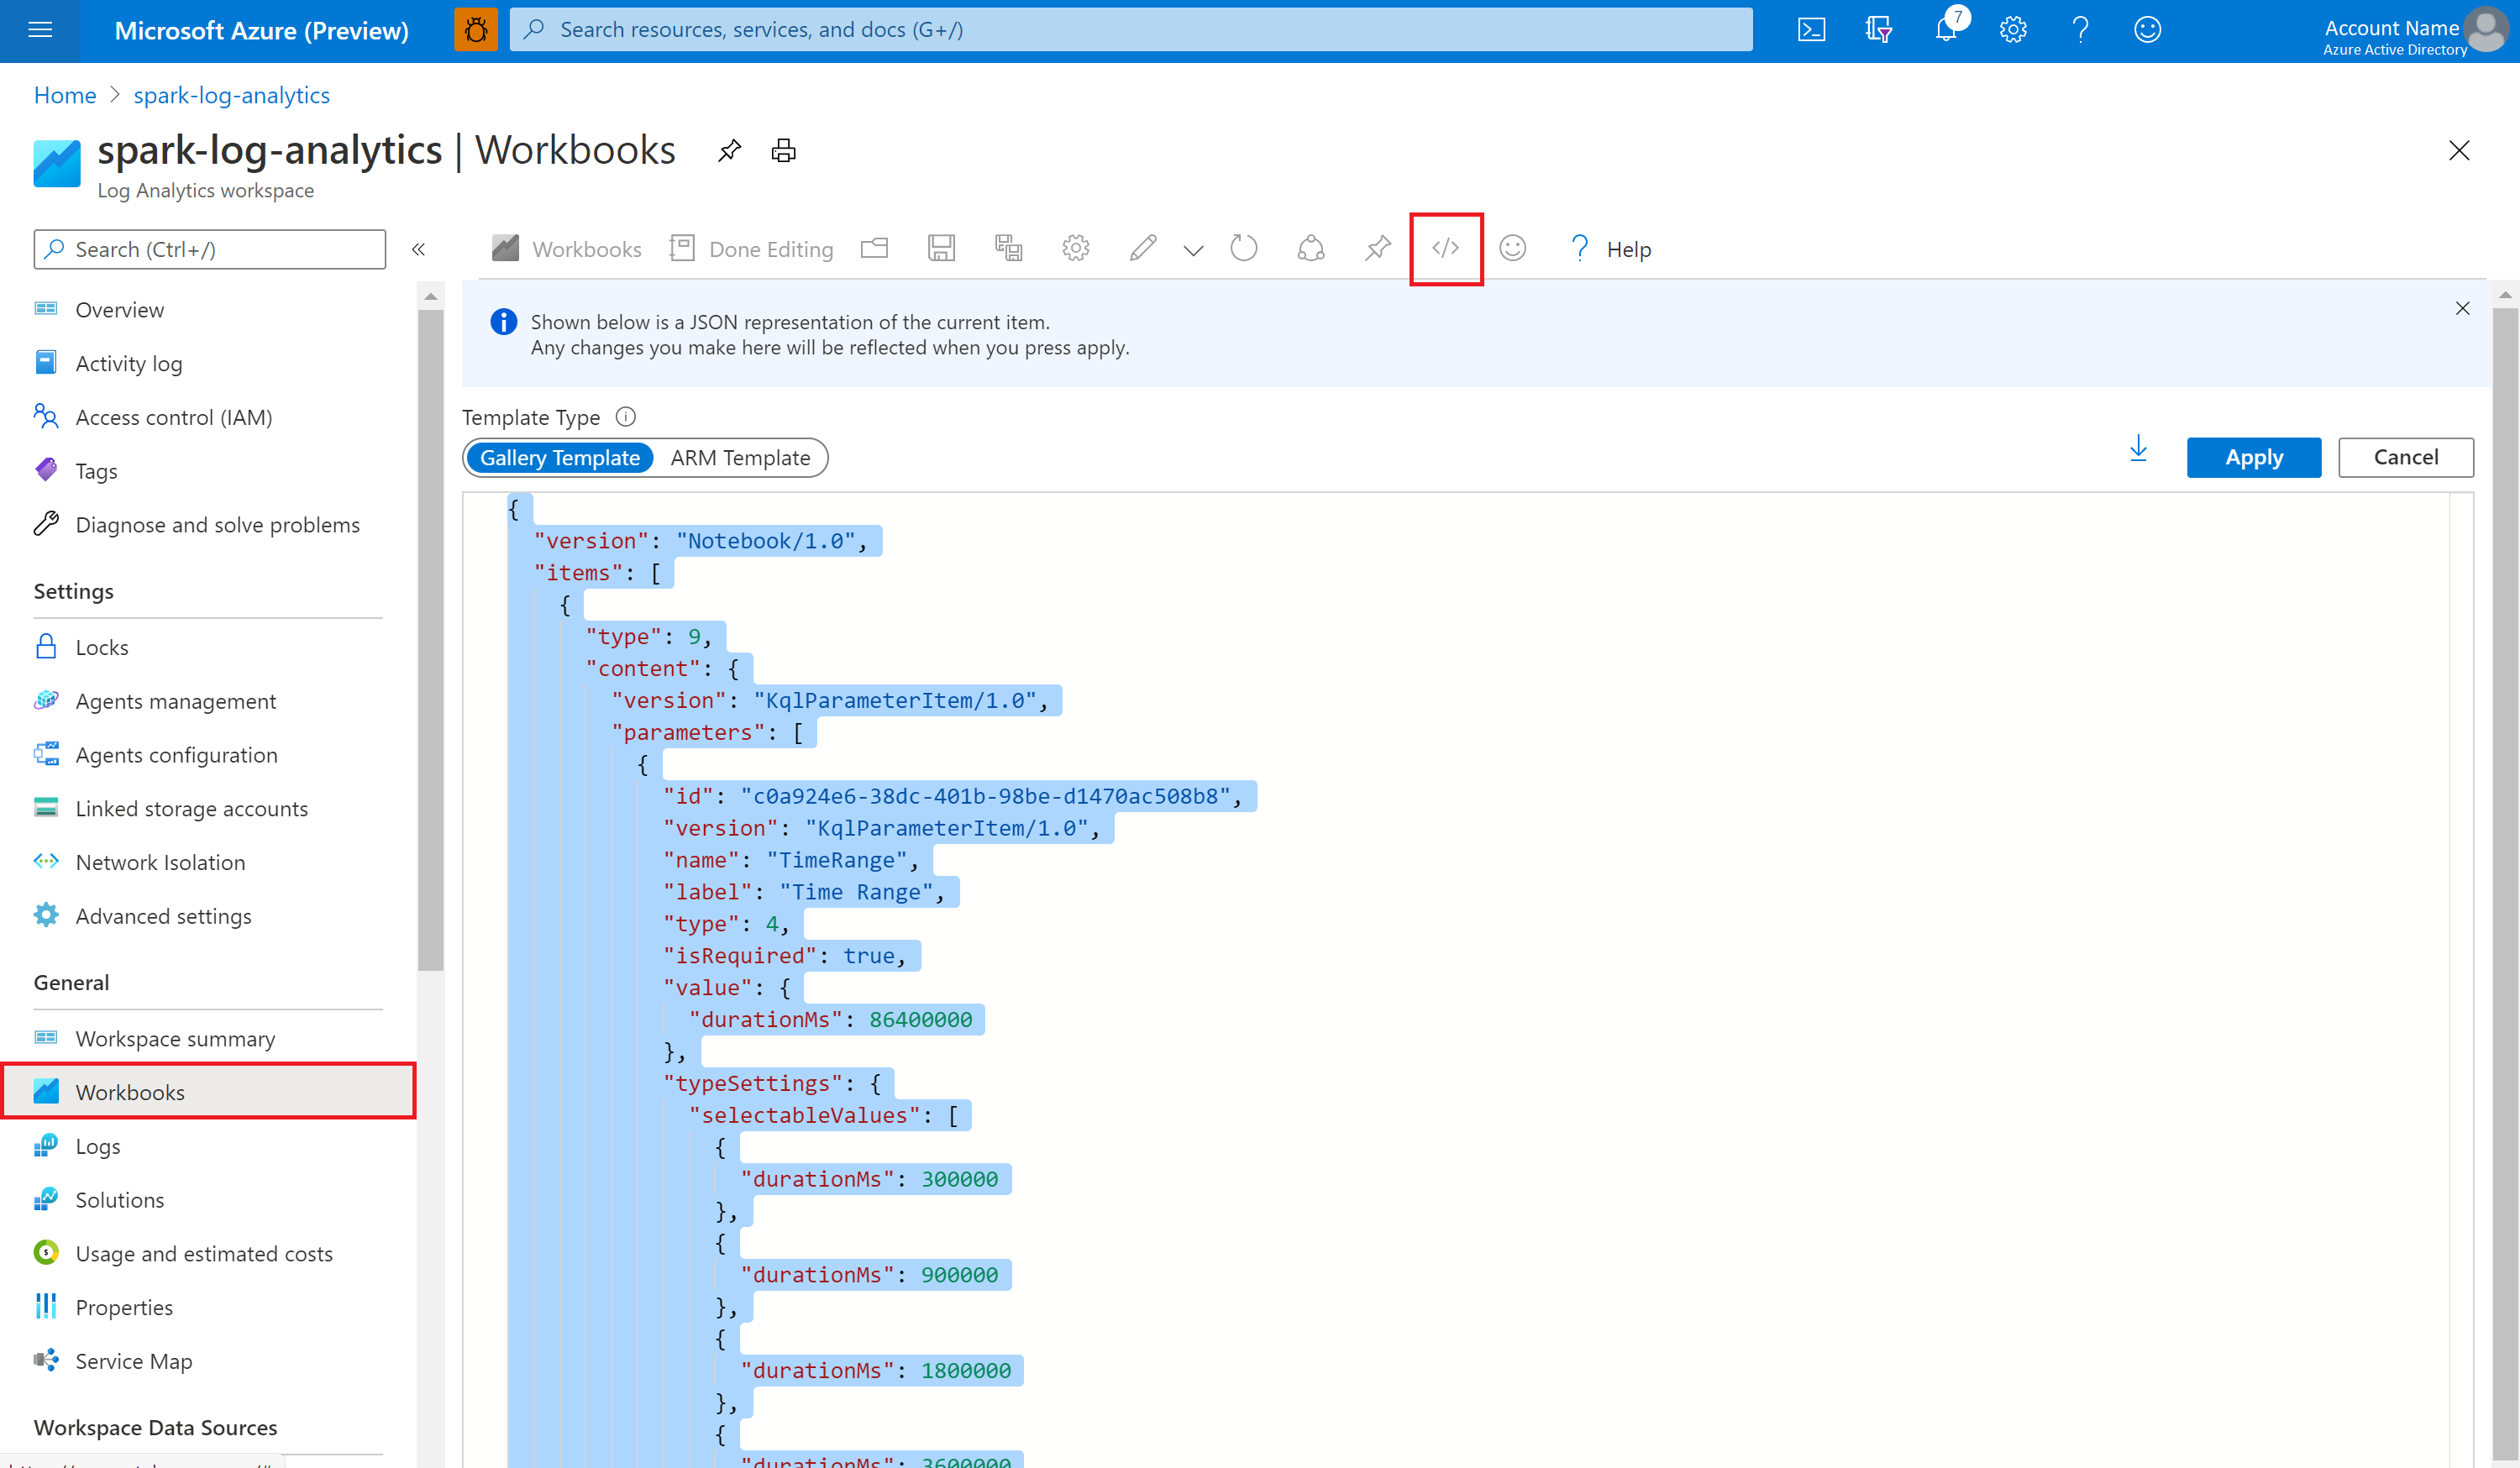
Open the Empty workbook. Use the Advanced Editor mode by selecting the </> icon.
Paste over any JSON code that exists.
Select Apply, and then select Done Editing.
Then, submit your Apache Spark application to the configured Apache Spark pool. After the application goes to a running state, choose the running application in the workbook dropdown list.
You can customize the workbook. For example, you can use Kusto queries and configure alerts.
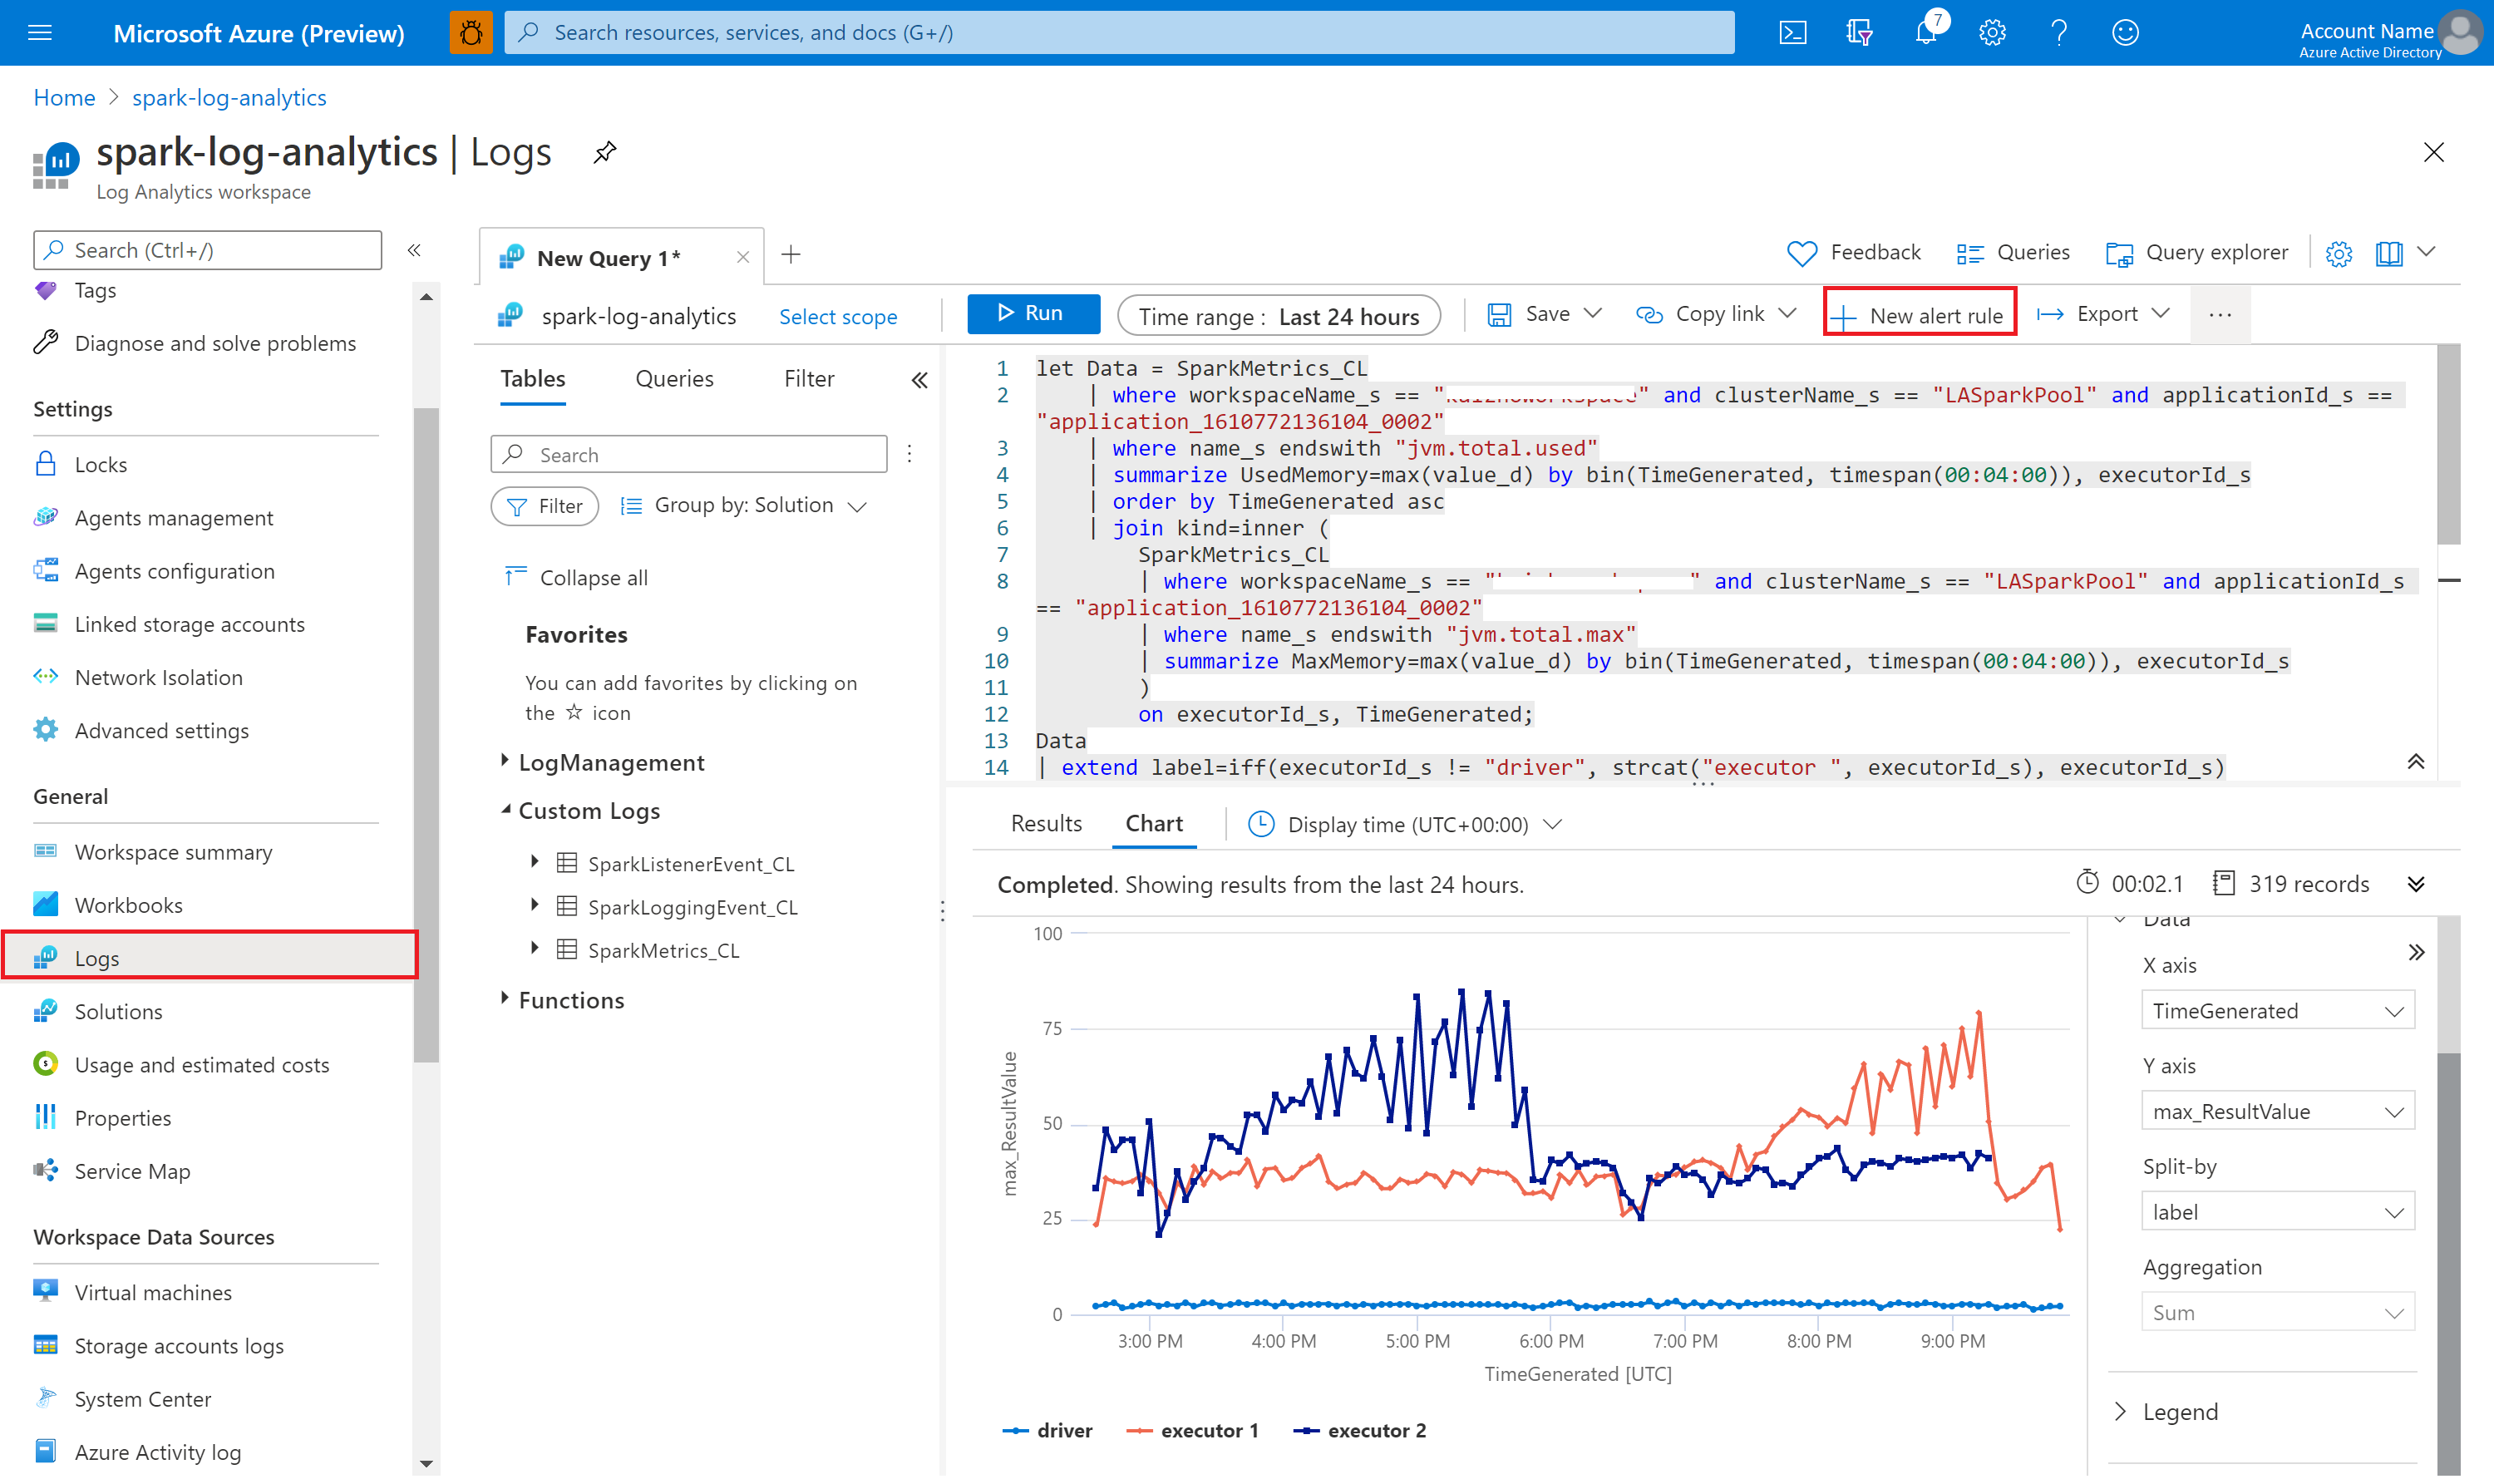
Query data with Kusto
The following is an example of querying Apache Spark events:
SparkListenerEvent_CL
| where workspaceName_s == "{SynapseWorkspace}" and clusterName_s == "{SparkPool}" and livyId_s == "{LivyId}"
| order by TimeGenerated desc
| limit 100
Here's an example of querying the Apache Spark application driver and executors logs:
SparkLoggingEvent_CL
| where workspaceName_s == "{SynapseWorkspace}" and clusterName_s == "{SparkPool}" and livyId_s == "{LivyId}"
| order by TimeGenerated desc
| limit 100
And here's an example of querying Apache Spark metrics:
SparkMetrics_CL
| where workspaceName_s == "{SynapseWorkspace}" and clusterName_s == "{SparkPool}" and livyId_s == "{LivyId}"
| where name_s endswith "jvm.total.used"
| summarize max(value_d) by bin(TimeGenerated, 30s), executorId_s
| order by TimeGenerated asc
Create and manage alerts
Users can query to evaluate metrics and logs at a set frequency, and fire an alert based on the results. For more information, see Create, view, and manage log alerts by using Azure Monitor.
Synapse workspace with data exfiltration protection enabled
After the Synapse workspace is created with data exfiltration protection enabled.
When you want to enable this feature, you need to create managed private endpoint connection requests to Azure Monitor private link scopes (AMPLS) in the workspace’s approved Microsoft Entra tenants.
You can follow below steps to create a managed private endpoint connection to Azure Monitor private link scopes (AMPLS):
- If there's no existing AMPLS, you can follow Azure Monitor Private Link connection setup to create one.
- Navigate to your AMPLS in Azure portal, on the Azure Monitor Resources page, select Add to add connection to your Azure Log Analytics workspace.
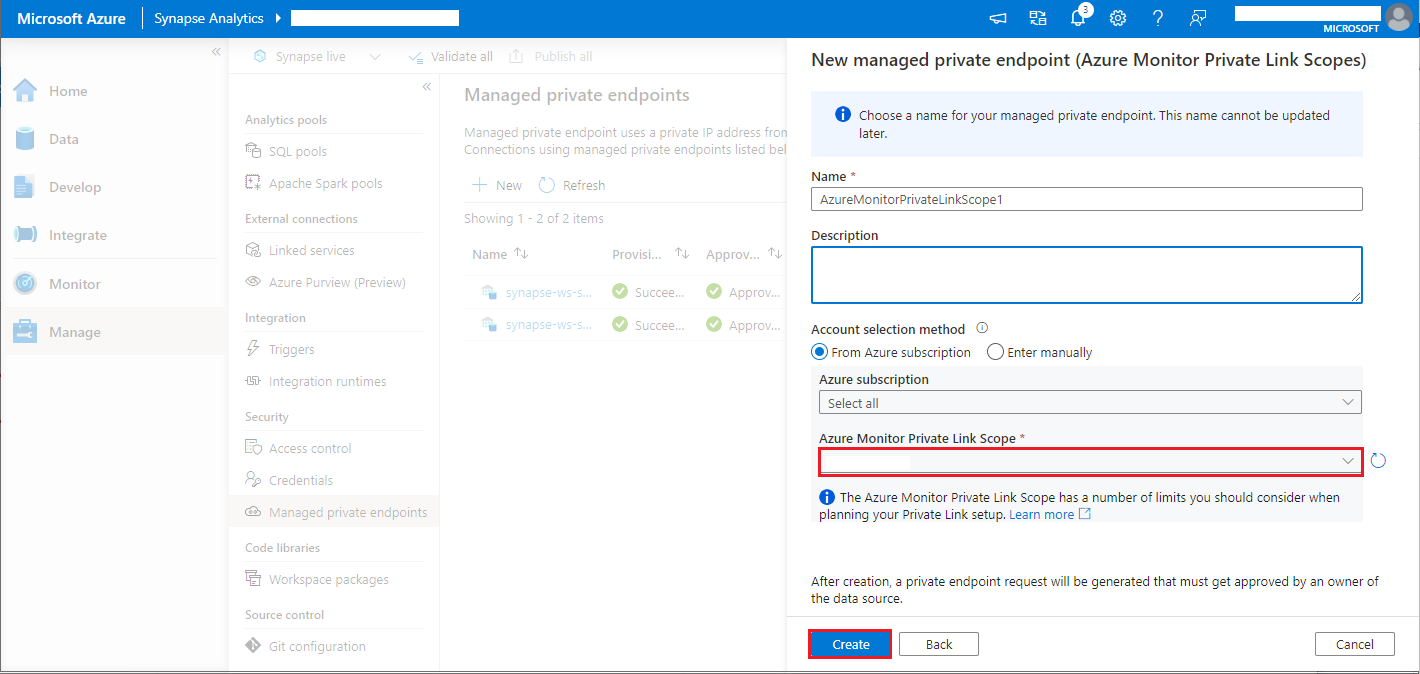
- Navigate to Synapse Studio > Manage > Managed private endpoints, select New button, select Azure Monitor Private Link Scopes, and continue.
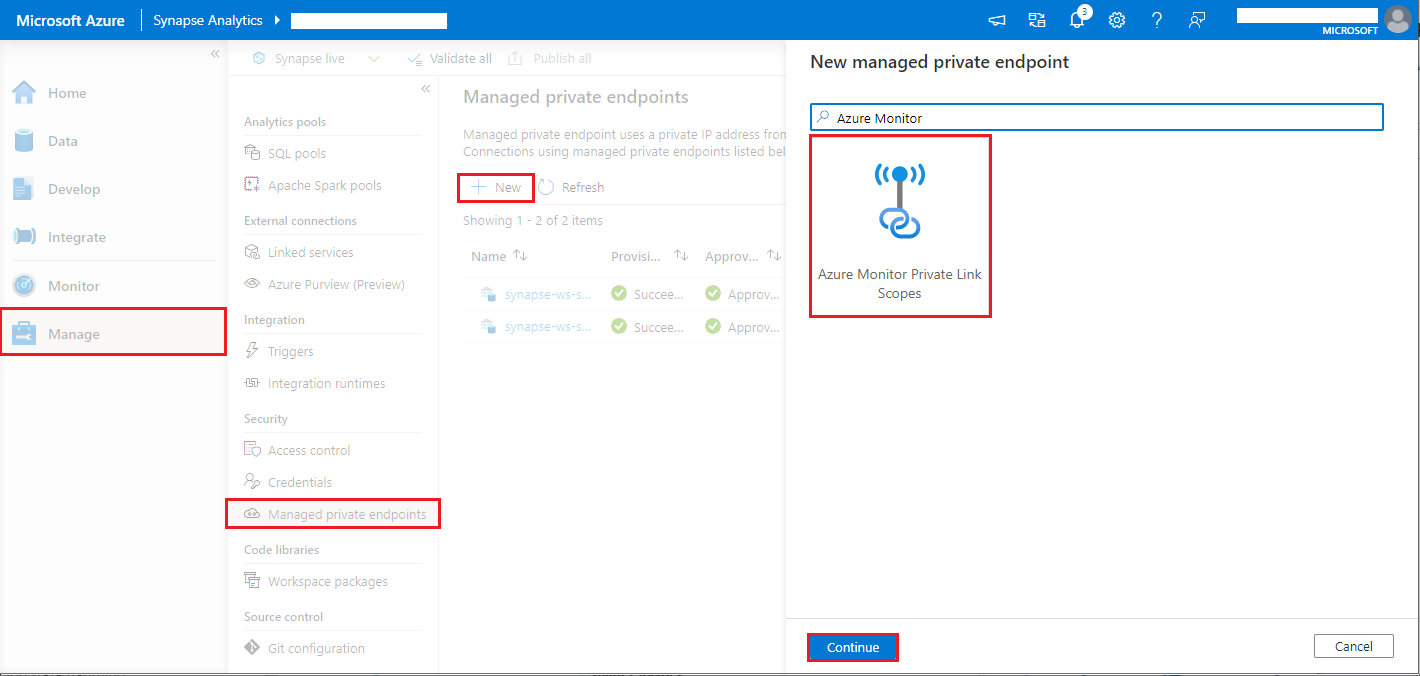
- Choose your Azure Monitor Private Link Scope you created, and select Create button.
- Wait a few minutes for private endpoint provisioning.
- Navigate to your AMPLS in Azure portal again, on the Private Endpoint connections page, select the connection provisioned and Approve.
Note
- The AMPLS object has many limits you should consider when planning your Private Link setup. See AMPLS limits for a deeper review of these limits.
- Check if you have right permission to create managed private endpoint.
Available configurations
| Configuration | Description |
|---|---|
spark.synapse.diagnostic.emitters |
Required. The comma-separated destination names of diagnostic emitters. For example, MyDest1,MyDest2 |
spark.synapse.diagnostic.emitter.<destination>.type |
Required. Built-in destination type. To enable Azure Log Analytics destination, AzureLogAnalytics needs to be included in this field. |
spark.synapse.diagnostic.emitter.<destination>.categories |
Optional. The comma-separated selected log categories. Available values include DriverLog, ExecutorLog, EventLog, Metrics. If not set, the default value is all categories. |
spark.synapse.diagnostic.emitter.<destination>.workspaceId |
Required. To enable Azure Log Analytics destination, workspaceId needs to be included in this field. |
spark.synapse.diagnostic.emitter.<destination>.secret |
Optional. The secret (Log Analytics key) content. To find this, in the Azure portal, go to Azure Log Analytics workspace > Agents > Primary key. |
spark.synapse.diagnostic.emitter.<destination>.secret.keyVault |
Required if .secret is not specified. The Azure Key vault name where the secret (AccessKey or SAS) is stored. |
spark.synapse.diagnostic.emitter.<destination>.secret.keyVault.secretName |
Required if .secret.keyVault is specified. The Azure Key vault secret name where the secret is stored. |
spark.synapse.diagnostic.emitter.<destination>.secret.keyVault.linkedService |
Optional. The Azure Key vault linked service name. When enabled in Synapse pipeline, this is necessary to obtain the secret from Azure Key vault. (Make sure the MSI has read access to the Azure Key vault). |
spark.synapse.diagnostic.emitter.<destination>.filter.eventName.match |
Optional. The comma-separated Log4j logger names, you can specify which logs to collect. For example SparkListenerApplicationStart,SparkListenerApplicationEnd |
spark.synapse.diagnostic.emitter.<destination>.filter.loggerName.match |
Optional. The comma-separated log4j logger names, you can specify which logs to collect. For example: org.apache.spark.SparkContext,org.example.Logger |
spark.synapse.diagnostic.emitter.<destination>.filter.metricName.match |
Optional. The comma-separated spark metric name suffixes, you can specify which metrics to collect. For example:jvm.heap.used |