Important
You can't currently create a Virtual Machine Scale Set using Flexible orchestration mode from an image shared by another tenant.
Create a scale set from a specialized image version stored in an Azure Compute Gallery. If you want to create a scale set using a generalized image version, see Create a scale set from a generalized image.
Important
When you create a new scale set from a specialized image, the VMs retain the computer name of the original VM. Other computer-specific information, like the CMID, is also kept. This duplicate information can cause issues. When using a specialized image, be aware of what types of computer-specific information your applications rely on.
Replace resource names as needed in these examples.
Create a scale set from your gallery
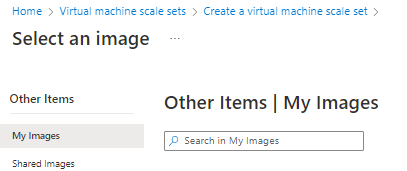
Creating a scale set using an image stored in an Azure Compute Gallery is the same as creating a scale set using a Marketplace image, except when you select an image, select See all images.

The Select an image page will open. Select My images if the image you want is in your own gallery, or select Shared images if the image has been shared to you from someone else's gallery.
If you choose to install and use the CLI locally, this tutorial requires that you are running the Azure CLI version 2.35.0 or later. Run az --version to find the version. If you need to install or upgrade, see Install Azure CLI.
List the image definitions in a gallery using az sig image-definition list to see the name and ID of the definitions.
resourceGroup=myGalleryRG
gallery=myGallery
az sig image-definition list \
   --resource-group $resourceGroup \
   --gallery-name $gallery \
   --query "[].[name, id]" \
   --output tsv
Create a scale set using az vmss create using the --specialized parameter to indicate the image is a specialized image.
Use the image definition ID for --image to create the scale set instances from the latest version of the image that is available. You can also create the scale set instances from a specific version by supplying the image version ID for --image. Be aware that using a specific image version means automation could fail if that specific image version isn't available because it was deleted or removed from the region. We recommend using the image definition ID for creating your new VM, unless a specific image version is required.
In this example, we are creating instances from the latest version of the myImageDefinition image.
az group create --name myResourceGroup --location eastus
az vmss create \
   --resource-group myResourceGroup \
   --name myScaleSet \
   --image "/subscriptions/<Subscription ID>/resourceGroups/myGalleryRG/providers/Microsoft.Compute/galleries/myGallery/images/myImageDefinition" \
   --specialized
In this example, we are using the image definition ID to ensure your new VM will use the most recent version of an image. You can also use a specific version by using the image version ID for -ImageReferenceId. For example, to use image version 1.0.0 type: -ImageReferenceId "/subscriptions/<subscription ID where the gallery is located>/resourceGroups/myGalleryRG/providers/Microsoft.Compute/galleries/myGallery/images/myImageDefinition/versions/1.0.0".
Be aware that using a specific image version means automation could fail if that specific image version isn't available because it was deleted or removed from the region. We recommend using the image definition ID for creating your new VM, unless a specific image version is required.
The following example creates a scale set named myScaleSet, in the myVMSSRG resource group, in the SouthCentralUS location. The scale set will be created from the myImageDefinition image, in the myGallery image gallery in the myGalleryRG resource group. When prompted, set your own administrative credentials for the VM instances in the scale set.
# Get the image definition

$imageDefinition = Get-AzGalleryImageDefinition `
   -GalleryName myGallery `
   -ResourceGroupName myGalleryRG `
   -Name myImageDefinition

# Define variables for the scale set
$resourceGroupName = "myVMSSRG"
$scaleSetName = "myScaleSet"
$location = "South Central US"

# Create a resource group
New-AzResourceGroup -ResourceGroupName $resourceGroupName -Location $location

# Create a networking pieces
$subnet = New-AzVirtualNetworkSubnetConfig `
  -Name "mySubnet" `
  -AddressPrefix 10.0.0.0/24
$vnet = New-AzVirtualNetwork `
  -ResourceGroupName $resourceGroupName `
  -Name "myVnet" `
  -Location $location `
  -AddressPrefix 10.0.0.0/16 `
  -Subnet $subnet
$publicIP = New-AzPublicIpAddress `
  -ResourceGroupName $resourceGroupName `
  -Location $location `
  -AllocationMethod Static `
  -Name "myPublicIP"
$frontendIP = New-AzLoadBalancerFrontendIpConfig `
  -Name "myFrontEndPool" `
  -PublicIpAddress $publicIP
$backendPool = New-AzLoadBalancerBackendAddressPoolConfig -Name "myBackEndPool"
$inboundNATPool = New-AzLoadBalancerInboundNatPoolConfig `
  -Name "myRDPRule" `
  -FrontendIpConfigurationId $frontendIP.Id `
  -Protocol TCP `
  -FrontendPortRangeStart 50001 `
  -FrontendPortRangeEnd 50010 `
  -BackendPort 3389
# Create the load balancer and health probe
$lb = New-AzLoadBalancer `
  -ResourceGroupName $resourceGroupName `
  -Name "myLoadBalancer" `
  -Location $location `
  -FrontendIpConfiguration $frontendIP `
  -BackendAddressPool $backendPool `
  -InboundNatPool $inboundNATPool
Add-AzLoadBalancerProbeConfig -Name "myHealthProbe" `
  -LoadBalancer $lb `
  -Protocol TCP `
  -Port 80 `
  -IntervalInSeconds 15 `
  -ProbeCount 2
Add-AzLoadBalancerRuleConfig `
  -Name "myLoadBalancerRule" `
  -LoadBalancer $lb `
  -FrontendIpConfiguration $lb.FrontendIpConfigurations[0] `
  -BackendAddressPool $lb.BackendAddressPools[0] `
  -Protocol TCP `
  -FrontendPort 80 `
  -BackendPort 80 `
  -Probe (Get-AzLoadBalancerProbeConfig -Name "myHealthProbe" -LoadBalancer $lb)
Set-AzLoadBalancer -LoadBalancer $lb

# Create IP address configurations
$ipConfig = New-AzVmssIpConfig `
  -Name "myIPConfig" `
  -LoadBalancerBackendAddressPoolsId $lb.BackendAddressPools[0].Id `
  -LoadBalancerInboundNatPoolsId $inboundNATPool.Id `
  -SubnetId $vnet.Subnets[0].Id

# Create a configuration
$vmssConfig = New-AzVmssConfig `
    -Location $location `
    -SkuCapacity 2 `
    -SkuName "Standard_DS2" `
    -UpgradePolicyMode "Automatic"

# Reference the image version
Set-AzVmssStorageProfile $vmssConfig `
  -OsDiskCreateOption "FromImage" `
  -ImageReferenceId $imageDefinition.Id

# Complete the configuration

Add-AzVmssNetworkInterfaceConfiguration `
  -VirtualMachineScaleSet $vmssConfig `
  -Name "network-config" `
  -Primary $true `
  -IPConfiguration $ipConfig

# Create the scale set
New-AzVmss `
  -ResourceGroupName $resourceGroupName `
  -Name $scaleSetName `
  -VirtualMachineScaleSet $vmssConfig
It takes a few minutes to create and configure all the scale set resources and VMs.
Important
Azure Compute Gallery – community galleries is currently in PREVIEW and subject to the Preview Terms for Azure Compute Gallery - community gallery.
Microsoft does not provide support for images in the community gallery.
You can create scale sets from images in the community gallery, but if the image is removed at a later time, you won't be able to scale up. To ensure you have long-term access to the image, you should consider creating an image in your own gallery from a VM created using the community gallery image that you want to use for your scale set. For more information, see Create an image definition and an image version.
As an end user, to get the public name of a community gallery, you need to use the portal. Go to Virtual machines > Create > Azure virtual machine > Image > See all images > Community Images > Public gallery name.
Replace resource names as needed in these examples.
If you choose to install and use the CLI locally, the community gallery requires that you are running the Azure CLI version 2.4.0 or later. Run az --version to find the version. If you need to install or upgrade, see Install Azure CLI.
To create a VM using an image shared to a community gallery, use the unique ID of the image for the --image which will be in the following format:
/CommunityGalleries/<community gallery name>/Images/<image name>/Versions/latest
To list all of the image definitions that are available in a community gallery using az sig image-definition list-community. In this example, we list all of the images in the ContosoImage gallery in West US and by name, the unique ID that is needed to create a VM, OS and OS state.
 az sig image-definition list-community \
   --public-gallery-name "ContosoImages-1a2b3c4d-1234-abcd-1234-1a2b3c4d5e6f" \
   --location westus \
   --query [*]."{Name:name,ID:uniqueId,OS:osType,State:osState}" -o table
Create the scale set by setting the --image parameter to the unique ID of the image in the community gallery. In this example, we are creating a Flexible scale set.
az group create --name myResourceGroup --location eastus

imgDef="/CommunityGalleries/ContosoImages-1a2b3c4d-1234-abcd-1234-1a2b3c4d5e6f>/Images/myLinuxImage/Versions/latest"

az vmss create \
   --resource-group myResourceGroup \
   --name myScaleSet \
   --image $imgDef \
   --orchestration-mode Flexible
When using a community image, you'll be prompted to accept the legal terms. The message will look like this:
To create the scale set from community gallery image, you must accept the license agreement and privacy statement: http://contoso.com. (If you want to accept the legal terms by default, please use the option '--accept-term' when creating VM/VMSS) (Y/n):
Creating a scale set using an image from the community gallery is the same as creating a scale set using a Marketplace image, except when you select an image, select See all images.
The Select an image page will open. Select Community images (PREVIEW) to see the list of images available in the community gallery.
Next steps
Azure Image Builder (preview) can help automate image version creation, you can even use it to update and create a new image version from an existing image version.
You can also create Azure Compute Gallery resource using templates. There are several Azure Quickstart Templates available: