Note
Access to this page requires authorization. You can try signing in or changing directories.
Access to this page requires authorization. You can try changing directories.
Applies to: ✔️ Linux VMs
Azure virtual machines (VMs) provide a fully configurable and flexible computing environment. This tutorial covers basic Azure virtual machine deployment combined with the installation and configuration of Oracle Automatic Storage Management (ASM). You learn how to:
- Create and connect to an Oracle Database VM
- Install and configure Oracle Automatic Storage Management
- Install and configure Oracle Grid infrastructure
- Initialize an Oracle ASM installation
- Create an Oracle DB managed by ASM
For an overview of the value proposition of ASM, see the documentation at Oracle.
If you choose to install and use the CLI locally, this tutorial requires that you're running the Azure CLI version 2.0.4 or later. To find the version, run az --version. If you need to install or upgrade, see Install Azure CLI.
Prepare the environment
This lab uses two VMs on Azure: asmXServer runs X Windows server used to run grid setup and asmVM hosts the Oracle Database and ASM installation. The Marketplace images used to create these virtual machines are
- asmVM: Oracle:oracle-database-19-3:oracle-database-19-0904:19.3.1
- asmXServer: MicrosoftWindowsDesktop:Windows-10:win10-22h2-pro-g2:19045.2604.230207
You also need to be familiar with Unix editor vi and have a basic understanding of X Server.
Sign in to Azure
Open your preferred shell on Windows, Linux, or Azure Shell.
Sign in to your Azure subscription with the az login command. Then follow the on-screen directions.
$ az loginEnsure you're connected to the correct subscription by verifying subscription name and/or ID.
$ az account show{ "environmentName": "XXXXX", "homeTenantId": "XXXXXXXX-XXXX-XXXX-XXXX-XXXXXXXXXXXX", "id": "<SUBSCRIPTION_ID>", "isDefault": true, "managedByTenants": [], "name": "<SUBSCRIPTION_NAME>", "state": "Enabled", "tenantId": XXXXXXXX-XXXX-XXXX-XXXX-XXXXXXXXXXXX", "user": { "cloudShellID": true, "name": "aaaaa@bbbbb.com", "type": "user" } }
Generate authentication keys
We use keyfile based authentication with ssh to connect to the Oracle Database VM. Ensure that you have your private (named id_rsa) and public (named id_rsa.pub) key files are created on your shell.
Location of key files depends on your source system.
Windows: %USERPROFILE%.ssh Linux: ~/.ssh
Should they not exist, you can create a new keyfile pair.
$ ssh-keygen -m PEM -t rsa -b 4096
The .ssh directory and key files are created. For more information, see Create and manage SSH keys for authentication to a Linux VM in Azure
Create a resource group
To create a resource group, use the az group create command. An Azure resource group is a logical container in which Azure resources are deployed and managed.
$ az group create --name ASMOnAzureLab --location westus
Create and configure network
Create virtual network
Use following command to create the virtual network that hosts resources we create in this lab.
$ az network vnet create \
  --name asmVnet \
  --resource-group ASMOnAzureLab \
  --address-prefixes "10.0.0.0/16" \
  --subnet-name asmSubnet1 \
  --subnet-prefixes "10.0.0.0/24"
Create a Network Security Group (NSG)
Create a network security group (NSG) to lock down your virtual network.
$ az network nsg create \
  --resource-group ASMOnAzureLab \
  --name asmVnetNSG
Create an NSG rule to allow communication within virtual network.
$ az network nsg rule create  --resource-group ASMOnAzureLab --nsg-name asmVnetNSG \
    --name asmAllowVnet \
    --protocol '*' --direction inbound --priority 3400 \
    --source-address-prefix 'VirtualNetwork' --source-port-range '*' \
    --destination-address-prefix 'VirtualNetwork' --destination-port-range '*' --access allow
Create NSG rule to deny all inbound connections
$ az network nsg rule create \
  --resource-group ASMOnAzureLab \
  --nsg-name asmVnetNSG \
  --name asmDenyAllInBound \
  --protocol '*' --direction inbound --priority 3500 \
  --source-address-prefix '*' --source-port-range '*' \
  --destination-address-prefix '*' --destination-port-range '*' --access deny
Assign NSG to Subnet where we host our servers.
$ az network vnet subnet update --resource-group ASMOnAzureLab --vnet-name asmVNet --name asmSubnet1 --network-security-group asmVnetNSG
Create Bastion Network
Create Bastion subnet. Name of the subnet must be AzureBastionSubnet
$ az network vnet subnet create  \
    --resource-group ASMOnAzureLab \
    --name AzureBastionSubnet \
    --vnet-name asmVnet \
    --address-prefixes 10.0.1.0/24
Create public IP for Bastion
$ az network public-ip create \
    --resource-group ASMOnAzureLab \
    --name asmBastionIP \
    --sku Standard
Create Azure Bastion resource. It takes about 10 minutes for the resource to deploy.
$ az network bastion create \
    --resource-group ASMOnAzureLab \
    --name asmBastion \
    --public-ip-address asmBastionIP \
    --vnet-name asmVnet \
    --sku Standard \
    --enable-tunneling \
    --enable-ip-connect true
Create X Server VM (asmXServer)
Replace your password and run following command to create a Windows workstation VM where we deploy X Server.
$ az vm create \
    --resource-group ASMOnAzureLab \
    --name asmXServer \
    --image MicrosoftWindowsDesktop:Windows-10:win10-22h2-pro-g2:19045.2604.230207 \
    --size Standard_DS1_v2  \
    --vnet-name asmVnet \
    --subnet asmSubnet1 \
    --public-ip-sku Standard \
    --nsg "" \
    --data-disk-delete-option Delete \
    --os-disk-delete-option Delete \
    --nic-delete-option Delete \
    --admin-username azureuser \
    --admin-password <ENTER_YOUR_PASSWORD_HERE>
Connect to asmXServer
Connect to asmXServer using Bastion.
- Navigate to asmXServer from Azure portal
- Locate Overview in the left navigation
- Select Connect > Bastion on the menu at the top
- Select the Bastion tab
- Select Use Bastion
Prepare asmXServer to run X Server
X Server is required for later steps of this lab. Perform following steps to install and start X Server.
Download Xming X Server for Windows to ggXServer and install with all default options
Verify you did'nt select Launch at the end of installation
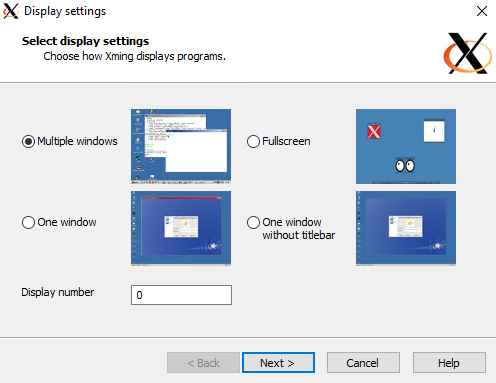
Launch the "XLAUNCH" application from start menu
Select Multiple Windows
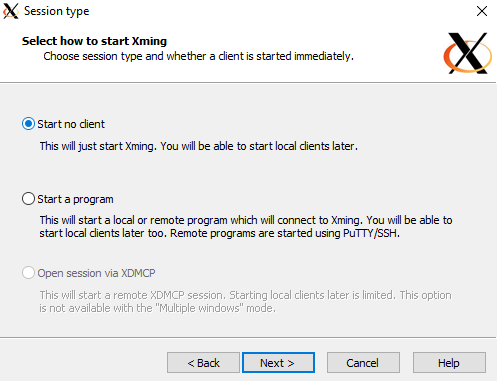
Select Start no client
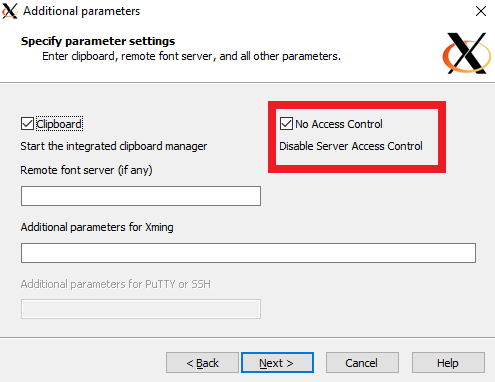
Select No access control
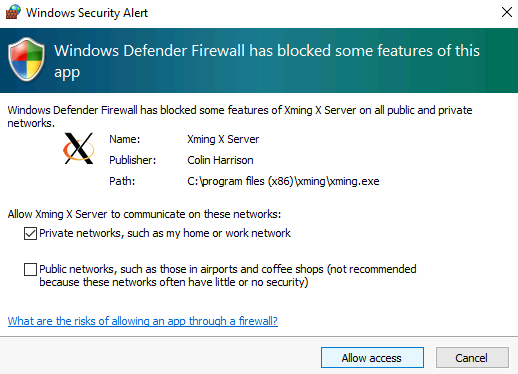
Select Allow Access to allow X Server through Windows Firewall
If you restart your asmXServer VM, follow steps 2-6 above to restart X Server application.
Create Oracle Database VM
For this lab, we create a virtual machine asmVM from Oracle Database 19c image. Run following to create asmVM with multiple data disks attached. If they don't already exist in the default key location, this command also creates SSH keys. To use a specific set of keys, use the --ssh-key-value option. If you have already created your SSH keys in Generate authentication keys section, those keys are used.
When you create a new virtual machine, the size parameter indicates the size and type of virtual machine created. Depending on the Azure region you select to create virtual machine and your subscription settings, some virtual machine sizes and types might not be available for you to use. Following command uses minimum required size for this lab Standard_D4_v5. If you want to change specs of virtual machine, select one of the available sizes from Azure VM Sizes. For test purposes, you can choose from General Purpose (D-Series) virtual machine types. For production or pilot deployments, Memory Optimized (E-Series and M-Series) are more suitable.
az vm create --resource-group ASMOnAzureLab \
   --name asmVM \
   --image Oracle:oracle-database-19-3:oracle-database-19-0904:19.3.1 \
   --size Standard_D4_v5 \
   --generate-ssh-keys \
   --os-disk-size-gb 30 \
   --data-disk-sizes-gb 20 40 40 \
   --admin-username azureuser \
   --vnet-name asmVnet \
   --subnet asmSubnet1 \
   --public-ip-sku Basic \
   --nsg ""
Connect to asmVM
Connect to asmVM using Bastion.
- Navigate to asmVM from Azure portal
- Locate Overview in the left navigation
- Select Connect > Bastion on the menu at the top
- Select the Bastion tab
- Select Use Bastion
Create swap file
This lab requires a swap file on the lab virtual machine. Complete following steps to create the swap file.
Prepare disk and mount point
When we created the virtual machine (asmVM) earlier, we included a 20GB data disk to place swap file. Run following command to find out the name for this 20GB disk. It's /dev/sdb most of the time but in case it comes up different make sure you note the name for 20G disk and use if for following steps. Similarly we use the names of 40G disks (which are named /dev/sdc and /dev/sdd in the following output) later on.
$ sudo su -
$ lsblk
NAME MAJ:MIN RM SIZE RO TYPE MOUNTPOINT sdd 8:48 0 40G 0 disk ====> Data disk 2 (40GB) sdb 8:16 0 20G 0 disk ====> Swap file disk (20GB) sr0 11:0 1 628K 0 rom fd0 2:0 1 4K 0 disk sdc 8:32 0 40G 0 disk ====> Data disk 1 (40GB) sda 8:0 0 30G 0 disk ├─sda2 8:2 0 29G 0 part / ├─sda14 8:14 0 4M 0 part ├─sda15 8:15 0 495M 0 part /boot/efi └─sda1 8:1 0 500M 0 part /bootRun the following command to create the partition on the swap file disk, modify disk name (/dev/sdb) if necessary.
$ parted /dev/sdb --script mklabel gpt mkpart xfspart xfs 0% 100%Check the name of the partition created. The following shows it's created as sdb1.
$ lsblkNAME MAJ:MIN RM SIZE RO TYPE MOUNTPOINT sdd 8:48 0 40G 0 disk sdb 8:16 0 20G 0 disk └─sdb1 8:17 0 20G 0 part ====> Newly created partition sr0 11:0 1 628K 0 rom fd0 2:0 1 4K 0 disk sdc 8:32 0 40G 0 disk sda 8:0 0 30G 0 disk ├─sda2 8:2 0 29G 0 part / ├─sda14 8:14 0 4M 0 part ├─sda15 8:15 0 495M 0 part /boot/efi └─sda1 8:1 0 500M 0 part /bootRun the following commands to initialize file system (xfs) and mount the drive as /swap.
$ mkfs.xfs /dev/sdb1
$ partprobe /dev/sdb1
$ mkdir /swap
$ mount /dev/sdb1 /swap
Run the following command:
$ blkidIn the output, you see a line for swap disk partition /dev/sdb1, note down the UUID.
/dev/sdb1: UUID="00000000-0000-0000-0000-000000000000" TYPE="xfs" PARTLABEL="xfspart" PARTUUID="...."Paste UUID from previous step into the following command and run it. This command ensures proper mounting of drive every time system reboots.
$ echo "UUID=00000000-0000-0000-0000-000000000000 /swap xfs defaults,nofail 1 2" >> /etc/fstab
Configure swap file
Create and allocate the swap file (16GB). This command takes a couple of minutes to run.
$ dd if=/dev/zero of=/swap/swapfile bs=1M count=16384Modify permissions and assign the swap file.
$ chmod 600 /swap/swapfile
$ mkswap /swap/swapfile
$ swapon /swap/swapfile
Verify the swap file is created.
$ cat /proc/swapsFilename Type Size Used Priority /swap/swapfile file 16777212 0 -2Verify the swap file setting is retained across reboots.
$ echo "/swap/swapfile none swap sw 0 0" >> /etc/fstab
Install Oracle ASM
To install Oracle ASM, complete the following steps.
For more information about installing Oracle ASM, see Oracle ASMLib Downloads for Oracle Linux 7.
Sign in as root to continue with the ASM installation, if you haven't already.
$ sudo su -Run the following commands to install Oracle ASM components:
$ yum list | grep oracleasmOutput of the command looks like:
kmod-oracleasm.x86_64                    2.0.8-28.0.1.el7            ol7_latest
oracleasm-support.x86_64                 2.1.11-2.el7                ol7_latest
Continue installation by running the following commands:
$ yum -y install kmod-oracleasm.x86_64
$ yum -y install oracleasm-support.x86_64
$ wget https://download.oracle.com/otn_software/asmlib/oracleasmlib-2.0.15-1.el7.x86_64.rpm
$ yum -y install oracleasmlib-2.0.15-1.el7.x86_64.rpm
$ rm -f oracleasmlib-2.0.15-1.el7.x86_64.rpm
Verify that Oracle ASM is installed:
$ rpm -qa |grep oracleasmThe output of this command should list the following components:
oracleasm-support-2.1.11-2.el7.x86_64
oracleasmlib-2.0.15-1.el7.x86_64
kmod-oracleasm-2.0.8-28.0.1.el7.x86_64
ASM requires specific users and roles to function correctly. The following commands create the prerequisite user accounts and groups:
$ groupadd -g 54345 asmadmin
$ groupadd -g 54346 asmdba
$ groupadd -g 54347 asmoper
$ usermod -a -g oinstall -G oinstall,dba,asmdba,asmadmin,asmoper oracle
Verify users and groups were created correctly.
$ grep oracle /etc/groupThe output of this command should list the following users and groups.
 oinstall:x:54321:oracle
 dba:x:54322:oracle
 oper:x:54323:oracle
 backupdba:x:54324:oracle
 dgdba:x:54325:oracle
 kmdba:x:54326:oracle
 racdba:x:54330:oracle
 asmadmin:x:54345:oracle
 asmdba:x:54346:oracle
 asmoper:x:54347:oracle
Create the app folder change the owner.
$ mkdir /u01/app/grid
$ chown oracle:oinstall /u01/app/grid
Set up Oracle ASM
For this tutorial, the default user is oracle and the default group is asmadmin. Ensure that the oracle user is part of the asmadmin group.
$ groups oracle
The output of command should look like
oracle : oinstall dba oper backupdba dgdba kmdba racdba asmadmin asmdba asmoper
To set up Oracle ASM, complete the following steps:
Set up the Oracle ASM library driver using the following command and providing following answers for prompts.
$ /usr/sbin/oracleasm configure -iThe output of this command should look similar to the following, stopping with prompts to be answered.
Configuring the Oracle ASM library driver.

This will configure the on-boot properties of the Oracle ASM library
driver. The following questions will determine whether the driver is
loaded on boot and what permissions it will have. The current values
will be shown in brackets ('[]'). Hitting <ENTER> without typing an
answer will keep that current value. Ctrl-C will abort.

Default user to own the driver interface []: oracle
Default group to own the driver interface []: asmadmin
Start Oracle ASM library driver on boot (y/n) [n]: y
Scan for Oracle ASM disks on boot (y/n) [y]: y
Writing Oracle ASM library driver configuration: done
Note
The
/usr/sbin/oracleasm configure -icommand asks for the user and group that default to owning the ASM driver access point. The database will be running as theoracleuser and theasmadmingroup. By selecting Start Oracle ASM library driver on boot = 'y', the system will always load the module and mount the filesystem on boot. By selecting Scan for Oracle ASM disks on boot = 'y', the system will always scan the Oracle ASM disks on boot. The last two configurations are very important, otherwise, you will run into disk reboot problems.View the disk configuration:
$ cat /proc/partitionsThe output of this command should look similar to the following listing of available disks
 major minor  #blocks  name
    8       16   20971520 sdb
    8       17   20969472 sdb1
    8       32   41943040 sdc
    8       48   41943040 sdd
    8        0   31457280 sda
    8        1     512000 sda1
    8        2   30431232 sda2
    8       14       4096 sda14
    8       15     506880 sda15
   11        0        628 sr0
    2        0          4 fd0
Format disk /dev/sdc by running the following command and answering the prompts with:
- n for new partition
- p for primary partition
- 1 to select the first partition
- press enter for the default first sector
- press enter for the default last sector
- press w to write the changes to the partition table
$ fdisk /dev/sdcThe output for the
fdiskcommand should look like the following output:Welcome to fdisk (util-linux 2.23.2). Changes will remain in memory only, until you decide to write them. Be careful before using the write command. Device does not contain a recognized partition table Building a new DOS disklabel with disk identifier 0x947f0a91. The device presents a logical sector size that is smaller than the physical sector size. Aligning to a physical sector (or optimal I/O) size boundary is recommended, or performance can be impacted. Command (m for help): n Partition type: p primary (0 primary, 0 extended, 4 free) e extended Select (default p): p Partition number (1-4, default 1): 1 First sector (2048-104857599, default 2048): Using default value 2048 Last sector, +sectors or +size{K,M,G} (2048-104857599, default 104857599): Using default value 104857599 Partition 1 of type Linux and of size 50 GiB is set Command (m for help): w The partition table has been altered! Calling ioctl() to re-read partition table. Syncing disks.Repeat the preceding
fdiskcommand for/dev/sdd$ fdisk /dev/sddCheck the disk configuration:
$ cat /proc/partitionsThe output of the command should look like the following output:
 major minor  #blocks  name
    8       16   20971520 sdb
    8       17   20969472 sdb1
    8       32   41943040 sdc
    8       33   41942016 sdc1
    8       48   41943040 sdd
    8       49   41942016 sdd1
    8        0   31457280 sda
    8        1     512000 sda1
    8        2   30431232 sda2
    8       14       4096 sda14
    8       15     506880 sda15
   11        0        628 sr0
    2        0          4 fd0
Note
Note that, in the following configuration, please use the exact commands as this document shows.
Check the Oracle ASM service status and start the Oracle ASM service:
$ oracleasm statusChecking if ASM is loaded: no Checking if /dev/oracleasm is mounted: no$ oracleasm initCreating /dev/oracleasm mount point: /dev/oracleasm Loading module "oracleasm": oracleasm Configuring "oracleasm" to use device physical block size Mounting ASMlib driver filesystem: /dev/oracleasmCreate Oracle ASM disks
Create first disk
$ oracleasm createdisk VOL1 /dev/sdc1The output of command should look like
 Writing disk header: done
 Instantiating disk: done
Create remaining disks
$ oracleasm createdisk VOL2 /dev/sdd1
Note
Disks are marked for ASMLib using a process described in ASMLib Installation. ASMLib learns what disk are marked during a process called disk scanning. ASMLib runs this scan every time it starts up. The system administrator can also force a scan via the
oracleasm scandiskscommand. ASMLib examines each disk in the system. It checks if the disk has been marked for ASMLib. Any disk that has been marked will be made available to ASMLib. You can visit documents Configuring Storage Device Path Persistence Using Oracle ASMLIB and Configuring Oracle ASMLib on Multipath Disks for more information.List Oracle ASM disks
$ oracleasm scandisks
$ oracleasm listdisks
The output of the command should list off the following Oracle ASM disks:
 VOL1
 VOL2
Change passwords for the root and oracle users. Make note of these new passwords as you are using them later during the installation.
$ passwd oracle
$ passwd root
Change folder permissions
$ chmod -R 775 /opt
$ chown oracle:oinstall /opt
$ chown oracle:oinstall /dev/sdc1
$ chown oracle:oinstall /dev/sdd1
$ chmod 600 /dev/sdc1
$ chmod 600 /dev/sdd1
Download and Prepare Oracle Grid Infrastructure
To download and prepare the Oracle Grid Infrastructure software, complete the following steps:
Download Oracle Grid Infrastructure from the Oracle ASM download page. Your download location should have Azure CLI installed because we copy these files to asmVM using Bastion. Because it uses a tunnel, this step won't work over Azure Cloud Shell, it needs to be run on a workstation.
Under the download titled Oracle Database 19c Grid Infrastructure (19.3) for Linux x86-64, download the .zip file.
After you download the .zip file to your client computer, you can use Secure Copy Protocol (SCP) to copy the files to your VM. Make sure that
scpcommand points to correct path of .zip file.Sign in and verify you're using the correct subscription as necessary as described in Sign in to Azure.
Use the following PowerShell command to open the tunnel to your target VM:
$asmVMid=$(az vm show --resource-group ASMOnAzureLab --name asmVM --query 'id' --output tsv)

az network bastion tunnel --name asmBastion --resource-group ASMOnAzureLab --target-resource-id $asmVMid --resource-port 22 --port 57500
Leave the first command prompt running and open a second command prompt to connect to your target VM through the tunnel. In this second command prompt window, you can upload files from your local machine to your target VM using the following command. Note the correct
id_rsakeyfile to access asmVM must reside in the.sshdirectory or you can point to a different key file using the-iparameter toscpcommand.scp -P 57500 "LINUX.X64_193000_grid_home.zip" azureuser@127.0.0.1:.
When upload is complete SSH back into your asmVM in Azure using Bastion in order to move the .zip files into the /opt folder and change the owner of the file.
$ sudo su -
$ mv /home/azureuser/*.zip /opt
$ cd /opt
$ chown oracle:oinstall LINUX.X64_193000_grid_home.zip
Unzip the files (install the Linux unzip tool if it's not already installed).
$ yum install unzip
$ unzip LINUX.X64_193000_grid_home.zip -d grid
Change permission
$ chown -R oracle:oinstall /opt/gridCleanup
$ rm -f LINUX.X64_193000_grid_home.zipExit root
$ exit
Install Oracle Grid Infrastructure
To install Oracle Grid Infrastructure, complete the following steps:
Sign in as oracle. (You should be able to sign in without being prompted for a password.)
Note
Make sure you have started X Server before you begin the installation.
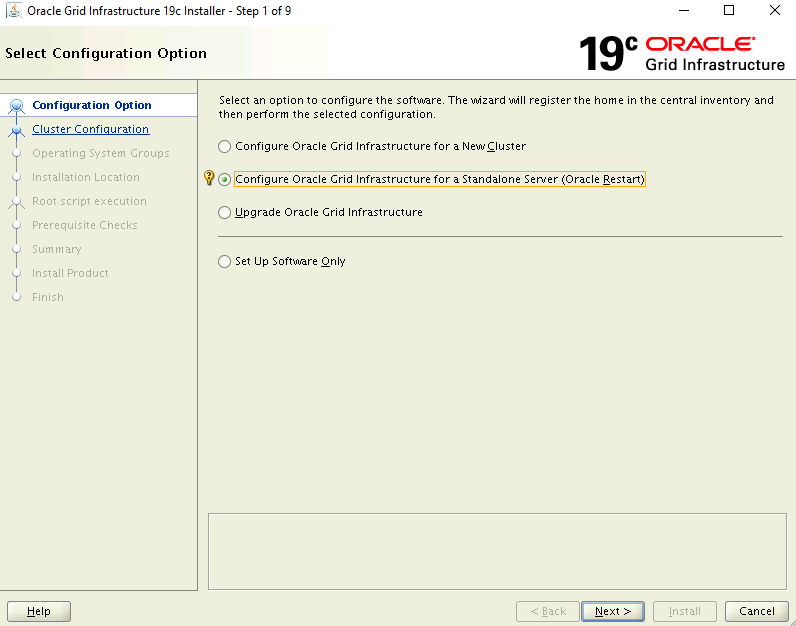
$ sudo su - oracle
$ export DISPLAY=10.0.0.4:0.0
$ cd /opt/grid
$ ./gridSetup.sh
Oracle Grid Infrastructure 19c Installer opens on asmXServer VM. (It might take a few minutes for the installer to start.)
On the Select Configuration Option page, select Configure Oracle Grid Infrastructure for a Standalone Server (Oracle Restart).
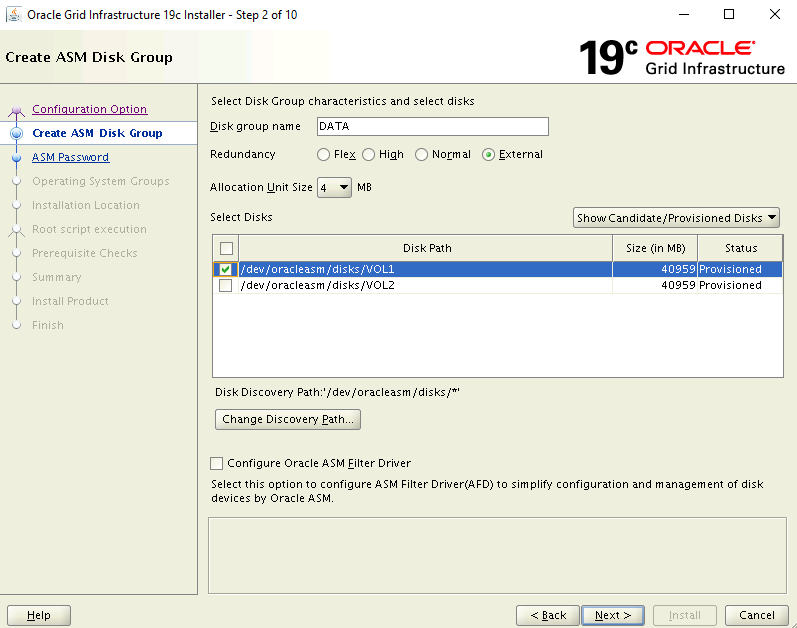
On the Create ASM Disk Group page:
- Select the Change Discovery Path
- Update the discovery path to be /dev/oracleasm/disks/
- Enter a name for the disk group DATA
- Under Redundancy, select External
- Under Allocation Unit Size, select 4
- Under Select Disks, select /dev/oracleasm/disks/VOL1
- Select Next
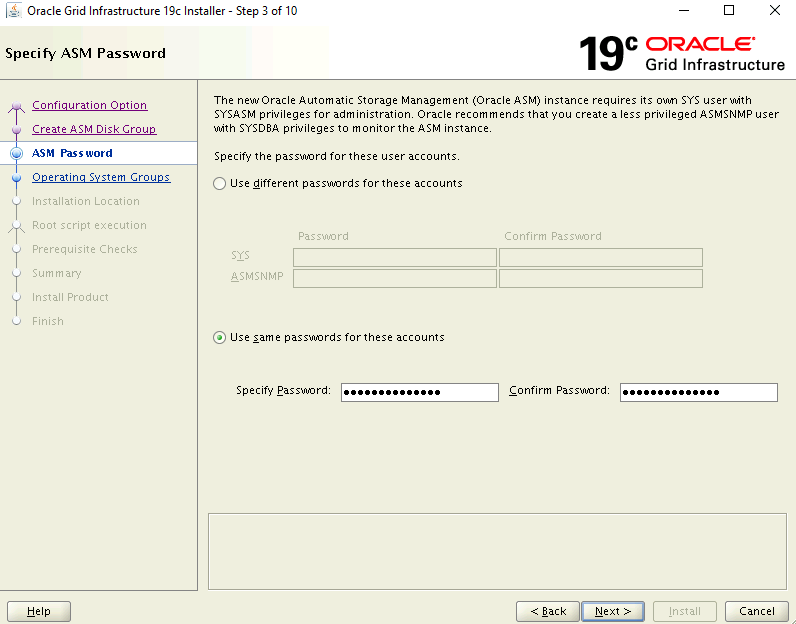
On the Specify ASM Password page, select the Use same passwords for these accounts option and enter a password.
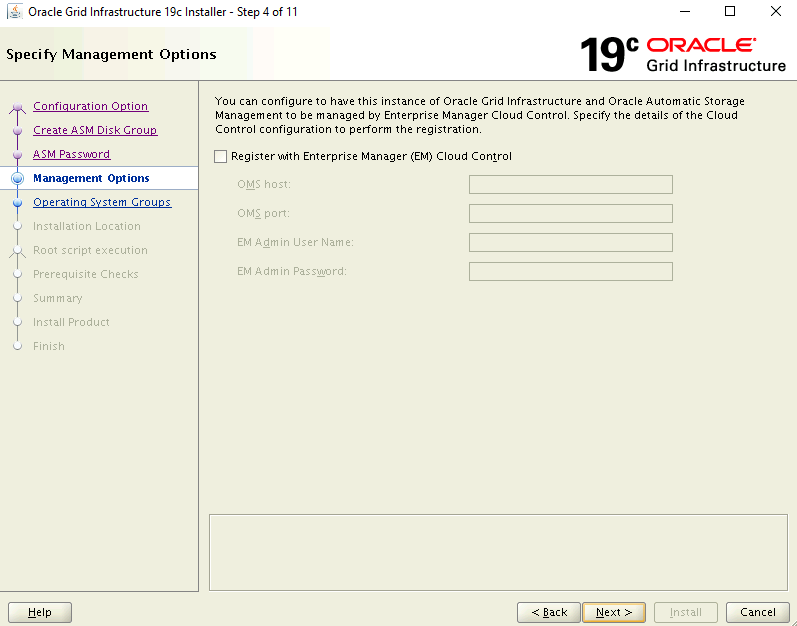
On the Specify Management Options page, verify the option to configure EM Cloud Control is unselected. Select Next to continue.
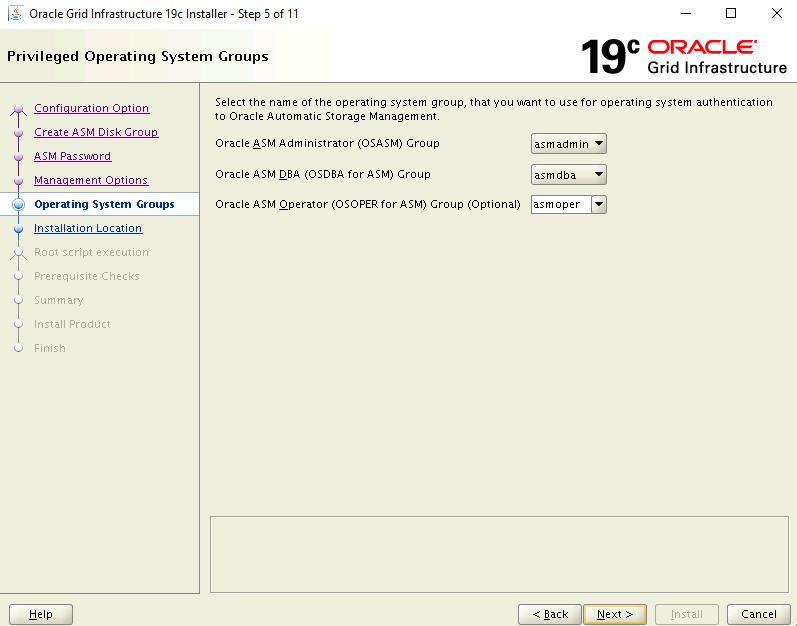
On the Privileged Operating System Groups page, use the default settings. Select Next to continue.
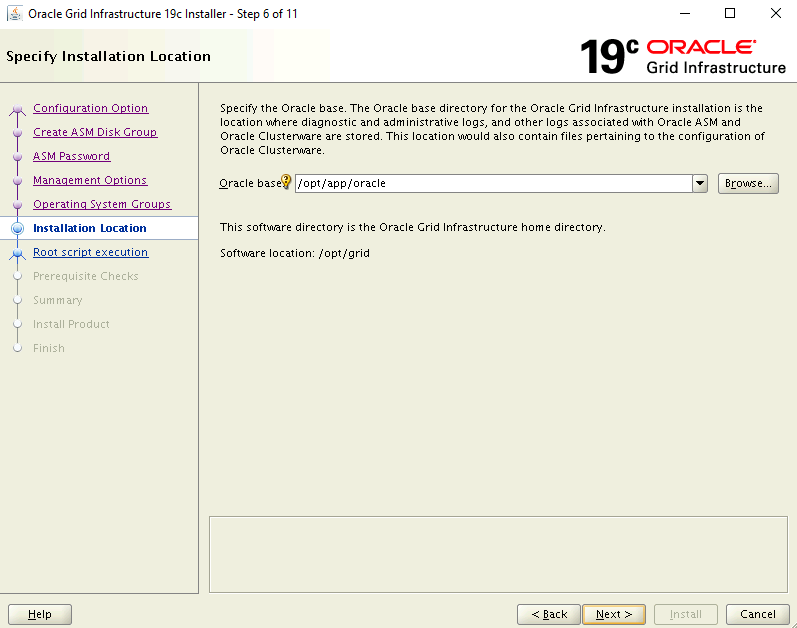
On the Specify Installation Location page, use the default settings. Select Next to continue.
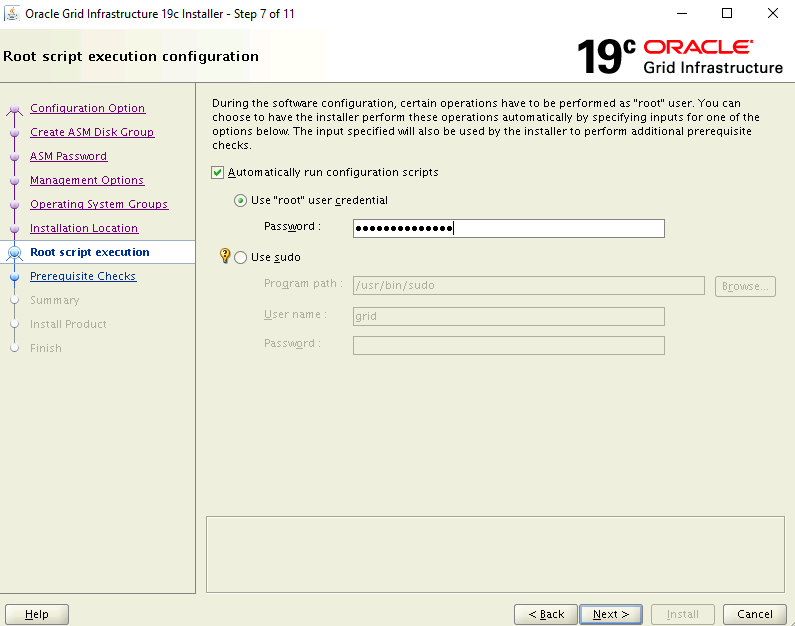
On the Root script execution configuration page, select the Automatically run configuration scripts check box. Then, select the Use "root" user credential option, and enter the root user password.
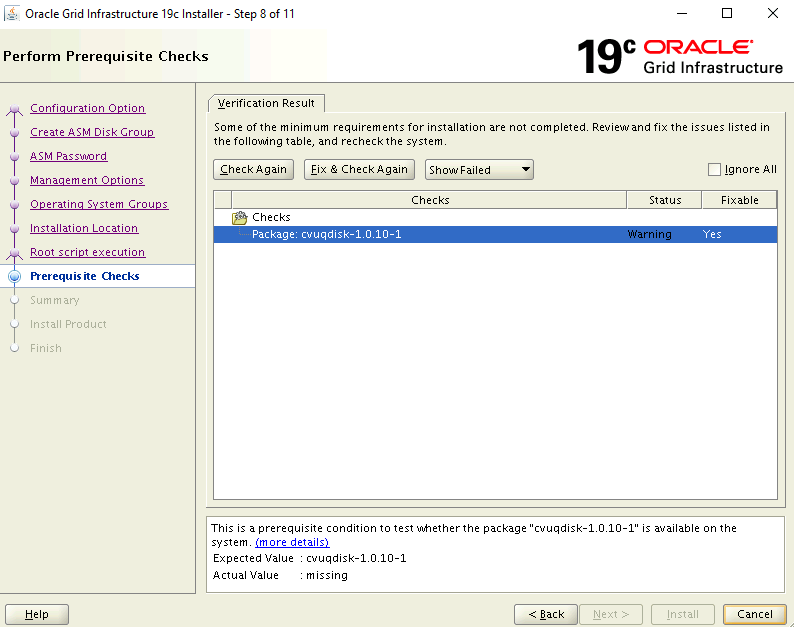
On the Perform Prerequisite Checks page, the current setup fails with errors. Select Fix & Check Again.
In the Fixup Script dialog box, select OK.
On the Summary page, review your selected settings, then select
Install.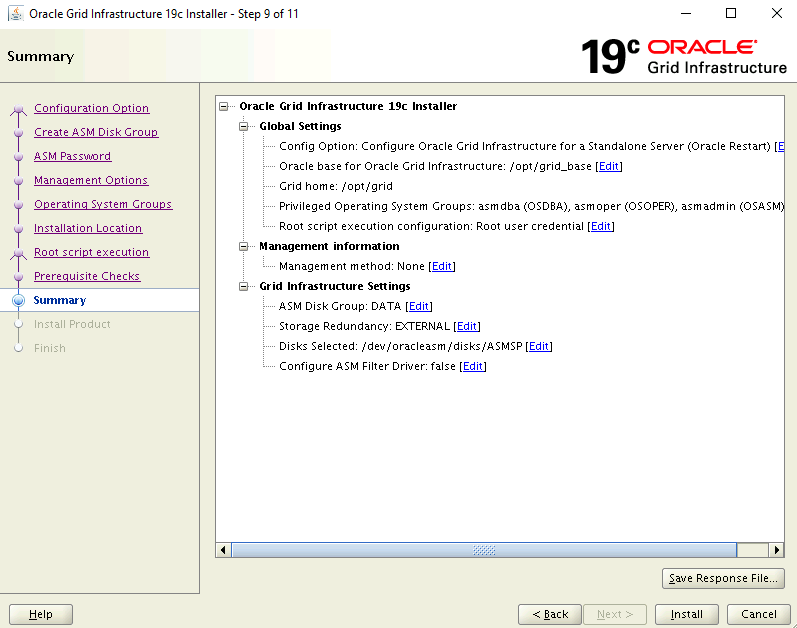
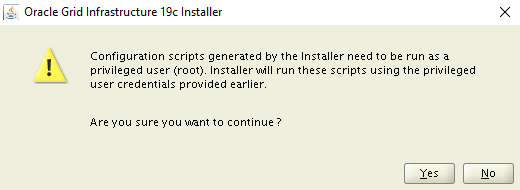
A warning dialog box appears informing you configuration scripts need to be run as a privileged user. Select Yes to continue.
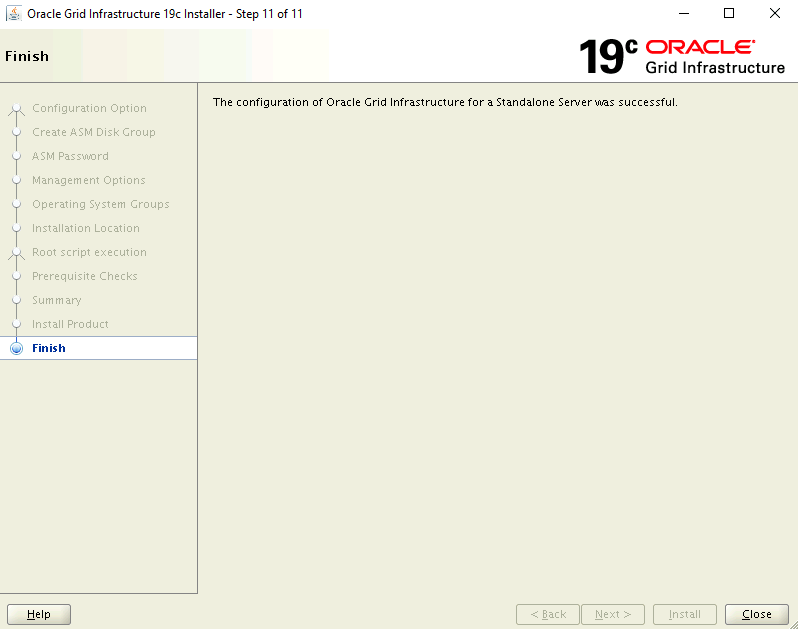
On the Finish page, select Close to finish the installation.
Setup Oracle ASM
Complete following steps to set up Oracle ASM.
Verify you're signed in as oracle, to asmVM from the Bastion ssh session.
Run the following to set context. If you still have the shell open from previous command, you can skip this step.
$ sudo su - oracle
$ export DISPLAY=10.0.0.4:0.0
Launch the Oracle Automatic Storage Management Configuration Assistant
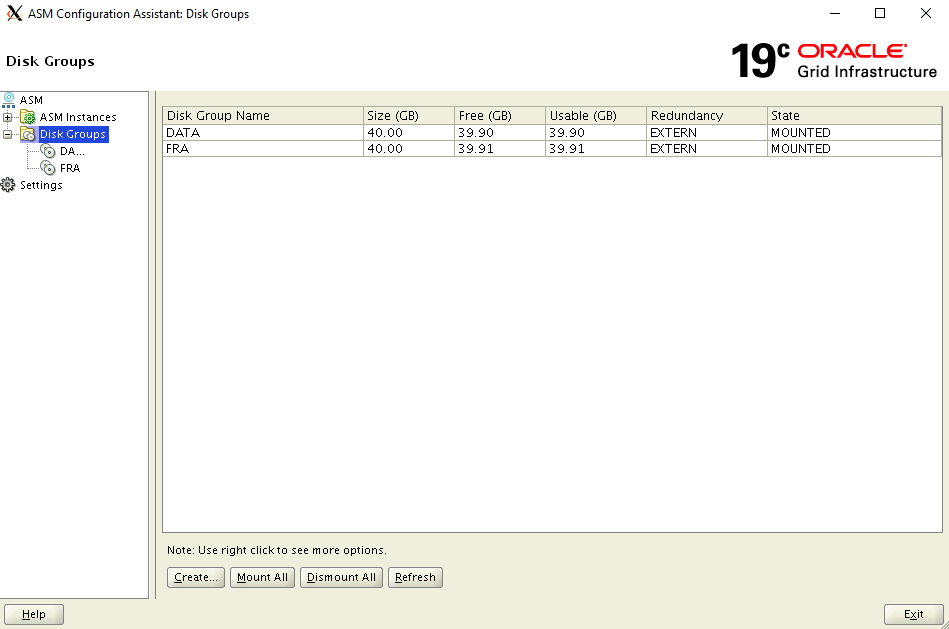
$ cd /opt/grid/bin
$ ./asmca
In a few minutes, Oracle ASM Configuration Assistant window opens on asmXServer VM.
Select DATA under Disk Groups in the tree and select the Create button at the bottom.
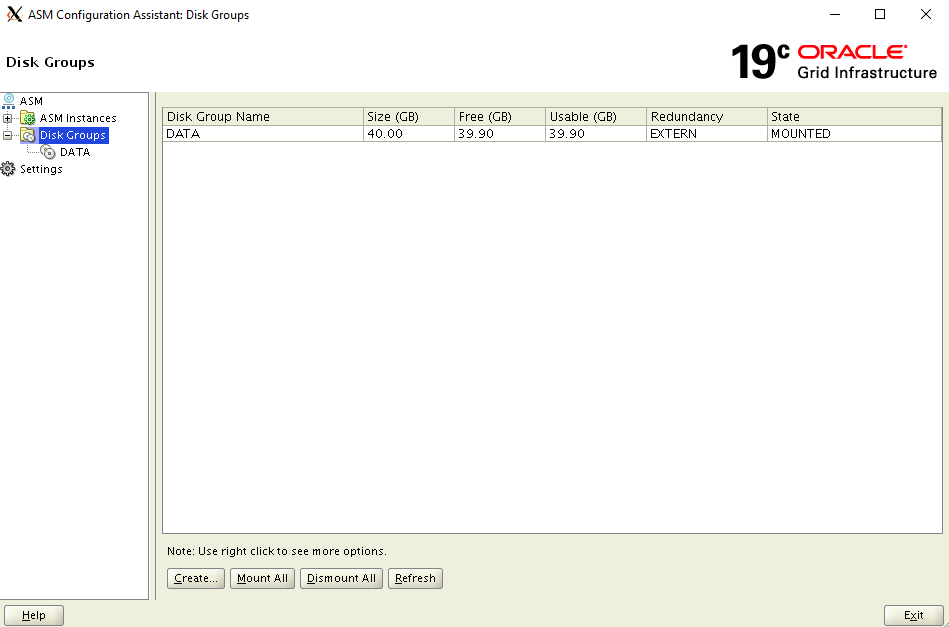
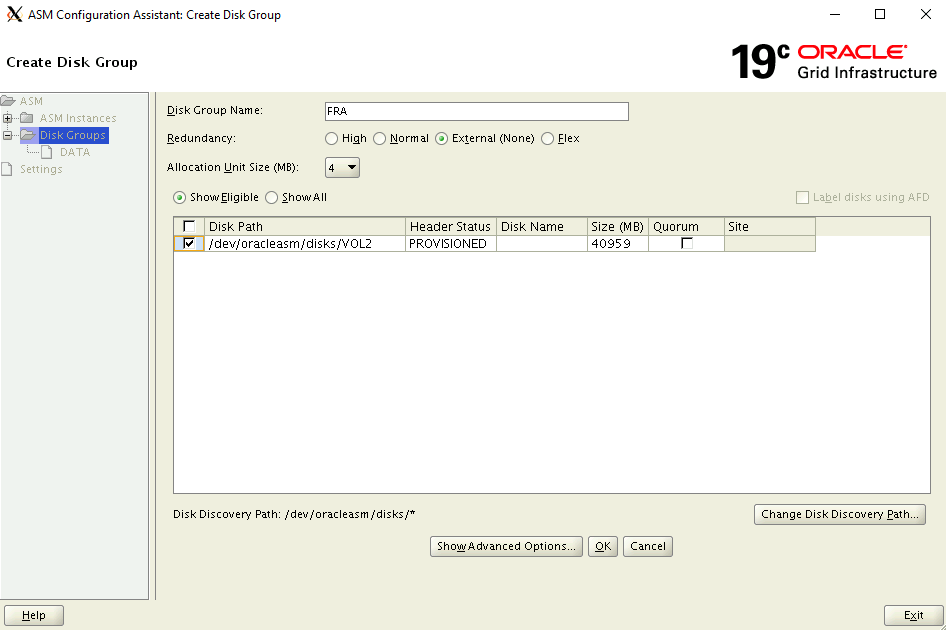
In the Create Disk Group dialog box:
- Enter the disk group name FRA
- For Redundancy option, select External (none)
- Under Select Member Disks, select /dev/oracleasm/disks/VOL2
- Under Allocation Unit Size, select 4
- Select ok to create the disk group
- Select ok to close the confirmation window
Select Exit to close ASM Configuration Assistant.
Create the database
The Oracle database software is already installed on the Azure Marketplace image. To create a database, complete the following steps:
Ensure the context is set to oracle user.
- Run following to set context. If you have the shell open from the previous command, this step might not be necessary.
$ sudo su - oracle
$ export DISPLAY=10.0.0.4:0.0
Run Database Configuration Assistant
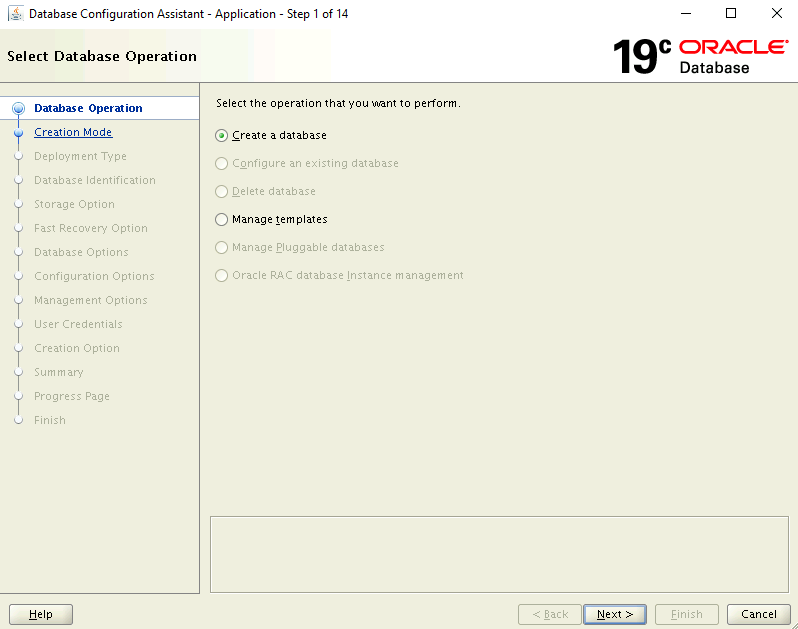
$ cd /u01/app/oracle/product/19.0.0/dbhome_1/bin
$ ./dbca
In a few seconds, Database Configuration Assistant window opens on asmXServer VM.
On the Database Operation page, select Create Database.
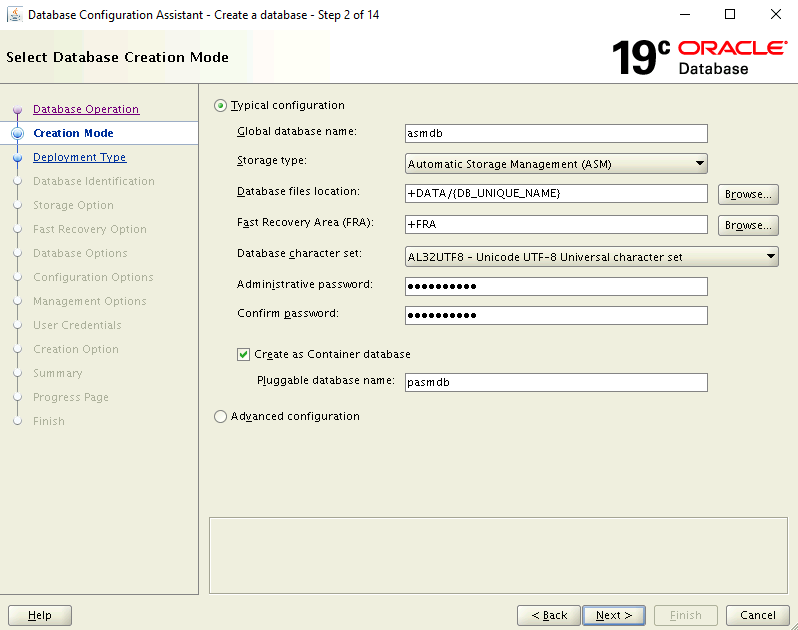
On the Creation Mode page:
- Ensure Typical configuration is selected
- Enter a name for the database: asmdb
- For Storage Type, ensure Automatic Storage Management (ASM) is selected
- For Database Files Location, browse and select DATA location
- For Fast Recovery Area, browse and select FRA location
- Type in an Administrative Password and confirm password
- Ensure create as container database is selected
- Type in a pluggable database name value: pasmdb
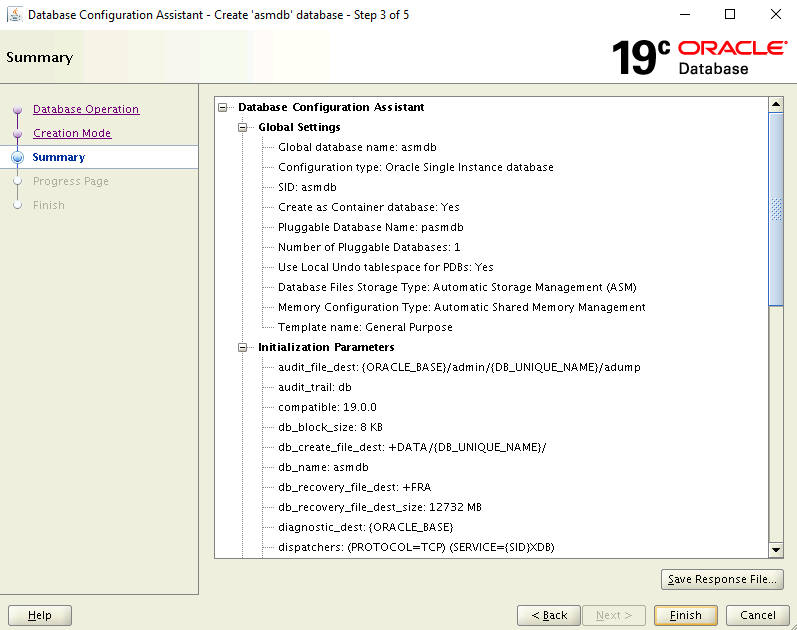
On the Summary page, review your chosen settings, then select Finish to create the database. Database creation can take more than 10 minutes.
The Database is now created. On the Finish page, you can opt to unlock more accounts to use this database and change the passwords. If you wish to do so, select Password Management - otherwise select Close.
Delete the asmXServer VM
asmXServer VM is only used during setup. You can safely delete it after completing this lab document but keep your ASM on Azure lab setup intact.
$ az vm delete --resource-group ASMOnAzureLab --name asmXServer --force-deletion yes

$ az network public-ip delete --resource-group ASMOnAzureLab --name asmXServerPublicIP
Delete ASM On Azure Lab Setup
You successfully configured Oracle Automatic Storage Management on the Oracle DB image from the Azure Marketplace. When you no longer need this environment, you can use the following command to remove the resource group and all related resources:
$ az group delete --name ASMOnAzureLab
Next steps
Tutorial: Configure Oracle DataGuard
Tutorial: Configure Oracle GoldenGate
Review Architect an Oracle DB