Note
Access to this page requires authorization. You can try signing in or changing directories.
Access to this page requires authorization. You can try changing directories.
Managing IP addresses across multiple Azure tenants can be complex, especially in large or distributed organizations. Azure Virtual Network Manager simplifies this process by enabling centralized IP address management (IPAM) across tenants. This article shows you how to deploy a virtual network in a managed tenant using an IP address allocation from an IPAM pool in a management tenant, all through the Azure portal. You'll learn about prerequisites, step-by-step configuration, and how to remove IPAM allocations when they're no longer needed.
Prerequisites
An Azure account with an active subscription. Create an account for free.
Two Azure tenants: a management tenant (Tenant A) and a managed tenant (Tenant B)
- Management tenant (Tenant A) must have:
- An Azure Virtual Network Manager instance. If you don't have a network manager instance, see Create a network manager instance.
- An IPAM pool created in the network manager instance. If you don't have an IPAM pool, see Create an IPAM pool.
- Network manager configured with cross-tenant connection to Tenant B. For more information, see Add remote tenant scope in Azure Virtual Network Manager.
- IPAM Pool User role assigned to your user or service principal.
- Managed tenant (Tenant B) must have:
- Network Contributor role assigned at the subscription or virtual network level.
- Management tenant (Tenant A) must have:
Deploy cross-tenant IPAM using the Azure portal
Create an IPAM allocation in the management tenant
Sign in to the Azure portal using credentials with access to Tenant A.
Navigate to Azure Virtual Network Manager and locate your network manager instance.
Select IP address pools under IP address management.
Select the IPAM pool where you want to create an allocation.
Select + Create > Allocate resources.
In the Allocate resources pane, select the Tenant : dropdown and choose the managed tenant (Tenant B) where you want to allocate IP addresses.
Select Apply and then select Authenticate.
Note
The authentication process requires you to sign in with a user or service principal that has the Network Contributor role in Tenant B at the subscription or resource level.
After authentication, select the virtual network, you want to associate with the IP address pool and select Associate.
Verify the cross-tenant association
In Tenant A's portal view, navigate to your IP address pool and select Allocations under Settings.
Select Resources and verify that the virtual network from Tenant B is listed as an allocated resource.
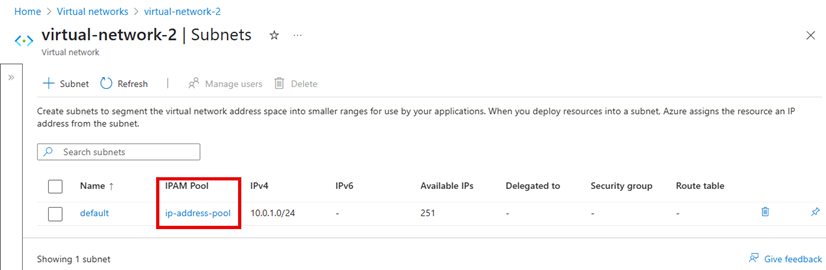
Switch to Tenant B's portal view and navigate to the virtual network that received the allocation.
Select Subnets under Settings and verify the name listed under IPAM pool matches the name of the IPAM pool in the management tenant (Tenant A).

Remove IPAM allocation
To remove an IP allocation from a cross-tenant resource:
Sign in to the Azure portal with credentials for Tenant A.
Navigate to Azure Virtual Network Manager and locate your network manager instance.
Select IP address pools under IP address management.
On the IP address pools page, select Allocations under Settings.
Select the virtual network that you want to remove the IPAM allocation from.
Select X Remove.
Authenticate to Tenant B and complete authentication.
Once authenticated, select Yes to remove the IPAM allocation.
Refresh the page to verify that the IPAM allocation is removed.