Configure active-active VPN gateways using the portal
This article helps you create highly available active-active VPN gateways using the Resource Manager deployment model and Azure portal. You can also configure an active-active gateway using PowerShell.
To achieve high availability for cross-premises and VNet-to-VNet connectivity, you should deploy multiple VPN gateways and establish multiple parallel connections between your networks and Azure. See Highly Available cross-premises and VNet-to-VNet connectivity for an overview of connectivity options and topology.
Important
The active-active mode is available for all SKUs except Basic or Standard. See About Gateway SKUs article for the latest information about gateway SKUs, performance, and supported features. For this configuration, Standard SKU Public IP addresses are required. You can't use a Basic SKU Public IP address.
The steps in this article help you configure a VPN gateway in active-active mode. There are a few differences between active-active and active-standby modes. The other properties are the same as the non-active-active gateways.
- Active-active gateways have two Gateway IP configurations and two public IP addresses.
- Active-active gateways have active-active setting enabled.
- The virtual network gateway SKU can't be Basic or Standard.
If you already have a VPN gateway, you can Update an existing VPN gateway from active-standby to active-active mode, or from active-active to active-standby mode.
Create a virtual network
If you don't already have a virtual network (VNet) that you want to use, create a VNet using the following values:
- Resource group: TestRG1
- Name: VNet1
- Region: (US) East US
- IPv4 address space: 10.1.0.0/16
- Subnet name: FrontEnd
- Subnet address space: 10.1.0.0/24
Sign in to the Azure portal.
In Search resources, service, and docs (G+/) at the top of the portal page, enter virtual network. Select Virtual network from the Marketplace search results to open the Virtual network page.
On the Virtual network page, select Create to open the Create virtual network page.
On the Basics tab, configure the virtual network settings for Project details and Instance details. You see a green check mark when the values you enter are validated. You can adjust the values shown in the example according to the settings that you require.
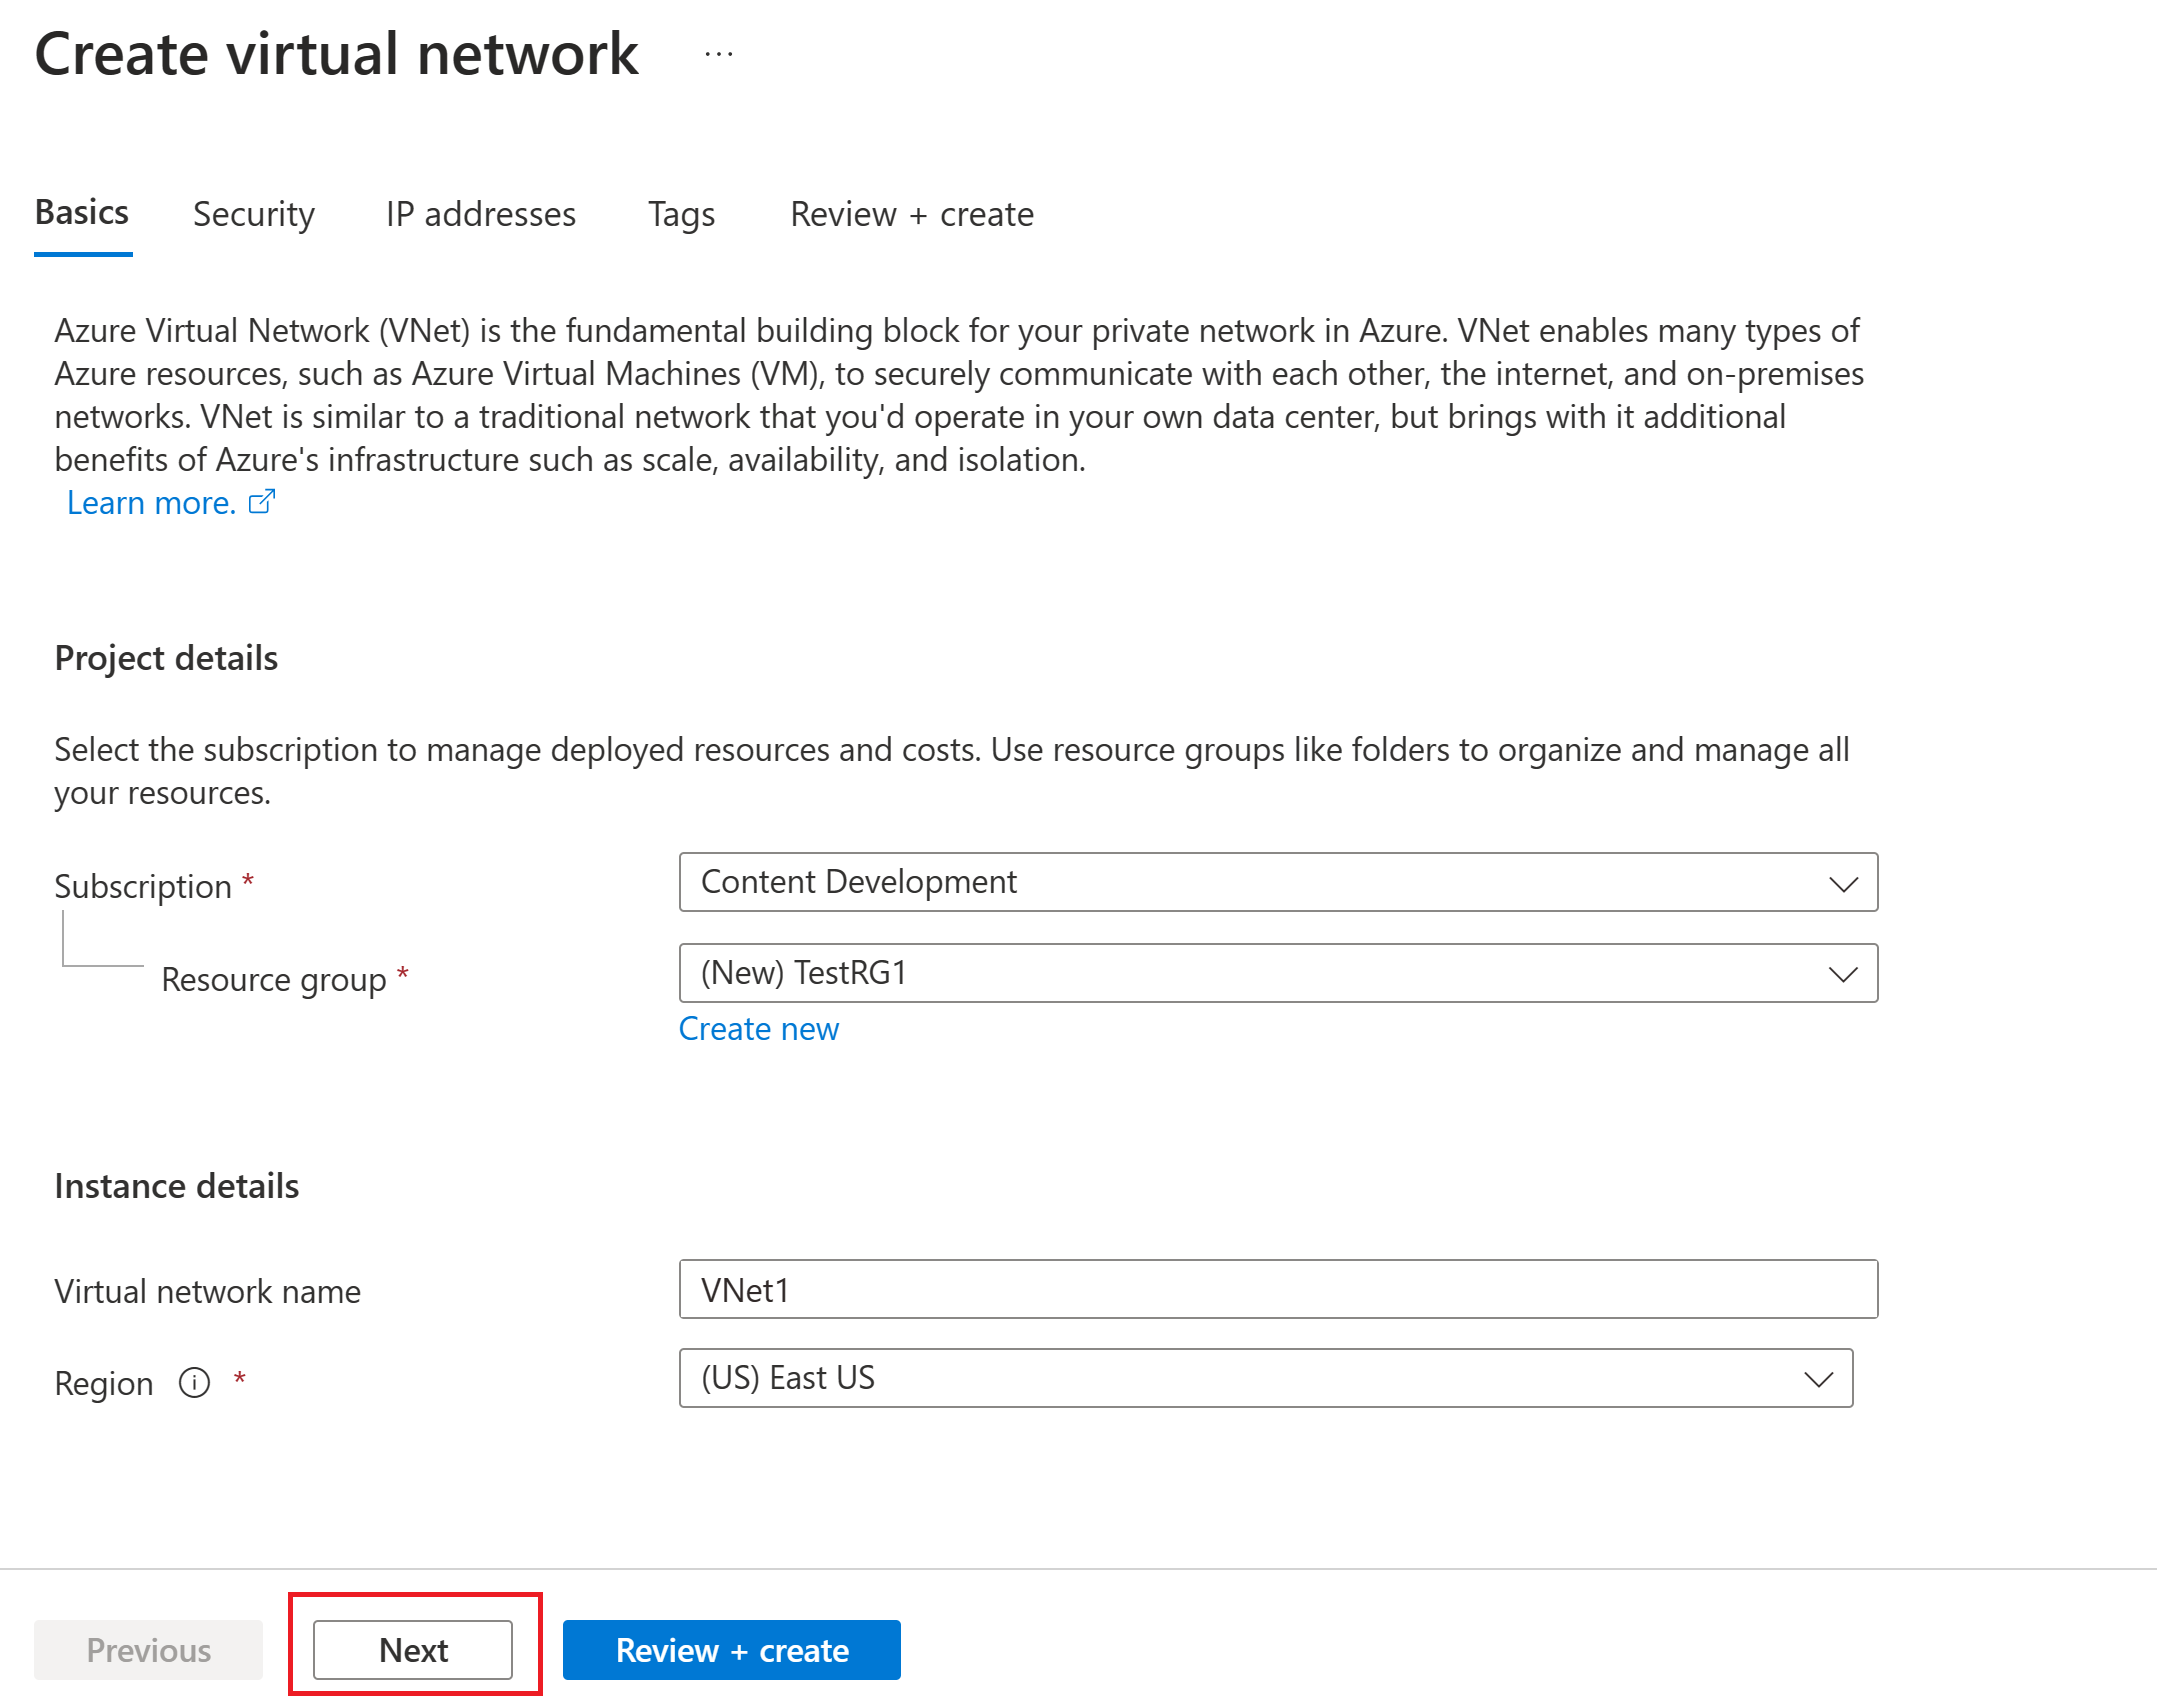
- Subscription: Verify that the subscription listed is the correct one. You can change subscriptions by using the dropdown box.
- Resource group: Select an existing resource group or select Create new to create a new one. For more information about resource groups, see Azure Resource Manager overview.
- Name: Enter the name for your virtual network.
- Region: Select the location for your virtual network. The location determines where the resources that you deploy to this virtual network will reside.
Select Next or Security to go to the Security tab. For this exercise, leave the default values for all the services on this page.
Select IP Addresses to go to the IP Addresses tab. On the IP Addresses tab, configure the settings.
IPv4 address space: By default, an address space is automatically created. You can select the address space and adjust it to reflect your own values. You can also add a different address space and remove the default that was automatically created. For example, you can specify the starting address as 10.1.0.0 and specify the address space size as /16. Then select Add to add that address space.
+ Add subnet: If you use the default address space, a default subnet is created automatically. If you change the address space, add a new subnet within that address space. Select + Add subnet to open the Add subnet window. Configure the following settings, and then select Add at the bottom of the page to add the values.
- Subnet name: An example is FrontEnd.
- Subnet address range: The address range for this subnet. Examples are 10.1.0.0 and /24.
Review the IP addresses page and remove any address spaces or subnets that you don't need.
Select Review + create to validate the virtual network settings.
After the settings are validated, select Create to create the virtual network.

Create an active-active VPN gateway
In this step, you create an active-active virtual network gateway (VPN gateway) for your VNet. Creating a gateway can often take 45 minutes or more, depending on the selected gateway SKU.
Create a virtual network gateway using the following values:
- Name: VNet1GW
- Region: East US
- Gateway type: VPN
- VPN type: Route-based
- SKU: VpnGw2
- Generation: Generation2
- Virtual network: VNet1
- Gateway subnet address range: 10.1.255.0/27
- Public IP address: Create new
- Public IP address name: VNet1GWpip
In Search resources, services, and docs (G+/), enter virtual network gateway. Locate Virtual network gateway in the Marketplace search results and select it to open the Create virtual network gateway page.
On the Basics tab, fill in the values for Project details and Instance details.
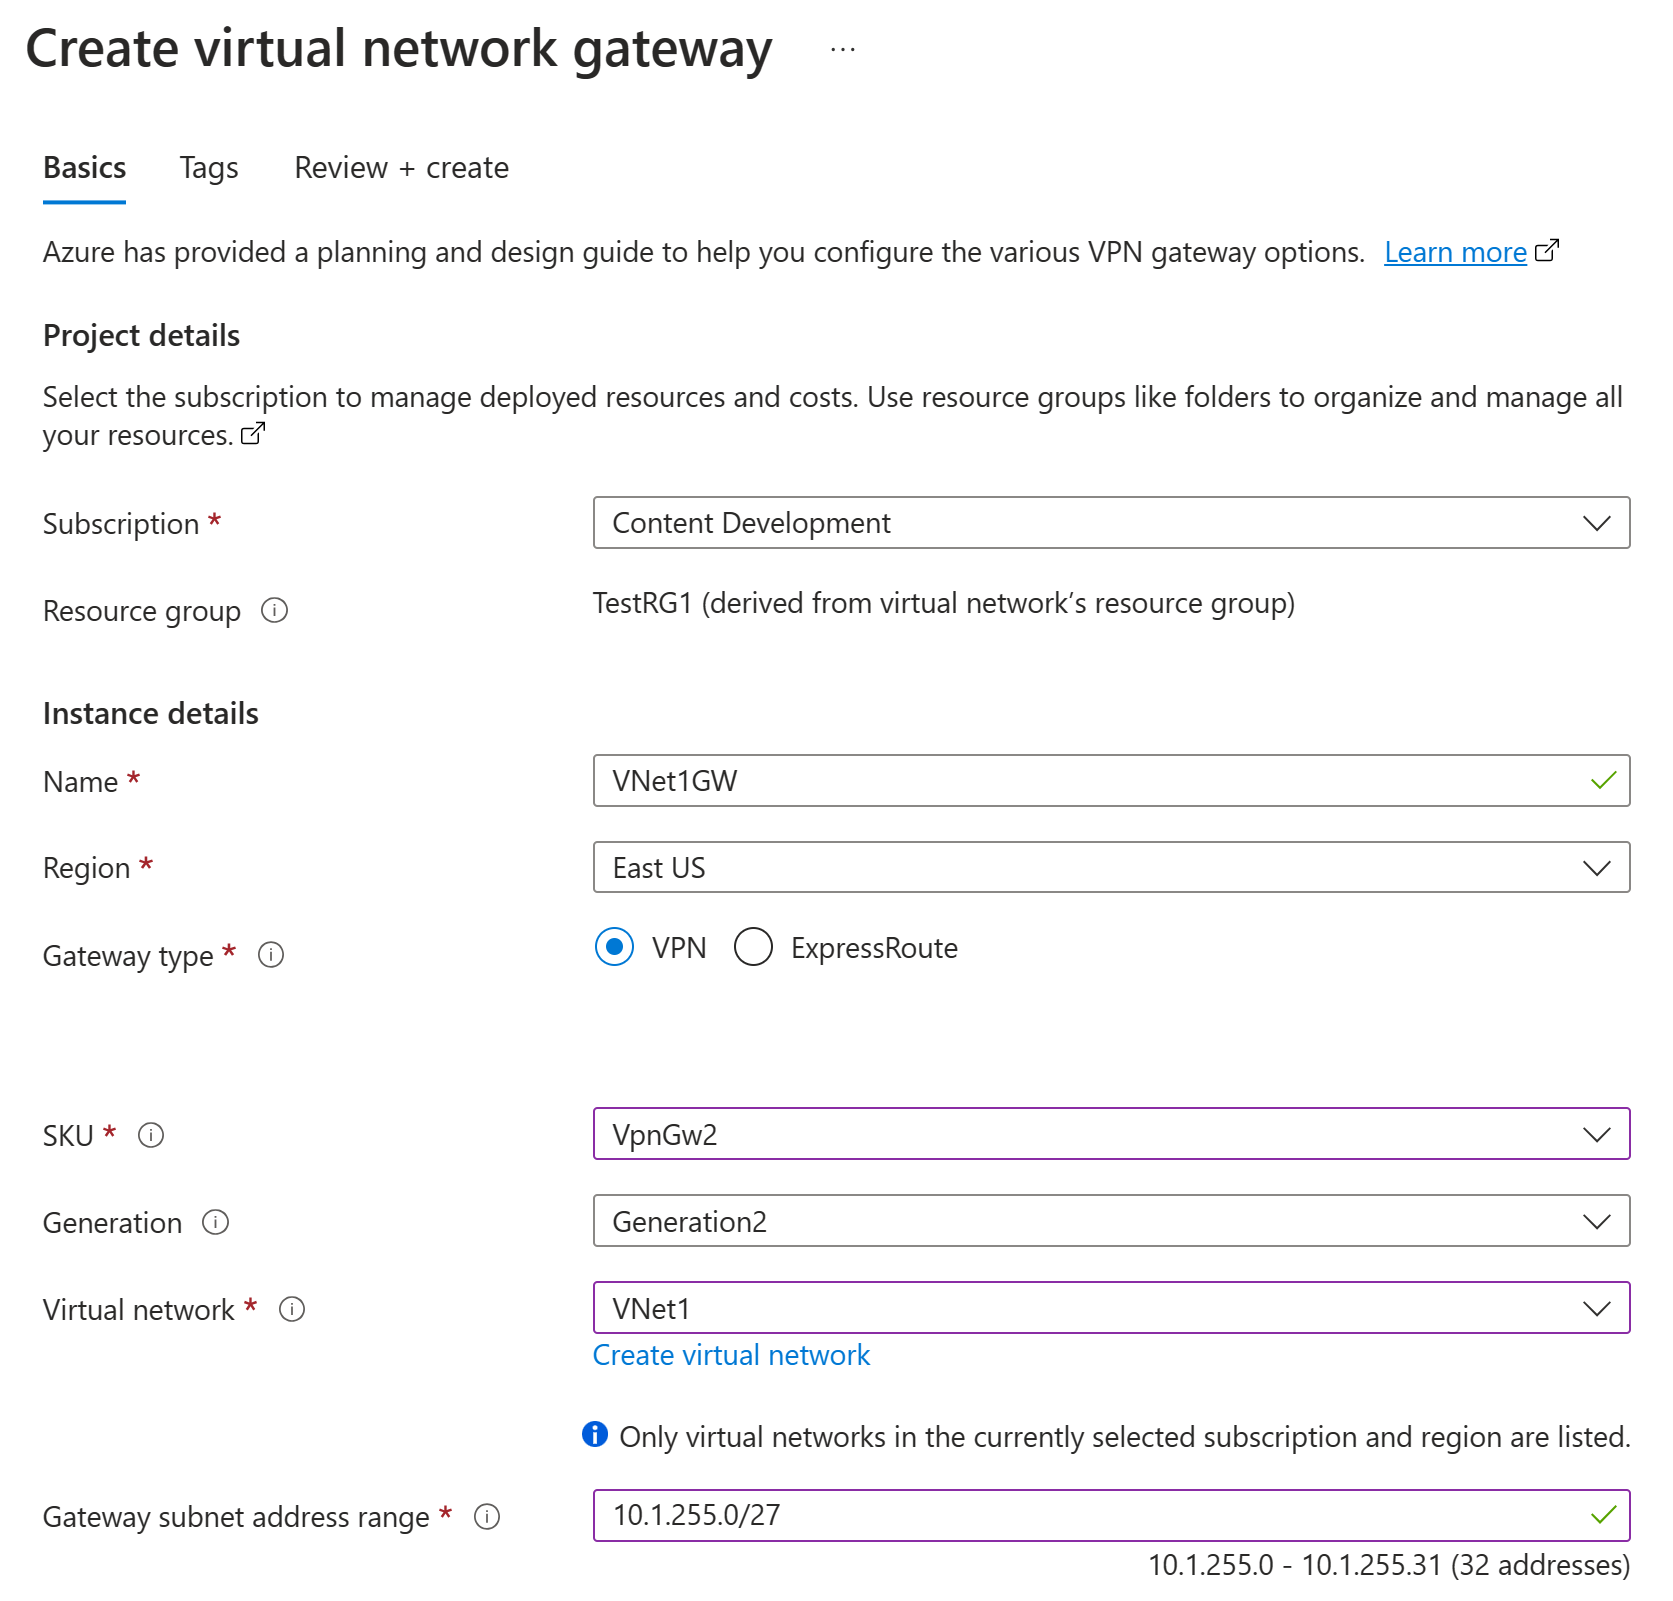
Subscription: Select the subscription you want to use from the dropdown list.
Resource group: This setting is autofilled when you select your virtual network on this page.
Name: Name your gateway. Naming your gateway isn't the same as naming a gateway subnet. It's the name of the gateway object you're creating.
Region: Select the region in which you want to create this resource. The region for the gateway must be the same as the virtual network.
Gateway type: Select VPN. VPN gateways use the virtual network gateway type VPN.
SKU: From the dropdown list, select the gateway SKU that supports the features you want to use. See Gateway SKUs. AZ SKUs support availability zones.
Generation: Select the generation you want to use. We recommend using a Generation2 SKU. For more information, see Gateway SKUs.
Virtual network: From the dropdown list, select the virtual network to which you want to add this gateway. If you can't see the virtual network for which you want to create a gateway, make sure you selected the correct subscription and region in the previous settings.
Gateway subnet address range or Subnet: The gateway subnet is required to create a VPN gateway.
At this time, this field can show various different settings options, depending on the virtual network address space and whether you already created a subnet named GatewaySubnet for your virtual network.
If you don't have a gateway subnet and you don't see the option to create one on this page, go back to your virtual network and create the gateway subnet. Then, return to this page and configure the VPN gateway.

Specify in the values for Public IP address. These settings specify the public IP address object that gets associated to the VPN gateway. When you create a public IP address object, an IP address is assigned to the object. The public IP address object is then associated to the gateway. For gateways that aren't zone-redundant, the only time the Public IP address changes is when the gateway is deleted and re-created. It doesn't change across resizing, resetting, or other internal maintenance/upgrades of your VPN gateway. You must associate a public IP address object that uses the Standard SKU. The Basic SKU public IP address object is only supported for Basic SKU VPN gateways.
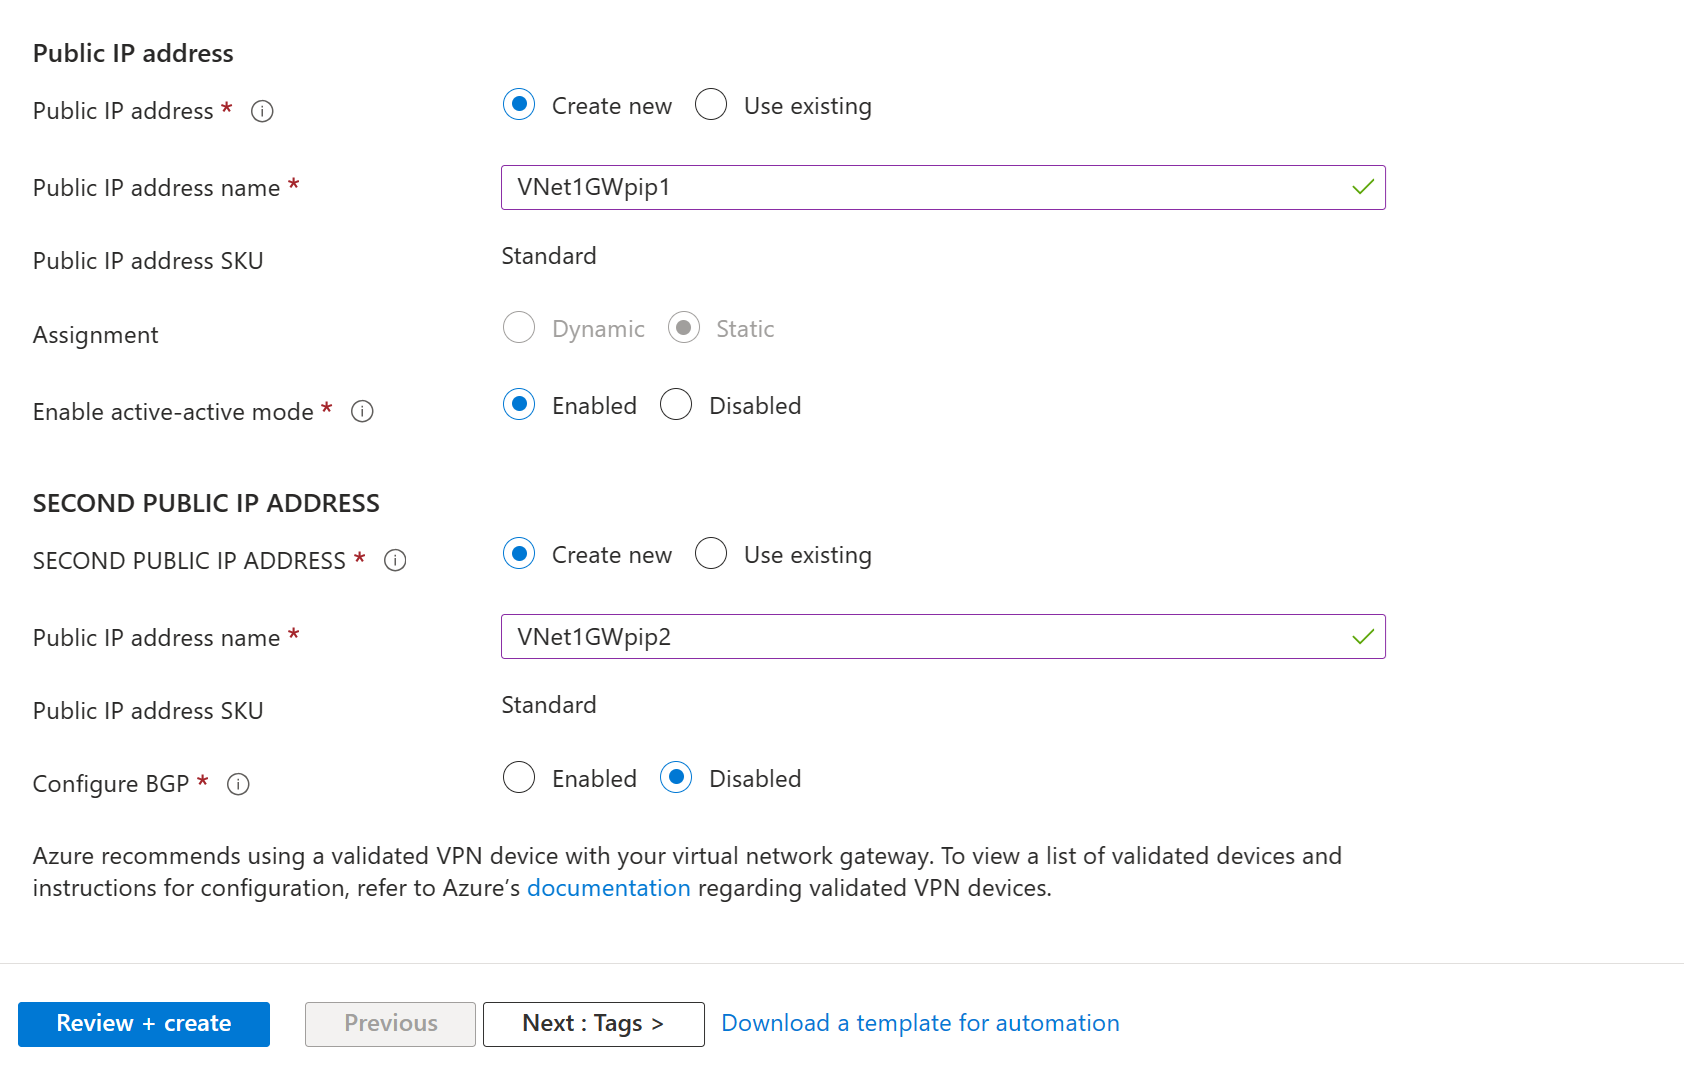
- Public IP address: Leave Create new selected.
- Public IP address name: In the text box, type a name for your public IP address instance.
- Assignment: Static is selected automatically.
- Enable active-active mode: Select Enabled.
- Second Public IP Address: Select Create new.
- Public IP address name: Name the second Public IP address.
- Leave Configure BGP as Disabled, unless your configuration specifically requires this setting. If you do require this setting, the default ASN is 65515, but other ASNs can be used.
Select Review + create to run validation.
Once validation passes, select Create to deploy the VPN gateway.
You can see the deployment status on the Overview page for your gateway. After the gateway is created, you can view the IP address that has been assigned to it by looking at the virtual network in the portal. The gateway appears as a connected device.
Important
Network security groups (NSGs) on the gateway subnet are not supported. Associating a network security group to this subnet might cause your virtual network gateway (VPN and ExpressRoute gateways) to stop functioning as expected. For more information about network security groups, see What is a network security group?
Update an existing VPN gateway
This section helps you change an existing Azure VPN gateway from active-standby to active-active mode, and from active-active to active-standby mode. When you change an active-standby gateway to active-active, you create another public IP address, then add a second gateway IP configuration.
Change active-standby to active-active
Use the following steps to convert active-standby mode gateway to active-active mode. If your gateway was created using the Resource Manager deployment model, you can also upgrade the SKU on this page.
Navigate to the page for your virtual network gateway.
On the left menu, select Configuration.
On the Configuration page, configure the following settings:
- Change the Active-active mode to Enabled.
- Click Add new to add another public IP address. If you already have an IP address that you previously created that's available to dedicate to this resource, you can instead select it from the SECOND PUBLIC IP ADDRESS dropdown.

On the Choose public IP address page and either specify an existing public IP address that meets the criteria, or select +Create new to create a new public IP address to use for the second VPN gateway instance. After you've specified the second public IP address, click OK.
At the top of the Configuration page, click Save. This update can take about 30-45 minutes to complete.

Important
If you have BGP sessions running, be aware that the Azure VPN Gateway BGP configuration will change and two newly assigned BGP IPs will be provisioned within the Gateway Subnet address range. The old Azure VPN Gateway BGP IP address will no longer exist. This will incur downtime and updating the BGP peers on the on-premises devices will be required. Once the gateway is finished provisioning, the new BGP IPs can be obtained and the on-premises device configuration will need to be updated accordingly. This applies to non APIPA BGP IPs. To understand how to configure BGP in Azure, see How to configure BGP on Azure VPN Gateways.
Change active-active to active-standby
Use the following steps to convert active-active mode gateway to active-standby mode.
Navigate to the page for your virtual network gateway.
On the left menu, select Configuration.
On the Configuration page, change the Active-active mode to Disabled.
At the top of the Configuration page, click Save.
Important
If you have BGP sessions running, be aware that the Azure VPN Gateway BGP configuration will change from two BGP IP addresses to a single BGP address. The platform generally assigns the last usable IP of the Gateway Subnet. This will incur downtime and updating the BGP peers on the on-premises devices will be required. This applies to non APIPA BGP IPs. To understand how to configure BGP in Azure, see How to configure BGP on Azure VPN Gateways.
Next steps
To configure connections, see the following articles: