Note
Access to this page requires authorization. You can try signing in or changing directories.
Access to this page requires authorization. You can try changing directories.
Starting with BizTalk Server 2020 and newer, you can send and receive messages between BizTalk Server and Azure Blob storage.
Azure Blob storage is Microsoft's object storage solution for the cloud, which is optimized for storing massive amounts of unstructured data. For more information, see What is Azure Blob storage?.
Prerequisites
Create an Azure blob storage account with a container.
Send messages to Azure Blob storage
In the BizTalk Server Administration console, right-click Send Ports > New > Static One-way send port.
Create a Send Port provides some guidance.
Enter a Name. In Transport, set the Type to AzureBlobStorage, and select Configure.
Configure the Azure Account properties.
Tip
The adapter configuration window can auto-populate your Azure resources after signing into your Azure subscription. This makes the configuration easier. Signing into the Azure subscription is optinal.
- Sign-in: Sign into your Azure account.
- Subscription: Select the subscription that has your Azure storage account.
- Resource group: Select the resource group that has your Azure storage account.
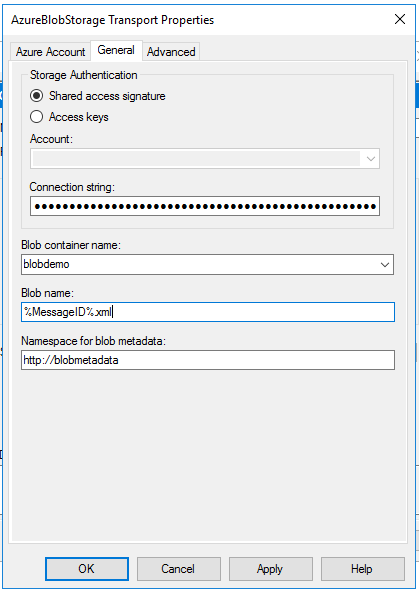
Configure the General properties:
Storage Authentication: Select an authentication method:
- Shared access signature is selected by default. You must input the Shared Access Signature connection string in the Connection string field.
- If you use Access keys, a collection of storage accounts is populated in the Account drop-down list. Once you select the storage account, the Connection string field is automatically populated with the primary access key, also known as key1.
The following links are good resources to help you decide which authentication method is right for your scenario:
Blob container name: Select the name of your Blob container from the drop-down list. The list is auto-populated after the Connection string is entered.
Blob name: Enter the name of the blob to be used by the adapter. Macros can be used in the blob name. For available macros, see Using macros in file names.
Namespace for blob metadata: Enter namespace as a filter. Context properties of the message are written to the blob metadata if the namespace of the property matches this field.
When finished, your properties look similar to the following:

Configure the Advanced properties:
- Blob type: Enter the Blob type to be used. For more information, see blob types.
- Write mode: Use this setting to specify adapter behavior when given Blob name already exists.
- Create new: The adapter always tries to create a new blob. If a blob with the same name already exists, the BizTalk message is suspended.
- Overwrite: The adapter overwrites if the blob name already exists. The metadata is also overwritten.
- Append: The adapter appends the message body to an existing blob if a blob already exists. The metadata doesn't change.
Select OK to save your changes.
Test your send port
You can use a simple File receive port and location to send messages to your Azure Blob storage.
Using the File adapter, create a receive port named FileReceivePort. Within your receive location, set the Receive folder to
C:\Temp\In\\, and set the file mask to\*.xml.In your Azure Blob storage send port properties, set Filters to
BTS.ReceivePortName == FileReceivePort.Paste the following into a text editor, and save the file as AzureBlobStorageMessage.xml. This file is your sample message.
<Data>
  <DataID>DataID_0</DataID>
  <DataDetails>DataDetails_0</DataDetails>
</Data>
Start the File receive location and the Azure blob storage send port.
Copy the AzureBlobStorageMessage.xml sample message into the receive folder, such as
C:\Temp\In\. The send port sends the XML file to the Azure blob storage. Confirm by looking into your Azure storage container, and viewing the newly-created or updated file.
Receive messages from Azure Blob storage
In the BizTalk Server Administration console, right-click Receive Ports > New > One-Way receive port.
Create a receive port provides some guidance.
Enter a name, and select Receive Locations.
Select New, and Name the receive location. In Transport, select AzureBlobStorage from the Type drop-down list. Select Configure.
Configure the Azure Account properties:
Tip
Similiar to the send adapter, this is optional.
- Sign-in: Sign into your Azure account.
- Subscription: Select the subscription that has your Azure storage account.
- Resource Group: Select the resource group that has your Azure storage account.
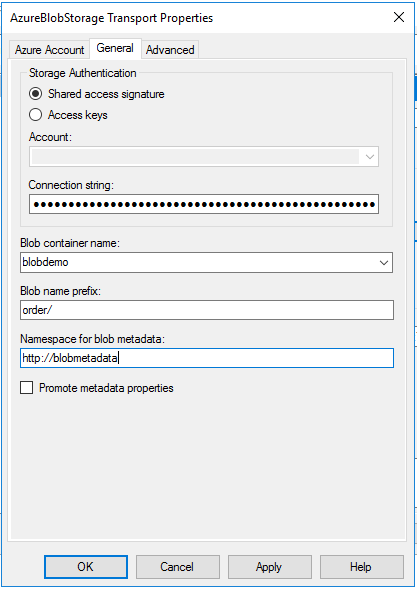
Configure the General properties:
Storage Authentication: Select an authentication method:
- Shared access signature is selected by default. You must input the Shared Access Signature connection string in the Connection string field.
- If you use Access keys, a collection of storage accounts is populated in the Account drop-down list. Once you select the storage account, the Connection string field is automatically populated with the primary access key, also known as key1.
The following links are good resources to help you decide which is right for your scenario:
Blob container name: Select the name of your blob container from the drop-down list. The list is auto-populated after the Connection string is entered.
Blob name prefix: Enter a prefix where applicable. For example, if "order/" is used for Blob name prefix, then the receive location only picks up the files in the "order" folder.
Namespace for blob metadata: Enter a namespace for the adapter to create context properties from custom blob metadata.
Promote metadata properties: Choose whether custom blob metadata is promoted or not.
Note
By default, all standard blob properties, such as Blob Uri, Name, and BlobType, are set as context properties of the BizTalk message with the
http://schemas.microsoft.com/BizTalk/Adapter/AzureStorage-propertiesnamespace.When finished, your properties look similar to the following:

Configure the Advanced properties:
- Polling interval: Enter the polling interval.
- Maximum messages per batch: Enter the number of messages the adapter batches when submitting to BizTalk.
- Parallel downloads: Enter the maximum number of blobs allowed to be downloaded in parallel.
- Error threshold: Enter the error threshold. When the receive location reaches this number of errors, the receive location is disabled.
Select OK to save your changes.
Test your receive settings
You can use a simple File send port to receive messages from your Azure Blob storage.
- Create a send port using the File adapter. Within your send port properties, set the Destination folder to
C:\Temp\Out\\, and set the and File name to%MessageID%.xml. - In your File send port properties, set Filters to
BTS.ReceivePortName == BlobReceivePort. - Create a receive port named BlobReceivePort, and create an Azure Blob storage receive location. Start it.
- Upload a file to the blob container in the Azure portal. Pay attention to the matching prefix that you configured in the adapter. Look for messages in the destination folder (c:\temp\out).
Important
The Azure Blob storage receive adapter deletes the blob after it's submitted to the BizTalk MessageBox database.
High Availability of Azure Blob storage adapter
The Azure Blob storage receive adapter supports high-availability. You can add multiple host instances in the same Azure Blob storage adapter receive handler to receive from the same blob container simultaneously. Blob leasing is used as a lock to avoid the same blob being received by multiple host instances. Accordingly:
- Blobs leased by other processes won't be received by Azure Blob storage adapter.
- Blobs being received by the Azure Blob storage adapter can't be updated while in a leased state.
For more information on Azure blob leasing, see pessimistic concurrency for blobs.
The Azure Blob storage send adapter, like most send adapters, provides high availability for the sending host by having multiple host instances in the same send host.