Setup CNTK with script on Windows
If you want to build CNTK from source code and want to use the Developer Install script, this page is for you.
If you are looking for any other kind of support in setting up a CNTK build environment or installing CNTK on your system, you should go here instead.
For Your Consideration
Here are recommendations to make sure you can build CNTK successfully:
- The system locale on the build machine should be set to a language with a 'latin' based character set.
- Avoid extremely long path names. The build procedure uses copy-operations (XCOPY) that can run into problems with path expression with over 256 characters in length.
64-bit OS
CNTK requires a 64-bit Windows installation. We tested the build process on Windows 8.1, Windows 10, and Windows Server 2012 R2 and later. Other environments are not officially supported. For compatibility issues check CNTK Production Build and Test configuration.
Preparation
There are steps required to create a CNTK development environment on your machine:
- Installation of required tools
- Visual Studio 2017
- NVIDIA CUDA 9.0
- Git
- Clone the CNTK Source code
- Running the developer installation script
- Setting command line options to configure script operation
- Executing the script
- Build and test
This page will walk you through all these steps. The script driven installation will create a development environment with all optional components, including NVIDIA tools, the Python environment, OpenCV and compression libraries. The script supports optional parameters to fine-tune the installation to your system (like the Anaconda installation directory etc.), details are available here
Installation of required tools
Visual Studio 2017
Install Microsoft Visual Studio 2017 for Windows. A link to the download can be found here. You will need a Microsoft account and either a free membership in the subscription Visual Studio Dev Essentials, or a valid MSDN subscription. If you don't have a Microsoft account, the required subscription membership or both, you will be offered to enroll.
The Community Version of Visual Studio 2017 is sufficient to build CNTK.
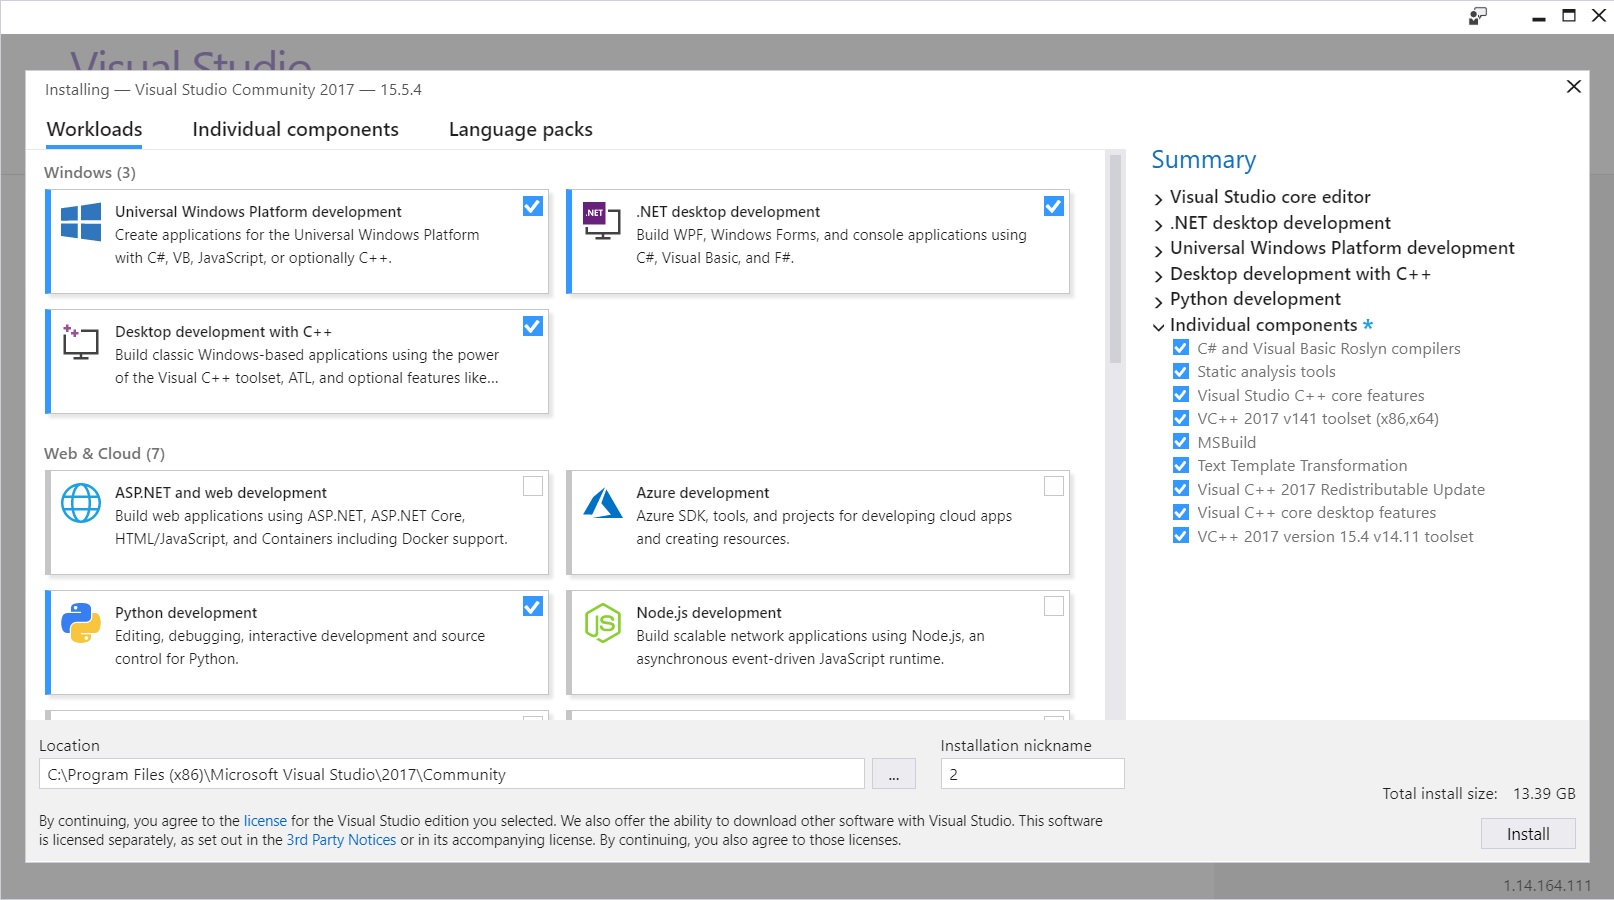
During the installation process, please select 'Universal Windows Platform development', '.NET desktop development', 'Desktop development with C++', and 'Python development' workloads:
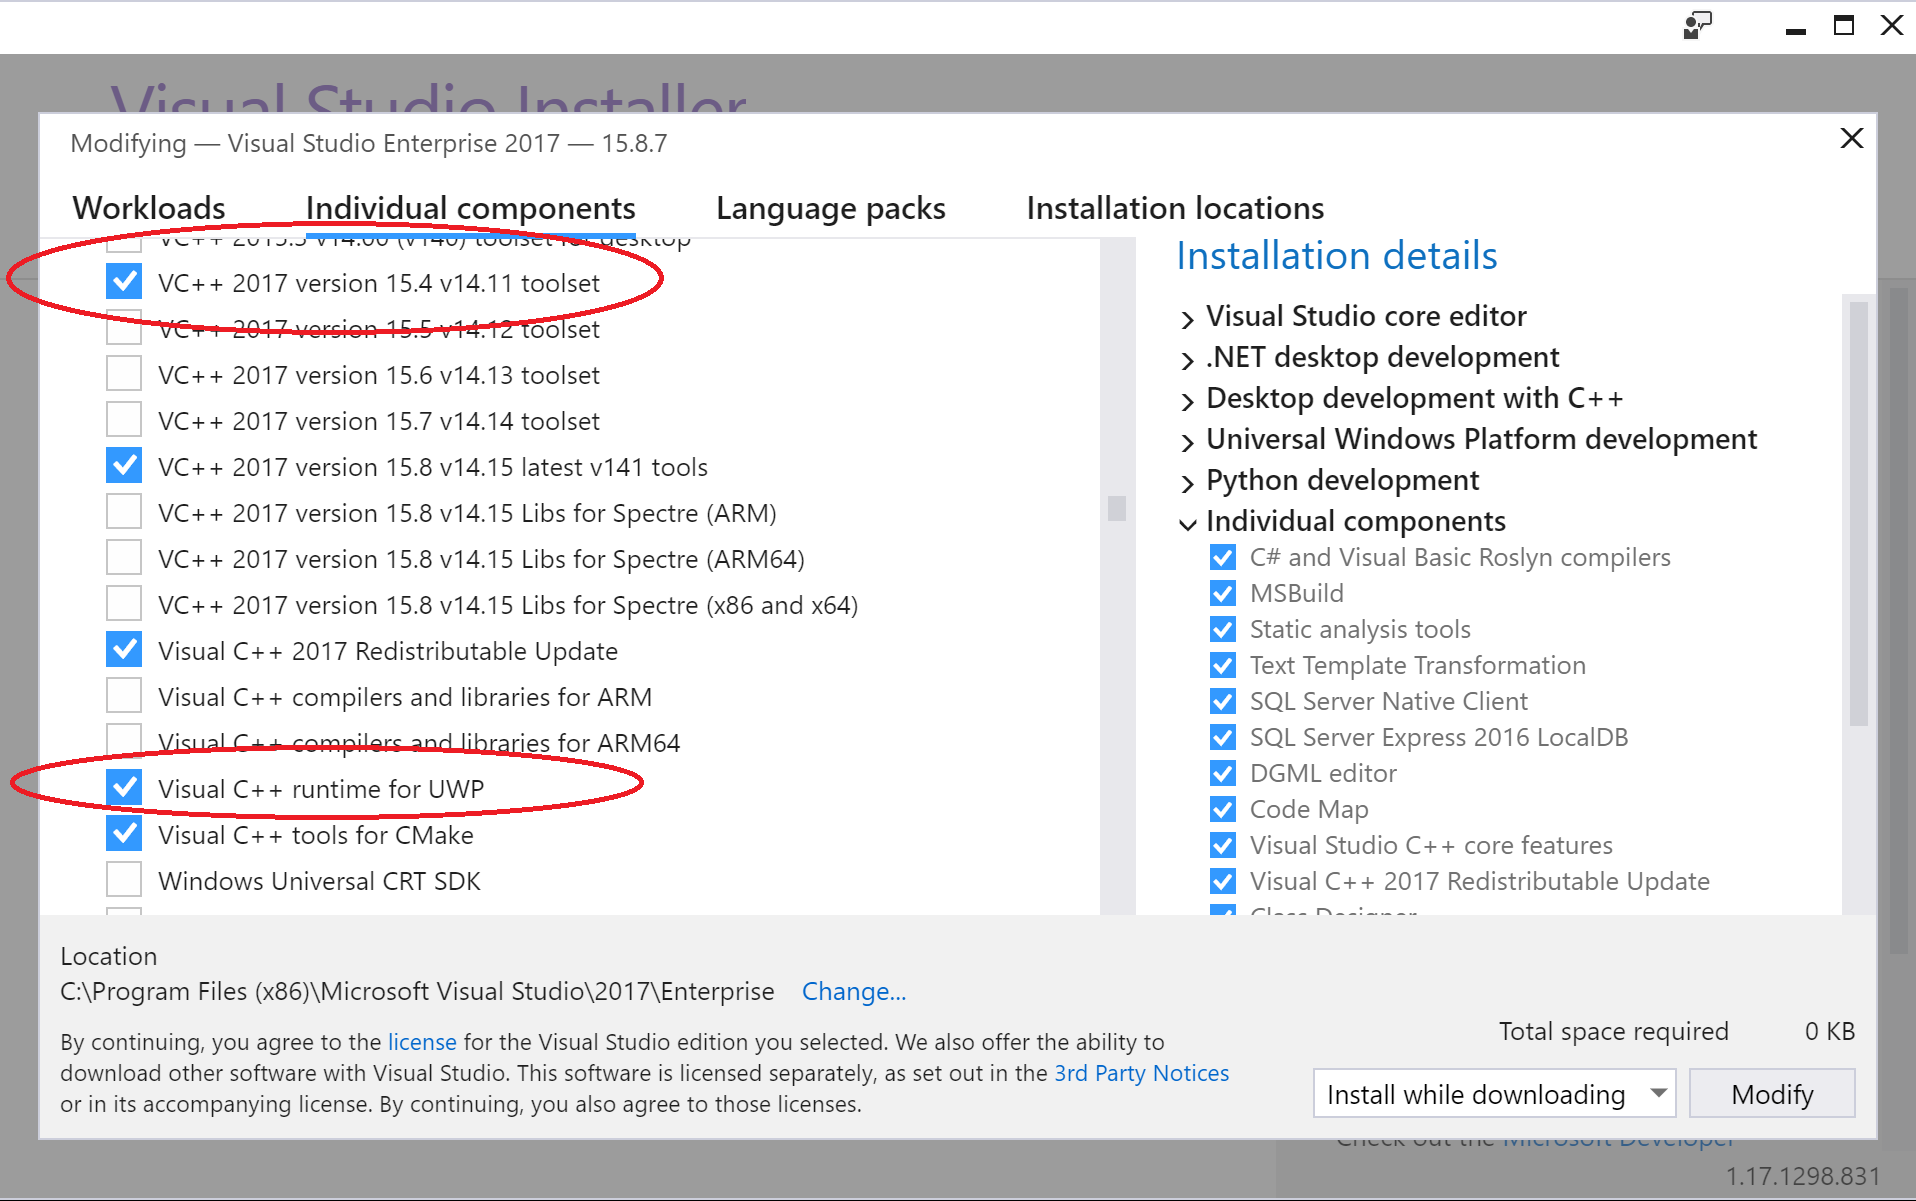
Besides, On the individual components screen make sure you add 'VC++ 2017 version 15.4 v14.11 toolset' and 'Visual C++ runtime for UWP' to your installation:
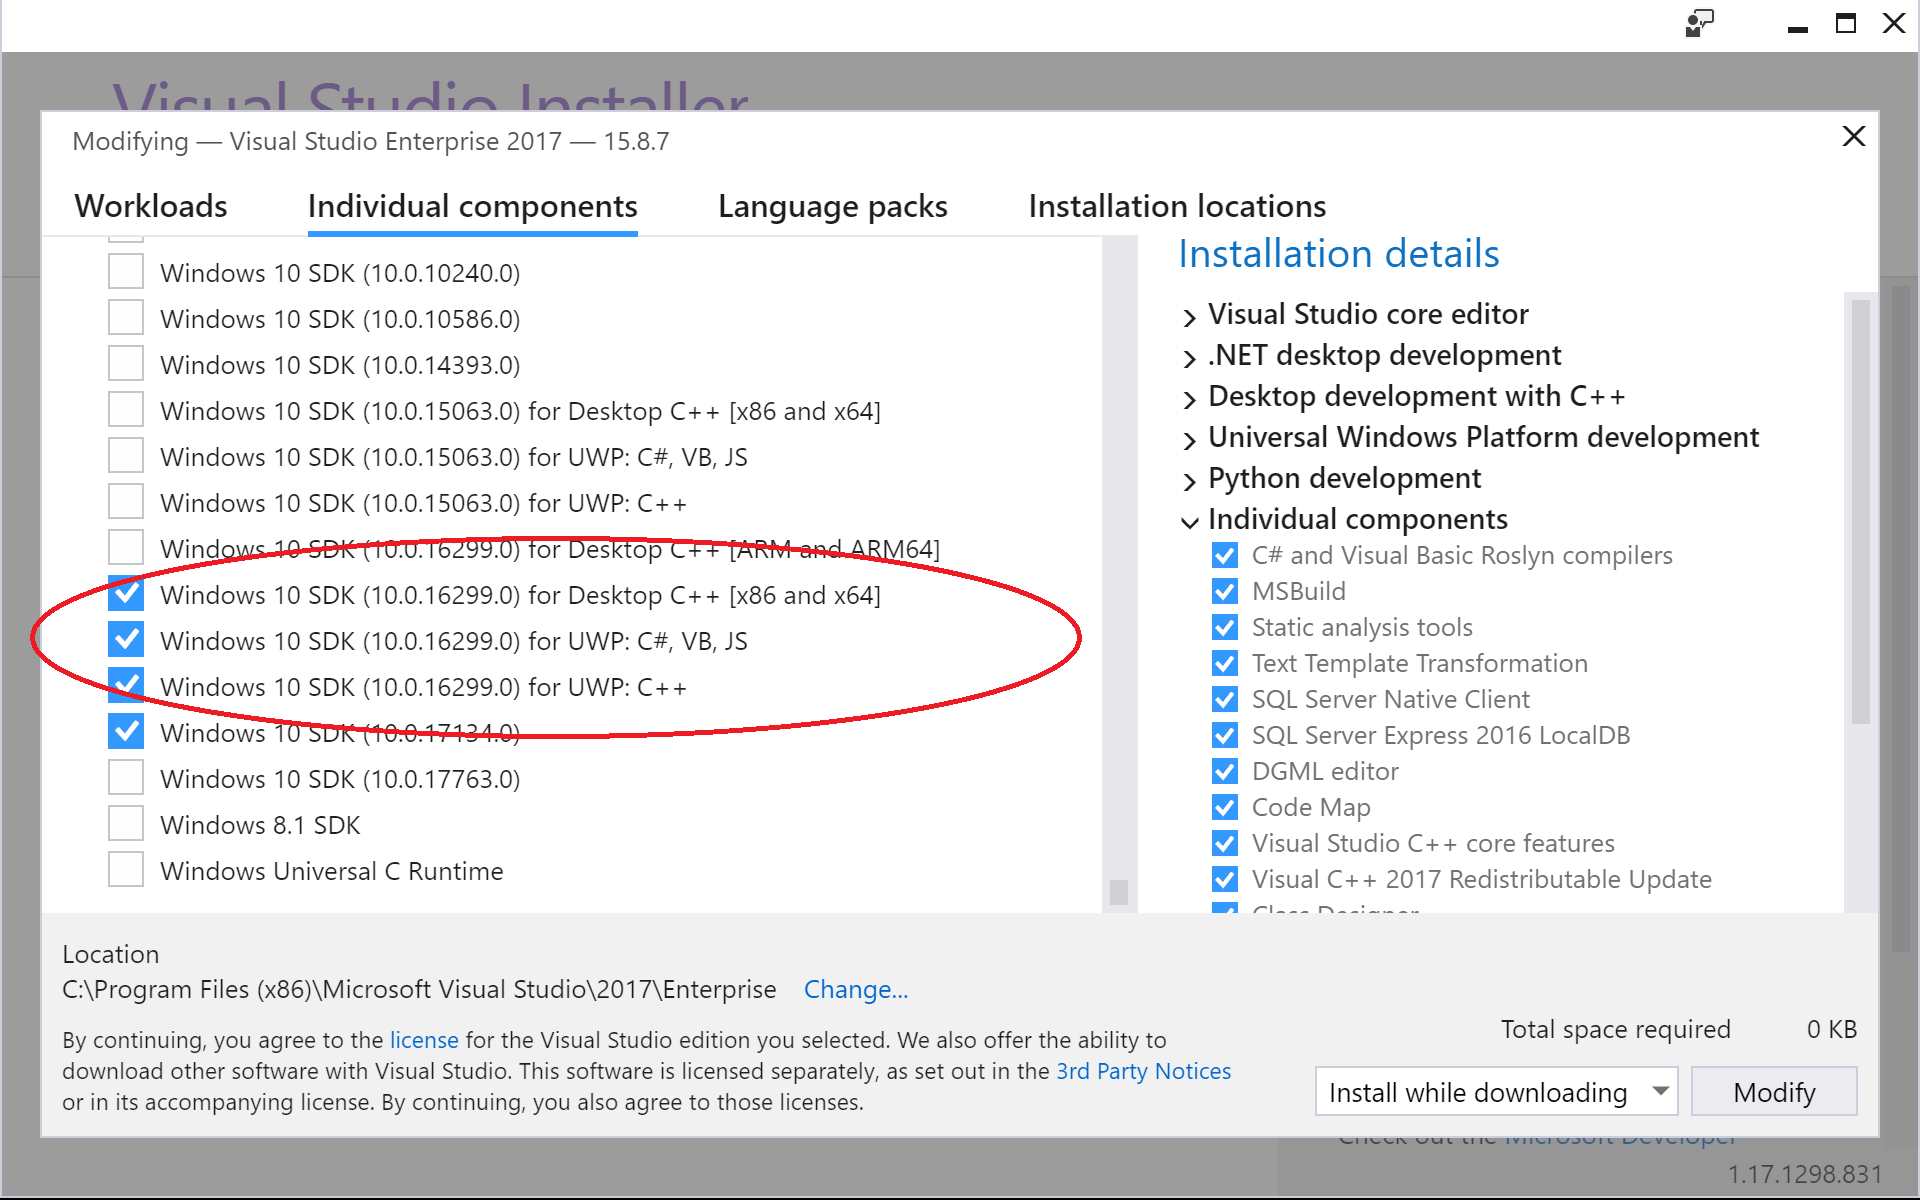
Lastly, add 'Windows 10 SDK (10.0.16299.0) for Desktop C++ [x86 and x64]':
Preexisting Visual Studio 2017 installation
You are required to have the 'VC++ 2017 version 15.4 v14.11 toolset', 'Visual C++ runtime for UWP' and 'Windows 10 SDK (10.0.16299.0) for Desktop C++ [x86 and x64]' installed on your system. To check open the Windows "Control Panel -> Programs -> Programs and Features' and select 'Visual Studio Community 2017' from the list of installed programs. This will start the Visual Studio setup again and allows you to make sure the aforementioned components are installed on your system (see picture above).
Note
If VS2017INSTALLDIR environment variable was not set by the Visual Studio installer, set it manually. The exact installation directory depends on both the version (2017 in this case) and offering (Community, Enterprise, etc) of Visual Studio, according to the following pattern: C:\Program Files (x86)\Microsoft Visual Studio\<version>\<offering>.
For Visual Studio 2017 Enterprise edition, run:
setx VS2017INSTALLDIR "C:\Program Files (x86)\Microsoft Visual Studio\2017\Enterprise"
For Visual Studio 2017 Community edition, run:
setx VS2017INSTALLDIR "C:\Program Files (x86)\Microsoft Visual Studio\2017\Community"
NVIDIA CUDA 9
Important
In case you have a first-time Visual Studio 2017 installation as described above, you will need to install NVIDIA CUDA 9 now, even if you have already an existing installation of CUDA 9! The NVIDIA CUDA 9 installation adds support to the NVIDIA development tools to the Visual Studio environment, which is required to build CNTK successfully.
CNTK is set to build with CUDA 9.0. Download and install the NVIDIA CUDA 9.0 Toolkit:
- Download the required package from this download page
- Run the installation procedure
Note: In case you don't have a system with a NVIDIA CUDA 9.0 compatible graphics card, the CUDA installer will issue a warning. Please continue the installer if you receive this warning, the CUDA tools will be installed, and you are able to build a NVIDIA GPU enabled version of CNTK on your system.
Git
Git is required to clone the CNTK code base. There are various Git client tools available. You can also work with Git directly from inside Visual Studio. Here we assume you installed Git for Windows. We assume you installed Git using the default options in the Git installer (Especially 'Use Git from the Windows Command Prompt' and with the option "Checkout Windows-style, commit UNIX-style line endings" at the "Configuring line endings" prompt enabled.
Clone the CNTK source code
We will create a clone of the CNTK source code in the c:\repos\cntk. If you prefer a different location you will need to adjust the commands accordingly.
Open a standard windows command shell, and execute these command
c: && md \repos && cd \repos
git clone --recursive https://github.com/Microsoft/cntk
cd cntk
The submodule Multiverso is used to enable DataParallelASGD for training. If you don't need DataParallelASGD support, then add the environment variable CNTK_ENABLE_ASGD and set its value to false. E.g. run this in a CMD prompt, and then reopen your CMD shell(s) and Visual Studio to pick up the change:
setx CNTK_ENABLE_ASGD false
Running the developer installation script
The developer installation script (devInstall.ps1) is a PowerShell script located in the tools subdirectory inside the root of the CNTK repository. It will install all required and optional tools to build CNTK on your system. It will also create the required user-local environment settings. Once the script is started no additional user input is necessary, although you will require to acknowledge the installation of programs or creation of environment variables, depending on your 'User Account Control' setting.
Configuration options
By default no additional options are required to run the installation script. There are various additional options to adapt the script functions to your requirements. More details are here.
Running the installation script
By default PowerShell doesn't allow the execution of any scripts. To allow execution of the installation script from a standard Windows command shell start PowerShell by:
start powershell -executionpolicy remotesigned
Assuming that you cloned the CNTK source code into the c:\repos\cntk directory, change inside the PowerShell session into the directory with the install script inside the cloned CNTK repository and start the installer in that directory:
cd C:\repos\cntk\Tools\devInstall\Windows
.\DevInstall.ps1
The script will inspect your system and determine the prerequisites which are missing. You will be notified about the proposed installation steps. If you are satisfied with the proposed changes, you can proceed to the actual installation. For more information about command line options see here.
The script will download needed components from the web, therefore a connection to the Internet is required. It will execute these components, and according to the setting of UAC (User Account Control) on your system, you will be asked to acknowledge the execution and installation of these components.
Depending on the speed of your system and your Internet connection, the whole process can take between 20 and 30 minutes. Especially the Anaconda3 install is very time consuming without any progress indication, please be patient. The downloaded files from the internet are being cached in the directory c:\installCacheCntk and allows you to rerun the installer without going through the component download again. In case of any problems you can restart the installer again, it will not reinstall already successfully installed components. Note: If the installer is interrupted you might need to restart PowerShell in order to propagate the new environment variables.
Build and test
At this point all the required components to build CNTK on you system are installed. You can follow the steps found here to build and test CNTK.
Note
If you want to build the CNTK Evaluation Library for Universal Windows Platform (UWP) you need to follow the additional installation steps here.
New in CNTK version 2.1.