Note
Access to this page requires authorization. You can try signing in or changing directories.
Access to this page requires authorization. You can try changing directories.
Details to consider when creating a virtual network data gateway:
- Virtual network data gateways require a Power BI Premium capacity license (A4 SKU or higher or any P SKU) or a Fabric license (any SKU).
- Before creating a virtual network data gateway, check that the feature is supported in your region.
- The creation of virtual network data gateways across tenant boundaries isn't supported.
- The metadata (name, details, data sources, encrypted credentials, and so on) for all your virtual network data gateways are stored in your Power BI home’s default region. However, the virtual network data gateway runs in the same region as your Azure virtual network. Sometimes, there's a difference between the default environment of Power Platform and the default region of Power BI. This difference might affect the regions you pick.
Creating a virtual network (VNet) data gateway is a three-step process:
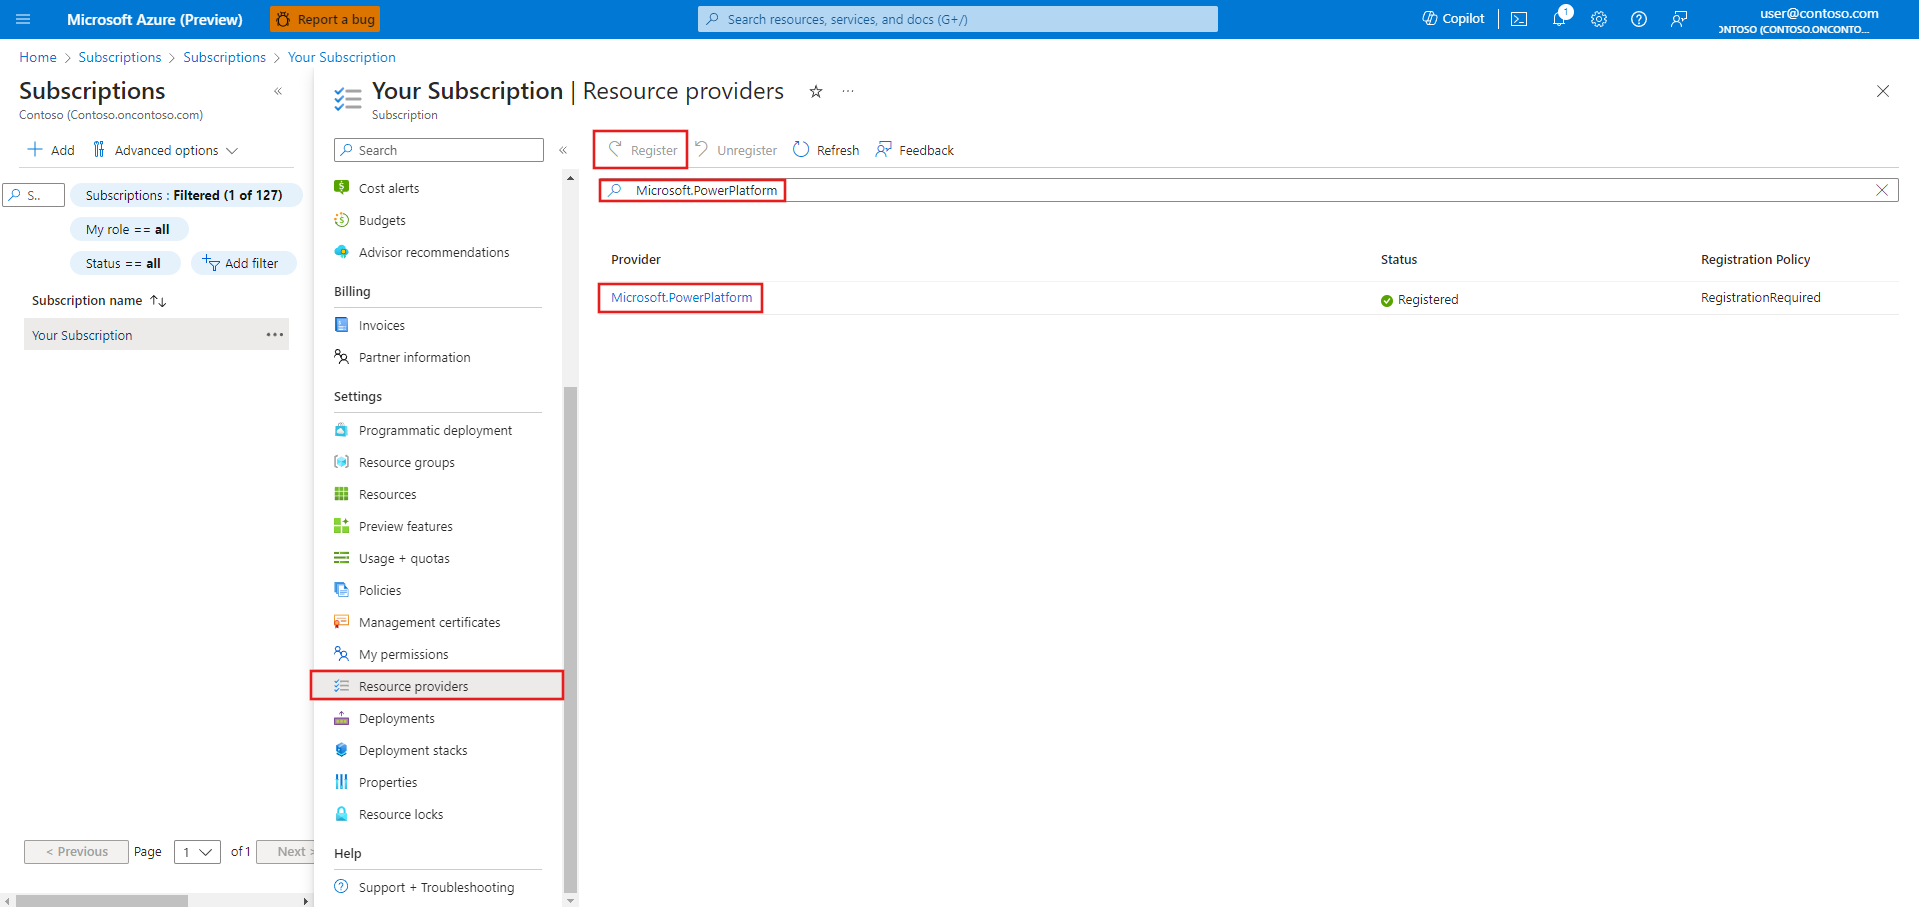
Step 1: Register Microsoft.PowerPlatform as a resource provider
Step 1: Register Microsoft.PowerPlatform as a resource provider
On the Azure portal, sign in as a subscription owner and register Microsoft.PowerPlatform as a resource provider for the subscription that contains the virtual network. This change enables your subscription to work with this resource provider.
Sign in to the Azure portal.
Navigate to the specific subscription.
Select Resource providers.
Search for and select Microsoft.PowerPlatform, and then select Register.

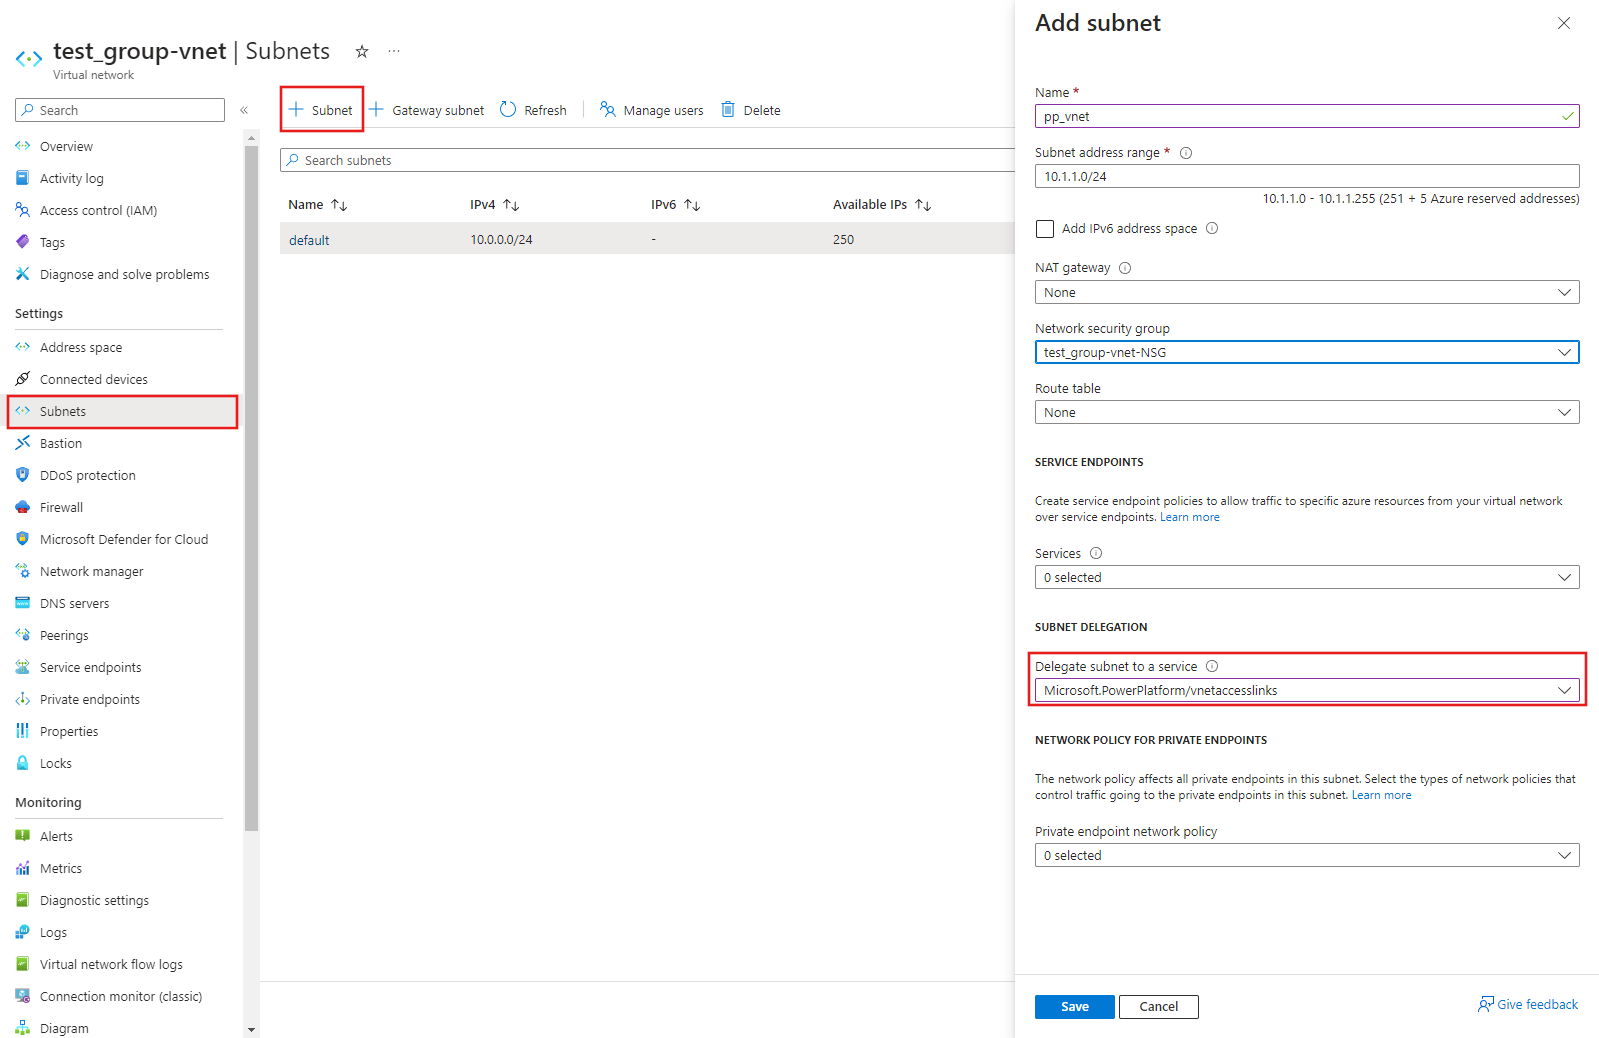
Step 2: Associate the subnet to Microsoft Power Platform
A user in a role with the Microsoft.Network/virtualNetworks/subnets/join/action permission on the virtual network, like the Azure Network Contributor role, can delegate the subnet within the same virtual network to Microsoft Power Platform. Subnet delegation enables you to designate a specific subnet for an Azure PaaS service of your choice that needs to be injected into your virtual network.
Note
The assignment of a user to the Network Contributor role or granting of the Microsoft.Network/virtualNetworks/subnets/join/action permission on the virtual network is configured in Azure. So users unfamiliar with how to do this configuration should contact the person in their organization who manages Azure virtual networks to assist them with the change.
This subnet should have connectivity to the data service.
Sign in to the Azure portal.
Add a new subnet in the virtual network. This new subnet can't be shared with other services, but is used entirely by the Power Platform virtual network service. Five IPs on this subnet are reserved for basic functionality. In addition to those five, reserve one IP for every gateway member you plan to create. For example, if you plan to have 2 clusters of 3 gateway members each, you would want a total of 2 x 3 + 5 or 11 IPs in the subnet CIDR range. It's a good idea to add more IPs for future gateways.
The gateways within each cluster need to be able to communicate. For this reason, if you're restricting the allowed IPs the delegated subnet can communicate with, don't block the subnet IP range itself.
Note
- Don't use the subnet names "gatewaysubnet" or "AzureBastionSubnet" as these names are reserved words for other features. You can't use these names to create a virtual network data gateway in Step 3.
- Make sure this subnet doesn't have an IPV6 address space added.
- Make sure the subnet's IP range doesn't overlap with 10.0.1.x.
- If you're dealing with large datasets, you must ensure that the
Microsoft.StorageService Endpoint is added to this subnet. - When using Azure Virtual Hub (vHub) with Propagate Default Route enabled, virtual network data gateway may be unable to connect to an Azure Storage Account located in the same region. You can enable the
Microsoft.StorageService Endpoint on the delegated subnet used by the gateway.
Select Microsoft.PowerPlatform/vnetaccesslinks from the subnet delegation drop-down list.
Select Save.

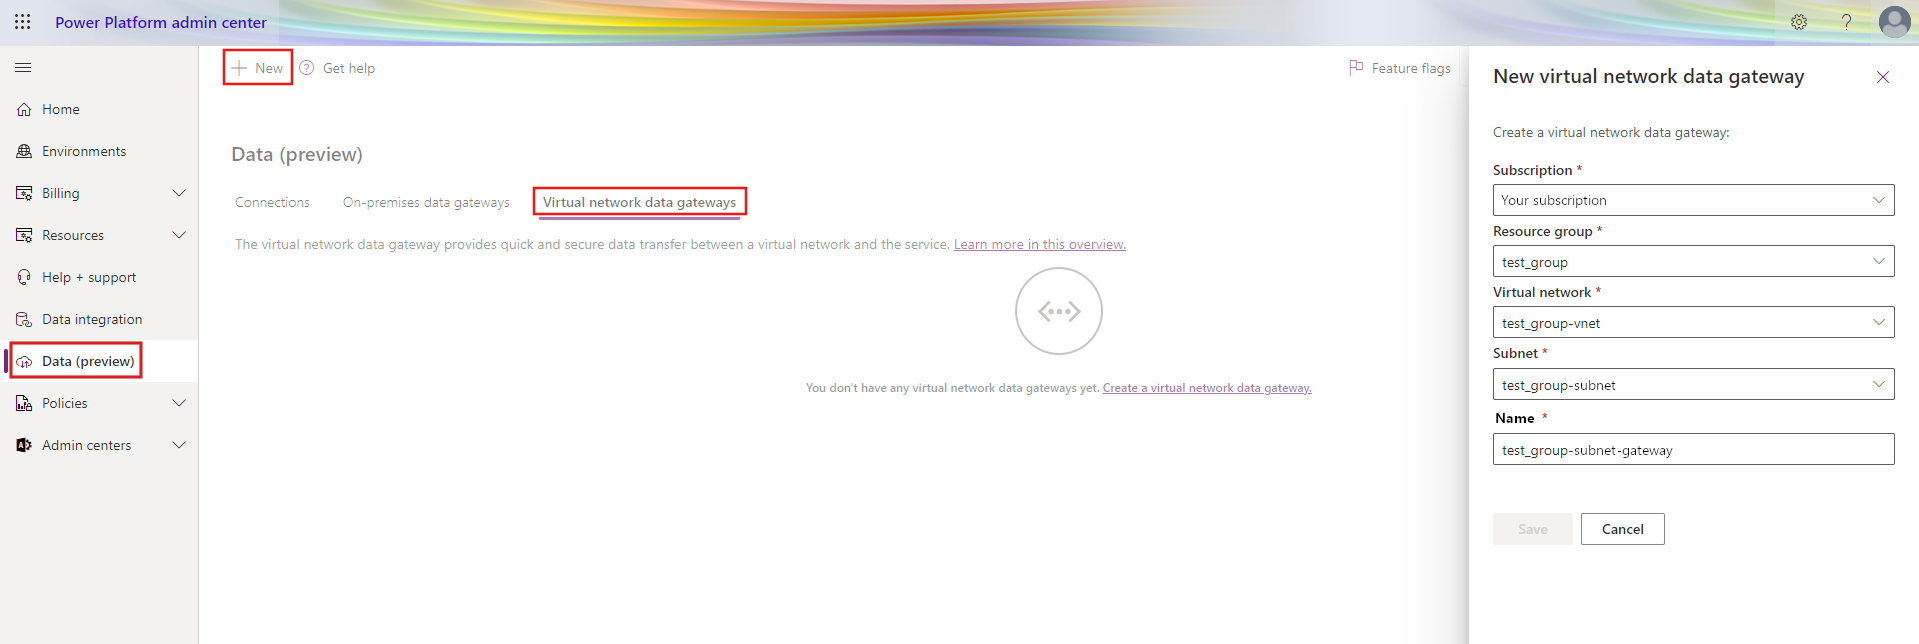
Step 3: Create a virtual network data gateway
A Microsoft Power Platform user enables the subnet for use in Microsoft Power Platform and creates a virtual network data gateway. By doing this process, the user authorizes the Microsoft Power Platform virtual network service to inject containers into the subnet. The user also needs Microsoft.Network/virtualNetworks/subnets/join/action permission on the virtual network to be able to perform this action.
Sign in to the Power BI homepage.
In the top navigation bar, select the settings gear icon.
From the drop-down, select the Manage connections and gateways page.
Select Virtual network (VNet) data gateway > New.
Select the license capacity, subscription, resource group, VNet, and the Subnet. Only subnets that are delegated to Microsoft Power Platform are displayed in the drop-down list. Virtual network data gateways require a Power BI Premium capacity license (A4 SKU or higher or any P SKU) or Fabric license to be used (any SKU).
By default, we provide a unique name for this data gateway, but you could optionally update it.
Select Save. This virtual network data gateway is now displayed in your Virtual network data gateways tab. A virtual network data gateway is a managed gateway that could be used for controlling access to this resource for Power Platform users.
Note
Depending on the permissions of your account, you might first be prompted to choose a capacity before selecting a subscription, as shown on the previous screenshot of the New virtual network data gateway dialog.

Regions supported for virtual network data gateways
Your Azure virtual network region needs to be in one of the following regions for you to be able to create a virtual network (VNet) data gateway:
- Australia East
- Australia Southeast
- Brazil South
- Canada Central
- Central India
- Central US
- East Asia
- East US
- East US 2
- France Central
- Germany West Central
- Japan East
- Korea Central
- Indonesia Central
- Israel Central
- Italy North
- Malaysia West
- Mexico Central
- New Zealand North
- North Central US
- North Europe
- Norway East
- Poland Central
- Spain Central
- South Africa North
- South Central US
- Southeast Asia
- Sweden Central
- Switzerland North
- Taiwan North
- UAE North
- UK South
- UK West
- West Central US
- West Europe
- West US
- West US 2
- West US 3