Note
Access to this page requires authorization. You can try signing in or changing directories.
Access to this page requires authorization. You can try changing directories.
Note
Microsoft Defender for Cloud Apps is now part of Microsoft Defender XDR, which correlates signals from across the Microsoft Defender suite and provides incident-level detection, investigation, and powerful response capabilities. For more information, see Microsoft Defender for Cloud Apps in Microsoft Defender XDR.
Session controls in Microsoft Defender for Cloud Apps can be configured to work with any web apps. This article describes how to onboard and deploy custom line-of-business apps, non-featured SaaS apps, and on-premises apps hosted via the Microsoft Entra ID Application Proxy with session controls. It provides steps to create a Microsoft Entra ID Conditional Access policy that routes app sessions to Defender for Cloud Apps. For other IdP solutions, see Deploy conditional access app control for custom apps with non-Microsoft IdP.
Prerequisites
Add admins to the app onboarding/maintenance list
In the menu bar of Defender for Cloud Apps, select the settings cog and select Settings.
Under Conditional Access App Control, select App onboarding/maintenance.
Enter the user principal name or email for the users that will be onboarding the app, and then select Save.

Check for necessary licenses
Your organization must have the following licenses to use conditional access app control:
- Microsoft Entra ID Premium P1 or higher
- Microsoft Defender for Cloud Apps
Apps must be configured with single sign-on
Apps must use one of the following authentication protocols:
IdP Protocols Microsoft Entra ID SAML 2.0 or OpenID Connect
Check for pre-onboarded apps
Before you onboard your apps, make sure that it's not included in the following list of pre-onboarded apps for both access and session controls:
- AWS
- Box
- Concur
- CornerStone on Demand
- DocuSign
- Dropbox
- Egnyte
- GitHub
- Google Workspace
- HighQ
- JIRA/Confluence
- LinkedIn Learning
- Microsoft Azure DevOps (Visual Studio Team Services)
- Microsoft Azure portal
- Microsoft Dynamics 365 CRM
- Microsoft Exchange Online
- Microsoft OneDrive
- Microsoft Power BI
- Microsoft SharePoint Online
- Microsoft Teams
- Microsoft Yammer
- Salesforce
- ServiceNow
- Slack
- Tableau
- Workday
- Workiva
- Workplace by Facebook
To use pre-onboarded apps with Defender for Cloud Apps, you must route the app to access and session controls and perform an initial sign-in.
To deploy any app
Follow these steps to configure any app to be controlled by Defender for Cloud Apps conditional access app control.
Note
To deploy conditional access app control for Microsoft Entra ID apps, you need a valid license for Microsoft Entra ID Premium P1 or higher as well as a Defender for Cloud Apps license.
Step 1: Configure Microsoft Entra ID to work with Defender for Cloud Apps
Note
When configuring an application with SSO in Microsoft Entra ID, or other identity providers, one field that may be listed as optional is the sign-on URL setting. Note that this field may be required for conditional access app control to work.
In Microsoft Entra ID, browse to Security > Conditional Access.
On the Conditional Access pane, in the toolbar at the top, select New policy.
On the New pane, in the Name textbox, enter the policy name.
Under Assignments, select Users and groups, assign the users that will be onboarding (initial sign-on and verification) the app, and then select Done.
Under Assignments, select Cloud apps, assign the apps you want to control with conditional access app control, and then select Done.
Under Access controls, select Session, select Use Conditional Access App Control, and choose a built-in policy (Monitor only or Block downloads) or Use custom policy to set an advanced policy in Defender for Cloud Apps, and then click Select.
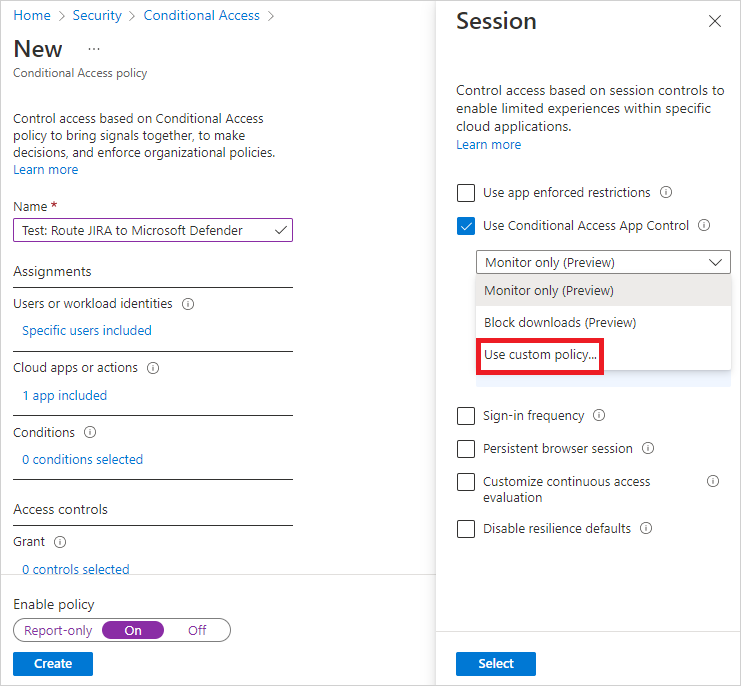
Optionally, add conditions and grant controls as required.
Set Enable policy to On and then select Create.
Step 2: Add the app manually and install certificates, if necessary
Applications in the app catalog are automatically populated into the table under Connected Apps. Check that the app you want to deploy is recognized by navigating there.
In the menu bar of Defender for Cloud Apps, select the settings cog, and select the Conditional Access App Control tab to access a table of applications that can be configured with access and session policies.
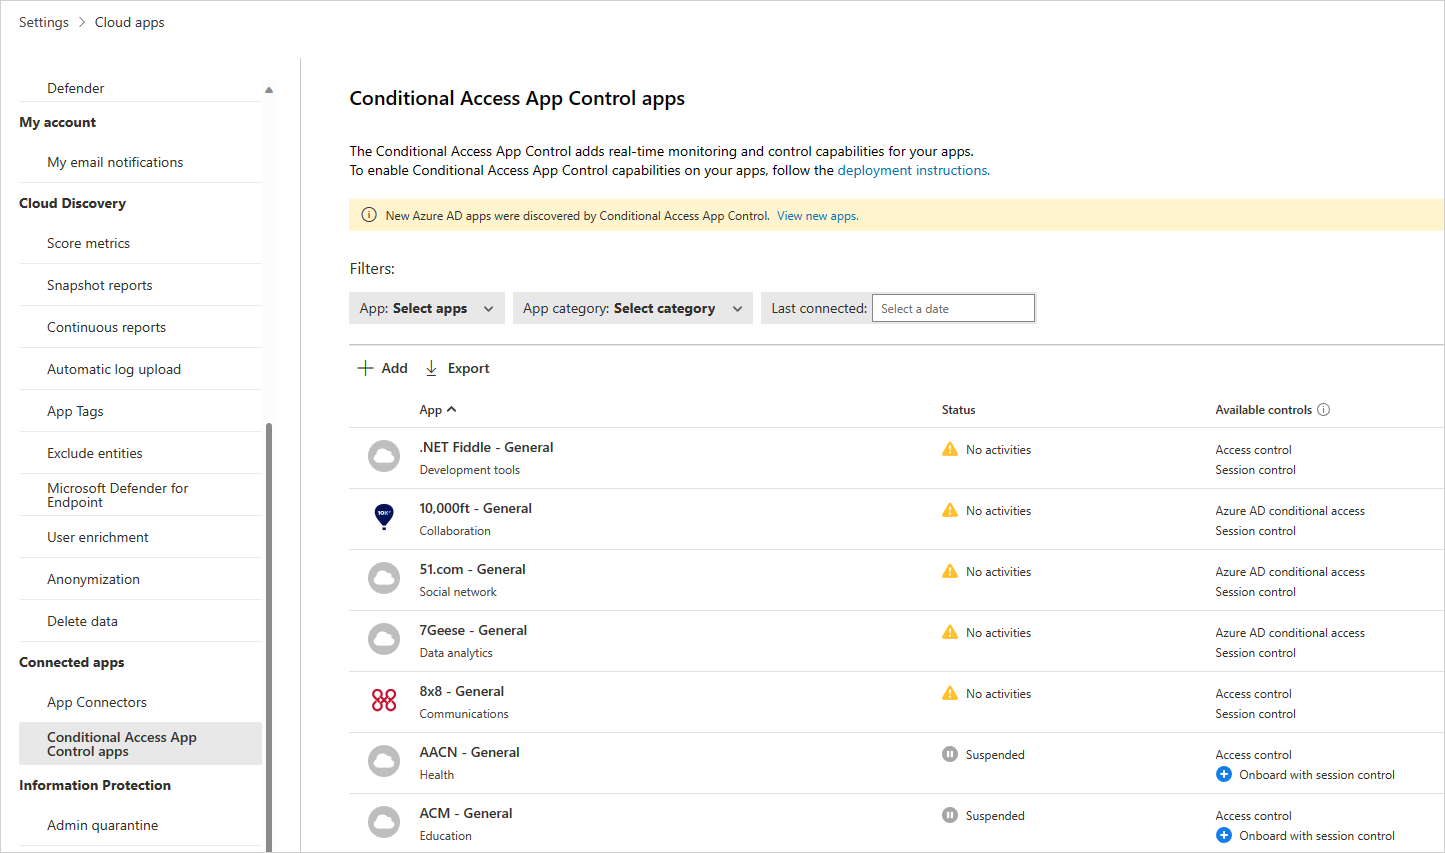
Select the App: Select apps… dropdown menu to filter and search for the app you want to deploy.

If you don't see the app there, you'll have to manually add it.
How to manually add an unidentified app
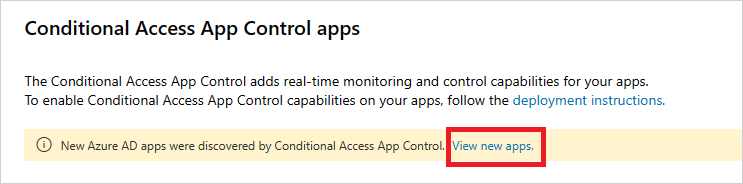
In the banner, select View new apps.
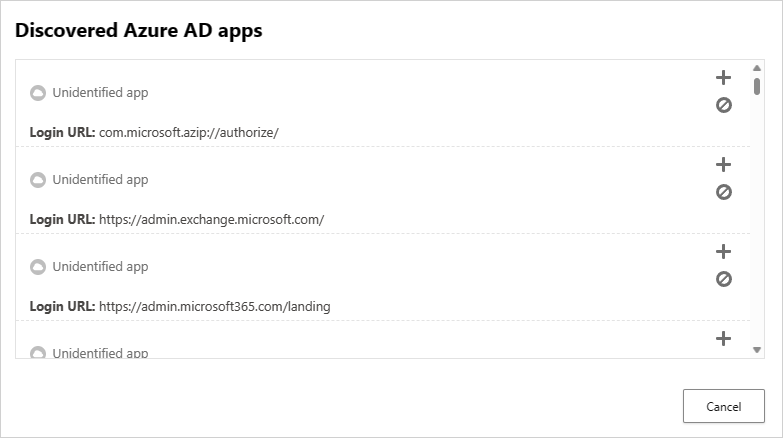
In the list of new apps, for each app that you're onboarding, select the + sign, and then select Add.
Note
If an app does not appear in the Defender for Cloud Apps app catalog, it will appear in the dialog under unidentified apps along with the login URL. When you click the + sign for these apps, you can onboard the application as a custom app.
To add domains for an app
Associating the correct domains to an app allows Defender for Cloud Apps to enforce policies and audit activities.
For example, if you've configured a policy that blocks downloading files for an associated domain, file downloads by the app from that domain will be blocked. However, file downloads by the app from domains not associated with the app won't be blocked and the action won't be audited in the activity log.
Note
Defender for Cloud Apps still adds a suffix to domains not associated with the app to ensure a seamless user experience.
- From within the app, on the Defender for Cloud Apps admin toolbar, select Discovered domains.
Note
The admin toolbar is only visible to users with permissions to onboard or maintenance apps.
- In the Discovered domains panel, make a note of domain names or export the list as a .csv file.
Note
The panel displays a list of discovered domains that are not associated in the app. The domain names are fully qualified.
- Go to Defender for Cloud Apps, in the menu bar, select the settings cog and select Conditional Access App Control.
- In the list of apps, on the row in which the app you're deploying appears, choose the three dots at the end of the row, and then under APP DETAILS, choose Edit.
Tip
To view the list of domains configured in the app, select View app domains.
- In User-defined domains, enter all the domains you want to associate with this app, and then select Save.
Note
You can use the * wildcard character as a placeholder for any character. When adding domains, decide whether you want to add specific domains (
sub1.contoso.com,sub2.contoso.com) or multiple domains (*.contoso.com).
Install root certificates
Repeat the following steps to install the Current CA and Next CA self-signed root certificates.
- Select the certificate.
- Select Open, and when prompted select Open again.
- Select Install certificate.
- Choose either Current User or Local Machine.
- Select Place all certificates in the following store and then select Browse.
- Select Trusted Root Certificate Authorities and then select OK.
- Select Finish.
Note
For the certificates to be recognized, once you have installed the certificate, you must restart the browser and go to the same page.
Select Continue.
Check that the application is available in the table.
Step 3: Verify that the app is working correctly
To verify that the application is being proxied, first perform either a hard sign-out of browsers associated with the application or open a new browser with incognito mode.
Open the application and perform the following checks:
- Check that the URL contains the
.mcassuffix - Visit all pages within the app that are part of a user's work process and verify that the pages render correctly.
- Verify that the behavior and functionality of the app isn't adversely affected by performing common actions such as downloading and uploading files.
- Review the list of domains associated with the app. For more information, see Add the domains for the app.
If you encounter errors or issues, use the admin toolbar to gather resources such as .har files and recorded sessions for filing a support ticket.
Step 4: Enable the app for use in your organization
Once you're ready to enable the app for use in your organization's production environment, do the following steps.
- In Defender for Cloud Apps, select the settings cog, and then select Conditional Access App Control.
- In the list of apps, on the row in which the app you're deploying appears, choose the three dots at the end of the row, and then choose Edit app.
- Select Use with Conditional Access App Control and then select Save.
Step 5: Update the Microsoft Entra ID policy
- In Microsoft Entra ID, under Security, select Conditional Access.
- Update the policy you created earlier to include the relevant users, groups, and controls you require.
- Under Session > Use Conditional Access App Control, if you selected Use Custom Policy, go to Defender for Cloud Apps and create a corresponding session policy. For more information, see Session policies.
Next steps
See also
If you run into any problems, we're here to help. To get assistance or support for your product issue, please open a support ticket.