Note
Access to this page requires authorization. You can try signing in or changing directories.
Access to this page requires authorization. You can try changing directories.
Overview
Windows Subsystem for Linux (WSL) 2, which replaces the previous version of WSL (supported by Microsoft Defender for Endpoint without a plug-in), provides a Linux environment that is seamlessly integrated with Windows, yet is isolated using virtualization technology. The Defender for Endpoint for WSL plug-in enables Defender for Endpoint to provide more visibility into all running WSL containers by plugging into the isolated subsystem.
Prerequisites
WSL version
2.0.7.0or later must be running with at least one active distro. Runwsl --updateto make sure you are on the latest version. Ifwsl -–versionshows a version older than2.0.7.0, runwsl --update --pre-releaseto get the latest update.The Windows client device must be onboarded to Defender for Endpoint.
Supported operating systems
- Windows 10, version 2004 and later (build 19044 and later)
- Windows 11 to support the WSL versions that can work with the plug-in.
Known issues and limitations
Be aware of the following considerations before you start:
The plug-in doesn't support automatic updates on versions prior to
1.24.522.2. On version1.24.522.2and later. Updates are supported through Windows Update across all rings. Updates through Windows Server Update Services (WSUS), System Center Configuration Manager (SCCM), and Microsoft Update catalog are supported only in the Production ring to ensure package stability.It takes a few minutes for the plug-in to fully instantiate, and up to 30 minutes for a WSL2 instance to onboard itself. Short-lived WSL container instances might result in the WSL2 instance not showing up in the Microsoft Defender portal (https://security.microsoft.com). When any distribution has been running long enough (at least 30 minutes), it does show up.
Running a custom kernel and custom kernel command line is not supported. Although the plug-in does not block running in that configuration, it does not guarantee visibility within WSL when you're running a custom kernel and custom kernel command line. We recommend blocking such configurations with Microsoft Intune wsl settings.
The plug-in is not supported on machines with an ARM64 processor.
The plug-in is not supported on multi-session variants of Windows 10 and 11.
The plug-in provides visibility into events from WSL, but other features like antimalware, threat and vulnerability management, and response commands are not available for the WSL logical device.
Software components and installer file names
Installer: DefenderPlugin-x64-0.24.426.1.msi. You can download it from the onboarding page in the Microsoft Defender portal. (Go to Settings > Endpoints > Onboarding.)
Installation directories:
%ProgramFiles%%ProgramData%
Components installed:
DefenderforEndpointPlug-in.dll. This DLL is the library to load Defender for Endpoint to work within WSL. You can find it at%ProgramFiles%\Microsoft Defender for Endpoint plug-in for WSL\plug-in.healthcheck.exe. This program checks the health status of Defender for Endpoint and enables you to see the installed versions of WSL, plug-in, and Defender for Endpoint. You can find it at%ProgramFiles%\Microsoft Defender for Endpoint plug-in for WSL\tools.
Installation steps
If your Windows Subsystem for Linux isn't installed yet, follow these steps:
Open Terminal or Command Prompt. (In Windows, go to Start > Command Prompt. Or, right-click the start button and then select Terminal.)
Run the command
wsl -–install.Confirm that WSL is installed and running.
Using Terminal or Command Prompt, run
wsl –-updateto make sure you have the latest version.Run the
wslcommand to ensure WSL is running before testing.
Install the plug-in by following these steps:
Install the MSI file downloaded from the onboarding section in the Microsoft Defender portal (Settings > Endpoints > Onboarding > Windows Subsystem for Linux 2 (plug-in)).
Open a command prompt/terminal and run
wsl.
Note
If WslService is running, it stops during the installation process. You do not need to onboard the subsystem separately. Instead, the plug-in automatically onboards to the tenant the Windows host is onboarded to.
Microsoft Defender for Endpoint update for plug-in for WSL KB Update.
Installation validation checklist
After update or installation, wait for at least five minutes for the plug-in to fully initialize and write log output.
Open Terminal or Command Prompt. (In Windows, go to Start > Command Prompt. Or, right-click the start button and then select Terminal.)
Run the command:
cd "%ProgramFiles%\Microsoft Defender for Endpoint plug-in for WSL\tools".Run the command
.\healthcheck.exe.Review the details of Defender and WSL and make sure they match or exceed the following requirements:
- Plug-in Version:
1.24.522.2 - WSL Version:
2.0.7.0or later - Defender App Version:
101.24032.0007 - Defender Health Status:
Healthy
- Plug-in Version:
Setting a proxy for Defender running in WSL
This section describes how to configure proxy connectivity for the Defender for Endpoint plug-in. If your enterprise uses a proxy to provide connectivity to Defender for Endpoint running on the Windows host, continue reading to determine whether you need to configure it for the plug-in.
If you want to use the host windows EDR telemetry proxy configuration for MDE for the WSL plug-in, nothing more is required. This configuration is adopted by the plug-in automatically.
If you want to use the host winhttp proxy configuration for MDE for WSL plug-in, nothing more is required. This configuration is adopted by the plug-in automatically.
If you want to use the host network and network proxy setting for MDE for WSL plug-in, nothing more is required. This configuration is adopted by the plug-in automatically.
Note
WSL defender supports only http proxy.
Plug-in Proxy selection
If your host machine contains multiple proxy settings, the plug-in selects the proxy configurations with the following hierarchy:
Defender for Endpoint static proxy setting (
TelemetryProxyServer).Winhttpproxy (configured throughnetshcommand).Network & Internet proxy settings.
For example, if your host machine has both
Winhttp proxyandNetwork & Internet proxy, the plug-in selectsWinhttp proxyas the proxy configuration.
Note
The DefenderProxyServer registry key is no longer supported. Follow the steps described earlier in this article to configure proxy in plug-in.
Connectivity test for Defender for Endpoint running in WSL
The Defender for Endpoint connectivity test is triggered whenever there is a proxy modification on your device and is scheduled to run every hour.
On starting your wsl machine, wait for 5 minutes and then run healthcheck.exe (located at %ProgramFiles%\Microsoft Defender for Endpoint plug-in for WSL\tools for the results of the connectivity test). If successful, you can see that the connectivity test was a success. If failed, you can see that the connectivity test was invalid indicating that the client connectivity from MDE plug-in for WSL to Defender for Endpoint service URLs is failing.
Note
The ConnectivityTest registry key is no longer supported.
To set a proxy for use in WSL containers (the distributions running on the subsystem), see Advanced settings configuration in WSL.
Verifying functionality and SOC analyst experience
After installing the plug-in, the subsystem and all its running containers are onboarded to the Microsoft Defender portal.
Sign into the Microsoft Defender portal, and open the Devices view.
Filter using the tag WSL2.

You can see all WSL instances in your environment with an active Defender for Endpoint plug-in for WSL. These instances represent all distributions running inside WSL on a given host. The hostname of a device matches that of the Windows host. However, it's represented as a Linux device.
Open the device page. In the Overview pane, there's a link for where the device is hosted. The link enables you to understand that the device is running on a Windows host. You can then pivot to the host for further investigation and/or response.


The timeline is populated, similar to Defender for Endpoint on Linux, with events from inside the subsystem (file, process, network). You can observe activity and detections in the timeline view. Alerts and incidents are generated as appropriate as well.
Setting up custom tag for your WSL machine
The plug-in onboards the WSL machine with the tag WSL2. Should you or your organization need a custom tag, please follow the steps outlined below:
Open Registry Editor as an administrator.
Create a registry key with the following details:
- Name:
GROUP - Type:
REG_SZor registry string - Value:
Custom tag - Path:
HKEY_LOCAL_MACHINE\SOFTWARE\Policies\Microsoft\Windows Advanced Threat Protection\DeviceTagging
- Name:
Once the registry is set, restart wsl using the following steps:
Open Command Prompt and run the command,
wsl --shutdown.Run the
wslcommand.
Wait for 5-10 minutes for the portal to reflect the changes.
Note
The custom tag set in registry will be followed by a _WSL2.
For example, if the registry value set is Microsoft, then the custom tag will be Microsoft_WSL2 and the same will be visible in the portal.
Test the plug-in
To test the plug-in after installation, follow these steps:
Open Terminal or Command Prompt. (In Windows, go to Start > Command Prompt. Or, right-click the start button and then select Terminal.)
Run the command
wsl.Download and extract the script file from https://aka.ms/MDE-Linux-EDR-DIY.
At the Linux prompt, run the command
./mde_linux_edr_diy.sh. An alert should appear in the portal after a few minutes for a detection on the WSL2 instance.Note
It takes about five minutes for the events to appear on the Microsoft Defender portal.
Treat the machine as if it were a regular Linux host in your environment to perform testing against. In particular, we would like to get your feedback on the ability to surface potentially malicious behavior using the new plug-in.
Advanced hunting
In the Advanced Hunting schema, under the DeviceInfo table, there's a new attribute called HostDeviceId that you can use to map a WSL instance to its Windows host device. Here are a few sample hunting queries:
Get all WSL device IDs for the current organization/tenant
//Get all WSL device ids for the current organization/tenant
let wsl_endpoints = DeviceInfo
| where OSPlatform == "Linux" and isempty(HostDeviceId) != true
| distinct DeviceId;

wsl_endpoints
Get WSL device IDs and their corresponding host device IDs
//Get WSL device ids and their corresponding host device ids
DeviceInfo
| where OSPlatform == "Linux" and isempty(HostDeviceId) != true
| distinct WSLDeviceId=DeviceId, HostDeviceId
Get a list of WSL device IDs where curl or wget was run
//Get a list of WSL device ids where curl or wget was run
let wsl_endpoints = DeviceInfo
| where OSPlatform == "Linux" and isempty(HostDeviceId) != true
| distinct DeviceId;

DeviceProcessEvents
| where FileName == "curl" or FileName == "wget"
| where DeviceId in (wsl_endpoints)
| sort by Timestamp desc
Troubleshooting
Installation failure
If you see an error on launching WSL, such as A fatal error was returned by plugin 'DefenderforEndpointPlug-in' Error code: Wsl/Service/CreateInstance/CreateVm/Plugin/ERROR_FILE_NOT_FOUND, it means the Defender for Endpoint plug-in for WSL installation is faulty. To repair it, follow these steps:
In Control Panel, go to Programs > Programs and Features.
Search for and select Microsoft Defender for Endpoint plug-in for WSL. Then select Repair. This action should fix the problem by placing the right files in the expected directories.


The command healthcheck.exe shows the output, "Launch WSL distro with 'bash' command and retry in five minutes."

Open a terminal instance and run the command
wsl.Wait for at least five minutes before rerunning the health check.
The healthcheck.exe command might show the output, "Waiting for Telemetry. Please retry in five minutes."

If that error occurs, wait for five minutes and rerun healthcheck.exe.
You don't see any devices in the Microsoft Defender portal, or you don't see any events in the timeline
Check the following things:
If you aren't seeing a machine object, make sure sufficient time has passed for onboarding to complete (typically up to 10 minutes).
Make sure to use the right filters, and that you have the appropriate permissions assigned to view all device objects. (For example, is your account/group is restricted to a specific group?)
Use the health check tool to provide an overview of overall plug-in health. Open Terminal, and run the
healthcheck.exetool from%ProgramFiles%\Microsoft Defender for Endpoint plug-in for WSL\tools.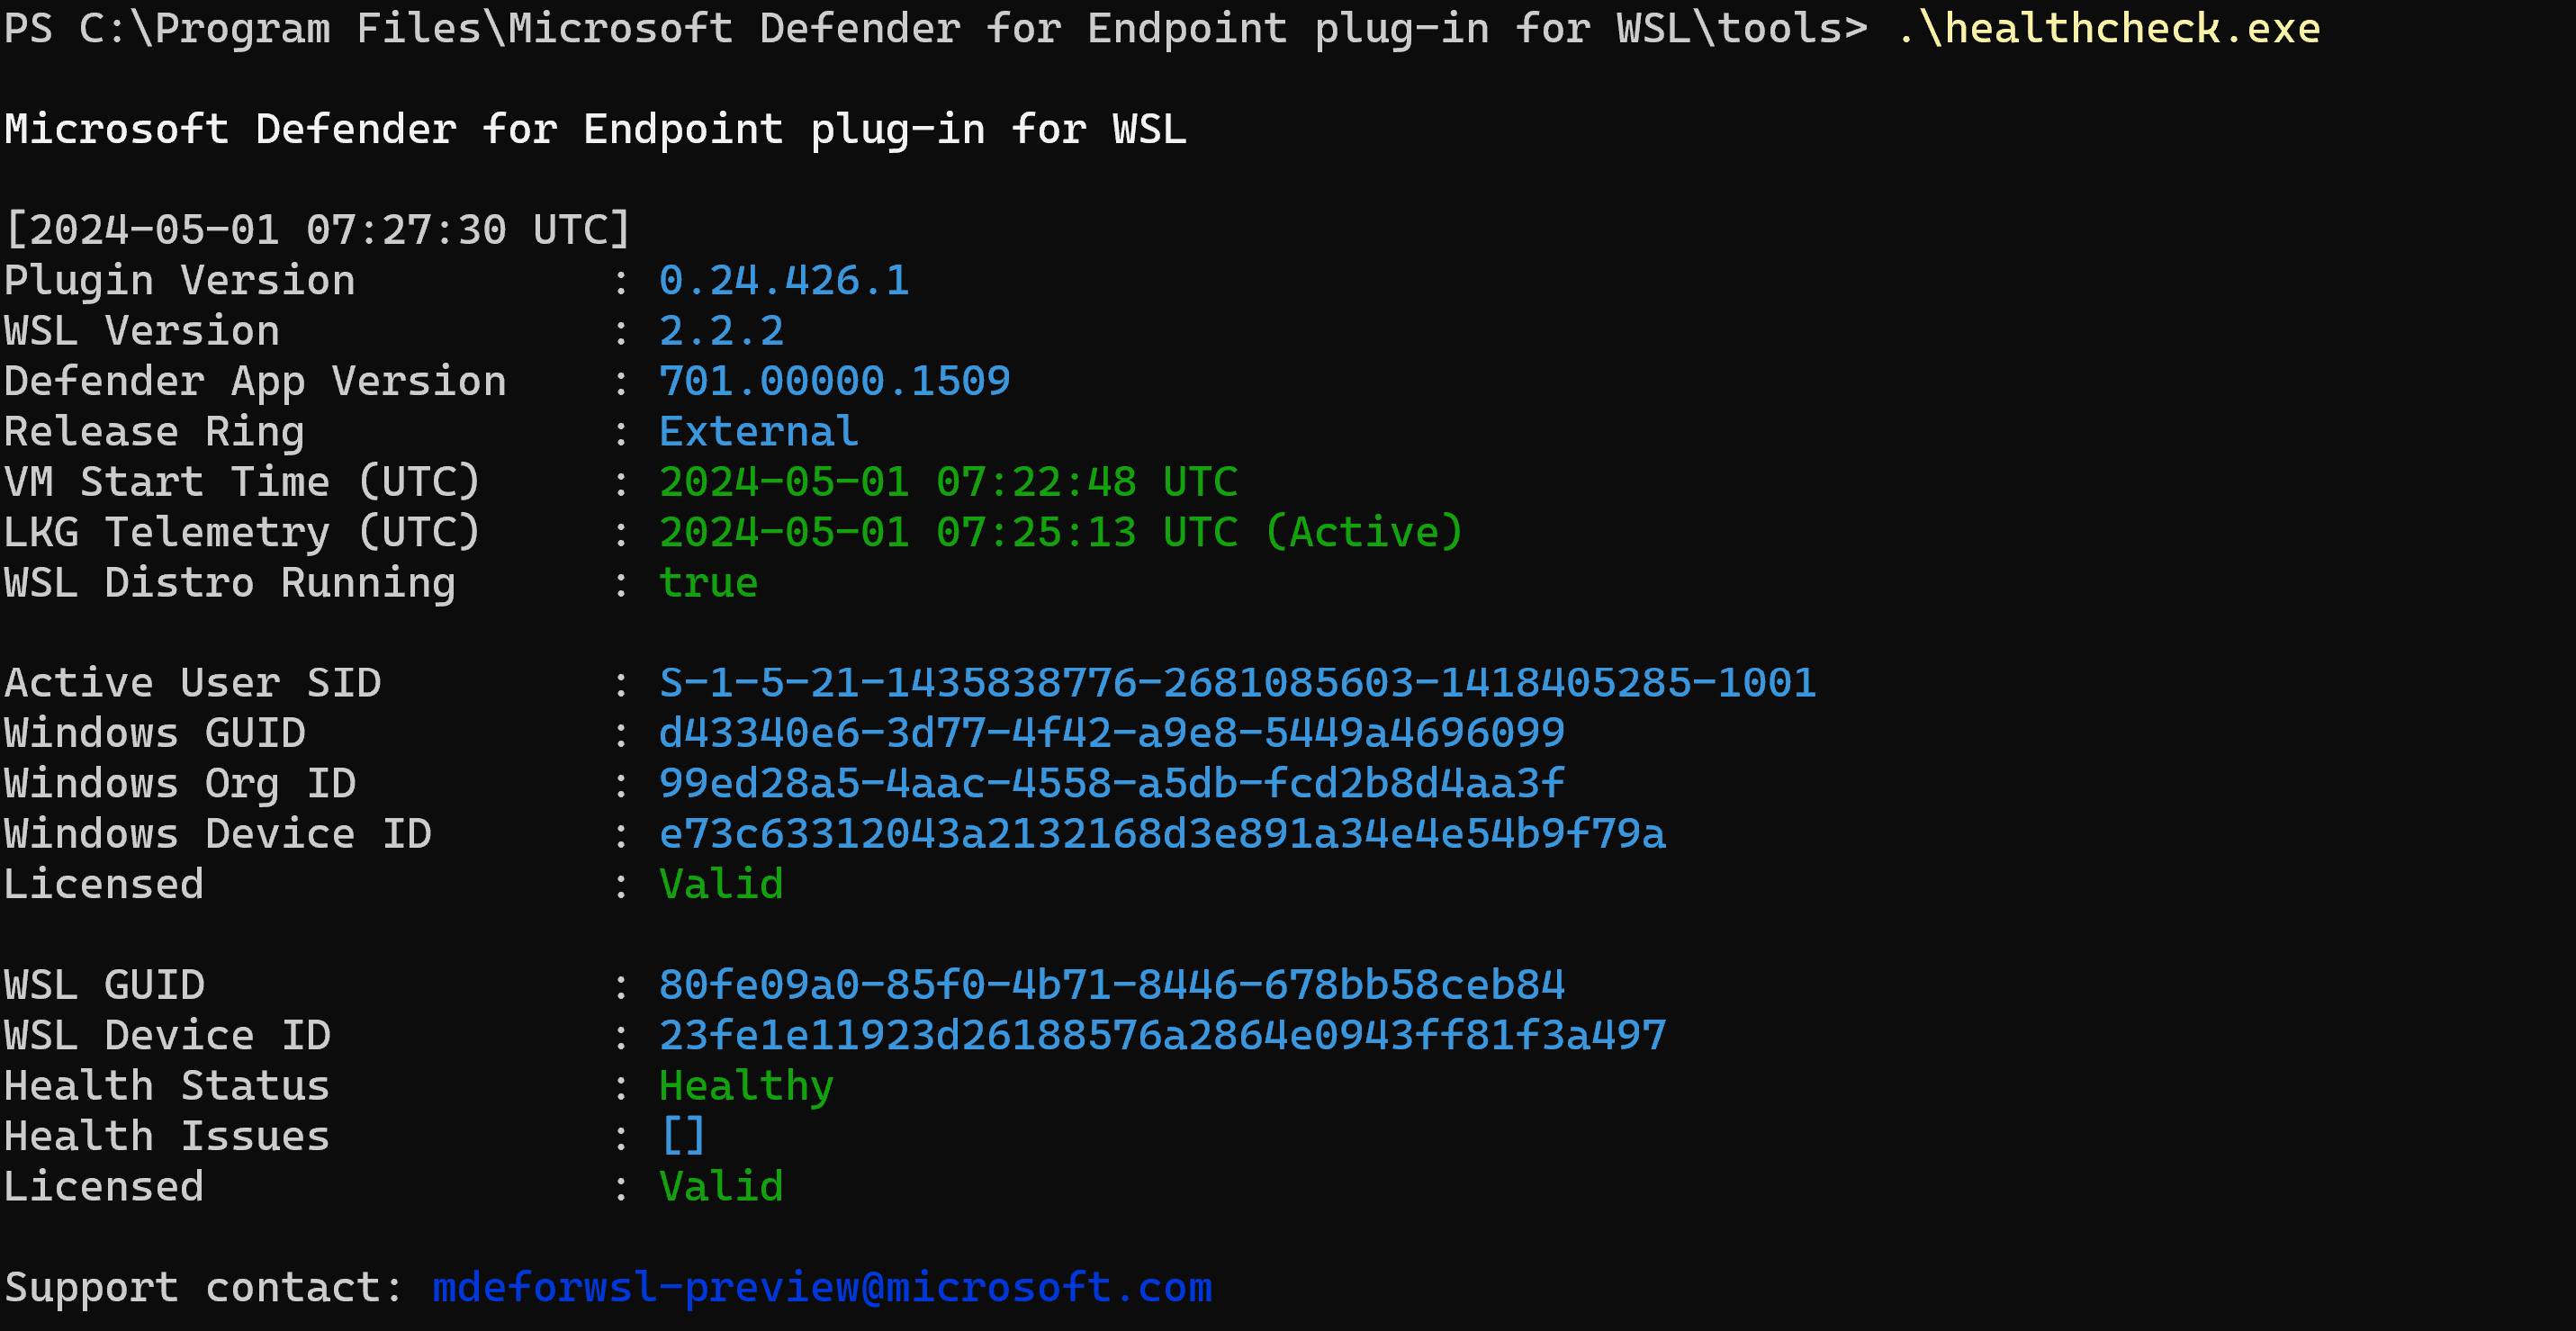
Enable the connectivity test and check for Defender for Endpoint connectivity in WSL. If the connectivity test fails, provide the output of the health check tool to our support team.

Connectivity test reports "invalid" in health check
If your machine has a proxy setup, run the command
healthCheck --extendedProxy. This will provide information on which proxy(s) is set on your machine and whether these configurations are invalid for WSL defender.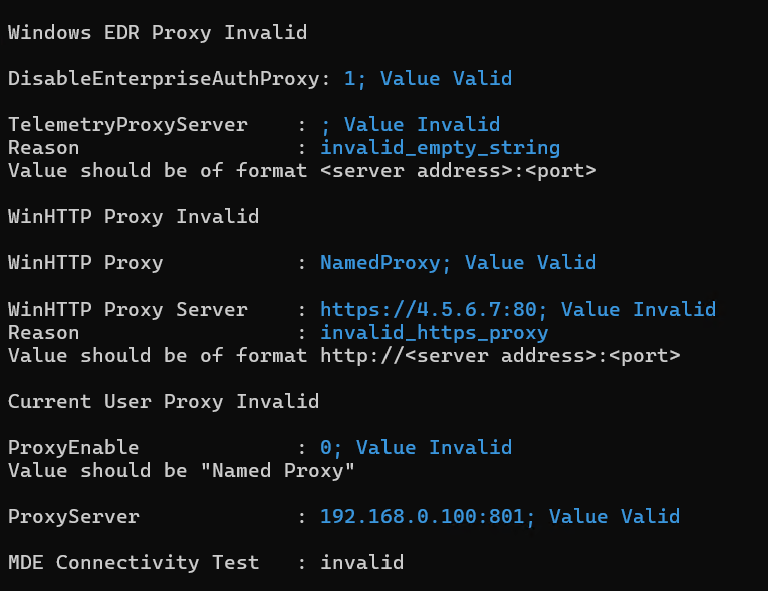
If the steps mentioned above do not fix the problem, include the following configuration settings in the
.wslconfiglocated in your%UserProfile%and restart WSL. Details about settings can be found in WSL Settings.In Windows 11
# Settings apply across all Linux distros running on WSL 2
[wsl2]

dnsTunneling=true

networkingMode=mirrored
In Windows 10
# Settings apply across all Linux distros running on WSL 2
[wsl2]

dnsProxy=false
Connectivity issues persist
Collect the networking logs by following these steps:
Open an elevated(admin) PowerShell prompt.
Download and run:
.\collect-networking-logs.ps1Invoke-WebRequest -UseBasicParsing "https://raw.githubusercontent.com/microsoft/WSL/master/diagnostics/collect-networking-logs.ps1" -OutFile collect-networking-logs.ps1 Set-ExecutionPolicy Bypass -Scope Process -Force .\collect-networking-logs.ps1Open a new command prompt and run the following command:
wsl.Open an elevated(admin) command prompt and run the following command:
wsl --debug-shell.In debug shell, run:
mdatp connectivity test.Allow the connectivity test to be completed.
Stop the .ps1 ran in step #2.
Share the generated .zip file along with support bundle that can be collected as mentioned in steps.
Collect a support bundle
If you run into any other challenges or issues, open Terminal, and run the following commands to generate a support bundle:
cd "%ProgramFiles%\Microsoft Defender for Endpoint plug-in for WSL\tools".\healthcheck.exe --supportBundleThe support bundle can be found in the path provided by the previous command.


WSL1 vs WSL2
Microsoft Defender Endpoint plug-in for WSL supports Linux distributions running on WSL 2. If they're associated with WSL 1, you might encounter issues. Therefore, it's advised to disable WSL 1. To do so with the Intune policy, perform the following steps:
Go to your Microsoft Intune admin center.
Go to Devices > Configuration Profiles > Create > New Policy.
Select Windows 10 and later > Settings catalog.
Create a name for the new profile, and search for Windows Subsystem for Linux to see and add the full list of available settings.
Set the Allow WSL1 setting to Disabled, to ensure that only WSL 2 distributions can be used.
Alternately, if you want to keep using WSL 1, or not use the Intune Policy, you can selectively associate your installed distributions to run on WSL 2, by running the command in PowerShell:
wsl --set-version <YourDistroName> 2To have WSL 2 as your default WSL version for new distributions to be installed in the system, run the following command in PowerShell:
wsl --set-default-version 2
Override Release ring
The plug-in uses the Windows EDR ring by default. If you wish to switch to an earlier ring, set
OverrideReleaseRingto one of the following under registry and restart WSL:- Name:
OverrideReleaseRing - Type:
REG_SZ - Value:
Dogfood or External or InsiderFast or Production - Path:
Computer\HKEY_LOCAL_MACHINE\SOFTWARE\Microsoft\Microsoft Defender for Endpoint plug-in for WSL
- Name: