Tutorial: Connect an ASP.NET Core app to .NET Aspire storage components
Cloud-native apps often require scalable storage solutions that provide capabilities like blob storage, queues, or semi-structured NoSQL databases. .NET Aspire components simplify connections to various storage services, such as Azure Blob Storage. In this tutorial, you'll create an ASP.NET Core app that uses .NET Aspire components to connect to Azure Blob Storage and Azure Queue Storage to submit support tickets. The app sends the tickets to a queue for processing and uploads an attachment to storage. You'll learn how to:
- Create a basic .NET app that is set up to use .NET Aspire components
- Add .NET Aspire components to connect to multiple storage services
- Configure and use .NET Aspire Component features to send and receive data
Prerequisites
To work with .NET Aspire, you need the following installed locally:
- .NET 8.0
- .NET Aspire workload:
- A container runtime, such as:
- Integrated Developer Environment (IDE) or code editor, such as:
- Visual Studio 2022 Preview version 17.9 or higher (Optional)
- Visual Studio Code (Optional)
For more information, see .NET Aspire setup and tooling.
Explore the completed sample app
A completed version of the sample app from this tutorial is available on GitHub. The project is also structured as a template for the Azure Developer CLI, meaning you can use the azd up command to automate Azure resource provisioning if you have the tool installed.
git clone https://github.com/Azure-Samples/dotnet-aspire-connect-storage.git
Set up the Azure Storage resources
For this article, you'll need data contributor access to an Azure Storage account with a blob container and storage queue. Ensure you have the following resources and configurations available:
For this article, you'll need to create a blob container and storage queue resource in your local development environment using an emulator. To do so, use Azurite. Azurite is a free, open source, cross-platform Azure Storage API compatible server (emulator) that runs in a Docker container.
To use the emulator you need to install Azurite.
- An Azure Storage account - Create a storage account.
- A Blob Storage container named fileuploads - Create a blob storage container.
- A Storage Queue named tickets - Create a storage queue.
Run the following commands in the Azure CLI or CloudShell to set up the required Azure Storage resources:
az group create --name aspirestorage --location eastus2
az storage account create -n aspirestorage -g aspirestorage -l eastus2
az storage container create -n fileuploads --account-name aspirestorage
az storage queue create -n tickets --account-name aspirestorage
You also need to assign the following roles to the user account you are logged into Visual Studio with:
- Storage Blob Data Contributor - Assign an Azure RBAC role
- Storage Queue Data Contributor - Assign an Azure RBAC role
The Azure Developer CLI enables you to provision and deploy Azure resources using a template system. This tutorial provides a complete template that provisions the required Azure resources and includes the completed sample application code. Run the following commands to initialize and run the template:
Run
azd auth loginto sign-in to Azure:azd auth loginRun
azd initto clone and initialize the sample template:azd init --template dotnet-aspire-connect-storageRun
azd upto provision the Azure resources:azd upWhen prompted, select the subscription and Azure region for the provisioned resources. The template runs and completes the following tasks for you:
- Creates an Azure Storage Account with blob and queue services enabled
- Creates a blob storage container named
fileUploads - Creates a queue named
tickets - Assigns the following roles to the user account that ran the template.
- Storage Blob Data Contributor
- Storage Queue Data Contributor
After the operation completes successfully, you have two options moving forward:
- Option 1: Run the .NET sample app in the template
srcdirectory to experiment with the completed app. - Option 2: Build the sample app step by step using the sections ahead and connect it to the Azure resources provisioned by
azd.
Create the sample solution
Create a .NET Aspire app using either Visual Studio or the .NET CLI.
- At the top of Visual Studio, navigate to File > New > Project.
- In the dialog window, search for Blazor and select Blazor Web App. Choose Next.
- On the Configure your new project screen:
- Enter a Project Name of AspireStorage.
- Leave the rest of the values at their defaults and select Next.
- On the Additional information screen:
- Make sure .NET 8.0 is selected.
- Ensure the Interactive render mode is set to None.
- Check the Enlist in .NET Aspire orchestration option and select Create.
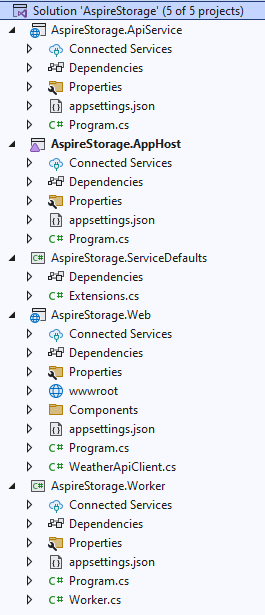
Visual Studio creates a new ASP.NET Core solution that is structured to use .NET Aspire. The solution consists of the following projects:
- AspireStorage: A Blazor project that depends on service defaults.
- AspireStorage.AppHost: An orchestrator project designed to connect and configure the different projects and services of your app. The orchestrator should be set as the startup project.
- AspireStorage.ServiceDefaults: A shared class library to hold configurations that can be reused across the projects in your solution.
Add the Worker Service project
Next, add a Worker Service project to the solution to retrieve and process messages as they are added to the Azure Storage queue.
- In the solution explorer, right click on the top level AspireStorage solution node and select Add > New project.
- Search for and select the Worker Service template and choose Next.
- For the Project name, enter AspireStorage.Worker and select Next.
- On the Additional information screen:
- Make sure .NET 8.0 is selected.
- Make sure Enlist in .NET Aspire orchestration is checked and select Create.
Visual Studio adds the project to your solution and updates the Program.cs file of the AspireStorage.AppHost project with a new line of code:
builder.AddProject<Projects.AspireStorage_Worker>();
Visual Studio tooling added this line of code to register your new project with the IDistributedApplicationBuilder object, which enables orchestration features. For more information, see .NET Aspire orchestration overview.
The completed solution structure should resemble the following:
Add the .NET Aspire components to the Blazor app
Add the .NET Aspire Azure Blob Storage component and .NET Aspire Azure Queue Storage component packages to your AspireStorage project:
dotnet add package Aspire.Azure.Storage.Blobs --prerelease
dotnet add package Aspire.Azure.Storage.Queues --prerelease
Your AspireStorage project is now set up to use .NET Aspire components. Here's the updated AspireStorage.csproj file:
<Project Sdk="Microsoft.NET.Sdk.Web">

  <PropertyGroup>
    <TargetFramework>net8.0</TargetFramework>
    <Nullable>enable</Nullable>
    <ImplicitUsings>enable</ImplicitUsings>
  </PropertyGroup>

  <ItemGroup>
    <PackageReference Include="Aspire.Azure.Storage.Blobs"
                      Version="8.0.0-preview.7.24251.11" />
    <PackageReference Include="Aspire.Azure.Storage.Queues"
                      Version="8.0.0-preview.7.24251.11" />
  </ItemGroup>

  <ItemGroup>
    <ProjectReference Include="..\AspireStorage.ServiceDefaults\AspireStorage.ServiceDefaults.csproj" />
  </ItemGroup>

</Project>
The next step is to add the components to the app.
In the Program.cs file of the AspireStorage project, add calls to the AddAzureBlobClient and AddAzureQueueClient extension methods after the creation of the builder but before the call to AddServiceDefaults. For more information, see .NET Aspire service defaults. Provide the name of your connection string as a parameter.
using AspireStorage.Components;
using Azure.Storage.Blobs;
using Azure.Storage.Queues;

var builder = WebApplication.CreateBuilder(args);

builder.AddAzureBlobClient("BlobConnection");
builder.AddAzureQueueClient("QueueConnection");

builder.AddServiceDefaults();

// Add services to the container.
builder.Services.AddRazorComponents();

var app = builder.Build();

app.MapDefaultEndpoints();

// Configure the HTTP request pipeline.
if (!app.Environment.IsDevelopment())
{
    app.UseExceptionHandler("/Error", createScopeForErrors: true);
    // The default HSTS value is 30 days. You may want to change this for production
    // scenarios, see https://aka.ms/aspnetcore-hsts.
    app.UseHsts();
}
else
{
    // In development, create the blob container and queue if they don't exist.
    var blobService = app.Services.GetRequiredService<BlobServiceClient>();
    var docsContainer = blobService.GetBlobContainerClient("fileuploads");

    await docsContainer.CreateIfNotExistsAsync();

    var queueService = app.Services.GetRequiredService<QueueServiceClient>();
    var queueClient = queueService.GetQueueClient("tickets");

    await queueClient.CreateIfNotExistsAsync();
}

app.UseHttpsRedirection();

app.UseStaticFiles();
app.UseAntiforgery();

app.MapRazorComponents<App>();

app.Run();
using AspireStorage.Components;
using Azure.Storage.Blobs;
using Azure.Storage.Queues;

var builder = WebApplication.CreateBuilder(args);

builder.AddAzureBlobClient("BlobConnection");
builder.AddAzureQueueClient("QueueConnection");

builder.AddServiceDefaults();

// Add services to the container.
builder.Services.AddRazorComponents();

var app = builder.Build();

app.MapDefaultEndpoints();

// Configure the HTTP request pipeline.
if (!app.Environment.IsDevelopment())
{
    app.UseExceptionHandler("/Error", createScopeForErrors: true);
    // The default HSTS value is 30 days. You may want to change this for production
    // scenarios, see https://aka.ms/aspnetcore-hsts.
    app.UseHsts();
}

app.UseHttpsRedirection();

app.UseStaticFiles();
app.UseAntiforgery();

app.MapRazorComponents<App>();

app.Run();
With the additional using statements, these methods accomplish the following tasks:
- Register a Azure.Storage.Blobs.BlobServiceClient and a Azure.Storage.Queues.QueueServiceClient with the DI container for connecting to Azure Storage.
- Automatically enable corresponding health checks, logging, and telemetry for the respective services.
When the AspireStorage project starts, it will create a fileuploads container in Azurite Blob Storage and a tickets queue in Azurite Queue Storage. This is conditional when the app is running in a development environment. When the app is running in a production environment, the container and queue are assumed to have already been created.
Add the .NET Aspire component to the Worker Service
The worker service handles pulling messages off of the Azure Storage queue for processing. Add the .NET Aspire Azure Queue Storage component component package to your AspireStorage.Worker app:
dotnet add package Aspire.Azure.Storage.Queues --prerelease
In the Program.cs file of the AspireStorage.Worker project, add a call to the AddAzureQueueClient extension method after the creation of the builder but before the call to AddServiceDefaults:
using AspireStorage.Worker;

var builder = Host.CreateApplicationBuilder(args);

builder.AddAzureQueueClient("QueueConnection");

builder.AddServiceDefaults();
builder.Services.AddHostedService<Worker>();

var host = builder.Build();
host.Run();
This method handles the following tasks:
- Register a QueueServiceClient with the DI container for connecting to Azure Storage Queues.
- Automatically enable corresponding health checks, logging, and telemetry for the respective services.
Create the form
The app requires a form for the user to be able to submit support ticket information and upload an attachment. The app uploads the attached file on the Document (IFormFile) property to Azure Blob Storage using the injected BlobServiceClient. The QueueServiceClient sends a message composed of the Title and Description to the Azure Storage Queue.
Use the following Razor markup to create a basic form, replacing the contents of the Home.razor file in the AspireStorage/Components/Pages directory:
@page "/"

@using System.ComponentModel.DataAnnotations
@using Azure.Storage.Blobs
@using Azure.Storage.Queues

@inject BlobServiceClient BlobClient
@inject QueueServiceClient QueueServiceClient

<PageTitle>Home</PageTitle>

<div class="text-center">
    <h1 class="display-4">Request Support</h1>
</div>

<EditForm Model="@Ticket" FormName="Tickets" method="post"
          OnValidSubmit="@HandleValidSubmit" enctype="multipart/form-data">
    <DataAnnotationsValidator />
    <ValidationSummary />

    <div class="mb-4">
        <label>Issue Title</label>
        <InputText class="form-control" @bind-Value="@Ticket.Title" />
        <ValidationMessage For="() => Ticket.Title" />
    </div>
    <div class="mb-4">
        <label>Issue Description</label>
        <InputText class="form-control" @bind-Value="@Ticket.Description" />
        <ValidationMessage For="() => Ticket.Description" />
    </div>
    <div class="mb-4">
        <label>Attachment</label>
        <InputFile class="form-control" name="Ticket.Document" />
        <ValidationMessage For="() => Ticket.Document" />
    </div>
    <button class="btn btn-primary" type="submit">Submit</button>
    <button class="btn btn-danger mx-2" type="reset" @onclick=@ClearForm>Clear</button>
</EditForm>

@code {
    [SupplyParameterFromForm(FormName = "Tickets")]
    private SupportTicket Ticket { get; set; } = new();

    private async Task HandleValidSubmit()
    {
        var docsContainer = BlobClient.GetBlobContainerClient("fileuploads");

        // Upload file to blob storage
        await docsContainer.UploadBlobAsync(
            Ticket.Document.FileName,
            Ticket.Document.OpenReadStream());

        // Send message to queue
        var queueClient = QueueServiceClient.GetQueueClient("tickets");

        await queueClient.SendMessageAsync(
             $"{Ticket.Title} - {Ticket.Description}");
    }

    private void ClearForm() => Ticket = new();

    private class SupportTicket()
    {
        [Required] public string Title { get; set; } = default!;
        [Required] public string Description { get; set; } = default!;
        [Required] public IFormFile Document { get; set; } = default!;
    }
}
For more information about creating forms in Blazor, see ASP.NET Core Blazor forms overview.
Update the AppHost
The AspireStorage.AppHost project is the orchestrator for your app. It's responsible for connecting and configuring the different projects and services of your app. The orchestrator should be set as the startup project.
To add Azure Storage hosting support to your IDistributedApplicationBuilder, install the Aspire.Hosting.Azure.Storage NuGet package.
dotnet add package Aspire.Hosting.Azure.Storage --prerelease
Replace the contents of the Program.cs file in the AspireStorage.AppHost project with the following code:
using Microsoft.Extensions.Hosting;

var builder = DistributedApplication.CreateBuilder(args);

var storage = builder.AddAzureStorage("Storage");

if (builder.Environment.IsDevelopment())
{
    storage.RunAsEmulator();
}

var blobs = storage.AddBlobs("BlobConnection");
var queues = storage.AddQueues("QueueConnection");

builder.AddProject<Projects.AspireStorage>("aspirestorage")
    .WithReference(blobs)
    .WithReference(queues);

builder.AddProject<Projects.AspireStorage_Worker>("aspirestorage-worker")
    .WithReference(queues);

var app = builder.Build();
app.Run();
The preceding code adds Azure storage, blobs, and queues, and when in development mode, it uses the emulator. Each project defines references for these resources that they depend on.
using Microsoft.Extensions.Hosting;

var builder = DistributedApplication.CreateBuilder(args);

var storage = builder.AddAzureStorage("Storage");

var blobs = storage.AddBlobs("BlobConnection");
var queues = storage.AddQueues("QueueConnection");

builder.AddProject<Projects.AspireStorage>("aspirestorage")
    .WithReference(blobs)
    .WithReference(queues);

builder.AddProject<Projects.AspireStorage_Worker>("aspirestorage-worker")
    .WithReference(queues);

var app = builder.Build();
app.Run();
The preceding code adds Azure storage, blobs, and queues, and defines references for these resources within each project that depend on them.
Process the items in the queue
When a new message is placed on the tickets queue, the worker service should retrieve, process, and delete the message. Update the Worker.cs class, replacing the contents with the following code:
using Azure.Storage.Queues;
using Azure.Storage.Queues.Models;

namespace AspireStorage.Worker;

public sealed class Worker(
    QueueServiceClient client,
    ILogger<Worker> logger) : BackgroundService
{
    protected override async Task ExecuteAsync(CancellationToken stoppingToken)
    {
        var queueClient = client.GetQueueClient("tickets");
        await queueClient.CreateIfNotExistsAsync(cancellationToken: stoppingToken);

        while (!stoppingToken.IsCancellationRequested)
        {
            QueueMessage[] messages =
                await queueClient.ReceiveMessagesAsync(
                    maxMessages: 25, cancellationToken: stoppingToken);

            foreach (var message in messages)
            {
                logger.LogInformation(
                    "Message from queue: {Message}", message.MessageText);

                await queueClient.DeleteMessageAsync(
                    message.MessageId,
                    message.PopReceipt,
                    cancellationToken: stoppingToken);
            }

            // TODO: Determine an appropriate time to wait
            // before checking for more messages.
            await Task.Delay(TimeSpan.FromSeconds(15), stoppingToken);
        }
    }
}
Before the worker service can process messages, it needs to be able to connect to the Azure Storage queue. With Azurite, you need to ensure that the queue is available before the worker service starts executing message queue processing.
using Azure.Storage.Queues;
using Azure.Storage.Queues.Models;

namespace AspireStorage.Worker;

public sealed class Worker(
    QueueServiceClient client,
    ILogger<Worker> logger) : BackgroundService
{
    protected override async Task ExecuteAsync(CancellationToken stoppingToken)
    {
        var queueClient = client.GetQueueClient("tickets");
        while (!stoppingToken.IsCancellationRequested)
        {
            QueueMessage[] messages =
                await queueClient.ReceiveMessagesAsync(
                    maxMessages: 25, cancellationToken: stoppingToken);

            foreach (var message in messages)
            {
                logger.LogInformation(
                    "Message from queue: {Message}", message.MessageText);

                await queueClient.DeleteMessageAsync(
                    message.MessageId,
                    message.PopReceipt,
                    cancellationToken: stoppingToken);
            }

            // TODO: Determine an appropriate time to wait
            // before checking for more messages.
            await Task.Delay(TimeSpan.FromSeconds(15), stoppingToken);
        }
    }
}
The worker service processes messages by connecting to the Azure Storage queue, and pulling messages off the queue.
The worker service processes message in the queue and deletes them when they've been processed.
Configure the connection strings
The AspireStorage and AspireStorage.Worker projects must be configured to connect to the correct Azure Storage Account you created earlier. You can specify the endpoints for the blob and queue services in the storage account using the appsettings.json file in each project.
In the AspireStorage project, add the following configuration to the
appsettings.Development.jsonfile:"ConnectionStrings": { "BlobConnection": "https://<your-storage-account-name>.blob.core.windows.net/", "QueueConnection": "https://<your-storage-account-name>.queue.core.windows.net/" }In the AspireStorage.Worker project, add the following configuration to the
appsettings.Development.jsonfile:"ConnectionStrings": { "QueueConnection": "https://<your-storage-account-name>.queue.core.windows.net/" }
Run and test the app locally
The sample app is now ready for testing. Verify that the submitted form data is sent to Azure Blob Storage and Azure Queue Storage by completing the following steps:
Press the run button at the top of Visual Studio to launch your .NET Aspire app dashboard in the browser.
On the resources page, in the aspirestorage row, click the link in the Endpoints column to open the UI of your app.
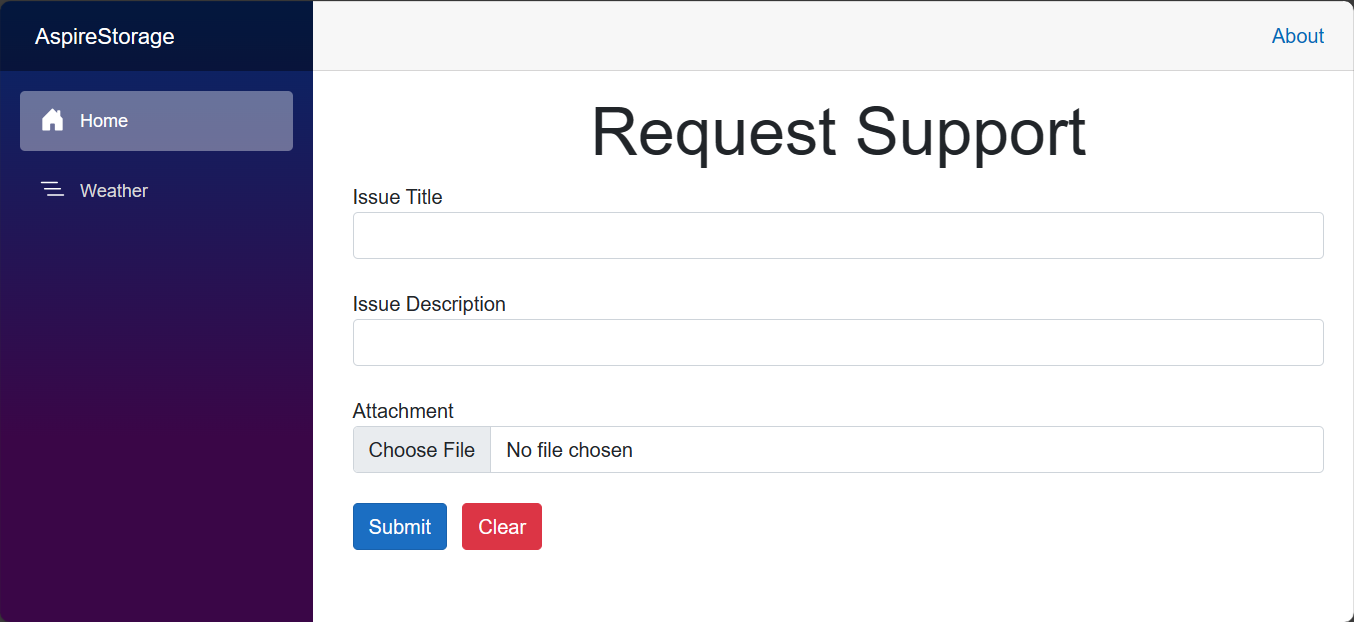
Enter sample data into the
TitleandDescriptionform fields and select a simple file to upload.Select the Submit button, and the form submits the support ticket for processing — and clears the form.
In a separate browser tab, use the Azure portal to navigate to the Storage browser in your Azure Storage Account.
Select Containers and then navigate into the Documents container to see the uploaded file.
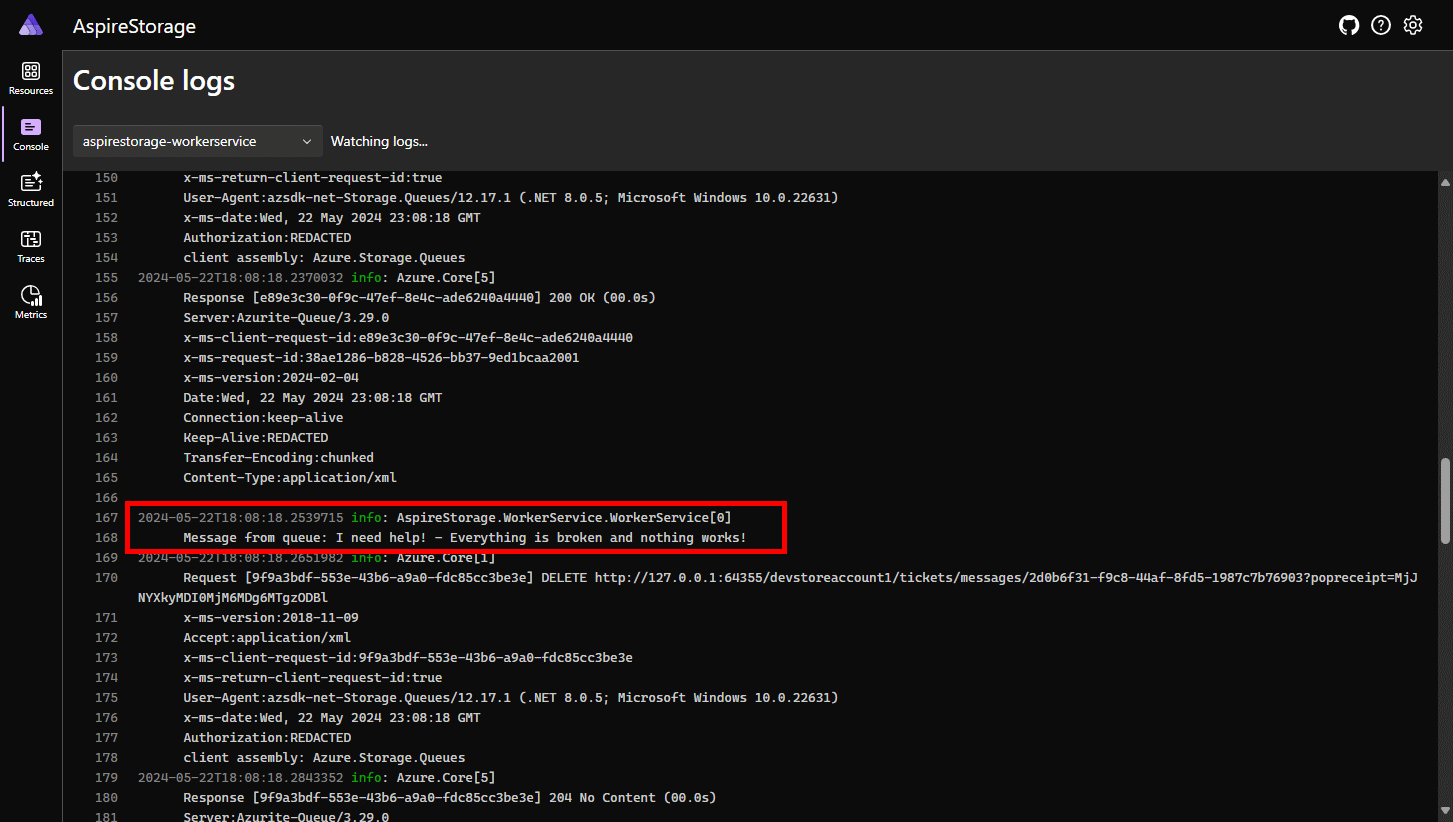
You can verify the message on the queue was processed by looking at the Project logs of the .NET Aspire dashboard, and selecting the aspirestorage.worker from the dropdown.


Summary
The example app that you built demonstrates persisting blobs from an ASP.NET Core Blazor Web App and processing queues in a .NET Worker Service. Your app connects to Azure Storage using .NET Aspire components. The app sends the support tickets to a queue for processing and uploads an attachment to storage.
Since you choose to use Azurite, there's no need to clean up these resources when you're done testing them, as you created them locally in the context of an emulator. The emulator enabled you to test your app locally without incurring any costs, as no Azure resources were provisioned or created.
Clean up resources
Run the following Azure CLI command to delete the resource group when you no longer need the Azure resources you created. Deleting the resource group also deletes the resources contained inside of it.
az group delete --name <your-resource-group-name>
.NET Aspire
Feedback
Coming soon: Throughout 2024 we will be phasing out GitHub Issues as the feedback mechanism for content and replacing it with a new feedback system. For more information see: https://aka.ms/ContentUserFeedback.
Submit and view feedback for