Manual provisioning for iOS apps
Manual provisioning is an approach for deploying a .NET Multi-platform App UI (.NET MAUI) iOS app to a device, where you have full control over the provisioning data that gets created. With this approach, you manually create and manage signing identities, App IDs, and provisioning profiles in your Apple Developer Account, and then have to download this data into Visual Studio. Before starting the manual provisioning process, you should ensure that you've added your Apple Developer Account to Visual Studio. For more information, see Apple account management.
Development teams, certificates, and profiles can all be managed by accessing the Certificates, Identifiers & Profiles section of your Apple Developer Account.
Create a signing certificate
With manual provisioning, the first step in setting up a development device is to create a signing certificate, which consists of a development certificate and a private key.
Development certificates and their associated keys establish your identity with Apple, and associate you with specific devices and profiles for development. This is analogous to adding your digital signature to your apps. Apple uses these certificates to ensure that you can only deploy your apps to specific devices.
Important
You can only have two iOS development certificates at any one time. If you need to create any more, you will need to revoke an existing one. Any machine using a revoked certificate will not be able to sign their app.
Once you've added your Apple Developer Account to Visual Studio, you need to generate a signing certificate:
- In Visual Studio, go to Tools > Options > Xamarin > Apple Accounts.
- In the Apple Developer Accounts dialog, select a team and then select View Details.
- In the Details dialog, select Create Certificate > iOS Development. A new signing identity will be created and will sync with Apple if you have the correct permissions.
Important
The private key and certificate that make up your signing identity will also be exported to Keychain Access on your Mac build host, provided that the IDE is paired to it. For more information, see Pair to Mac for iOS development.
Understanding certificate key pairs
A developer profile contains certificates, their associated keys, and any provisioning profiles associated with the Apple Developer Account. There are two versions of a developer profile—one exists in your Apple Developer Account, and the other lives on a local machine. The difference between the two is the type of keys they contain: the profile in your Apple Developer Account contains all of the public keys associated with your certificates, while the copy on your local machine contains all of the private keys. For certificates to be valid, the key pairs must match.
Warning
Losing the certificate and associated keys can be incredibly disruptive, as it will require revoking existing certificates and re-provisioning any associated devices. After successfully setting up a development certificate, export a backup copy and store it in a safe place. For more information on how to do this, see Export developer accounts on help.apple.com.
Provision an iOS device for development
After creating a signing certificate, you must set up a development provisioning profile so that it's possible to deploy your app to a device. The device must be running a version of iOS that's supported by Xcode.
Add a device
When you create a provisioning profile, the profile must include which devices can run the app. Before selecting a device to be added to a provisioning profile, you must first add the device to your Apple Developer Account. You can add the device with the following steps:
Connect the device to be provisioned to your local Mac with a USB cable.
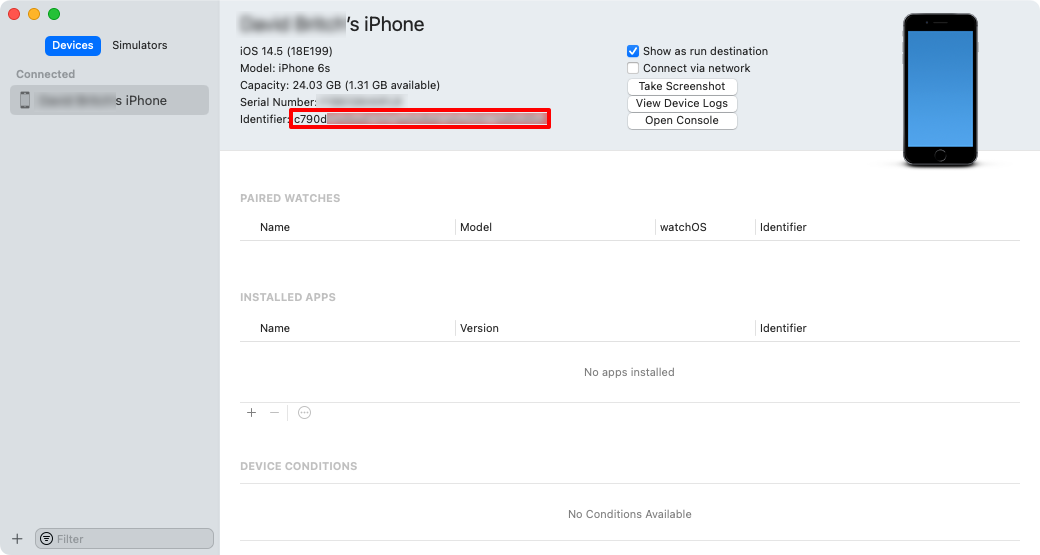
Open Xcode, and navigate to Window > Devices and Simulators.
In Xcode, select the Devices tab, and select the device from the list of connected devices.
In Xcode, copy the Identifier value to the clipboard:
In a web browser, go to the Devices section of your Apple Developer Account and click the + button.
In the Register a New Device page, set the correct Platform and provide a name for the new device. Then paste the identifier from the clipboard into the Device ID (UDID) field, and click Continue:
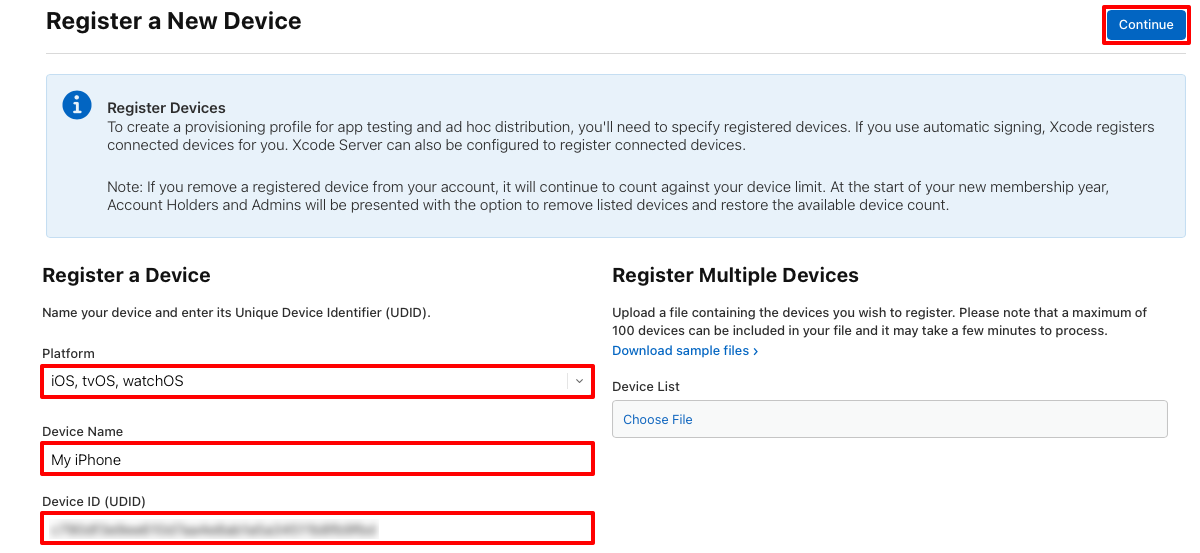
In the Register a New Device page, review the information and then click Register.
Repeat the previous steps for any iOS device that you want to deploy a .NET MAUI iOS app onto.
Create an App ID
After adding a device to your Apple Developer Account, you should create an App ID. An App ID is similar to a reverse-DNS string, that uniquely identifies an app, and should be identical to the bundle identifier for your app.
Important
The bundle identifier for a .NET MAUI app is stored in the project file as the Application ID property. In Visual Studio, in Solution Explorer right-click on your .NET MAUI app project and select Properties. Then, navigate to the MAUI Shared > General tab. The Application ID field lists the bundle identifier.
When the value of the Application ID field is updated, the value of the Bundle identifier in the Info.plist will be automatically updated.
There are two types of App ID:
- Wildcard. A wildcard App ID allows you to use a single App ID to match multiple apps, and typically takes the form
com.domainname.*. A wildcard App ID can be used to install most apps to a device, and should be used for apps that do not enable app-specific capabilities. - Explicit. An explicit App ID is unique to a single app, and typically takes the form
com.domainname.myid. An explicit App ID allows the installation of one app, with a matching bundle identifier, to a device. Explicit App IDs are typically used for apps that enable app-specific capabilities such as Apple Pay, or Game Center.
The recommended approach is to create a wildcard App ID, unless your app uses app-specific capabilities. For more information about capabilities, see Capabilities.
A wildcard App ID can be created with the following steps:
In a web browser, go to the Identifiers section of your Apple Developer Account and click the + button.
In the Register a new identifier page, select App IDs and click the Continue button.
In the Register a new identifier page, select the App type and click the Continue button.
In the Register an App ID page, provide a Description and set the Bundle ID to Wildcard. Then, enter an App ID in the format
com.domainname.*and click the Continue button:
In the Confirm your App ID page, review the information and then click the Register button.
Create a development provisioning profile
Once the App ID has been created, you should create a development provisioning profile. A provisioning profile contains information on what app (or apps, if it's a wildcard App ID) the profile relates to, who can use the profile (depending on the developer certificates that are added), and what devices can install the app.
A development provisioning profile can be created with the following steps:
In a web browser, go to the Profiles section of your Apple Developer Account and click the + button.
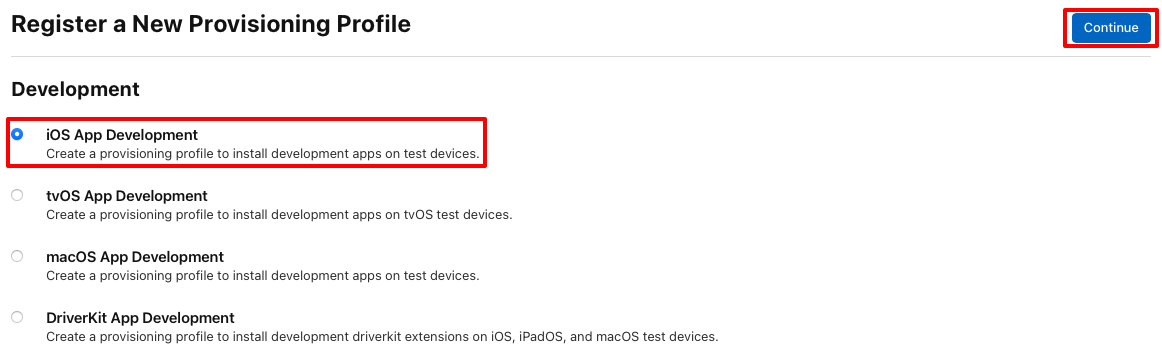
In the Register a New Provisioning Profile page, in the Development section, select iOS App Development and click the Continue button:
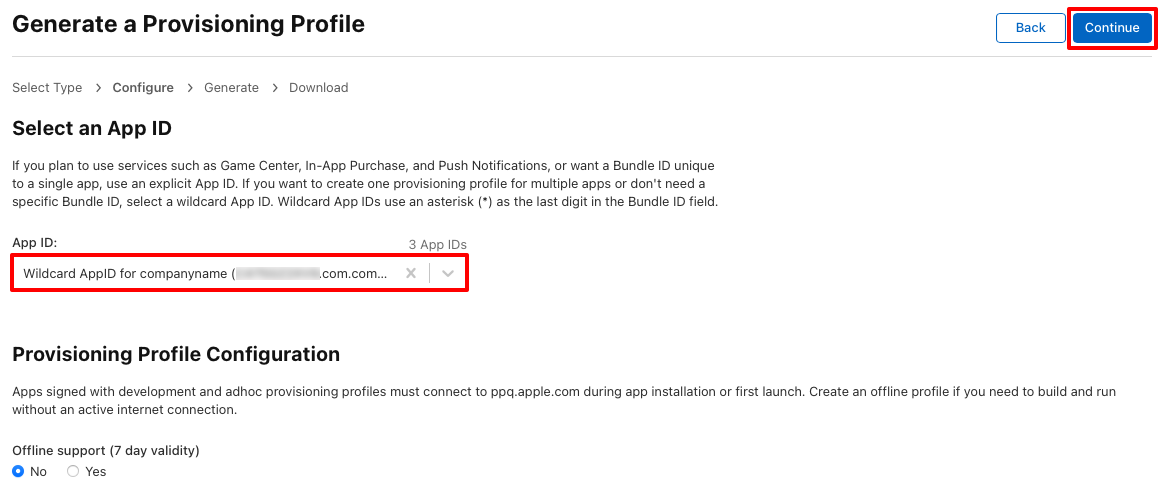
In the Generate a Provisioning Profile page, select the App ID to use and then click the Continue button.
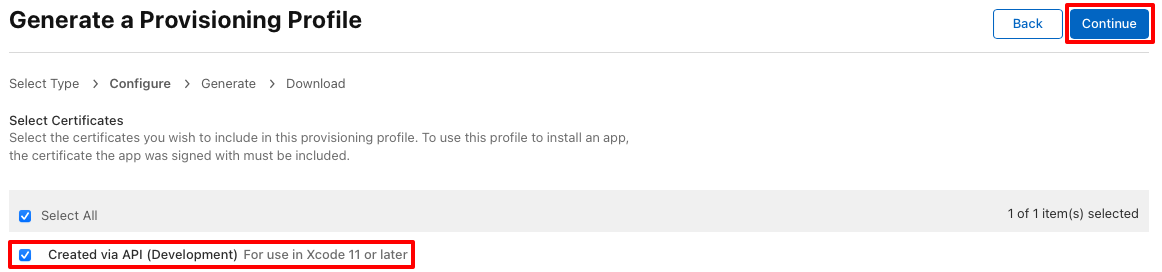
In the Generate a Provisioning Profile page, select the certificates to include in the provisioning profile and then click the Continue button.
In the Generate a Provisioning Profile page, select the devices that the app will be installed on and then click the Continue button.

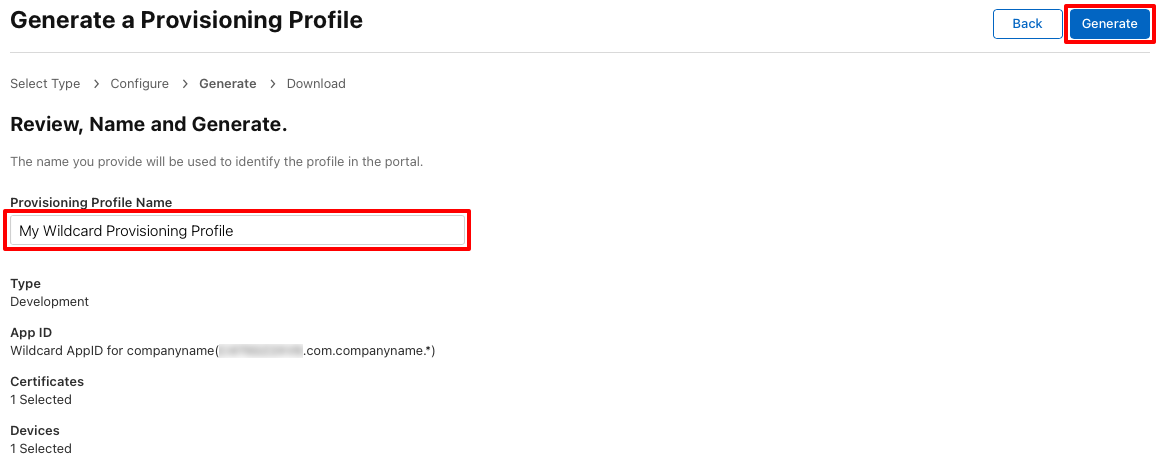
In the Generate a Provisioning Profile page, provide a provisioning profile name and then click the Generate button.
In the Generate a Provisioning Profile page, you can optionally click the Download button to download the provisioning profile.
Download provisioning profiles in Visual Studio
After creating a development provisioning profile in your Apple Developer Account, Visual Studio can download it so that it's available for signing your app:
- In Visual Studio, go to Tools > Options > Xamarin > Apple Accounts.
- In the Apple Developer Accounts dialog, select a team and click the View Details... button.
- In the Details dialog, verify that the new profile appears in the Provisioning Profiles list. You may need to restart Visual Studio to refresh the list.
- In the Details dialog, click the Download All Profiles button.
The provisioning profiles will be downloaded on Windows, and exported to your Mac build host if the IDE is paired to it. For more information, see Pair to Mac for iOS development.
Enable manual provisioning
After manually creating the development provisioning profile, and installing it in Visual Studio, your .NET MAUI app project should be configured to use manual provisioning:
In Solution Explorer right-click on your .NET MAUI app project and select Properties. Then, navigate to the MAUI Shared > General tab and ensure that the value of the Application ID field corresponds to the format of the App ID you created earlier.
In the project properties, navigate to the iOS Bundle Signing tab and ensure that Manual Provisioning is selected in the Scheme drop-down:
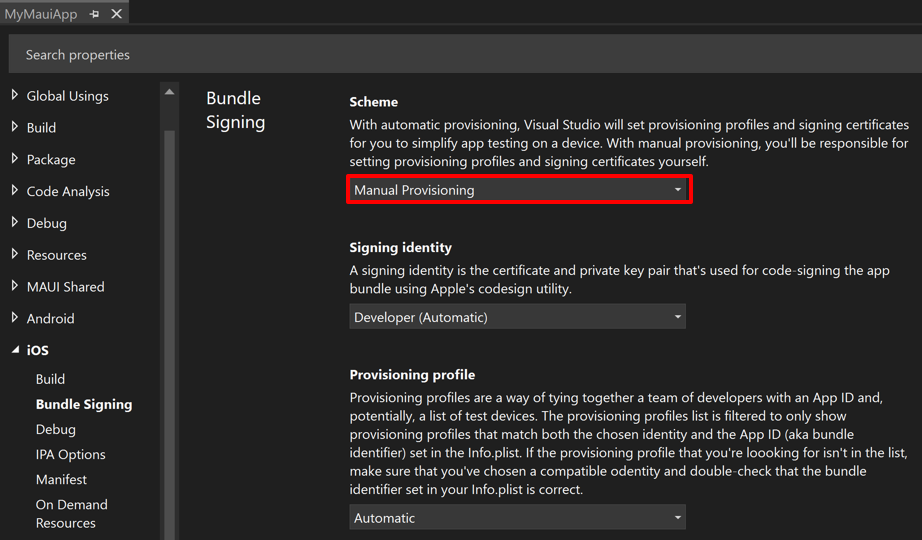
In the Bundle Signing properties, select your Signing identity and Provisioning profile, or set both to Automatic. When Signing identity and Provisioning profile are both set to Automatic, Visual Studio will select the signing identity and provisioning profile based on the Bundle identifier in Info.plist (which is identical to the value of the Application ID property in your project file).
Deploy to device
After configuring provisioning in your .NET MAUI app project, the app can be deployed to a device with Visual Studio:
In Visual Studio, ensure that the IDE is paired to a Mac Build host. For more information, see Pair to Mac for iOS development.
Ensure that your iOS device is connected to your Mac build host via USB or WiFi. For more information about wireless deployment, see Wireless deployment for .NET MAUI iOS apps.
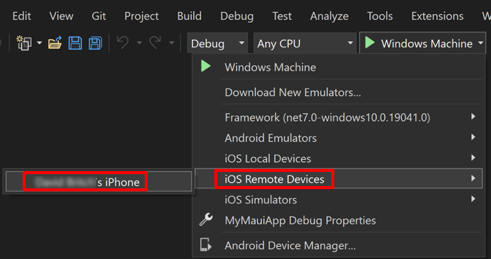
In the Visual Studio toolbar, use the Debug Target drop-down to select iOS Remote Devices and then the device that's connected to your Mac build host:
In the Visual Studio toolbar, press the green Start button to launch the app on your remote device:
Note
An alternative approach to deploying a .NET MAUI iOS app to a device is to use hot restart. Hot restart enables you to deploy a .NET MAUI app to a 64-bit local iOS device, from Visual Studio, without requiring a Mac build host. For more information, see Deploy an iOS app using hot restart.
Provisioning for application services
Apple provides a selection of application services, known as capabilities, that can be activated for a .NET MAUI iOS app. These capabilities must be configured in both your provisioning profile, when the App ID is created, and in the Entitlements.plist file that should be added to the .NET MAUI app project. For more information about capabilities, see Entitlements and Capabilities.