Note
Access to this page requires authorization. You can try signing in or changing directories.
Access to this page requires authorization. You can try changing directories.
This part of the documentation explains how to maintain your Purchase Order Processing data. Once you've determined how much historical information is necessary, you can remove the information that's no longer needed.
Be sure to back up your accounting data before performing any of these procedures, because they remove historical data from your system.
The following topics are discussed:
Chapter 27, "Purchase order history removal," explains the different types of historical information you can keep in Purchase Order Processing, and describes how remove historical information that is no longer needed.
Chapter 28, "Purchase order reconciliation," describes reconciliation, the process of verifying that your accounting records are accurate.
Chapter 27: Purchase order history removal
History records provide useful information for auditing purposes. If you're keeping history, you can maintain and review records for an unlimited number of years. Because historical records increase the amount of hard disk space needed, you should remove history periodically to ensure that you're keeping only the information you need.
This information is divided into the following sections:
Purchase Order Processing history types
Removing purchasing history
Removing tax history
Removing Intrastat history
Purchase Order Processing history types
Purchase Order Processing allows you to maintain four types of history: purchase order, receipt, account distribution, and journal. When you remove purchasing history, select one of the four history types for the date range you want to remove.
Account Distributions Select Account Distributions to remove account distribution history without also removing receipts. Distribution history includes a detailed list of each account and amount posted to the General Ledger, including the audit trail code, account number, account description, debit or credit amount. Once account distribution history has been removed, the documents in the range you've removed won't be printed on the Distribution History Report.
Purchase Order Select Purchase Order to remove purchase order history. If you're keeping purchase order history, line-by-line detail of all the information entered for each purchase order has been kept. When voiding a new purchase order or removing a completed purchase order, the purchase order is transferred to history. Once purchase order history has been removed, the documents in the range you've removed won't be printed on the Purchase Order History Report.
When removing purchase order history, you can remove document attachments with the purchase orders or just the attachments assigned to purchase orders. The attachments are not removed from where they are stored. The Attachments Only option is available if you are using document attachments or have attachments assigned to purchase orders or purchase order line items.
Receipt Select Receipt to remove detailed information about shipment and invoice receipts. If you're keeping receipt history, line-by-line detail of all the information entered on each receipt has been kept, including landed costs, lot numbers, serial numbers, and bin information. Once receipt history has been removed, the documents in the range you've removed won't be printed on the Receivings Transaction History Report.
When removing receipt history, you can remove document attachments with the receipts or just the attachments assigned to receipts. The attachments are not removed from where they are stored. The Attachments Only option is available if you are using document attachments or have attachments assigned to receipts or receipt line items.
By selecting Receipt, you also can remove purchase order returns history.
If you've marked Receipt, you can select to remove both the receipts and the account distribution history for the receipts. Distribution history is a detailed record of how receipt transactions have affected the balances of posting accounts in General Ledger. When you remove account distribution history, the audit trail code, account, account description, debit or credit amounts and other information about receipts will be removed.
Journal Select Journal to remove posting journal history. If you've selected to reprint Purchase Order Processing posting journals in the Audit Trail Codes Setup window, the system will maintain the history necessary to reprint posting journals whether you've marked to maintain history or not in the Purchase Order Processing Setup window. Once journal history has been removed, you won't be able to reprint posting journals for the range of information you're removing.
If you haven't selected to maintain purchase order and receipt history in the Purchase Order Processing Setup window, purchase orders will be deleted when they're removed using the Remove Completed Purchase Orders window. Receipts will be deleted after they've been posted unless you've selected to reprint Purchase Order Processing posting journals in the Audit Trail Codes Setup window. In this case, the system will maintain the history necessary to reprint posting journals.
If you are maintaining purchase order history, you may want to use the Remove Completed Purchase Orders window to transfer closed or canceled purchase orders to history.
Removing purchasing history
Use the Remove Purchasing History window to remove Purchase Order Processing history. You also can remove Purchase Order Returns history. When you remove history, any corresponding multicurrency information will be removed, as well.
Before removing history, back up your company's accounting data. For more information about making backups, refer to your System Administrator's Guide (Help >> Contents >> select System Administration).
To remove purchasing history
- Open the Remove Purchasing History window. (Purchasing >> Utilities >> Remove Purchasing History)
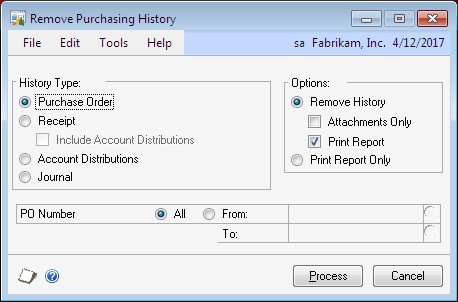
- Select a history type to remove.
If you remove purchase order history but not receipt history, you may notice that information is missing when you view your receipts. The required date, promised date, promised ship date, and comment ID information for the purchase order will not appear when you view the receipt in the Receivings Item Detail Inquiry Zoom window.
Select whether you want to remove history and print the history removal report.
To remove attachments without removing purchase order or receipt history, mark Attachments Only. This option is available if you are using document attachments or have attachments assigned to purchase orders, receipts or line items.
To print a history removal report without removing history, mark Print Report Only.
Depending on the type of history you're removing, you can print one of the following reports:
Purchase Order Transaction History Removal Report
Receivings Transaction Removal Report
Account Distribution Removal Report
Journal History Removal Report
- Using the All, From, and To fields, define a restriction.
If you enter a value in only one of the restriction fields, purchasing history will be removed from the value you enter to either the beginning or end of the records. For example, if you enter a starting value and the ending value is blank, all purchasing history from the starting value to the end of the records will be removed.
- Choose Process to remove history or to print the removal report.
If you aren't keeping history and select to print the history removal report, the report will be blank. The report also will be blank if no records exist within the range you specified.
Removing tax history
Use the Tax History Removal window to remove tax detail transactions. Only the tax history for the range you specify will be removed. Once tax history has been removed, the tax details in the range you've removed won't be printed on tax reports.
Before removing history, back up your company's accounting data. For more information about making backups in Microsoft Dynamics GP, refer to your System Administrator's Guide (Help >> Contents >> select System Administration).
To remove tax history
- Open the Tax History Removal window. (Administration >> Utilities >> Company >> Remove Tax History)
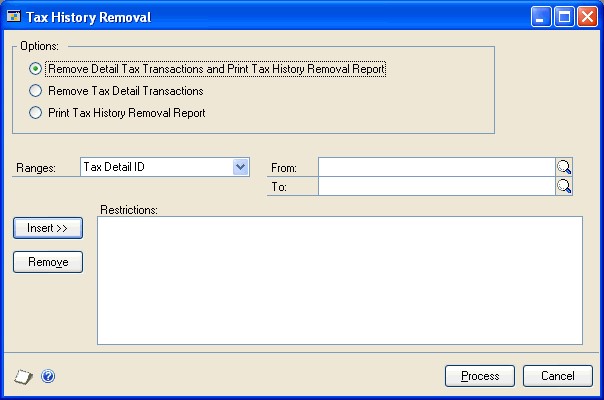
Select whether you want to remove tax detail transactions and print the Tax History Removal Report, remove the tax detail transactions, or print the Tax History Removal Report.
Enter or select a range of tax history to remove or print a report of.
Choose Insert to insert the range.
Choose Process to remove tax history. If Print Tax History Removal Report was marked, the Tax History Removal Report will print.
Removing Intrastat history
Use the Remove Intrastat History window to remove Intrastat history records that are no longer necessary. Only the Intrastat records for the range you specify will be removed.
Before removing history, back up your company's accounting data. For more information about making backups in Microsoft Dynamics GP, refer to your System Administrator's Guide (Help >> Contents >> select System Administration).
Once history has been removed, you won't be able to print the Intrastat removal reports for the ranges of information you've removed.
To remove Intrastat history
Open the Remove Intrastat History window. (Administration >> Utilities >> Company >> Remove Intrastat History)
Select a range type for the historical information you want to remove. Define the beginning and the end of the range, then choose Insert to display the range.
You can enter and insert additional ranges. However, you can enter only one range for each range type. For example, if you enter a restriction specifying that history should be deleted for customer records COMPUTER0003 through GRAHAMAR0001, you can't enter another restriction for customer IDs CONTINEN0001 through EXECUTIV0001.
- Mark Remove Transactions, then mark Print Report to print the Intrastat removal reports for the range of customer records or vendor records you've specified. Print these reports to retain a permanent record of your past Intrastat records after you've cleared history.
You can print the Intrastat removal reports without removing history. To do so, mark only Print Report and choose OK.
Chapter 28: Purchase order reconciliation
Reconciling is the process of verifying that your accounting records are accurate. Reconcile Purchase Order Processing before reconciling Payables Management or Inventory Control. It's important that the purchasing documents are correct since purchasing information may be altered and is used when reconciling inventory quantities and payables accounts.
Before reconciling purchase orders, back up your company's accounting data. For more information about making backups, refer to your System Administrator's Guide (Help >> Contents >> select System Administration).
This information is divided into the following topics:
Printing a reconcile report
Reconciling purchase orders
Printing a reconcile report
Use the Reconcile Purchasing Documents window to print the Reconcile Purchasing Documents Report without reconciling your purchasing records. You can print the report for all documents or a selected range of documents.
If you print this report before you reconcile, you can verify which documents in the range will be reconciled before you actually reconcile the records.
To print a reconcile report
- Open the Reconcile Purchasing Documents window. (Purchasing >> Utilities >> Reconcile Purchasing Documents)
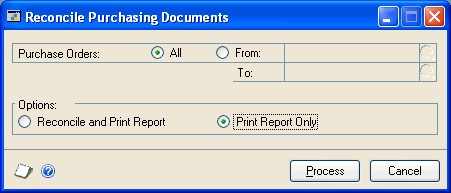
- Using the All, To, and From fields, select a document range.
If you're creating a range, you must enter at least one value in the restriction fields. If you enter a value in only one of the restriction fields, the report will show purchase orders from the value you enter to either the beginning or end of the records. For example, if you enter a starting value and the ending value is blank, all purchase orders from the starting value to the end of the records will be reconciled.
Select Print Report Only to print the Reconcile Purchasing Documents Report without reconciling.
Choose Process. When processing is complete, the Reconcile Purchasing Documents Report will be printed. This report lists the purchasing documents that will be reconciled.
If the Reconcile Purchasing Documents Report indicates that an amount will be adjusted for a specific purchasing document, review the document to verify the accuracy of the changes that were made.
Reconciling purchase orders
Use the Reconcile Purchasing Documents window to reconcile your purchasing records. You can reconcile all records or a selected range of records.
When you reconcile purchase orders, the following information will be recalculated and adjusted, if needed:
Document quantity canceled
Quantities linked to sales line items
Line item status
Purchase order status
Line item extended cost
Remaining purchase order subtotals
Document subtotals
Document extended costs
Discount available
Trade discount
Taxes
Quantity ordered for the control blanket line item on blanket purchase orders and drop-ship blanket purchase orders
To reconcile purchase orders
- Open the Reconcile Purchasing Documents window. (Purchasing >> Utilities >> Reconcile Purchasing Documents)
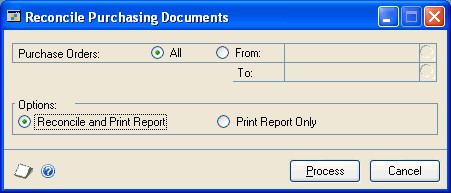
- Using the All, To, and From fields, select a document range.
If you're creating a range, you must enter at least one value in the restriction fields. If you enter a value in only one of the restriction fields, purchase orders will be reconciled from the value you enter to either the beginning or end of the records. For example, if you enter a starting value and the ending value is blank, all purchase orders from the starting value to the end of the records will be reconciled.
- Select to reconcile and print the Reconcile Purchasing Documents Report.
Select Print Report Only to print the Reconcile Purchasing Documents Report without reconciling. If you select the Print Report Only option before you reconcile and print, you can verify which documents in the range will be reconciled before you actually reconcile the documents.
- Choose Process to reconcile purchasing documents. When processing is complete, the Reconcile Purchasing Documents Report will be printed. This report lists the purchasing documents that were reconciled.
If the Reconcile Purchasing Documents Report indicates that an amount has been adjusted for a specific purchasing document, review the document to verify the accuracy of the changes that were made.
See Also
Part 1: Setup and cards
Part 2: Purchase orders
Part 3: Receipts
Part 4: Purchase order returns
Part 5: Inquiries and reports