Note
Access to this page requires authorization. You can try signing in or changing directories.
Access to this page requires authorization. You can try changing directories.
This part of the documentation contains information about entering analysis information for transactions in Microsoft Dynamics GP. This information includes the following topics:
Chapter 4, “General Ledger Transactions” describes how to enter analysis information for General Ledger transactions. It also explains how you can adjust analysis information for posted journal entries.
Chapter 5, “Payables Management Transactions” explains how to enter analysis information for Payables Management transactions.
Chapter 6, “Purchase Order Processing Transactions” explains how to enter analysis information for Purchase Order Processing transactions.
Chapter 7, “Receivables Management Transactions” describes how to enter analysis information for Receivables Management transactions.
Chapter 8, “Sales Order Processing Transactions” explains how to enter analysis information for transactions in Sales Order Processing.
Chapter 9, “Inventory Transactions” explains how to enter analysis information for Inventory transactions.
Chapter 10, “Fixed Asset Transaction” explains how to enter analysis information for Fixed Asset Transactions
*Chapter 11, “Bank Reconciliation Transactions”*explains how to enter analysis information for Bank Reconciliation transactions.
*Chapter 12, “Cashbook Bank Management Transactions”*describes how to enter analysis information for Cashbook Bank Management transactions.
*Chapter 13, “Electronic Bank Management.”*describes how to enter analysis information for Electronic Bank Management transactions.
*Chapter 14, “Direct Debits And Refunds Transactions”*describes the analysis information that is created for Direct Debits and Refunds transactions.
Chapter 15, “Analysis information for U.S. Payroll transactions” describes the analysis information that is created for U.S. Payroll transactions.
Chapter 4: General Ledger Transactions
The various procedures involved in entering analysis information for General Ledger transactions are explained here. You can enter analysis information for distribution accounts that are linked to an account class. You can also adjust analysis information for posted journal entries. Also, you can view the analysis information for a selected account or journal entry.
The reports generated using the Distribution and Multilevel queries display analysis information entered in General Ledger.
You can open the Analytical Transaction Entry window only if Analytical
Accounting has been activated. Refer to Activating Analytical Accounting for more information.
This information is divided into the following sections:
Entering analysis information for General Ledger transactions
Validating transactions and correcting errors
Entering analysis information for Quick Journals
Entering analysis information for Miscellaneous Checks
Analysis information in batches
Voiding an unposted transaction
Backing out a posted transaction
Backing out and correcting a posted transaction
Copying a posted transaction
Voiding a Quick Journal entry
Analysis information for writeoffs
Series posting and master posting
Adjusting analysis information in posted transactions
Validating adjustments and correcting errors
Viewing detail journal entries with analysis information
Viewing journal entries with analysis information
Analytical Accounting check links
Copying Analytical Accounting Information for General Journal
Entering analysis information for General Ledger transactions
Use the following information to enter analysis information for distribution accounts that are linked to an account class. You can save transactions individually or in a batch with or without analysis information.

The Analytical General Transaction Entry window opens automatically when you press TAB from a field in the Transaction Entry window (Transactions >> Financial >> General) in the following instances:
If an account is linked to an account class and no analysis information has been entered for the account earlier.
If changes are made to a distribution line that affects analysis information entered previously for the line. These include changing the account, amount or debit to credit or vice versa, as this will delete the previously entered analysis information and create a single assignment of 100 percent.
If the option Calculate Taxes in General Ledger is marked in the Company
Setup Options window (Administration >> Setup >> Company >> Company >> Options), you may need to enter analysis information for distribution accounts that are created from the Tax Entry window. If any of the new distribution accounts are linked to an account class, after the tax transactions are created from the Tax Entry window, the Analytical General Transaction Entry will open automatically from the general Transaction Entry window. If the Analytical General Transaction Entry window has been opened earlier for the distribution accounts, it displays the first of the new distribution accounts that are linked to an account class (as per the distribution sequence). If not, the first of the previous distribution accounts linked to an account class will be displayed.
If you delete a transaction in the General Ledger Transaction Entry window, any analysis information entered for the transaction is also deleted.
For multicurrency transactions, a change in the transaction date re-creates distribution amounts due to a change in the exchange rate. If the transaction date is modified, analysis information created previously is deleted when the distribution amounts are re-created.
To enter analysis information for General Ledger transactions:
Open the Analytical General Transaction Entry window. (Transactions >>Financial >> General >> Enter account/amount >> Choose the Analytical Accounting button)
(Transactions >>Financial >> General >> Enter account/amount >> Additional >> Analytical Transaction or CTRL+T)The Analytical General Transaction Entry window displays the distribution account selected in the General Transaction Entry window. To view the other distributions for the transaction, enter or select a distribution number.
The sequence of distributions in the Analytical General Transaction Entry window may not correspond to the sequence in the General Transaction Entry window because only accounts linked to an account class are displayed in the Analytical General Transaction Entry window.
The Originating or Functional Amount field displays the distribution amount in the originating or functional currency based on the option selected in the currency view.
Note
You can choose the expansion button to view multicurrency information if the originating currency differs from the functional currency. The currency icon is not displayed if the displayed distribution account is a unit account.
The Company ID field displays the ID for the current company.
The Account field displays the account related to the distribution. The expansion button will open the Microsoft Dynamics GP Account Entry window. The balance type, whether debit or credit, is also displayed.
The Assigned field displays the total distribution amount in value and percentage that has been assigned.
The Unassigned field displays the remaining distribution amount that is to be assigned in value and percentage.
In the assignment list view, an arrow before the Number field indicates that the analysis information displayed is for the selected assignment. Each assignment created for the distribution is displayed separately.
In the list window, enter the transaction distribution amount in functional or originating currency, by value or on a percentage basis.
The Number field displays the number of the assignment.
The Originating or Functional Amount field in the assignment list view, displays the assignment in the originating or the functional currency based on the option you selected in the Currency View. Enter the amount to assign in the Originating/Functional Amount field. Assignments can be entered in the functional or originating currency.
Note
You can enter the assignment either in value or percentage terms.
Enter the assignment in percentage value in the Assign% field. Initially, a single assignment is created by default. You can overwrite the assignment with more than one assignment.
You can save analysis information for a distribution even if the assignment is not 100%. However, you can post a transaction with partial assignments only if you have opted to allow partial assignments during posting for the module you’re working in. Refer to Setting up assignment options for more information.
Select an alias in the Alias field. The Alphanumeric field in the scrolling window displays the transaction dimension codes that are associated with the alias for the transaction dimensions displayed. You can change these codes if required. Refer to Creating an alias for more information.
Enter reference information for the assignment in the Reference field.
Choose Delete Row to delete a single row in the assignment List View. You cannot choose this option if only a single assignment has been entered.
Choose Remaining to add one assignment for the remaining unassigned amount. The new assignment will ensure that the total assigned amount equals the distribution amount. For example, the distribution amount is $100 and you’ve entered four assignments that total $75. When you choose Remaining, a fifth assignment for the remaining value, $25 is created. This button is not available if the distribution field is blank or has a zero value.
Choose Default to load the current setup information specified for the account class in the Accounting Class Maintenance window and create a single assignment. The following processes will occur:
Fixed, Required, and Optional Transaction Dimensions (including hidden transaction dimensions) will be installed.
All the assignments that you have created for the current distribution will be removed and create a single assignment that is equal to the distribution amount will be created.
If the analysis type is changed to or from Not Allowed, transaction dimensions will be added or removed.
Transaction dimensions that have been deleted will be removed.
The Trx Dimension field displays transaction dimensions for the account class that the distribution account is linked to. Only transaction dimensions that have been set as Required, Fixed, or Optional are displayed.
The Transaction Dimension Description field displays the description of the Transaction Dimension that you’ve entered in the Transaction Dimension Maintenance window.
Enter or select the code for each Alphanumeric transaction dimension in the Alphanumeric column. If you’ve marked the Show valid code combinations in trns and budgets option in the Analytical Accounting Options window, then the lookup window will display only those codes that have a valid combination with the codes you have already selected for the transaction.
Note
Security access to use a transaction dimension code is granted automatically to the user who created the code during transaction entry.
Enter a transaction dimension code in the Numeric, Yes/No or Date field for a Numeric, Boolean or Date type Transaction Dimension.
Choose OK to save your changes and close the window. The analysis information that you have entered is validated when you choose OK. Refer to Validating transactions and correcting errors for more information.
Choose Save to save the analysis information you have entered and clear the window. A validation takes place when you choose Save in the Analytical General Transaction Entry window. Refer to Validating transactions and correcting errors for more information. You can save the analysis information with errors or without updating changes made to the account class.
Choose Clear to clear the information from the Analytical General Transaction Entry window.
Choose Validate to validate the analysis information of the distribution displayed in the window. If changes are made to the account class in the Analytical Accounting setup or errors are found during the validation process, the Analytical Accounting Validation Log window will open where you can view the errors or changes. Refer to Validating transactions and correcting errors for more information about validation.
Choose Print to print the error report. Choose OK to close the window and return to the Analytical General Transaction Entry window.
To view the changes to the account class choose the Default button in the Analytical General Transaction Entry window. Double click on an Analytical Accounting error to open the Analytical Accounting General Transaction Entry window where the specific error will be highlighted
Choose the printer icon button to print the Analytical Accounting edit list for the current distribution displayed or for all distributions of the transaction linked to an account class. The Analytical Accounting Validation Log report which describes the Analytical Accounting errors also is printed.
If you post a reversing transaction or reverse an existing transaction, the analysis information is copied from the transaction to the reversed transaction with the change in balance type, whether debit or credit.
If you void a transaction that has been posted to General Ledger, a reversing transaction is created along with any analysis information assigned to the original transaction.
On posting Clearing Journals, analysis information that has been entered for the transactions will not be posted. Also, no validation will take place for the distribution accounts, even if the accounts are linked to an account class. To post analysis information, use the general Transaction Entry window (Transactions >> Financial >> General).
Validating transactions and correcting errors
You can validate a transaction document by selecting the transaction in the relevant
Analytical Accounting Transaction Entry window and choosing Additional >> Run Validation or by pressing CTRL+R. You can validate a transaction distribution by choosing OK, Save or Validate, only if it has an amount.
The validation process verifies the following information:
The assignments that you’ve created conform to the assignment options you have set up for the module.
Codes are specified for all transaction dimensions that have a required status.
The code combinations are valid.
All the alphanumeric codes have access to the relevant user ID and distribution account.
That accounts associated with the transaction are still linked to an account class.
The transaction dimensions and codes have not been deleted from the setup.
The multicurrency information for Analytical Accounting and Microsoft Dynamics GP is the same.
There is a distribution record and at least one assignment record for all the Microsoft Dynamics GP distributions.
All distributions, assignments and codes link to existing Microsoft Dynamics GP distribution.
Changes that were made to the analysis type of the transaction dimension are invalid.
The validation routine takes place in the following stages:
Stage one At the first stage, changes in setup are verified. If any changes have been made, then you must click the Default button in the Analytical Transaction Entry window to update the window with changes.
Stage two At the second stage, the validation routine checks whether code combinations are valid and selected codes exist and have the required access to user ID and account; if codes have been entered for required transaction dimensions and if assignments equal the transaction distribution amount. This part of validation takes place only after all errors that are indicated at the first stage have been corrected.
When you post a general transaction, a validation takes place for the entire document. The document is posted if no errors are found in the transaction.
If errors are found while posting a general entry transaction, the transaction will not be posted. The Analytical Accounting Validation Log window will open. The Microsoft Dynamics GP errors will be listed first in the window and then the Analytical Accounting errors.
We recommend that you resolve the Microsoft Dynamics GP errors before you correct the Analytical Accounting errors.
To correct an Analytical Accounting error, double-click on the relevant error to open the Analytical General Transaction Entry window. The specific distribution where the error exists is displayed.
Entering analysis information for Quick Journals
Use the following information to enter analysis information for distribution accounts in the Analytical Quick Journal Entry window. The Analytical Quick Journal window is similar to the Analytical General Transaction Entry window. Refer to Entering analysis information for General Ledger transactions for more information.
To enter analysis information for Quick Journals
Open the Analytical Quick Journal Entry window. (Transactions >> Financial >> Quick Journal >> Choose the Analytical Accounting button)
(Transactions >> Financial >> Quick Journal >> Additional >> Analytical Transaction or CTRL+T)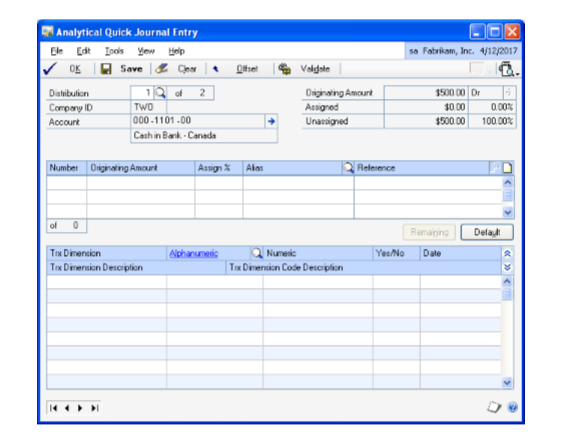
The Analytical Quick Journal Entry window will open only if you have entered an account and amount in the scrolling window of the Quick Journal Entry window.
The Analytical Quick Journal Entry window displays the first account linked to a class ID in the accounts scrolling window.
Enter or select a distribution number. If you click Offset to open the Analytical Transaction Entry window and lookup, only one distribution is displayed. If the window and lookup window are opened from the main distribution account, then only the main distribution accounts are displayed.
Choose Browse to view the remaining distributions. If you browse when the main account is displayed, you cannot view the control account distribution. Similarly, if you choose to browse when the control account is displayed, you cannot view the main account distribution.
The total number of distributions, including all accounts of the document linked to an account class is displayed in the Distribution of field.
Enter the percentage to assign in the Assign% field. You can view the total of the assignments in percentage. Assignment can be given in amount or percentage.
Select an alias in the Alias field. The Alphanumeric field in the scrolling window displays the transaction dimension codes that are associated with the alias for the transaction dimensions displayed. You can change these codes if required. Refer to Creating an alias for more information.
Enter a reference for the assignment in the Reference field.
Choose Remaining to add one assignment for the unassigned balance amount. You can assign an amount in a new assignment line and you can modify the assignment line.
Choose Default to remove all the assignments for a given distribution line and to create a new assignment amount of 100%. Refer to Entering analysis information for General Ledger transactions for more information about the Default button.
The Trx Dimension field will display transaction dimensions for the account class to which the distribution account is linked. Transaction dimensions that have been set as Required, Fixed, or Optional will be displayed.
The default transaction dimensions are displayed in the Trx Dimension Code field.
Enter the transaction dimension code for an alphanumeric transaction dimension in the Alphanumeric field. You can click the alphanumeric link to open the Transaction Dimension Code window to view information about an existing code. The Alphanumeric column is available only for an alphanumeric transaction dimension
Security access to use a transaction dimension code is granted automatically to the user who created the code during transaction entry.
Enter a transaction dimension code in the Numeric, Yes/No or Date field for a Numeric, Boolean or Date type Transaction Dimension.
Choose the Show button to view the description of the transaction dimensions in the Trx Dimension field. You can view the description of a transaction dimension code in the Trx Dimension Code Description field.
When you open the Analytical Quick Journal Entry window from any distribution line, you can use the Offset Acct. button to assign an Analytical Accounting assignment to an offset account. The Offset Acct. button is not available if the control total is zero. Control total is the net total of debits and credits.
When you click Offset Acct., the Main button becomes available. You can switch between the main and offset accounts and enter Analytical Accounting assignment by clicking this button.
If the offset account is linked to an account class, and the control total is not entered, the control total amount is calculated when you choose Post or Save and the Analytical Transaction Entry window opens.
Choose the printer icon button in the Quick Journal Entry window to print the Quick Journal Entry edit list and the Analytical Accounting edit list. A validation takes place for the entire document before the Analytical Accounting assignment in the distribution accounts is printed. Assignments with errors as well as the ones without errors will be printed.
Choose OK to save the changes and to close the window. Choose Continue to close the window or No to keep the window open.
Choose Clear to clear the entries you’ve made in the window.
When you post a quick journal, a validation takes place for the entire document. The document would be posted if no errors occur in the Microsoft Dynamics GP transaction and in the Analytical Accounting assignments. You can print the Quick Posting Journal and the Analytical Accounting posting journal reports if you close the Quick Journal Entry window after posting. Refer to Validating transactions and correcting errors for more information.
Entering analysis information for Miscellaneous Checks
Use the Analytical Miscellaneous Check Entry window to enter analysis information for the distribution accounts used in miscellaneous checks. You can create assignments, enter transaction dimension codes and references for accounts that are linked to an account class. The Analytical Miscellaneous Check Entry window does not support multicurrency since miscellaneous checks do not support multicurrency.
The Analytical Miscellaneous Check Entry window opens automatically when you press TAB in the Miscellaneous Checks (Transactions >> Financial >> Miscellaneous Checks) window in the following instances:
If an account is linked to an account class and no analysis information has been entered for the account earlier.
If changes are made to a distribution line that affects analysis information such as account or amount or type of amount created previously for such line.
The analysis information is deleted if the distribution line is deleted, and you do not post the document. The analysis information you’ve entered is validated before you post the transaction. Refer to Validating transactions and correcting errors for more information.
Note
The analytical information for miscellaneous checks cannot be voided since you cannot void miscellaneous checks.
To enter analysis information for Miscellaneous Checks:
Open the Analytical Miscellaneous Check Entry window. (Transactions >> Financial >> Miscellaneous Check >> CTRL+T or Additional >>Analytical Transaction)
Refer to Entering analysis information for General Ledger transactions for more information.IMAGE – AAMC.jpg
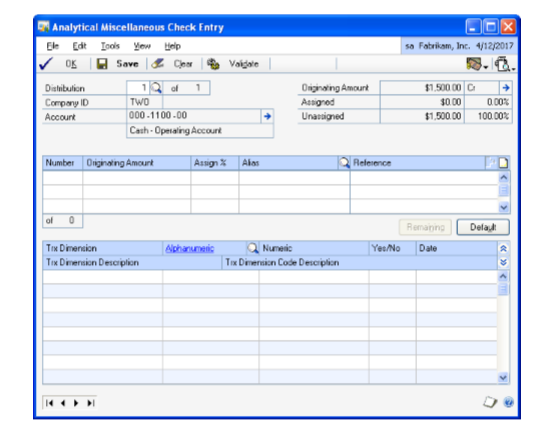
A screenshot of a computer Description automatically generated
- You can also edit the analysis information you’ve entered in the Analytical Miscellaneous Check Entry window before you post the transaction.
Analysis information in batches
The following section deals with information specific to batches. To enter analysis information for individual transactions, refer to Entering analysis information for General Ledger transactions .
To print the Analytical Accounting Edit List and Analytical Accounting error list along with the Microsoft Dynamics GP edit list for a selected batch, choose the printer icon button in the Analytical Transaction Entry window. You can correct the Analytical Accounting errors by selecting the batch and then correcting each of the transactions that have errors.
When you post a batch from the Batch Entry window (Transactions >> Financial >> Batches), a validation will take place for all the transactions saved in the batch. Microsoft Dynamics GP and Analytical Accounting transactions without errors will be posted and the Analytical Accounting General Posting report will be printed along with the Microsoft Dynamics GP reports. If errors are found during the validation process, an error list report is printed listing analysis errors for the transaction distributions in the batch being posted. You can correct the errors by modifying the transactions in the window where the transaction originated from.
If you delete a single or recurring use batch or a transaction within such batches, the analysis information entered for the transaction distributions in the batch or for the transaction also will be deleted.
You can save a transaction in a batch with Analytical Accounting errors but cannot post the transaction.
For a recurring batch, the analysis information of the batch last posted will be retained and will update each subsequent batch that is posted, unless changes are made to the analysis information in the batch.
Analysis information that originated in the subsidiary modules can be viewed in the General Ledger. Such information can be modified prior to updating General Ledger.
Voiding an unposted transaction
You can void a transaction saved in General Ledger using the Transaction Entry window. You also can void transactions that originated in other modules in this window, if you’ve marked the Void/Correcting of Subsidiary Transactions option in the General Ledger Setup window (Administration >> Setup >> Financial >> General Ledger). The analysis information for the transaction voided in the General Ledger will not be updated in the subsidiary module.
When you void a transaction with analysis information and close the Transaction Entry window, the Analytical Accounting Posting Journal will be printed along with the Microsoft Dynamics GP Posting Journal. The Analytical Accounting Posting Journal will only display the journal number and the account for the transaction. When you void a transaction in a batch, the analysis information for the voided transaction will be deleted.
Backing out a posted transaction
You can back out a transaction posted in General Ledger using the General Ledger Transaction Entry window. You also can back out a posted transaction that originated in a subsidiary module using the Transaction Entry window, if you’ve marked the Void/Correcting of Subsidiary Transactions option in the General Ledger Setup window (Administration >> Setup >> Financial >> General Ledger).
When you back out a posted transaction with analysis information, the transaction dimension codes in the posted transaction will be copied from the backed out transaction to the new transaction that is created. You cannot open the Analytical General Transaction Entry window for the backed out transaction. The analysis information will not be validated when you post the backed out transaction.
Backing out and correcting a posted transaction
You can back out and correct a transaction posted in General Ledger using the General Ledger Transaction Entry window. You can also back out and correct a posted transaction that originated in a subsidiary module in this window, if you’ve marked the Void/Correcting of Subsidiary Transactions option in the General Ledger Setup window (Administration >> Setup >> Financial >> General Ledger).
When you back out and correct a posted transaction with analysis information, the transaction dimension codes in the posted transaction will be copied to the reversing transaction that is created. You cannot open the Analytical General Transaction Entry window for the backed out transaction. The analysis information will not be validated when you post the backed out transaction.
Also, a new correcting transaction is created using the debits and credits of the original transaction. However, the analysis information will not be copied to the correcting transaction, which will be treated as a new transaction. You need to enter analysis information for the new transaction in General Ledger. Refer to Entering analysis information for General Ledger transactions for more information.
Copying a posted transaction
When you copy a saved or posted transaction, the analysis information for the source transaction will not be copied to the new transaction. You need to enter analysis information for the new transaction in the General Ledger. Refer to Entering analysis information for General Ledger transactions for more information.
Voiding a Quick Journal entry
You can void a saved Quick Journal entry using the Quick Journal Entry window.
When you void a transaction with analysis information and close the Quick Journal Entry window, the Analytical Accounting Posting Journal will be printed along with the Microsoft Dynamics GP Posting Journal. The Analytical Accounting Posting Journal will display only the journal number and the account for the transaction. When you void a transaction in a batch, the analysis information for the voided transaction will be deleted.
Analysis information for writeoffs
When you process writeoffs for underpayments or overpayments, the Analytical Accounting validation process will take place. If the distribution accounts for the writeoffs are linked to an account class ID, the default analysis codes for the account class will be loaded for the distribution accounts. The Analytical Accounting validation will not run if the distributions are linked to an account class ID, but the default codes for the account class ID to which the distributions are linked are not specified.
The Analytical Transaction Entry window will not open when you process writeoffs from the Write Off Documents window. A single assignment of 100 percent will be created for every distribution account that is linked to an account class.
When you process writeoffs, the Analytical Accounting Posting Journal is printed, along with the Microsoft Dynamics GP Posting Journal, if you have marked the option to print the report in the Posting Setup window (Administration >> Setup >> Posting >> Posting).
If you have marked the Post Through GL option for Receivables Apply Docs in the
Posting Setup window, the Analytical Accounting validation takes place and the
Analytical Accounting Posting Journal is printed along with the Microsoft Dynamics GP Posting Journal when you process a writeoff. If the default codes for the distribution accounts linked to an account class are not entered, the Analytical Validation log will be printed displaying the errors, and the transaction will not be posted to the General Ledger.
Series posting and master posting
When you select multiple batches to post from the Series Posting or Master Posting window, batches with analysis information are validated. If errors are found in the batch, the status of the batch automatically changes to available.
When you choose the Mark All button, only General Ledger batches without Analytical Accounting errors are selected. You can print the Analytical Error Log to view and correct the Analytical Accounting errors in the other General Ledger batches, before you can select them for posting.
The Analytical Accounting Posting Journal is printed for all transactions that have been successfully posted in each batch.
Adjusting analysis information in posted transactions
You can enter or edit analysis information for all journal entries posted from General Ledger, irrespective of their originating module.
In the case of Balance Brought forward journal entries, you can enter the analysis values only for transaction dimensions other than alphanumeric. The analysis data for alphanumeric transaction dimensions is consolidated and brought forward when you perform the year-end close. Refer to Year-end close for Analytical Accounting for more information.
You can also change the number of assignments and the value of each assignment for entries that have existing analysis information. Thus, any analysis information that you have entered for a posted transaction in a module, say, Receivables Management or Payables Management, can be adjusted after you’ve posted the transaction from General Ledger. You can add or remove transaction dimensions, and also change the transaction dimension codes for those dimensions that have the Allow Adjustments option marked on the Transaction Dimension Maintenance window. Refer to Defining transaction dimensions for more information.
You can modify the analysis information for a journal entry as often as required. Once you post an adjustment, the analysis information that you’ve entered will override the previous analysis information.
Note
Analytical information can be adjusted only for those distribution accounts of a journal entry that are linked to an accounting class at the time of adjustment.
To adjust analysis information in posted transactions:
Open the Analytical Adjustment Entry window. (Transactions >> Financial >> Analytical Accounting >> Edit Analysis)
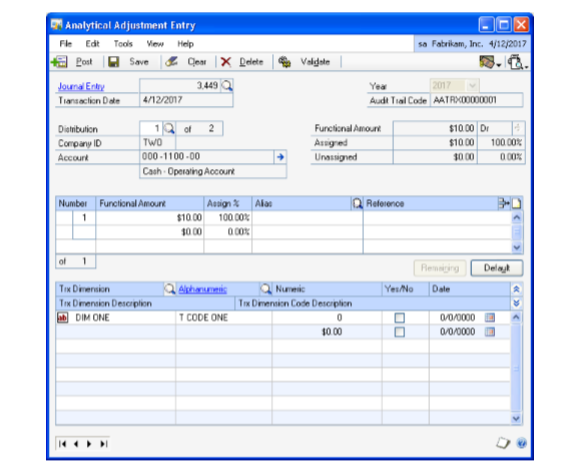
Enter the open year for which to view transactions. All open years for the company are listed in the drop down.
Enter or select the journal entry number for which to enter or edit the analysis information. The following values default on selecting a journal entry:
The Transaction Date field displays the transaction date of the journal entry. Any adjustments to the analysis information will also have the transaction date.
The Audit Trail Code field displays the Analytical Accounting audit trail code if the selected journal entry has existing analysis information. This field is blank if no analysis information exists for the selected journal entry.
The Distribution field displays the first distribution account of the selected journal entry. You can view all distributions for a journal entry, however, you can adjust analysis information only for those distributions that are linked to an accounting class.
The Originating or Functional Amount field displays the distribution amount in the originating or functional currency based on the option selected in the currency view. You cannot edit this amount.
Tip
Choose the expansion button to view multicurrency information if the originating currency differs from the functional currency. If the Analytical Adjustment Entry window is opened for a unit account, the currency icon is not displayed. You cannot edit the multicurrency information, and conversions for adjusted assignments will take place using the same rate.
The Company ID field displays the ID for the current company.
The Account field displays the account related to the distribution. The expansion button will open the Microsoft Dynamics GP Account Entry window. The balance type, whether debit or credit, is also displayed.
The Assigned field displays the total distribution amount in value and percentage that has been assigned. This field is blank if no analysis information exists for the selected journal entry.
The Unassigned field displays the distribution amount that is not assigned in value and percentage.
In the assignment list view, enter the transaction distribution amount for an assignment in functional or originating currency, by value or on a percentage basis. Each assignment created for the distribution is displayed separately.
The Number field displays the number of the assignment. When you enter a new assignment for an account that already has one assignment, the analytical information from the first assignment automatically defaults on to the new assignment. You can edit this information.
An arrow before the Number field indicates that the analysis information displayed is for the selected assignment.
The Originating or Functional Amount field displays the assignments originally posted for the selected account. Enter or edit the amount assigned in the Originating/Functional Amount field. You can enter assignments in the functional or originating currency based on the option you selected in the Currency View.
The Assign% field displays the assignments originally posted for the selected account. You can overwrite these assignments.
You can enter the assignment either in value or percentage terms.
Alias field Displays the alias. The Alphanumeric field in the scrolling window displays the transaction dimension codes that are associated with the alias for the transaction dimensions displayed. You can change these codes if required. Refer to Creating an alias for more information.
The Reference field displays the information entered for the existing assignments. You can change this information for existing assignments, and add new reference information for any new assignments that you create.
The assignment option you’ve saved for General Ledger determines whether the distribution amount must be assigned fully, or can be assigned partially. Refer to Setting up assignment options for more information.
Choose Delete Row to delete a selected row in the assignment list view. You cannot choose this option if only a single assignment has been entered.
Choose Remaining to add one assignment for the remaining unassigned amount. The new assignment will ensure that the total assigned amount equals the distribution amount. For example, the distribution amount is $100 and you’ve entered four assignments that total $75. When you choose Remaining, a fifth assignment for the remaining value, $25 is created. This button is not available if the distribution field is blank or has a zero value.
Choose Default to load the current setup information specified for the account class in the Accounting Class Maintenance window and create a single assignment. The following processes will occur:
Fixed, Required, and Optional Transaction Dimensions (including hidden transaction dimensions) will be installed.
All the assignments that you have created for the current distribution will be removed and a single assignment that is equal to the distribution amount will be created.
If the analysis type is changed to or from Not Allowed, transaction dimensions will be added or removed.
Transaction dimensions that have been deleted will be removed.
Enter or select an existing transaction dimension in the Trx. Dimension field to add it to the analytical account if required. You can only select transaction dimensions whose analysis type is set as Required, Fixed, or Optional for the account class that the distribution account is linked to.
You can also remove a transaction dimension from the scrolling window if it is no longer needed.
The Transaction Dimension Description field displays the description of each Transaction Dimension that is listed.
Enter or edit the transaction dimension code for each transaction dimension listed in the Trx Dimension field if required. Entering a code is optional, except for those transaction dimensions that have the analysis type set to Required.
You can add new alphanumeric codes on the fly if you’ve selected that option in the Transaction Dimension Maintenance window. You can only edit an alphanumeric code that the user ID you’re logged in as and the selected distribution account, both have access to. Refer to Setting up user access to codes , and Setting up account access to codes for more information.
Choose Validate to validate the analysis information of the analytical account displayed in the window. The Analytical Accounting Validation Log Report is displayed if errors are found in the analysis information entered. Refer to Validating adjustments and correcting errors for more information.
Choose the printer icon to print the Analytical Adjustment Entry edit list for the current distribution displayed or for all distributions of the journal entry that can be adjusted. The Analytical Accounting Validation Log report which describes the Analytical Accounting errors also is printed if errors exist.
Choose Clear to clear all the values entered that you’ve not saved. If you’ve saved any changes to a selected journal entry, you cannot clear this window until you’ve posted or deleted such saved changes.
Choose Save to save the changes you’ve made to the analysis information of all the analytical accounts of the journal entry. You can only save changes for one journal entry at a time. You must post or delete these changes before you can make changes to another journal entry.
The analysis information that you have entered is validated when you choose Save. You can save with errors, but you cannot post until all the errors have been corrected.
Choose Post to post your changes and close the window. The analysis information that you have entered is validated when you choose Post. You can post a partial assignment if you have allowed partial assignments in General Ledger on the Assignment Setup window.
Note
Until you post an adjustment, the analysis information last posted with the journal entry will be available for inquiry and reporting.
Choose Delete to delete any adjusted analytical information for the journal entry. Any analytical information entered for the journal entry when it was last posted will be retained.
Validating adjustments and correcting errors
You can validate an adjustment by choosing the Additional >> Run Validation or by pressing CTRL+R. You can also validate an adjustment by choosing the OK, Save or Validate buttons.
If errors are found while posting, the adjustment will not be posted. The Analytical Accounting Validation Log window will open, listing all the errors found.
To correct an Analytical Accounting error, double-click on the relevant error to open the Analytical Adjustment Entry window. The specific distribution where the error exists is displayed. You can post the adjustment only after all the errors have been resolved.
The validation process verifies the following information for each analytical account that has been adjusted:
The transaction dimensions of the analytical account are active or have not been deleted.
Transaction dimension codes have been entered for all those transaction dimensions where Code Required During Adjustment has been marked on the Transaction Dimension Maintenance window.
The transaction dimension codes used are active.
The analytical account has access to the transaction dimension codes that have been entered.
The user making the adjustments has access to the transaction dimension codes that have been entered.
The combination between the transaction dimension codes of the alphanumeric transaction dimensions is valid.
If Full Assignment is opted for in General Ledger, then the total of all assignments entered for the analytical account equals the distribution amount of the account.
Viewing detail journal entries with analysis information
Use the Analytical Accounting Detail Journal Entry Inquiry window to view analysis information of an account for the current year or for a closed year from the Transaction Entry Zoom window. Refer to Transferring analysis information for closed years to history for more information on year end closing process.
This window only will display those distribution accounts of a Journal Entry that comprise analysis information.
To view detail journal entries with analysis information:
Open the Analytical Accounting – Detail Journal Entry Inquiry window. (Inquiry >> Financial >> Detail >> Select an account and Year >> Click the Journal Entry link >> Select account >> CTRL+T)
(Inquiry >> Financial >> History Detail >> Select an account and Year >> Click the Journal Entry link >> Select account >> CTRL+T)The Analytical Detail Inquiry window displays all analysis information that has been entered for the distribution account. The Journal Entry field displays the Journal Number.
The Reporting Ledger field displays the reporting ledger assigned to the General Ledger transaction in the General Ledger transaction entry window (Transactions >> Financial >> General). Refer to the General Ledger documentation for more information.
This field is available only if you have marked the Allow check box for the Reporting Ledger option in the General Ledger Setup window (Administration >> Setup >> Financial >> General Ledger).
Enter or select a distribution for the Journal Entry.
The Account field displays the account related to the distribution. Choose the expansion button to open the Microsoft Dynamics GP Account Entry window.
The Audit Trail Code field displays the Analytical Accounting Audit Trail Code.
Note
An Audit Trail Code is created for each Journal Entry made in Analytical Accounting. This Audit Trail is separate from the one created by Dynamics GP.
The Transaction Date field displays the transaction date of the selected Journal Entry
The Company ID field displays the ID for the current company.
The Originating or Functional Amount field displays the distribution amount in the originating or functional currency based on the option selected in the Currency View. Choose the expansion button to view multicurrency information if the originating currency differs from the functional currency. When the Analytical Accounting-Journal Entry Inquiry window is opened for Unit Accounts, the currency information will not be available.
Choose Expand to display all analysis information entered for the distribution account in the list window which includes assignments, reference information entered per assignment, transaction dimensions and their codes.
Choose Collapse to display analysis information entered per assignment.
You also can view all information entered for each assignment or just reference information that may exist. Choose the plus button (+) available next to each assignment to view all analysis information entered for an assignment or choose the minus button (-) to view only reference information.
Viewing journal entries with analysis information
You can view analysis information for posted transactions in the Analytical Accounting Journal Entry Inquiry window.
To view journal entries with analysis information:
Open the Analytical Accounting-Journal Entry Inquiry window. (Inquiry >> Financial >> Journal Entry Inquiry >> CTRL+T)
(Inquiry >> Financial >> Analytical Accounting >> Journal Entry)The Journal Entry field displays the Journal Number selected. Enter or select a Journal Entry Number of an open Year.
The Reporting Ledger field displays the reporting ledger assigned to the General Ledger transaction in the General Ledger transaction entry window (Transactions >> Financial >> General). Refer to the General Ledger documentation for more information.
This field is available only if you have marked the Allow check box for the Reporting Ledger option in the General Ledger Setup window (Administration >> Setup >> Financial >> General Ledger).
You can browse and sort by the following options:
Journal Entry You can browse analysis information entered for each Journal Entry.
Audit Trail Code You can browse analysis information based on the Audit Trail Code of a Journal Entry.
Posting Date You can browse analysis information by Posting Date.
Choose OK to close the window.
Analytical Accounting check links
Checking links examines tables, checking corresponding information in related tables in Analytical Accounting and Microsoft Dynamics GP and, if possible, changing the data to match the corresponding data in a table.
To check links:
Ensure that all users are logged out of Microsoft Dynamics GP. To view which users are in the Microsoft Dynamics GP system and where, choose Administration >> Setup >> System >> User Activity.
Take a backup of all your databases.
Always take a backup before checking links.
Open the Analytical Accounting Check Links window
(Administration >> Maintenance >> Analytical Accounting Check Links).Select the table groups to check links for, whether AA Open and History Transactions, AA Work Transactions, or both.
Choose Insert to insert the highlighted logical tables in the Selected Tables list.
Choose All to Insert all files from the Logical Tables list into the Selected Tables list so you can check links for all files.
Choose Remove to remove any table from the Selected Tables list, highlight the table name and choose Remove.
Choose Preview to print the AA File Maintenance Error Log Report - Preview.
Choose Cancel to Close the window. If you inserted table group names into the Selected Tables list.
Total Number of records field displays the total number of records within the tables in the Selected Tables list.
Choose Process to check links for the selected tables and print the Check Links Report.
The Report Destination window will appear, and you can specify where the Check Links Report should be printed. If you mark File, select the appropriate table format and enter the report file name.
The Check Links Report will display any information that was re-created. We recommend that you send the Check Links Report to the screen, and then print it if necessary, because it may be very large. Each report can only be printed once each time you check links, so its a good idea to send the report to a file as well.
To determine what information to re-enter, use the Table Descriptions window (Administration >> Resource Descriptions >> Tables) to view information for the table you checked links for, then use a window that accesses the table to reenter information.
Tip
You may want to create a report using Report Writer that lists all fields included in the table that you checked links for. This report can serve as a valuable reference tool. For more information, refer to the Report Writer manual.
Copying Analytical Accounting Information for General Journal
Use the Copy Journal Entry window to copy analytical accounting information for posted transaction.
To copy analytical accounting information for general journal:
- Open copy the Transaction Entry window.
(Transactions >>Financial >> General)
Choose Copy. The Copy Journal Entry window will open.
In the Copy Journal Entry window, select the year that the transaction you’re copying was posted.
Select the journal entry number for the transaction that you’re copying.
Mark the Copy Analytical Accounting information option.
Choose OK. The Copy Journal Entry window will close. The new transaction will appear in the Transaction entry window along with the analytical accounting information. Modify the analytical accounting information as necessary.
Chapter 5: Payables Management Transactions
You can enter and view analysis information for transactions in Payables Management. You can create assignments, enter transaction dimension codes, and also view analysis information created for a document. You also can save transactions with analysis information to a single or recurring batch before posting the batch. Analysis information created for transactions can be validated at any time before they are posted.
You can open the Analytical Transaction Entry window only if Analytical
Accounting has been activated. Refer to Activating Analytical Accounting for more information about activating Analytical Accounting.
This information is divided into the following sections:
Entering analysis information for payables transactions
Entering analysis information for manual payments
Processing batches of computer checks with analysis information
Entering analysis information while applying documents
Unapplying a document
Applying unposted credit memos, returns and payments
Unapplying unposted credit memos, returns and payments
Voiding documents with analysis information
Viewing analysis information for payables transactions
Entering analysis information for payables transactions
You can create assignments and enter transaction dimension codes for accounts that are linked to an account class from the Payables Transaction Entry window. This information can be entered in the Analytical Payables Transaction Entry window.
The Analytical Payables Transaction Entry window opens automatically from the Payables Transaction Entry Distribution window in the following instances:
If the account is linked to an account class and the Analytical Payables Transaction Entry window has not been opened even once for the account.
If changes are made to a distribution line that affects analysis information such as account or amount or type of amount created previously for such line.
If you delete a document from the Payables Transaction Entry window, the analysis information that exists for the document will also be deleted.
In case of multicurrency transactions, a change in the transaction date re-creates distributions due to a change in the exchange rate. Analysis information entered previously is deleted when the distributions are re-created.
If you select Default in the Payables Transaction Entry Distribution window, all analysis information created for the document will be deleted.
To enter analysis information for payables transactions:
Open the Analytical Payables Transaction Entry window. (Transactions >> Purchasing >> Transaction Entry >> Choose the Analytical Accounting button)
(Transactions >> Purchasing >> Transaction Entry >> CTRL+T or Additional >>Analytical Transaction)
(Transactions >> Purchasing >> Transaction Entry >> Tax expansion button >>CTRL+T or Additional >> Analytical Transaction)
(Transactions >> Purchasing >> Transaction Entry >> Distributions button >> CTRL+T or Additional >> Analytical Transaction)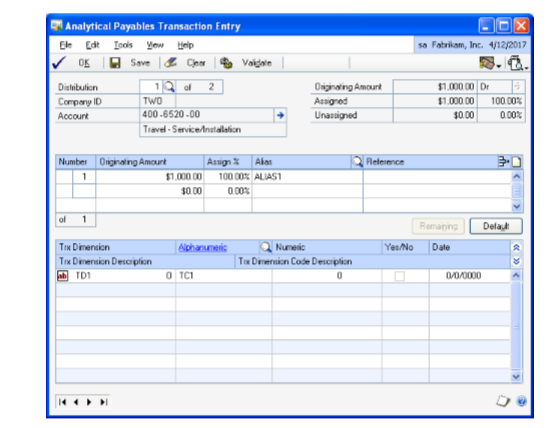
Refer to Entering analysis information for General Ledger transactions for more information about entering the analysis information.
Entering analysis information for manual payments
You can also enter analysis information for manual payments using the Analytical Payables Manual Payment Entry window.
If you delete a document from the Payables Manual Payment Entry window, the analysis information that exists for the document also will be deleted.
In case of multicurrency transactions, a change in the transaction date re-creates distributions due to a change in the exchange rate. Analysis information entered earlier is deleted when the distributions are re-created.
If you select Default on Payables Transaction Entry Distribution window, all analysis information created for the document will be deleted.
The Analytical Payables Manual Payment Entry window will open automatically from the Payables Transaction Entry Distribution window, when you press TAB from a row in the following instances:
• If the account is linked to an account class and the Analytical Payables Manual Payment Entry window has never been opened for the account.
• If changes are made to a distribution line that affects analysis information entered previously for the line. These include changing the account, amount or debit to credit or vice versa, as this will delete the previously entered analysis information and create a single assignment of 100 percent.
To enter analysis information for manual payments:
- Open the Analytical Payables Manual Payment Entry window.
(Transactions >> Purchasing >> Manual Payments >> Choose the
Analytical Accounting button)
(Transactions >> Purchasing >> Manual Payments >> CTRL+T or Additional>>Analytical Transaction)
(Transactions >> Purchasing >> Manual Payments >> Distributions >> CTRL+T or Additional >> Analytical Transaction)
IMAGE – AAPMT.jpg
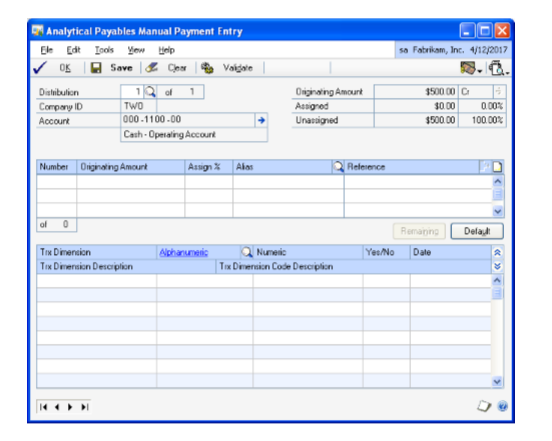
The Analytical Payables Transaction Entry window displays the distribution account selected. To view other distributions, enter or select a distribution number.
- Refer to Entering analysis information for General Ledger transactions for more information about the entering analysis information.
Processing batches of computer checks with analysis information
You can enter analysis information for distributions that are created after a computer check run only in the General Ledger. The Analytical Transaction Entry window cannot be opened from any of the Microsoft Dynamics GP windows where computer checks are posted.
For computer checks, the option Post Through General Ledger files under Posting Setup will not be available. This is to ensure that analysis information for distribution accounts linked to an account class is created before updating General Ledger History.
A verification takes place to check if any of the distribution accounts are linked to an account class in the following instances:
- When you print checks from the Print Payables Checks window
(Transactions >> Purchasing >> Print Checks)
- When you post a batch from the Post Payables Checks window
(Transactions >> Purchasing >> Post Checks)
- When you post a batch from the Process Payables Checks window
(Transactions >> Purchasing >> Process Remittance)
If the distribution accounts are linked to an account class, then the default codes that are set for the account class will be assigned to these distribution accounts. A single assignment will be created for each distribution account that is linked to an account class.
There will be no Analytical Accounting validation during a computer check run or while printing a cheque.
If you void checks in the Post Payables Check window, all the distributions for the payment will be deleted in Microsoft Dynamics GP and the payment will move to history. Any analysis information that exists for the payment will also be deleted.
Entering analysis information while applying documents
You can enter analysis information for distributions, if any, created after posted payments, credit memos and returns documents are applied in the Apply Payables Documents window (Transactions >> Purchasing >> Apply To). You can enter analysis information in the Analytical Apply Payables Documents window.
Analysis information can be entered for distributions created for terms taken, writeoffs, realized gain or realized loss when posted credit documents, returns and payments are applied against invoices, if the distribution accounts are linked to an account class in the Analytical Apply Payables Documents window. The Analytical Apply Payables Documents window will open when you choose OK in the Apply Payables Documents window. This would be applicable even if distributions are created after transactions are auto applied.
The Analytical Apply Payables Document window will also open if you change the Customer ID or Document No. in the Apply Payables Documents window.
If the Analytical Apply Payables Documents window has been opened at least once, you can open it any time thereafter by pressing CTRL+T or choosing Additional >> Analytical Transaction before the distributions are posted.
The Analytical Apply Payables Documents window will open displaying the first of the distribution accounts created during the process of apply that have been linked to an account class.
If you’ve marked the Show valid code combinations in trns and budgets option in the Analytical Accounting Options window, then the lookup window will display only those codes that have a valid combination with the codes you have already selected for the transaction.
Refer to Entering analysis information for payables transactions for more information about entering analysis information.
Unapplying a document
When you unapply posted credit memos, returns or payments, the entries relating to terms taken, write offs, realized gain or loss are reversed. Analysis information must be entered for these distribution accounts if they are linked to an account class. You can enter analysis information in the Analytical Apply Payables Documents window. The window opens when you choose OK in the Apply Payables Documents window.
The analysis information entered for distribution accounts relating to terms taken, write offs, realized gain or loss will be validated before these entries are posted. Errors detected will be displayed in the Analytical Accounting Validation Log.
You will not be able to close the Apply Payables Document window without entering all required analysis information for the distribution accounts linked to an account class.
Applying unposted credit memos, returns and payments
You can enter analysis information for credit memos, returns and payments applied in the Payables Transaction Entry and Payables Manual Payment Entry windows using the Analytical Payables Transaction Entry or Analytical Payables Manual Payment Entry windows. The Analytical Payables Transaction Entry or Analytical Payables Manual Payment Entry windows will open when you select OK in the Apply Payables Documents window.
Analysis information entered for the Accounts Payable account in the Payables Transaction Entry or Manual Payments Entry windows before the credit memo, return or payment is applied, will be deleted if distributions are created for terms taken, write offs, and realized gain or loss.
Unapplying unposted credit memos, returns and payments
If you unapply unposted credit memos, returns and payments that were applied, prior to posting, analysis information entered for the distribution accounts relating to terms taken, write offs and realized gain or loss accounts will be deleted.
Voiding documents with analysis information
When you void documents in the Void Historical Payables Transaction window
(Transactions >> Purchasing >> Void Historical Transaction) or the Void Open Payables Transaction window (Transactions >> Purchasing >> Void Open Transaction), all analysis information entered for the document during transaction entry will be copied with the exception of the balance type of each distribution account linked to an account class. The balance type of each distribution account will be reversed.
The Analytical Transaction Entry window cannot be opened prior to voiding a document in the Void Historical Payables Transaction or Void Open Payables Transaction windows.
The Analytical Accounting Posting Journal will print after the Microsoft Dynamics GP reports, if you’ve selected the option under Posting Setup. This report will display all analysis information for the voided transaction.
Viewing analysis information for payables transactions
You can view analysis information for payables transactions in the Analytical Payables Transaction Entry zoom window. The Analytical inquiry window will only display distribution accounts of a document that are linked to an account class.
To view analysis information for payables transactions:
Open the Analytical Payables Transaction Entry zoom window. (Inquiry >> Purchasing >> Transaction by Vendor/Document >> Select a document and zoom on the Document Number >> Additional >> Analytical Transaction)
(Inquiry >> Purchasing >> Transaction by Vendor/Document >> Select document and zoom to Document Number >> Distributions button >> Additional >> Analytical Transaction)The Analytical Payables Transaction Entry zoom window displays all analysis information created for a distribution account.
Refer to Viewing analysis information for Purchase Order Processing documents for more information about viewing analysis information for transactions.
Chapter 6: Purchase Order Processing Transactions
You can enter analysis information for transactions in Purchase Order Processing and save analysis information for a batch.
This information is divided into the following sections:
Entering analysis information for purchase orders and receipts
Entering analysis information for purchase orders
Analysis information for adjusting entries
Posting transactions with analysis information
Posting a batch with analysis information
Posting through to General Ledger for transaction posting
Viewing analysis information for Purchase Order Processing documents
Viewing analysis information for purchase orders
Copying Analytical Accounting Information for Purchase Order or Purchase Order Line Items
Entering analysis information for purchase orders and receipts
The Analytical Receivings Transaction Entry and the Analytical Purchasing Invoice Entry windows will open automatically when you press TAB from a row in the Payables Transaction Distribution Entry window in the following instances:
If the account is linked to an account class and the Analytical Transaction Entry window has not been opened even once for the account.
If changes are made to a distribution line that affects analysis information entered previously for such line. These include changing the account or amount or debit to credit or credit to debit, as this will delete the previously entered analysis information and create a single assignment of 100 percent.
If you delete a document in the Receivings Transaction Entry window or the Purchasing Invoice Entry window, the analysis information entered for the document also will be deleted.
If you void an unposted document in the Receivings Transaction Entry or Purchasing Invoice Entry windows, analysis information created for the document will be deleted.
In case of multicurrency transactions, a change in the transaction date re-creates distributions due to a change in the exchange rate. If the transaction date is altered, analysis information created previously is deleted when the distributions are recreated.
To enter analysis information for purchase orders and receipts:
Open the Analytical Receivings Transaction Entry or Analytical Purchasing Invoice Entry windows. (Transactions >> Purchasing >> Receivings Transaction Entry >> Choose the Analytical Accounting button)
(Transactions >> Purchasing >> Receivings Transaction Entry >> Enter vendor item >> CTRL+T or Additional >> Analytical Transaction)
(Transactions >> Purchasing >> Enter/Match Invoice >> Choose the Analytical Accounting button)
(Transactions >> Purchasing >> Enter/Match Invoice >> Enter quantity invoiced >> CTRL+T or Additional >> Analytical Transaction)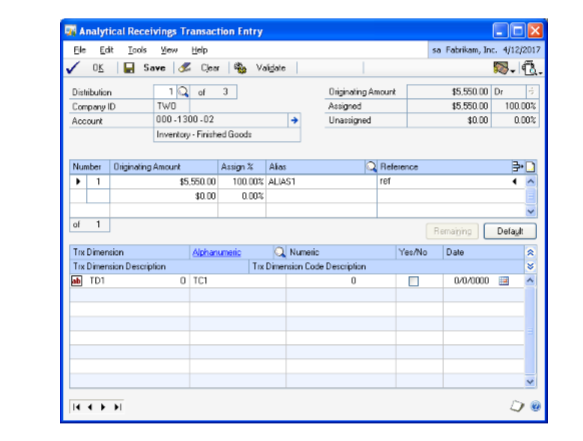
Refer to Entering analysis information for General Ledger transactions for more information on entering analysis information for transactions.
You can validate a transaction by pressing CTRL+T or by choosing Additional>> Run Validation in the following windows:
Payables Transaction Entry
Payables Manual Payments Entry
Apply Payables Documents
Receivings Transaction Entry
Purchasing Invoice Entry
Refer to Validating transactions and correcting errors for more information about validation.
If errors are detected in the transaction, the Analytical Accounting Validation Log window will open displaying all errors detected by the validation routine.
Tip
You can select View >> Incomplete or Erroneous Distributions, to browse through the distribution accounts in the Analytical Transaction Entry window which are incomplete or have erroneous information.
Entering analysis information for purchase orders
You can enter analysis information for inventory, purchases or drop ship accounts linked to a line item while entering a purchase order. The information will default when you receive these line items in the Receivings Transaction Entry window.
You can open the Analytical Purchase Order Entry window from the Purchasing Item Detail Entry window in the following instance if the account is linked to an account class:
• If changes are made to a distribution line that affects analysis information such as account or amount entered previously for such line. This will delete and refresh the previously entered analysis information and create a single assignment of 100 percent.
If you delete a document or a distribution line in the Purchase Order Entry or the Purchasing Item Detail Entry window, the analysis information entered for the same will also be deleted.
You cannot edit the Purchase Order Entry or the Purchasing Item Detail Entry window while the Analytical Purchase Order Entry window is open.
In the case of multicurrency transactions, a change in the transaction date re-creates distributions due to a change in the exchange rate. If the transaction date is altered, analysis information created previously is deleted when the distributions are recreated.
Note
Analysis information is not copied when you choose to copy PO lines from another PO to the current PO. You must enter fresh analytical information for the new purchase order.
To enter analysis information for purchase orders:
Open the Analytical Purchase Order Entry window. (Transactions >> Purchasing >> Purchase Order Entry >> Enter or select a purchase order >> Choose the Analytical Accounting button)
(Transactions >> Purchasing >> Purchase Order Entry >> Enter or select a purchase order >> CTRL+T or Additional >> Analytical Transaction) (Transactions >> Purchasing >> Purchase Order Entry >> Enter or select a purchase order >> Item or Vendor Item expansion button >> Choose the Analytical Accounting button)
(Transactions >> Purchasing >> Purchase Order Entry >> Enter or select a purchase order >> Item or Vendor Item expansion button >> CTRL+T or Additional >> Analytical Transaction)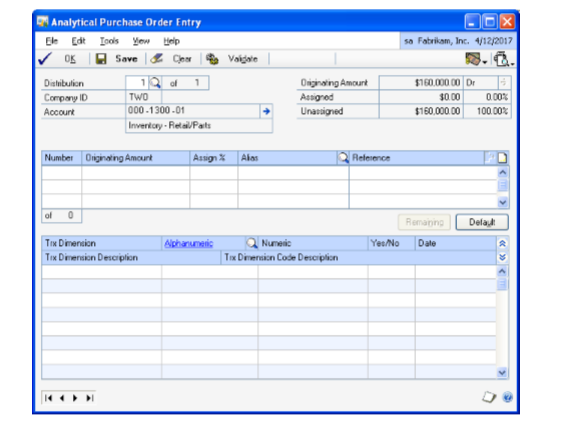
When you open the Analytical Purchase Order Entry window from the Purchasing Item Detail Entry window, it displays only the account for the selected item.
Refer to Entering analysis information for General Ledger transactions for more information on entering analysis information for transactions.
You can validate the analysis information by pressing CTRL+R or by choosing Additional >> Run Validation in the Purchase Order Entry or the Purchasing Item Detail Entry windows. Refer to Validating transactions and correcting errors for more information about validation.
Analysis information for adjusting entries
Adjusting entries are posted to General Ledger for each item that has its current cost changed and uses the Average Perpetual valuation method. Adjusting entries are also posted for quantity sold transactions relating to the purchase receipt of items that use the Average Perpetual, LIFO Perpetual, or FIFO Perpetual valuation method. Such entries are created in the following instances:
The user selects to revalue inventory when posting a purchasing invoice where the invoice cost differs from the shipment cost.
The Adjust Costs utility is used to edit a purchase receipt record’s cost.
A Purchase Order line item is changed to a status of Closed when its Quantity Shipped is greater than the Quantity Invoiced, when Quantity Invoiced is not zero.
A purchase receipt is inserted into an existing purchase receipt stack.
When such adjusting entries are generated in General Ledger, default transaction dimension codes are loaded and a single assignment is created for distribution accounts that are linked to an account class. You can modify the default analysis information, before posting through General Ledger. Refer to Entering analysis information for General Ledger transactions for more information.
If you have marked the option Post Through General ledger Files in the Posting Setup window (Administration >> Setup >> Posting >> Posting), or you have marked the option Post through to General Ledger for Trx Posting in the Analytical Accounting Options window (Administration >> Setup >> Company >> Analytical
Accounting >> Options), the transaction or batch is posted directly through General Ledger with default analysis information for the additional distributions. You can modify this information in the Analytical Adjustment Entry window if required. Refer to Adjusting analysis information in posted transactions for more information.
Posting transactions with analysis information
When you post a transaction with analysis information from the following windows, a validation will take place:
Payables Transaction Entry
Payables Manual Payments Entry
Receivings Transaction Entry
Purchasing Invoice Entry
When you close the Apply Payables Documents window, analysis information created for the document in the window will be validated.
Refer to Validating transactions and correcting errors for more information. In addition to Analytical Accounting information, Microsoft Dynamics GP information will also be validated before the transaction is posted.
The Analytical Posting Journal will be printed after a transaction is posted or after closing the Apply Payables Documents window if specified under Posting Setup.
Posting a batch with analysis information
You can enter analysis information for transactions within a Payables or Purchasing Batch. Refer to Entering analysis information for purchase orders and receipts for more information about entering analysis information.
You can print the Analytical Accounting Edit List and Analytical Accounting
Validation Log to check if errors exist in the analysis information along with the Microsoft Dynamics GP Edit List for a selected batch by choosing the printer icon button.
When you post a batch from the Payables Management window or the Purchase Order Processing window, a validation takes place for all the transactions saved in the batch. Refer to Validating transactions and correcting errors for more information about the validation process. Microsoft Dynamics GP and Analytical Accounting transactions without errors are posted. The Analytical Posting Journal is printed, if specified under Posting Setup, along with the Microsoft Dynamics GP reports. If errors are found during the validation process, the Analytical Accounting Validation Log report is printed listing the analysis errors for the transactions in the batch being posted. You can correct the errors by editing the transactions in the window where the transaction originated from.
If you delete a single or recurring use batch or a transaction within such batches, the analysis information entered for the transactions in the batch or for the transaction will also be deleted.
You can save a transaction in a batch with Analytical Accounting errors but you cannot post the transaction.
For a recurring batch, the analysis information of the batch last posted will be retained and will update each subsequent batch that is posted, unless changes are made to the analysis information in the batch.
When you print the Analytical Posting Journal, detailed analysis information of all accounts will be printed. This would also include accounts with errors. The Analytical Validation Log report detailing all Analytical Accounting errors will also be printed. You can correct Analytical Accounting errors by opening the batch and then correcting the transactions that have errors.
Posting through to General Ledger for transaction posting
Individual transactions and batches posted from Payables Management will automatically update the appropriate posting accounts in General Ledger if you have marked the following options, and if there are no Analytical Accounting and Microsoft Dynamics GP errors:
Post through General Ledger files under Posting Setup (Administration >> Setup >> Posting >> Posting); and
Post through to General Ledger for Trx Posting (Administration >> Setup >> Company >> Analytical Accounting >> Setup)
Refer to Setting up posting options for Analytical Accounting for more information about Analytical Accounting posting setup.
While posting individual and batch transactions, Analytical Accounting or Microsoft Dynamics GP errors may exist which would prevent the transaction or batch from updating the appropriate posting accounts in General Ledger. For example, default codes may not be assigned for Required transaction dimensions in the account class that the distribution accounts of Fixed or Variable accounts are linked to. The transaction or batch will update the General Ledger. You must correct the errors in the transaction or batch in the General Ledger from the Transaction Entry window (Transactions >> Financial >> General) before the posting accounts can be updated.
The Analytical Accounting and Microsoft Dynamics GP errors will be displayed in the Analytical Accounting Validation Log Report which will print after the transaction or batch updates Payables Management.
The transaction and batch will update the Payables Management. You will be able to view analysis information that originated for the transaction or batch in Payables Management from the relevant Inquiry windows.
Viewing analysis information for Purchase Order Processing documents
You can view analysis information created for transactions in Purchase Order Processing in the Analytical Purchasing Invoice Inquiry Zoom window.
You can view the assignments, transaction dimension codes and reference notes that have been created for individual transaction distributions in this window.
To view analysis information for Purchase Order Processing documents:
Open the Analytical Purchasing Invoice Inquiry Zoom window. (Inquiry >> Purchasing >> Purchase Order Docs >> Purchasing Invoice Inquiry Zoom >> CTRL+ T or Additional >> Analytical Transaction)
(Inquiry >> Purchasing >> Purchase Order Docs >> Receivings Transaction Inquiry Zoom >> CTRL+T or Additional >> Analytical Transaction)The Analytical Posting Inquiry window displays all analysis information created for a distribution account. The first distribution account of the document linked to an account class is displayed. Enter or select a distribution number to view analysis information for other distribution accounts.
If you select a specific account in the Purchasing Distribution Inquiry Zoom, the Analytical Posting Inquiry window will display analysis information relating to the selected account.
The Document Type and Number fields display the values from the Receivings Transaction Inquiry window or the Purchasing Invoice Inquiry zoom.
The Originating or Functional Amount field displays the distribution amount in the originating or functional currency based on the option you selected in the Currency View. Click the expansion button to view multicurrency information if the originating currency differs from the functional currency.
The Document Date displays the date of the document and will default from the Receivings Transaction Inquiry or Purchasing Invoice Inquiry Zoom.
The Company ID field displays the ID of the current company.
Click Expand to display all analysis information entered for the distribution account in the assignment list window. This includes assignments, reference information entered per assignment, transaction dimensions and their codes.
Click Collapse to display only assignments and reference information entered per assignment for the distribution account.
You also can view all information entered for each assignment or just reference information that may exist. Choose the plus button (+) available next to each assignment to view all analysis information entered for an assignment or choose the minus button (-) to view only reference information that may exist.
Choose OK to close the window.
Viewing analysis information for purchase orders
You can view the analysis information you’ve entered for a purchase order in the Analytical Purchase Order Inquiry window.
To view analysis information for purchase orders:
Open the Analytical Purchase Order Inquiry Zoom window. (Inquiry >> Purchasing >> Purchase Order Documents/Purchase Order Items >> Choose the PO Number link >> CTRL+T or Additional >> Analytical Transaction)
Transactions >> Purchasing >> Receivings Transaction Entry >> Select a purchase order in the scrolling window >> Choose the PO Number link >> CTRL+T or Additional >> Analytical Transaction)
(Transactions >> Purchasing >> Receivings Transaction Entry >> Select a purchase order in the scrolling window >> Choose the PO Number link >> Vendor Item Expansion button >> CTRL+T or Additional >> Analytical Transaction)Refer to Viewing analysis information for payables transactions for more information on viewing analysis information for transactions.
Copying Analytical Accounting Information for Purchase Order or Purchase Order Line Items
Use the Copy a Purchase Order window to copy analytical accounting information from an existing purchase order.
To copy analytical accounting information for purchase order or Purchase Order Line Items:
Open Purchase Order Entry window. (Transactions >> Purchasing >> Purchase Order Entry >> Actions >> Create and Copy New PO)
(Transactions >> Purchasing >> Purchase Order Entry >> enter a purchase order >> Actions >> Copy PO Lines to Current PO)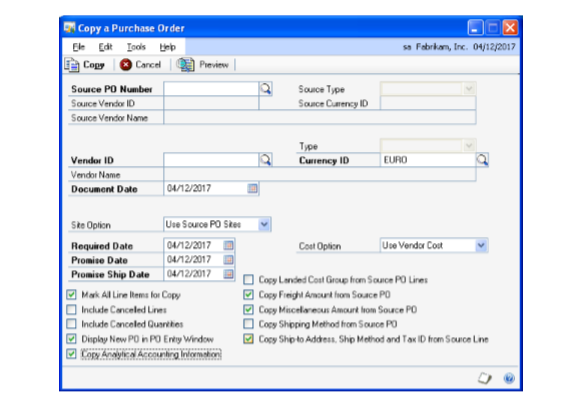
Choose Actions and select Create and Copy New PO or Copy PO lines to Current PO to open the Copy Purchase Order window.
Enter or select a purchase order with a status of New, Released, or Change Order to copy.
Mark the Copy Analytical Accounting information option.
Choose copy.The analytical accounting information is copied from the originating document to new document.
Chapter 7: Receivables Management Transactions
For transactions in Receivables Management, you can create assignments and enter transaction dimension codes for the distribution accounts that are linked to an account class. You can save transactions with analysis information to a single or recurring batch prior to posting the batch. Also, you can view analysis information created for transactions in the Analytical Inquiry windows. The process of validating transactions with analysis information is also explained.
You can open the Analytical Transaction Entry window only if Analytical
Accounting has been activated. Refer to Activating Analytical Accounting for more information about activating Analytical Accounting.
This information is divided into the following sections:
Entering analysis information for receivables documents
Entering analysis information for cash receipts
Entering analysis information for applied documents
Unapplying a document
Applying unposted credit memos, returns and payments
Unapplying unposted credit memos, returns and payments
Voiding or waiving documents with analysis information
Entering analysis information for NSF charges
Validating transactions and correcting errors
Posting transactions with analysis information
Posting a batch with analysis information
Posting through or to General Ledger
Viewing analysis information in Receivables Management
Entering analysis information for receivables documents
You can enter assignments and transaction dimension codes for receivables documents using the Analytical Receivables Transaction Entry window.
When you press TAB from a field in the Sales Transaction Distribution Entry window (Transaction >> Sales >> Transaction Entry), under the following instances, the Analytical Receivables Transaction Entry window will open:
If an account is linked to an account class and no analysis information has been entered for the account earlier.
If changes are made to a distribution line that affects analysis information entered previously for the line. These include changing the account, amount or debit to credit or vice versa, as this will delete the previously entered analysis information and create a single assignment of 100 percent.
If you delete a document from the Receivables Transaction Entry window, the analysis information that exists for the document will also be removed.
In case of multicurrency transactions, a change in the transaction date re-creates distributions due to a change in the exchange rate. If the transaction date is modified, analysis information created previously is deleted when the distributions are re-created.
If you select Default in the Sales Transaction Entry Distribution, all analysis information created for the document will be deleted.
To enter analysis information for receivables documents:
Open the Analytical Receivables Transaction Entry window. (Transaction >> Sales >> Transaction Entry >> Analytical Accounting button)
(Transaction >> Sales >> Transaction Entry >> Additional >> Analytical Transaction)
(Transaction >> Sales >> Transaction Entry >> Distributions >> Analytical Accounting button)
(Transactions >> Sales >> Transaction Entry >> Distributions >> Additional >>Analytical Transaction)
(Transactions >> Sales >> Transaction Entry >> Tax expansion button >> Additional >> Analytical Transaction)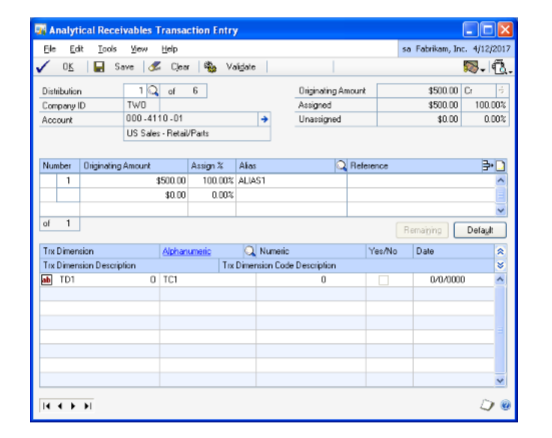
To enter analysis information for receivables transactions, refer to Entering analysis information for General Ledger transactions .
Entering analysis information for cash receipts
You can enter analysis information for cash receipts using the Analytical Cash Receipts Entry window.
If you delete a document from the Cash Receipts Entry window, the analysis information that exists for the document also will be removed.
For multicurrency transactions, a change in the transaction date re-creates distributions due to a change in the exchange rate. If the transaction date is modified, analysis information created previously is deleted when the distributions are re-created.
If you choose Default in the Cash Receipts Distribution Entry window, all analysis information created for the document will be deleted.
In the Cash Receipts Distribution Entry window, the Analytical Cash Receipts Entry window will open automatically when you press TAB from a row in the following instances:
If an account is linked to an account class and no analysis information has been entered for the account earlier.
If changes are made to a distribution line that affects analysis information entered previously for the line. These include changing the account, amount or debit to credit or vice versa, as this will delete the previously entered analysis information and create a single assignment of 100 percent.
Refer to Entering analysis information for receivables documents for more information about creating analysis information.
Entering analysis information for applied documents
You can enter analysis information for distributions created, if any, after a posted credit memo, return or payment is applied in the Apply Sales Documents window (Transactions >> Sales >> Apply) using the Analytical Apply Sales Documents window.
When posted credit memos, returns or payments are applied to sales documents or other debit documents, distributions will be created for terms taken, writeoffs, tax rebate, and realized gain or realized loss. If these distribution accounts are linked to an account class, you must enter analysis information for the accounts.
The Analytical Apply Sales Documents window will open when you select OK in the Apply Sales Documents window, or if distributions are created when you automatically apply sales documents.
The Analytical Apply Sales Document window also will open if you change the customer ID or document no. in the Apply Sales Documents window.
In Analytical Accounting, voided and applied documents will update General Ledger, if you marked the Post Through General Ledger option in the Posting Setup window (Administration >> Setup >> Posting >> Posting).
If the Analytical Apply Sales Documents window has been opened at least once, you can open it later from the Additional menu. Choose Additional >> Analytical Transaction or CTRL+T before the distributions are posted.
The Analytical Apply Sales Documents window will display the first of the distribution accounts created during the apply process that have been linked to an account class.
If you’ve marked the Show valid code combinations in trns and budgets option in the Analytical Accounting Options window, then the lookup window will display only those codes that have a valid combination with the codes you have already selected for the transaction.
Refer to Entering analysis information for receivables documents for more information about entering analysis information.
Unapplying a document
When you unapply posted credit documents, returns and payments, entries relating to terms taken, write offs, realized gain or loss are reversed. You must enter analysis information for these distribution accounts if such accounts are linked to an account class. You can enter analysis information in the Analytical Apply Sales Documents window which will open when you choose OK in the Apply Sales Documents window.
The analysis information entered for distribution accounts relating to terms taken, write offs, realized gain or loss will be validated before these entries are posted. Errors detected will be displayed in the Analytical Accounting Validation Log.
Refer to Posting transactions with analysis information for more information.
You can close the Apply Sales Document window only after entering all required analysis information for the distribution accounts linked to an account class.
Applying unposted credit memos, returns and payments
You can enter analysis information for credit memos, returns, and payments applied in the Receivables Transaction Entry and Cash Receipts Entry windows in the Analytical Receivables Transaction Entry or Analytical Cash Receipts Entry windows respectively. The Analytical Receivables Transaction Entry or Analytical Cash Receipts Entry windows will open when you select OK in the Apply Sales Documents window.
If you have created analysis information for the Accounts Receivable account in the Receivables Transaction Entry or Cash Receipts Entry windows prior to applying the credit memo, return or payment, such information will be deleted if distributions are created for terms taken, write offs, realized gain or loss. You will have to re-enter analysis information for the Accounts Receivable account.
Unapplying unposted credit memos, returns and payments
Before posting, if you unapply unposted credit memos, returns and payments, in the Apply Sales Documents window (Transaction >> Sales >> Transaction Entry >> Apply or Transactions >> Sales >> Cash Receipts >> Apply), the analysis information entered for the distribution accounts relating to terms taken, write offs and realized gain or loss accounts will be deleted.
Voiding or waiving documents with analysis information
If you make changes to the terms taken or writeoff amount before voiding a credit document in the Apply Sales Documents window (Transactions >> Sales >> Apply), extra distributions may be created. After voiding, default codes will be loaded for the distributions that have been created.
The Analytical Transaction Entry window cannot be opened prior to voiding a document in the Receivables Posted Transaction Maintenance window.
The Analytical Accounting Posting Journals will be printed along with the Microsoft Dynamics GP reports, if you’ve selected the option under Posting Setup.
This report will display all analysis information relating to the voided transaction.
Entering analysis information for NSF charges
When you mark a check as Non Sufficient Funds (NSF) in the Receivables Posted Transaction Maintenance window (Transactions >> Sales >> Posted Transactions), analysis information may have to be entered for distribution accounts relating to the NSF Charge, if such accounts are linked to an account class.
When you choose OK in the Auto Post NSF Debit Charge window, the Analytical Auto Post NSF Debit Charge window will open displaying the first of the distribution accounts relating to the NSF Charge that is linked to an account class (as per the distribution sequence).
Refer to Entering analysis information for receivables documents for more information about entering analysis information.
If the Analytical Auto Post NSF Debit Charge window has been opened at least once, you can open it any time thereafter from the Additional menu. Choose Additional >> Analytical Transaction or CTRL+T before the distributions are posted.
The analysis information entered for distribution accounts relating to NSF charges will be validated before these entries are posted. Errors detected will be displayed in the Analytical Accounting Validation Log.
Refer to Posting transactions with analysis information for more information.
You can close the Auto Post NSF Debit Charges window only after entering all required analysis information for the distribution accounts linked to an account class.
Analysis information that exists for the cash receipt will be copied, except for the balance type which will be reversed.
Refer to Voiding or waiving documents with analysis information for more information about voiding documents.
Validating transactions and correcting errors
You can use the following windows to validate a transaction. From the Additional menu, choose Additional >> Run Validation or CTRL+T:
Receivables Transaction Entry
Cash Receipts Entry
Apply Sales Documents
Auto Post NSF Debit Charge
Refer to Validating transactions and correcting errors for more information about validation.
If errors are detected in the transaction, the Analytical Accounting Validation Log window will open, displaying all errors detected by the validation routine.
You can select View >> Incomplete or Erroneous Distributions, to browse the distribution accounts in the Analytical Transaction Entry window that are incomplete or have errors.
To correct an Analytical Accounting error, double-click on the error to open the relevant Analytical Transaction Entry window. The specific distribution in which the error exists is displayed.
Posting transactions with analysis information
When you post a transaction from the Receivables Transaction Entry or the Cash Receipts Entry window, a validation will take place.
Also, when you close the Apply Sales Documents or Auto Post NSF Debit Charge window, analysis information created for the transaction/document will be validated.
In addition to analysis information, Microsoft Dynamics GP data also will be validated before the transaction is posted.
If errors are found while posting a transaction, the transaction will not be posted. The Analytical Accounting Validation Log window will open, listing the Microsoft Dynamics GP errors first and then the Analytical Accounting errors.
We recommend that you resolve the Microsoft Dynamics GP errors first, and then the Analytical Accounting errors.
To correct an Analytical Accounting error, double-click on the error to open the relevant Analytical Transaction Entry window. The specific distribution in which the error exists is displayed which you can then correct.
The Analytical Posting Journal will be printed, along with the Microsoft Dynamics GP Posting reports if specified under Posting Setup.
Posting a batch with analysis information
When you post a batch from Receivables Management, a validation will take place for all the transactions saved in the batch. Microsoft Dynamics GP and Analytical Accounting transactions without errors will be posted and the Analytical Posting Journal will be printed, along with the Microsoft Dynamics GP reports if specified in the Posting Setup window. If errors are found during the validation process, the Analytical Accounting Validation Log report will be printed listing analysis errors for the transactions in the batch being posted. You can correct the errors by modifying the transactions in the window where the transaction originated from.
If you delete a single or recurring use batch or a transaction within such batches, the analysis information entered for the transactions in the batch or for the transaction also will be deleted.
You can save a transaction in a batch with Analytical Accounting errors but cannot post the transaction.
For a recurring batch, the analysis information of the batch last posted will be retained and will update each subsequent batch that is posted, unless changes are made to the analysis information in the batch.
You can print the Analytical Accounting Edit List and Analytical Accounting Validation Log Report along with the Microsoft Dynamics GP Edit List for a selected batch by choosing the printer icon button.
When you print the Analytical Posting Journal, detailed analysis information of all accounts will be printed including accounts with errors. The Analytical Validation Log report detailing all Analytical Accounting errors also will be printed. You can correct Analytical Accounting errors by opening the batch and then correcting each of the transactions that have errors.
Posting through or to General Ledger
If you’ve marked the following options, individual transactions and batches posted from Receivables Management will automatically update the appropriate posting accounts in General Ledger, if there are no Analytical Accounting and Microsoft Dynamics GP errors.
Post through General Ledger files under Posting Setup (Administration >> Setup >> Posting >> Posting)
Post through to General Ledger for Trx Posting (Administration >> Setup >> Company >> Analytical Accounting >> Setup)
While posting individual and batch transactions, errors might exist in Analytical Accounting or Microsoft Dynamics GP information that prevent the transaction or batch from updating the appropriate posting accounts in General Ledger. For example, default codes may not have been assigned for required transaction dimensions in the account class to which the distribution accounts of Fixed or Variable accounts are linked. The transaction or batch will update General Ledger.
You must correct the errors in the transaction or batch in General Ledger from the Transaction Entry window (Transactions >> Financial >> General) before the posting accounts can be updated.
The transaction and batch will update Receivables Management. You can view analysis information that originated for the transaction or batch in Receivables Management from the relevant Inquiry windows.
The Analytical Accounting and Microsoft Dynamics GP errors will be displayed in the Analytical Accounting Validation Log Report which will print after the transaction or batch updates Receivables Management.
Viewing analysis information in Receivables Management
You can view analysis information entered for transactions in Receivables
Management in the Analytical Receivables Transaction Inquiry Zoom window. The Analytical Inquiry window will display only distribution accounts of a document that are linked to an account class.
To view analysis information in Receivables Management:
Open the Analytical Receivables Transaction Inquiry Zoom window. (Inquiry >> Sales >> Transaction by Customer/Transaction by Document >>Additional >> Analytical Transaction)
When the Analytical Transaction Inquiry window opens, all analysis information created for a distribution account will be displayed.
The first distribution account of the document linked to an account class is displayed. Enter or select a distribution number to view analysis information of other distribution accounts.
Note
If you select a specific account in the Receivables Distribution Inquiry Zoom, the Analytical Posting Inquiry window will display analysis information relating to such account.
The Document Type and Number fields display values from the Receivables Transaction Inquiry zoom or Cash Receipts Inquiry zoom.
The Originating or Functional Amount field displays the distribution amount in the originating or functional currency based on the option you have chosen in the Currency View. Click the expansion button to view multicurrency information if the originating currency differs from the functional currency.
The Document Date field displays the date of the document from the Receivables Transaction Inquiry zoom or Cash Receipts Inquiry Zoom.
The Company ID field displays the ID of the current company.
Choose Expand to display all analysis information entered for the distribution account in the list window. This includes assignments, reference information entered per assignment, transaction dimensions and their codes.
Click Collapse to display only assignments and reference information entered per assignment for the distribution account.
You also can view all information entered for each assignment or just reference information that may exist. Choose the plus button (+) available next to each assignment to view all analysis information entered for an assignment or choose the minus button (-) to view only reference information that may exist.
Chapter 8: Sales Order Processing Transactions
You can enter and view analysis information such as assignments, transaction dimension codes and reference information for transactions entered in Sales Order Processing. You can save transactions with analysis information in a Sales Batch before posting. The analysis information you have entered will be validated before posting.
You can enter analysis information in Sales Order Processing only from the Sales Transaction Entry window (Transactions >> Sales >> Sales Transaction Entry) and for Sales Invoices and Sales Returns.
You can open the Analytical Transaction Entry window only if Analytical
Accounting has been activated. Refer to Activating Analytical Accounting for more information.
This information is divided into the following sections:
Entering analysis information for an invoice or return
Analysis information in re-created distributions
Analysis information for deposits received against an order
Deletion of analysis information on invoice transfer to back order
Validating transactions and correcting errors
Posting an invoice or return with analysis information
Posting a batch with analysis information
Posting through to General Ledger for transaction posting
Voiding transactions with analysis information
Viewing analysis information for sales documents
Copying Analytical Accounting Information for Sales Order
Entering analysis information for an invoice or return
You can enter analysis information for an invoice or return in the Sales Transaction Entry window (Transactions >> Sales >> Sales Transaction Entry) using the Analytical Sales Transaction Entry window.
If you delete an invoice or return from the Sales Transaction Entry window, the analysis information that exists for the document will also be removed.
If you delete an item number from an invoice or return, analysis information that exists for distribution accounts relating to the item number deleted will also be removed.
In case of multicurrency transactions, a change in the transaction date re-creates distributions due to a change in the exchange rate. If the transaction date is altered, analysis information created previously is deleted when the distributions are recreated.
If you select Default in the Sales Distribution Entry window, all analysis information created for the invoice or return will be deleted.
The Analytical Sales Transaction Entry window will open automatically when you press TAB from a field in the Sales Distribution Entry window, in the following instances:
If the account is linked to an account class and the Analytical Sales Transaction Entry window has not been opened even once for the account.
If changes are made to a distribution line that affects analysis information entered previously for such line. These include changing the account or amount or debit to credit or vice versa, as this will delete the previously entered analysis information and create a single assignment of 100 percent.
In an invoice, you can enter analysis information for the Cost of Goods Sold (COGS) and Inventory accounts of the relevant item numbers entered in the invoice, if such accounts are linked to an account class even though these accounts are not displayed in the Sales Distribution Entry window. However, you cannot create assignments for such accounts as the amount that updates these accounts can be determined only after the invoice is posted.
To enter analysis information for an invoice or return:
Open the Analytical Sales Transaction Entry window. (Transactions >> Sales >> Sales Transaction Entry >> Analytical Accounting button)
(Transactions >> Sales >> Sales Transaction Entry >> Additional >> Analytical Transaction or CTRL+T)
(Transactions >> Sales >> Sales Transaction Entry >> Distributions >>Analytical Accounting button)
(Transactions >> Sales >> Sales Transaction Entry >> Distributions >>Additional >> Analytical Transaction or CTRL+T)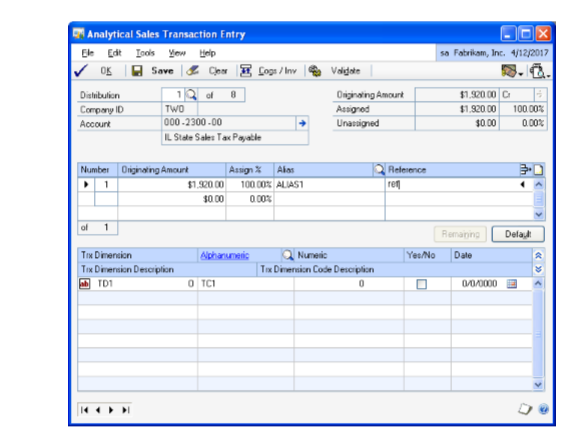
The distribution accounts of each item number linked to an account class that you enter on an invoice or return, will be added to the total distributions in the Analytical Sales Transaction Entry window only after you tab off the Line Item in the Sales Transaction Entry window.
The Analytical Sales Transaction Entry window will open only if you have specified at least one item number with a unit cost more than zero for the invoice or return.
The first of the distribution accounts in the Sales Distribution Entry window that is linked to an account class is displayed in the Analytical Sales Transaction Entry window. To view other distributions (other than the COGS and Inventory Accounts in case of an invoice) enter or select a distribution number or use the browse buttons.
You view a specific distribution account linked to an account class by selecting that account prior to opening the Analytical Sales Transaction Entry window.
The sequence of distributions in the Analytical Sales Transaction Entry window may not correspond to the sequence in the Sales Distribution Entry window as only accounts linked to an account class are displayed here.
If only the COGS and Inventory Accounts of an Invoice are linked to an account class, the Analytical Sales Transaction Entry window will open displaying the first of such accounts linked to an account class.
Refer to Entering analysis information for General Ledger transactions for more information about entering analysis information for transactions.
Choose Cogs/Inv to view the Cost of Goods Sold and Inventory accounts of an Invoice, linked to an account class. The first of these accounts linked to an account class will be displayed when you select this button. The sequence in which the Cost of Goods Sold and Inventory Accounts will be displayed will be based on the order in which item numbers are displayed on the invoice. To view the other COGS and Inventory Accounts linked to an account class, you can use the browse button or enter or select the distribution number in the Distribution field. Choose MAIN to view the distribution accounts displayed in the Sales Distribution Entry window that are linked to an account class.
For an invoice, since the amount that updates the COGS and Inventory accounts can be determined only after the invoice is posted, the fields and scrolling windows relating to amount and assignment will not be available in relation to these accounts.
The Cogs/Inv button will not be available in the following instances:
If the COGS and Inventory accounts are not available under the relevant setup, such as Item or Customer or Posting or if these accounts are not linked to an account class.
If non-inventory items are entered on an invoice.
If the unit cost for drop-ship items in the Sales Transaction Entry window is zero.
If the item number selected in the Sales Transaction Entry window is marked as is marked as Misc Charges/Services/Flat Fee on Item Maintenance window
If the Document Type of the transaction is Return. In the case of Sales Returns, the COGS and Inventory accounts will form part of the distribution accounts displayed in the Sales Distribution Entry window. You can enter analysis information including assignments for these accounts if required, in the same manner as the other distribution accounts displayed in the Sales Distribution Entry window that are linked to an account class.
If you have entered Kit Items on an invoice, addition or deletion of a component item from the Sales Kit Options window (Transactions >> Sales >> Sales Transaction Entry >> Item Number expansion button >> Kits) may increase or decrease the COGS and Inventory Accounts displayed in the Analytical Sales Transaction Entry window, if the accounts concerned are linked to an account class.
If you have entered Kit Items on a return, addition of a component item in the Sales Kit Options window may increase the COGS and Inventory Accounts displayed in the Analytical Sales Transaction Entry window, if the relevant accounts are not already displayed and are linked to an account class.
Choose OK to close the window. A validation will take place when you choose OK. Refer to Validating transactions and correcting errors for more information about validation.
Choose Save to save the analysis information you’ve entered and clear the window. A validation takes place when you choose Save in the Analytical Sales Transaction Entry window. Refer to Validating transactions and correcting errors for more information about validation.
You can save the analysis information with errors or without updating changes made to the account class.
Choose Clear to clear the information you have entered but not saved.
Choose Validate to validate the analysis information of the distribution account displayed in the window. If changes are made to the account class or errors are found during the validation process, the Analytical Accounting Validation Log window will open displaying the changes and errors. Double click an Analytical Accounting error to open the Analytical Sales Transaction Entry window where the distribution account comprising the error is displayed.
You can select View >> Incomplete or Erroneous Distributions, to browse through the distribution accounts which are incomplete or have erroneous information.
Click the printer icon button to print the Analytical Accounting Edit List which will display analysis information of the distribution account currently displayed or for all distribution accounts of the Invoice or Return that are linked to an account class. The Analytical Accounting Validation Log report describing the Analytical Accounting errors, if any, in brief is also printed.
Analysis information in re-created distributions
Before posting a sales invoice/return, if changes listed below are made to the existing information for these documents, distributions will be re-created. This will automatically delete the existing analysis information for distribution accounts linked to an account class. Analysis information entered for COGS and Inventory accounts of an invoice is not affected by these changes.
| Window name | Changes made |
|---|---|
| Sales Tax Summary Entry or Sales Line Item Tax Detail Entry window | Change in or deletion of a Tax Detail ID, Total Sales and Tax Amount; Selecting Default or Delete in the Sales Tax Summary Entry window. |
| Sales Item Detail Entry window | Changes to the Shipping address or the tax schedule assigned to this address; Change to the Item Tax Schedule ID; Change in Salesperson ID; Distributions will also be re-created if the Total Invoice or Sales Amount is altered. |
| Sales Payment Terms Entry window | Change in Discount Percent; Change in Terms Discount Available or Payment Terms Amount (this will re-create distributions if Default is selected in the Sales Distribution Entry window after changes); Deletion of Terms Discount or Payment Terms Percent or Amount; (would re-create distributions if Default is selected in the Sales Distribution Entry window after changes) |
| Sales Customer Detail Entry window | Changes to the payment terms. |
| Sales Tax Schedule Entry window | Change in tax schedules; Change in tax status. For example, from taxable to non taxable; Price level in the Sales Item Detail Entry window; Change in Unit Price, Extended Price, and Invoice Quantity in the Sales Item Detail Entry window or Sales Transaction Entry window. |
| Sales Commission Entry window | Change in Salesperson ID, Percent of Sale (provided the Territory ID remains unchanged), Commission Percent and Commission Amount; Addition or deletion of a Salesperson ID; Deletion of commission distributions; Amending or deleting Commission Sale Amount. |
| Sales Payment Entry window | Change in Cash Account in the Checkbook Setup window. The distributions will be re-created only if you select Default in the Sales Distribution Entry window; Deletion of line item in the Sales Transaction Entry window. |
| Sales Trade Discount Entry window | Change in Trade Discount. |
| Sales Transaction Entry window | Amending the Trade Discount percent or amount; Inclusion or deletion of freight and miscellaneous charges; Change or deletion of Amount Received; Entering or deleting an amount on the Terms Discount Taken field. |
| Sales Transaction Entry window (Selecting the Show Detail option) | Changes to the following could re-create distributions: Invoice Quantity, Unit Price, Extended Price, Entering a Mark Down in the Sales Markdown Entry window, Price Level, Ship To Address ID (affects tax calculations), Site ID (affects tax calculations if method of shipping is Pickup). |
In the case of analysis information entered for the COGS and Inventory Accounts of a Return, the following changes prior to posting would result in a re-creation of such information:
| Window name | Changes made |
|---|---|
| Sales Item Detail Entry or Line Item Detail Entry windows | Change in Unit Cost |
| Sales Returned Quantities Entry window | Changes to Return Quantity Type. For example, splitting the quantity returned between Returned and Damaged, after the entire quantity was assigned to Returned. |
| Sales Kit Options window If Kit Items are entered on the Return | Deletion of a component item from the Sales Kit Options window. This could result either in a change in distribution amount or removal of a distribution account. |
Analysis information for deposits received against an order
For a deposit received against an order in the Sales Transaction Entry window, distributions relating to the deposit will be created in General Ledger after the order is saved.
If the distribution accounts relating to the deposit are linked to an account class, you can enter analysis information for such accounts only in the General Ledger. Refer to Entering analysis information for General Ledger transactions for more information.
You cannot open the Analytical Sales Transaction Entry window from the Sales Transaction Entry or Sales Payment Entry windows. Also, no validation will take place when you save the order.
Deletion of analysis information on invoice transfer to back order
If you transfer an invoice quantity fully or partly to a back order, the analysis information entered for the document, including the COGS and Inventory accounts, will be deleted.
You will have to re-create analysis information when the back order is subsequently converted to an invoice.
Refer to Entering analysis information for an invoice or return for more information about entering analysis information.
Validating transactions and correcting errors
You can validate analysis information entered for an invoice or return in the Sales Transaction Entry window, before posting by choosing CTRL+T or Additional >> Run Validation.
Refer to Validating transactions and correcting errors for more information about validation.
If errors are detected in the document, the Analytical Accounting Validation Log window will open displaying all errors detected by the validation routine.
You can select View >> Incomplete or Erroneous Distributions, to browse through the distribution accounts in the Analytical Sales Transaction Entry window which are incomplete or have erroneous information.
To correct an Analytical Accounting error, double-click in the relevant error to open the Analytical Sales Transaction Entry window. The specific distribution in which the error exists is displayed which you can then correct.
Posting an invoice or return with analysis information
When you post an invoice or return from the Sales Transaction Entry window, analysis information created for the document will be validated.
In addition to Analytical Accounting information, Microsoft Dynamics GP data will also be validated before the transaction is posted.
If errors are found while posting the invoice or return, the transaction will not be posted. The Analytical Accounting Validation Log window will open listing the Microsoft Dynamics GP errors first and then the Analytical Accounting errors.
We recommend that you resolve the Microsoft Dynamics GP errors first and then the Analytical Accounting errors.
To correct an Analytical Accounting error, double-click on the relevant error to open the Analytical Sales Transaction Entry window. The specific distribution in which the error exists is displayed which you can then correct.
The Analytical Posting Journal will be printed along with the Microsoft Dynamics GP Posting reports if specified under Posting Setup.
Posting a batch with analysis information
You can enter analysis information for transactions within a Sales Batch
(Transactions >> Sales >> Sales Batches). Refer to Entering analysis information for an invoice or return for more information.
You can print the Analytical Accounting Edit List and Analytical Accounting
Validation Log Report (if errors exist in analysis information) along with the Microsoft Dynamics GP Edit List for a selected batch by choosing the printer icon button.
When you post a batch from Sales Order Processing, a validation will take place for all the transactions saved in the batch. Refer to Validating transactions and correcting errors for more information about the validation process. Microsoft Dynamics GP and Analytical Accounting transactions without errors will be posted and the Analytical Posting Journal will be printed, if specified under Posting Setup along with the Microsoft Dynamics GP reports. If errors are found during the validation process, the Analytical Accounting Validation Log report will be printed listing analysis errors for the transactions in the batch being posted. You can correct the errors by correcting the transactions in the window where the transaction originated.
If you delete a batch or a transaction within a batch, the analysis information entered for the transactions in the batch or for the transaction will also be deleted.
You can save a transaction in a batch with Analytical Accounting errors but cannot post the transaction.
When you print the Analytical Posting Journal, detailed analysis information of all accounts will be printed. This would include even accounts with errors. The Analytical Validation Log report detailing all Analytical Accounting errors will also be printed. You can correct Analytical Accounting errors by opening the batch and then correcting each of the transactions that have errors.
Posting through to General Ledger for transaction posting
If you have marked the following options, individual transactions and batches posted from Sales Order Processing will automatically update the appropriate posting accounts in General Ledger if there are no Analytical Accounting and Microsoft Dynamics GP errors.
Post through General Ledger files under Posting Setup (Administration >> Setup >> Posting >> Posting); and
Post through to General Ledger for Trx Posting (Administration >> Setup >> Company >> Analytical Accounting >> Setup)
While posting individual and batch transactions, Analytical Accounting or Microsoft Dynamics GP errors may exist which would prevent the transaction or batch from updating the appropriate posting accounts in General Ledger. For example, default codes may not be assigned for Required Transaction Dimensions in the account class to which the distribution accounts of Fixed or Variable accounts are linked. The transaction or batch will update the General Ledger. You must correct the errors in the transaction or batch in General Ledger from the Transaction Entry window (Transactions >> Financial >> General) before the posting accounts can be updated.
The Analytical Accounting and Microsoft Dynamics GP errors will be displayed in the Analytical Accounting Validation Log Report which will print after the transaction or batch updates Sales Order Processing.
The transaction and batch will update Sales Order Processing. You can view analysis information that originated for the transaction or batch in Sales Order Processing from the relevant Inquiry windows.
Voiding transactions with analysis information
If you void an unposted invoice or return in the Sales Transaction Entry window, the analysis information entered for the document will be deleted.
If you void an invoice or return posted from Sales Order Processing from
Receivables Posted Transaction Maintenance window (Transactions >> Sales >> Posted Transactions), analysis information created for the invoice or return will be copied for each distribution account linked to an account class with the exception of the balance type. The Balance type of each distribution account will be reversed.
You can view the analysis information for a voided invoice or return in General Ledger (Transactions >> Financial >> General).
If posted from the General Ledger, the analysis information of the voided document can be viewed by zooming to the source document in the Financial Inquiry windows. You can open the Analytical Accounting Inquiry window from the Receivables Transaction Inquiry Zoom choosing Additional >> Analytical Transaction or CTRL+T).
Viewing analysis information for sales documents
You can use the Analytical Sales Transaction Inquiry Zoom window to view analysis information that you have entered for invoices or returns in Sales Order Processing.
To view analysis information for sales documents:
Open the Analytical Sales Transaction Inquiry Zoom window. (Inquiry >> Sales >> Sales Documents >> Click Document Number link >>Additional >> Analytical Transaction)
(Inquiry >> Sales >> Sales Documents >> Click Document Number link >>Distributions >> Additional >> Analytical Transaction)The Analytical Sales Transaction Inquiry Zoom window displays all the analysis information you’ve created for a distribution account.
The first distribution account of the document linked to an account class is displayed. To view analysis information of other distribution accounts, enter or select a distribution number.
If you select a specific account in the Sales Distribution Inquiry Zoom, the Analytical Sales Inquiry window will display analysis information relating to such account.
The information in the Document Type and Number field will correspond to that in the Sales Transaction Inquiry zoom.
The Originating or Functional Amount field displays the distribution amount in the originating or functional currency based on the option you have chosen in the Currency View. Click the expansion button to view multicurrency information if the originating currency differs from the functional currency.
The Document Date displays the date of the document and will default from the Sales Transaction Inquiry zoom.
The Company ID field displays the ID of the current company.
Click Expand to display all analysis information entered for the distribution account in the list window. This would comprise assignments, reference information entered per assignment, transaction dimensions and their codes.
Click Collapse to display only assignments and reference information entered per assignment for the distribution account.
You also can view all information entered for each assignment or just reference information that may exist. Choose the plus button (+) available next to each assignment to view all analysis information entered for an assignment or choose the minus button (-) to view only reference information.
Choose OK to close the window.
Copying Analytical Accounting Information for Sales Order
Use the Copy a Sales Order window to copy analytical accounting information from one sales order document to another.
To copy analytical accounting information for sales order:
Open Copy a Sales Order window.
(Transaction>> Sales >> Sales Transaction Entry >>enter a sales order number >> Actions >> Copy)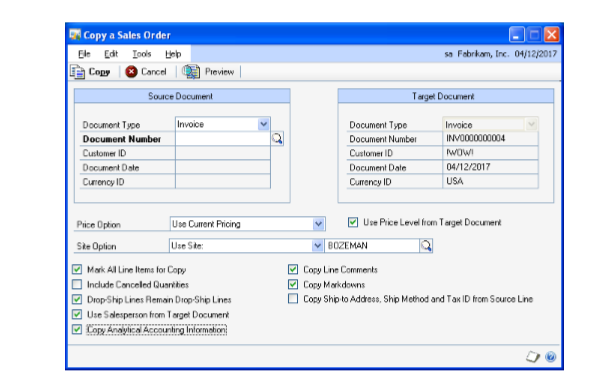
Choose Actions and select copy to open the Copy a Sales Order window.
Enter or select the document number for the document that contains the information to copy.
Mark the Copy Analytical Accounting information option.
Choose copy. The analytical accounting information is copied from the originating document to the new document.
Note
Analytical Accounting information is copied only for invoice and Return type of documents in the Sales Transaction Entry window.
Chapter 9: Inventory Transactions
Use the following information to create analysis information for Inventory transactions.
This information is divided into the following sections:
Entering analysis information for inventory transactions
Entering analysis information during transfer entry
Entering analysis information for variance accounts
Posting inventory transactions
Batch posting
Series posting
Post through General Ledger for transaction posting
Viewing analysis information for inventory transactions
Entering analysis information for inventory transactions
You can enter analysis information such as transaction dimension codes and reference information for inventory transactions. You cannot create assignments as the Extended Cost of a document can be determined only after the transaction is posted.
You can enter analysis information for adjustment, variance and transfer transactions and view the Item Number, Site ID, Balance Type, and the Inventory and/or Offset accounts. This is possible only if such accounts are linked to an account class in the Analytical Item Transaction Entry, Analytical Item Transfer Entry or Analytical Stock Count Entry window.
The Analytical Item Transaction/Transfer/Stock Count Entry window will only display those distribution accounts attached to an item number that are linked to an account class.
For Inventory transactions, the Analytical Transaction Entry windows will open when you TAB off the Item line in the Item Transaction, Item Transfer or Stock Count Entry windows. This will only happen if one or both of the distribution accounts associated with the item number are linked to an account class, and if the window has not been previously opened for such accounts.
If you are tracking inventory items by serial or lot numbers, the Analytical Transaction Entry window will open automatically when you press TAB only after you close the Item Serial/Lot Number Entry window.
In the Inventory Batch Entry window, if the option Post to General Ledger is not marked in the Posting Setup window (Administration >> Setup >> Posting >> Posting), the Analytical Transaction Entry window will not open when you TAB off an item line in the Item Transaction or Item Transfer Entry window.
The Analytical Transaction Entry window will open automatically only once except in the following instances.
The Site ID is changed in the scrolling window of the Item Transaction Entry window.
The From and/or To Site ID are changed in the scrolling window in the Item Transfer Entry window.
The quantity is changed from positive to negative or from negative to positive in the Item Transaction Entry window.
The variance quantity is changed from positive to negative or from negative to positive in the Stock Count Entry window.
The distribution account is changed in the Distribution window. In this case the analysis information that you entered will be deleted.
Change in quantity type in the Item Transfer Entry window.
You can also open the Analytical Transaction Entry window from the Item Transaction or Item Transfer or Stock Count Entry windows and the Distribution windows from Additional >> Analytical Transaction Entry or by using CTRL+T.
If the quantity of an item number in the Item Transaction or Item Transfer windows has not been specified, the Analytical Transaction Entry window will not open automatically from Additional >> Analytical Transaction Entry or using CTRL+T.
In the Stock Count Entry window, if the variance quantity is zero, the Analytical Transaction Entry window will not open automatically from Additional >> Analytical Transaction Entry or by using CTRL+T.
If you delete the quantity specified for an item number in the Item Transaction, Item Transfer or Stock Count Entry windows, the analysis information created for such item number also will be deleted.
To enter analysis information during transaction entry:
Open the Analytical Item Transaction Entry window. (Transactions >> Inventory >> Transaction Entry >> Analytical Accounting button)
(Transactions >> Inventory >> Transaction Entry >> CTRL+T or Additional menu>> Additional >> Analytical Transaction Entry)
(Transactions >> Inventory >> Stock Count Entry >> Analytical Accounting button)
(Transactions >> Inventory >> Stock Count Entry >> CTRL+T >> Additional >>Analytical Transaction Entry)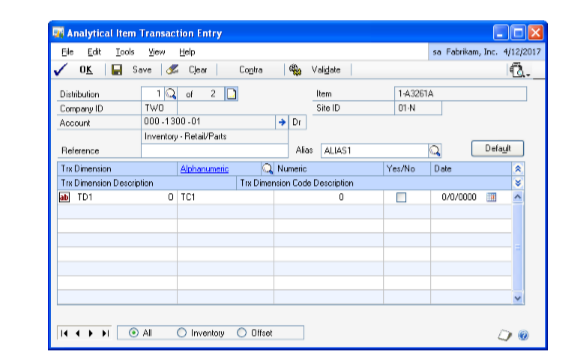
The Analytical Item Transaction Entry window displays the first distribution account of the Item Number selected that is linked to an account class. To view other distributions enter or select a distribution number. The distribution lookup displays all distribution accounts of the transaction linked to an account class.
The Account field will display the distribution account for which analytical information is being entered. The description of the account, as set up in the Account Maintenance window, will appear in the next line. Click the Account expansion button to open the Account Entry window.
The balance type of the account, whether debit or credit, will be displayed next to the account.
In the Reference field, enter reference information for the account.
The Item field will display the item number of the distribution account for which you are entering analysis information. This will appear as a default value from the Item Transaction Entry window.
The Site ID of the item number as displayed in the Item Transaction Entry window will be displayed.
Select an alias in the Alias field. The Alphanumeric field in the scrolling window displays the transaction dimension codes that are associated with the alias for the transaction dimensions displayed. You can change these codes, if required. Refer to Creating an alias for more information.
Choose Default to load the current setup information specified for the account class in the Accounting Class Maintenance window and create a single assignment.
The Trx Dimension field displays Transaction Dimensions of the account class to which the distribution account is linked. Only Transaction Dimensions which have been set as Fixed, Required, or Optional will be displayed.
Transaction dimensions which are set to Hide in the Accounting Class Maintenance window will not be displayed. Refer to Setting up an account class for more information.
The Trx Dimension Description field displays the description of the transaction dimension.
Enter or select an alphanumeric transaction dimension code in the Alphanumeric column. You can add a new alphanumeric transaction dimension code if you have selected the Create New Codes On The Fly option in the Transaction Dimension Maintenance window.
Note
The Alphanumeric column is available only for an alphanumeric transaction dimension.
The description of the Alphanumeric Transaction Dimension Code is displayed in the Transaction Dimension Code Description field.
Enter a Transaction Dimension Code in the Numeric, Yes/No or Date field if the Transaction Dimension is Numeric, Boolean or Date.
Select the type of account that you want to browse through for each item number entered in the Item Transaction Entry window, from the following:
All to browse through the Inventory and Offset accounts for each item number if it is linked to an account class.
Inventory to browse through the Inventory account of each Item Number if it is linked to an account class.
Offset to browse through the Offset account of each item number if it is linked to an account class.
Note
The Radio Group will further filter accounts if you select View >> Incomplete or Erroneous Dist.
Choose OK to save and close the window.
Choose Save to save the analysis information you have entered and clear the window.
You can save analysis information with errors, but you cannot post them.
Choose Contra to switch between the inventory account and the offset account of the item number that is currently displayed in the Analytical Item Transaction Entry window. This is possible only if both the Inventory and Offset accounts of an item number are linked to an account class.
If only one account of an item number is linked to an account class, a message appears when you select the Contra button.
Choose Validate to validate the distribution displayed in the window. If changes are made to the account class in setup or errors are found during the validation process, the Analytical Accounting Validation Log window will open displaying the errors or changes identified. You can view the changes to the account class by selecting the Default button in the Analytical Item Transaction Entry window.
Note
Analysis information will also be validated if you select OK or Save in the Analytical Item Transaction Entry window.
You can choose to save analysis information with errors or without updating changes made to the account class.
You can validate a document in the Item Transaction Entry window by using the options CTRL+R or Additional >> Run Validation.
Refer to Validating transactions and correcting errors for more information about validation.
Choose the Print drop-down to print the Analytical Accounting Edit list for the distribution currently displayed in the window or for all distributions of the transaction linked to an account class. If errors are detected, the Analytical Validation Log is also printed.
If you delete a transaction in the Item Transaction window, the analysis information you entered for the transaction will be deleted.
You cannot insert or delete a row, or change the Site ID or distribution accounts in the Item Transaction Entry window if the Analytical Item Transaction Entry window is open.
Entering analysis information during transfer entry
You can enter analysis information for inventory transfers in the Analytical Item Transfer Entry window.
To enter analysis information during transfer entry:
Open the Analytical Item Transfer Entry window. (Transactions >> Inventory >> Transfer Entry >> Analytical Accounting button)
(Transactions >> Inventory >> Transfer Entry >> CTRL+T or Additional >> Analytical Transfer Entry)Enter or select the distribution number for the distribution account.
The Company ID field will display the company in which the transaction is taking place.
The Account field will display the distribution account for which the Analytical information is being entered and the balance type of the account, whether debit or credit. The description of the account, as set up in the Account Maintenance window, will appear in the next line. Click the Account expansion button to open the Microsoft Dynamics GP Account Entry window.
In the Reference field, enter reference information up to 30 characters for the account or distribution.
The balance type of the account, whether debit or credit, will be displayed next to the account.
The Item field will display the item number for the distribution account for which you are entering analysis information. This will appear as a default value from the Transfer Entry window.
The From Site ID and To Site ID of the Item Number in the Inventory Transfer Entry window are displayed.
Select an alias in the Alias field. The Alphanumeric field in the scrolling window displays the transaction dimension codes that are associated with the alias for the transaction dimensions displayed. You can change these codes if required. Refer to Creating an alias for more information.
Choose Default to load the default transaction dimension codes if you overwrite the codes of Required or Optional Alphanumeric Transaction Dimensions while creating analysis information.
The transaction dimensions for the account class to which the distribution account is linked are displayed in the scrolling window. Only transaction dimensions which have been set as Fixed, Required, or Optional will be displayed. Transaction dimensions which are set to Hide in the Accounting Class Maintenance window will not be displayed. Refer to Setting up an account class for more information.
Enter or select a transaction dimension code in the Alphanumeric column.
Enter a numeric transaction dimension code in the Numeric field.
Mark or unmark the Yes/No checkbox in the Yes/No column.
Enter a date type transaction dimensions in the Date field.
The description of the transaction dimension is displayed in the Transaction Dimension Description field.
The description of the alphanumeric transaction dimension code will be displayed in the Transaction Dimension Code Description field.
Select the type of account that you want to browse through from the following:
All to browse through the inventory and offset accounts for each item number if it is linked to an account class.
Inventory to browse through the inventory account of each item number if it is linked to an account class.
Offset to browse through the offset account of each item number if it is linked to an account class.
Choose Contra to switch between the offset account and the inventory account of the item number that is currently displayed in the Analytical Transaction Entry window. This button is available only if both the inventory and the offset accounts for an item number are linked to an account class.
Choose Save to save the analysis information for the distribution.
Choose Clear to clear the information you have entered.
Choose Validate to validate the distribution displayed in the window. You can also validate transactions by choosing CTRL+R or from Additional >>Run validation. Refer to Validating transactions and correcting errors for more information about the validation process.
Choose the Print drop-down list to print information for the distribution displayed in the window or for all distributions.
If you delete a transaction in the Inventory Transfer window the analysis information you entered for the transaction will also be deleted.
You cannot insert or delete a row, or change the Site ID or distribution accounts in the Item Transfer Entry window if the Analytical Item Transfer Entry window is open.
Entering analysis information for variance accounts
You can create analysis information for variance transactions in the Analytical Stock Count Entry window. The window can be opened from the Stock Count Entry window by choosing Additional >> Analytical Transaction Entry or CTRL+T.
You can enter analysis information such as transaction dimension codes and reference information for the transactions in this window. Refer to Entering analysis information for inventory transactions for more information about entering analysis information for inventory transactions.
If you choose Clear Count in the Stock Count Entry window, the analysis information you’ve entered for the transaction also will be deleted.
You cannot change the quantity or distribution accounts in the Stock Count Entry window or the Unit of Measure in the Stock Count Unit of Measure window or make changes in the Stock Count Serial/Lot Number Entry window if the Analytical Stock Count Entry window is open.
Posting inventory transactions
When you post a transaction with analysis information from the Item Transaction or Item Transfer window or process a Stock Count Schedule in the Stock Count Entry window, a validation takes place for the document.
If selected in Posting setup, the Analytical Posting Journals will be printed along with the Microsoft Dynamics GP Journal. If no errors are found during the validation process, the document will be posted.
If errors are detected in the Microsoft Dynamics GP or Analytical Accounting transactions, the Analytical Validation Log window will open displaying all the errors. You can double click on an Analytical Accounting error to go to the relevant distribution in the Analytical Transaction Entry window. You cannot zoom to a Microsoft Dynamics GP window from the Analytical Validation Log.
We recommend that you correct the Microsoft Dynamics GP errors first before correcting the Analytical Accounting errors.
In the Stock Count Entry window, if Autopost Stock Count Variances is not marked, the analysis information created will update the Item Transaction Entry window when you process the Stock Count Schedule.
Batch posting
You can print the Analytical Accounting Edit List along with the Microsoft
Dynamics GP Edit List from the Inventory Batch Entry window. The Analytical Validation Log is also printed if there are any Analytical Accounting errors in the transactions in the batch.
You can also print the Analytical Accounting Edit List from the Item Transaction or Item Transfer Entry window.
Analysis information that has been created for transactions in an inventory batch will not be posted if the Post to General Ledger option is not marked in the Inventory Batch Entry window.
If the option Post to General Ledger is marked, the analysis information entered for transactions in a batch will be validated when you choose Post. Transactions that do not have any Microsoft Dynamics GP or Analytical Accounting errors will be posted. The Analytical Posting Journal will be printed with the Microsoft Dynamics GP Posting Journals if specified in Posting setup. If errors are found during the validation process, the Analytical Validation Log report will be printed. Refer to Validating transactions and correcting errors for more information.
When you delete a single or recurring use batch or a transaction within such batches, the analysis information you’ve entered for the transaction distributions in the batch or for the transaction will also be deleted.
For recurring batches, you must enter analysis information each time the batch is posted.
Series posting
When you post multiple batches from the Series Posting window, batches with analysis information are validated. You can modify the analysis information created for transactions in a batch before posting.
When you post batches, transactions without any errors will be posted. Transactions with errors will not be posted and the errors will be listed in the Analytical Validation Log. The errors must be corrected before you post the transactions again.
The Analytical Posting Journal is printed for all transactions that are successfully posted in each batch.
Post through General Ledger for transaction posting
If you have marked the following options, online transactions and batches posted from Inventory will automatically update the appropriate posting accounts in General Ledger if there are no Analytical Accounting and Microsoft Dynamics GP errors.
Post through General Ledger files under Posting Setup (Administration >> Setup >> Posting >> Posting); and
Post through to General Ledger for Trx Posting (Administration >> Setup >> Company >> Analytical Accounting >> Setup)
While posting online and batch transactions, Analytical Accounting or Microsoft Dynamics GP errors may exist which would prevent the transaction or batch from updating the appropriate posting accounts in General Ledger. For example, default codes may not be assigned for Required Transaction Dimensions in the account class to which the distribution accounts of Fixed or Variable accounts are linked. The transaction or batch will update the General Ledger. You must correct the errors in the transaction or batch in General Ledger from the Transaction Entry window (Transactions >> Financial >> General) before the posting accounts can be updated.
The Analytical Accounting and Microsoft Dynamics GP errors will be displayed in the Analytical Accounting Validation Log Report which will print after the transaction or batch updates Sales Order Processing.
The transaction and batch will update Sales Order Processing. You can view analysis information that originated for the transaction or batch in Sales Order Processing from the relevant Inquiry windows.
Viewing analysis information for inventory transactions
Use the Analytical Inventory Transaction Inquiry window to view the analysis information that has been created for accounts associated with an Item Number in the Item Transaction or Item Transfer or Stock Count Entry windows.
You can view transaction dimension codes and other related information such as reference notes created for the accounts.
A single assignment equal to the transaction distribution amount will be displayed for each distribution account linked to an account class, which can be viewed in the Analytical Inventory Transaction Inquiry window.
To view analysis information for inventory transactions:
Open the Analytical Inventory Transaction Inquiry window. (Inquiry >> Inventory >> Item Transaction >> Select an Item Number >>Additional >> Analytical Transaction)
The Analytical Inventory Inquiry window displays the first distribution of the Item Number selected that is linked to an account class.
The Document Type field Displays the type of transaction.
The Number field Displays the document number.
The Item field Displays the item number relevant to the account displayed. The Site ID field Displays the site ID of the item number.
Enter or select the distribution in the Distribution field. The Distribution lookup will only display those distributions that are linked to an account class.
The Account field will display the account for which you are viewing analysis information. The description for the account is displayed in the next line. The expansion button will open the Microsoft Dynamics GP Account Entry window.
The distribution amount is displayed in the functional amount field. The type of balance, whether credit or debit, is displayed next to the Functional Amount field.
The transaction date of the document selected is displayed in the Transaction Date field.
The Company ID field displays the ID for the current company.
Select the Expand button to view all analysis information created for the distribution account in the list window. This would comprise assignments (always single), reference information, transaction dimensions and their codes.
Select the Collapse button to view only assignments and reference information.
You can also view all information created for each account or just reference information that may exist. Select the +/- buttons available next to the assignment to view all analysis information created for the account or only reference information that may exist.
Select the type of account that you want to browse through from the following:
All You can browse through the inventory and offset accounts for each item number if it is linked to an account class.
Inventory You can browse through the Inventory account of each item number if it is linked to an account class.
Offset You can browse through the Offset account of each item number if it is linked to an account class.
Choose Contra to switch between the Inventory account and the Offset account of the Item Number that is currently displayed in the Analytical Inventory Inquiry window. This is possible only if both the Inventory and Offset accounts of an Item Number are linked to an account class.
If only one account of an Item Number is linked to an account class, a message appears when you click the Contra button.
Click the printer icon button to print information for the distribution displayed in the Inquiry window or for all distributions of the document that are linked to an account class.
Choose OK to close the window.
Chapter 10: Fixed Asset Transaction
Analytical Transfer Maintenance window is used to maintain information on the asset transfer for Fixed Asset module. You can view the transaction dimension codes and description for the transaction dimension codes for fixed asset transactions. You can enter or select the Alias details in the Analytical Transfer Maintenance window.
For transactions in Fixed Asset, you can create assignments and enter transaction dimension codes for the distribution accounts that are linked to an account class. You can save transactions with analysis information to a single or recurring batch prior to posting the batch. The process of validating transactions with analysis information is also explained in the Analytical fixed Asset Transaction Entry window.
This information is divided into the following sections:
Entering Analysis information for Asset Transfer
Entering analysis information for Fixed Asset Transaction
Viewing analysis information for Financial Detail
Viewing analysis information for Asset Account
Viewing analysis information for Transfer
Entering Analysis information for Asset Transfer
Use the Analytical Transfer Maintenance window to enter the analytical information for assets transferred from one location, structure ID, account number, or master asset ID to another.
To enter analysis information on asset transfer
Open the Analytical Transfer Maintenance window. (Transactions >> Fixed Asset >> Transfer >> enter or select an asset ID>>Additional >> Analytical Transaction or CTRL+T)
(Transactions >> Fixed Assets >> Transfer >> enter or select an asset ID >> G/L Accounts expansion button>> Expand Transfer>> Analytical Accounting Button)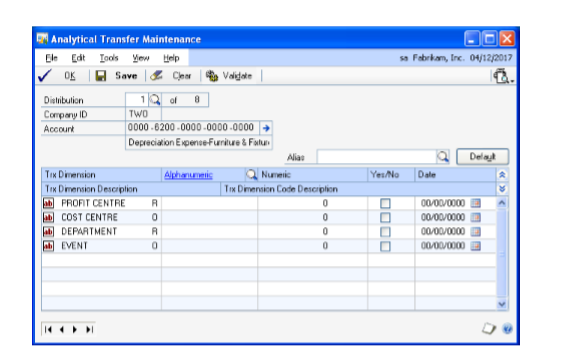
The Distribution field displays the first distribution account of the Item Number selected one of the account associated to Asset ID.To view other distributions, enter or select a distribution number. Select the distribution lookup button to view all the distribution accounts of the transaction linked to an account class in the Analytical Asset Account Lookup window.
The Company ID field will display the company in which the transaction is taking place.
The Account field will display the distribution account for which analytical information is being entered. The description of the account, as set up in the Account Maintenance window, will appear in the next line. Click the Account expansion button to open the Microsoft Dynamics GP Account Entry window.
The balance type of the account, whether debit or credit, will be displayed next to the account.
Select an alias in the Alias field. The Alphanumeric field in the scrolling window displays the transaction dimension codes that are associated with the alias for the transaction dimensions displayed. You can change these codes, if required. Refer to Creating an alias or more information.
The Trx Dimension field displays Transaction Dimensions of the account class to which the distribution account is linked. Only Transaction Dimensions which have been set as Fixed, Required, or Optional will be displayed. Transaction dimensions which are set to Hide in the Accounting Class Maintenance window will not be displayed. Refer to Setting up an account class for more information.
The Trx Dimension Description field displays the description of the transaction dimension.
Enter or select an alphanumeric transaction dimension code in the Alphanumeric column. You can add a new alphanumeric transaction dimension code if you have selected the Create New Codes On The Fly option in the Transaction Dimension Maintenance window.
Note
The Alphanumeric column is available only for an alphanumeric transaction dimension.
The description of the Alphanumeric Transaction Dimension Code is displayed in the Transaction Dimension Code Description field.
Enter a Transaction Dimension Code in the Numeric, Yes/No or Date field if the Transaction Dimension is Numeric, Boolean or Date.
Choose OK to save and close the window.
Choose Save to save the analysis information you have entered and clear the window.
Choose Validate to validate the distribution displayed in the window. If changes are made to the account class in setup or errors are found during the validation process, the Analytical Accounting Validation Log window will open displaying the errors or changes identified. You can view the changes to the account class by selecting the Default button in the Analytical Item Transaction Entry window.
Note
Analysis information will also be validated if you select OK or Save in the Analytical Fixed Asset Setup window.
You can choose to save analysis information with errors or without updating changes made to the account class.
You can validate a document in the Item Transaction Entry window by using the options CTRL+R or Additional >> Run Validation.
Refer to Validating transactions and correcting errors for more information about validation.
Choose the Print drop-down to print the Analytical Accounting Edit list for the distribution currently displayed in the window or for all distributions of the transaction linked to an account class. If errors are detected, the Analytical Validation Log is also printed.
Entering analysis information for Fixed Asset Transaction
Use the Analytical Fixed Asset Transaction Entry windows to enter analysis information for transactions for Fixed Asset module. The window name depends upon the path where you open this window.
You can enter assignments and transaction dimension codes for fixed asset documents using the Analytical Fixed Asset Transaction Entry window.Also, you can view analysis information created for transactions in the Analytical Inquiry windows.
You can open the Analytical Transaction Entry window only if Analytical Accounting has been activated. Refer to Activating Analytical Accounting for more information about activating Analytical Accounting.
In case of multicurrency transactions, a change in the transaction date re-creates distributions due to a change in the exchange rate. If the transaction date is modified, analysis information created previously is deleted when the distributions are re-created.
To enter Analytical Fixed Asset Transaction Entry
Open the Analytical Fixed Asset Transaction Entry window. (Cards>> Fixed Asset>> Book>> select Book ID and enter Asset ID>>Analytical Accounting Icon.)
(Cards>> Fixed Asset>> Book>> select Book ID and enter Asset ID>>Additional >> Analytical Transaction or CTRL+T)
(Cards>> Fixed Asset>> Book>> select Book ID and enter AssetID>>Distributions>> Financial Detail Maintenance>> Analytical Accounting Icon) (Cards>> Fixed Asset>> Book>> select Book ID and enter Asset ID>>Distributions>> Financial Detail Maintenance>> Additional>> Analytical Transaction or CTRL+T)
(Administration >> Routines>> Fixed Assets>> GL Posting>> Analytical Accounting Icon)
(Administration >> Routines>> Fixed Assets>> GL Posting>> Additional>> Analytical Transaction or CTRL+T)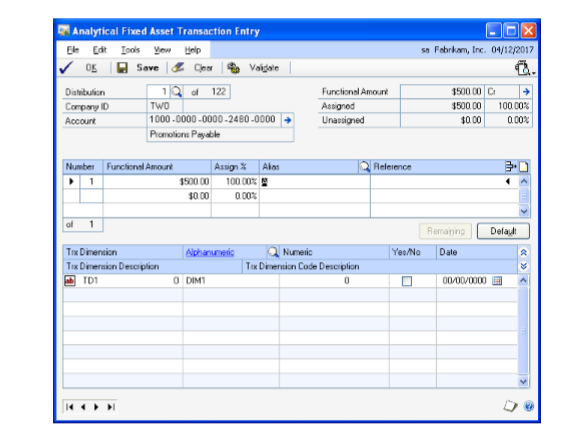
The Distribution field displays the first distribution account of the one of the account associated to Asset ID. To view other distributions for the transaction, enter or select a distribution number.
The sequence of distributions in the Analytical Fixed Asset Transaction Entry window may not correspond to the sequence in the Fixed Asset Entry window because only accounts linked to an account class are displayed in the Analytical Payroll Transaction Entry window.
In the list window, enter the transaction distribution amount in functional or originating currency, by value or on a percentage basis.
Enter the assignment in percentage value in the Assign% field. Initially, a single assignment is created by default. You can overwrite the assignment with more than one assignment.
You can save analysis information for a distribution even if the assignment is not 100%. However, you can post a transaction with partial assignments only if you have opted to allow partial assignments during posting for the module you’re working in. Refer to Setting up assignment options for more information.
Select an alias in the Alias field. The Alphanumeric field in the scrolling window displays the transaction dimension codes that are associated with the alias for the transaction dimensions displayed. You can change these codes if required. Refer to Creating an alias for more information.
Enter reference information for the assignment in the Reference field.
Choose Delete Row to delete a single row in the assignment List View. You cannot choose this option if only a single assignment has been entered.
Choose Remaining to add one assignment for the remaining unassigned amount. The new assignment will ensure that the total assigned amount equals the distribution amount. For example, the distribution amount is $100 and you’ve entered four assignments that total $75. When you choose Remaining, a fifth assignment for the remaining value, $25 is created. This button is not available if the distribution field is blank or has a zero value.
Choose Default to load the current setup information specified for the account class in the Accounting Class Maintenance window and create a single assignment. The following processes will occur:
Fixed, Required, and Optional Transaction Dimensions (including hidden transaction dimensions) will be installed.
All the assignments that you have created for the current distribution will be removed and create a single assignment that is equal to the distribution amount will be created.
If the analysis type is changed to or from Not Allowed, transaction dimensions will be added or removed.
Transaction dimensions that have been deleted will be removed.
Enter or select the code for each alphanumeric transaction dimension in the alphanumeric column. If you’ve marked the Show valid code combinations in trns and budgets option in the Analytical Accounting Options window, then the lookup window will display only those codes that have a valid combination with the codes you have already selected for the transaction.
Enter a transaction dimension code in the Numeric, Yes/No or Date field for a Numeric, Boolean or Date type Transaction Dimension.
Choose OK to save your changes and close the window. The analysis information that you have entered is validated when you choose OK. Refer to Validating transactions and correcting errors for more information.
Choose Save to save the analysis information you have entered and clear the window. A validation takes place when you choose Save in the Analytical General Transaction Entry window. Refer to Validating transactions and correcting errors for more information. You can save the analysis information with errors or without updating changes made to the account class.
Choose Clear to clear the information from the Analytical General Transaction Entry window.
Choose Validate to validate the analysis information of the distribution displayed in the window. If changes are made to the account class in the Analytical Accounting setup or errors are found during the validation process, the Analytical Accounting Validation Log window will open where you can view the errors or changes. Refer to Validating transactions and correcting errors for more information about validation.
To view the changes to the account class choose the Default button in the Analytical General Transaction Entry window. Double click on an Analytical Accounting error to open the Analytical Accounting General Transaction Entry window where the specific error will be highlighted.
Choose the printer icon button to print the Analytical Accounting edit list for the current distribution displayed or for all distributions of the transaction linked to an account class. The Analytical Accounting Validation Log report which describes the Analytical Accounting errors also is printed.
Viewing analysis information for Financial Detail
You can view analysis information for financial detail in the Analytical Financial Detail Inquiry window.
To view analysis information for financial detail
Open the Analytical Financial Detail Inquiry window
(Inquiry >> Fixed Assets >> Financial Detail >> enter or select an asset ID >> select a book ID >> select a line >> Additional >> Analytical Transaction or CTRL+T)Enter or select an asset ID and select a book ID.
Select a transaction and select Additional and choose Additional >> Analytical Transaction or CTRL+T to open the Analytical Financial Detail Inquiry window.
In the Analytical Financial Detail Inquiry window, click the account expansion button to open the Account Entry window to enter or select an alias for an account.
Choose OK to close the Analytical Financial Detail Inquiry window.
Viewing analysis information for Asset Account
You can view analysis information for asset account in the Analytical Asset Account Inquiry window.
To view analysis information for asset account
Open the Analytical Asset Account Inquiry window
(Inquiry >> Fixed Assets >> General>> enter or select an asset ID >> Goto button >> Account >>Additional >> Analytical Transaction or CTRL+T)Enter or select an Asset ID in the Asset Inquiry window.
Choose the Goto button to select the Account option.
Select Additional and choose Additional >> Analytical Transaction or CTRL+T to open the Analytical Asset Account Inquiry window.
In the Analytical Asset Account Inquiry window, click the account expansion button to open the Account Entry window to enter or select an alias for an account.
Choose OK to close the Analytical Asset Account Inquiry window.
Viewing analysis information for Transfer
You can view analysis information for Transfer Assets in the Analytical Transfer Inquiry window.
To view the transfer analysis information
Open Analytical Transfer Inquiry window
(Inquiry >> Fixed Assets >> Transfer>> enter or select asset ID >> Additional>> Analytical Transaction or CTRL+T)Enter or select an Asset ID in the Asset Inquiry window.
Select Additional and choose Additional >> Analytical Transaction or CTRL+T to open the Analytical Transfer Inquiry window.
In the Analytical Transfer Inquiry window, click the account expansion button to open the Account Entry window to enter or select an alias for an account.
Choose OK to close the Analytical Transfer Inquiry window.
Chapter 11: Bank Reconciliation Transactions
You can enter and view analysis information for transactions in Bank
Reconciliation. This would comprise creating assignments and entering transaction dimension codes for accounts that are linked to an account class.
This information is divided into the following sections:
Entering analysis information for bank transactions and receipts
Voiding transactions or receipts
Entering analysis information for bank transfers
Voiding bank transfers
Entering analysis information for reconcile adjustments
Validating transactions and correcting errors
Posting transactions with analysis information
Entering analysis information for deposits
Viewing analysis information in Bank Reconciliation
Entering analysis information for bank transactions and receipts
You can create assignments, enter transaction dimension codes, and reference information for accounts that are linked to an account class in the Analytical Bank Transaction Entry window. You can modify the analysis information that you have entered at any time before posting the document.
The Analytical Bank Transaction Entry window opens automatically when you press TAB from a row in the Bank Transaction Entry window in the following instances:
- If the distribution account is linked to an account class and the Analytical Bank Transaction Entry window has not been opened even once for the account and if all required fields have been entered in the Bank Transaction Entry window.
The Analytical Bank Transaction Entry window also opens automatically If the following changes are made:
Change in distribution account other than the checkbook account.
Change in checkbook amount.
Change in amount of other distribution accounts.
Change from debit to credit or vice versa.
Change in amount from positive to negative or vice versa.
These changes would result in a deletion of the analysis information created previously for the relevant account.
If you clear an unposted transaction or receipt from the Bank Transaction Entry window, the analysis information that exists for the transaction or receipt will be deleted.
If you choose to clear previous entries after you change the Option or Type in the Bank Transaction Entry window the analysis information that exists for the checkbook account and all other distribution accounts that are linked to an account class will be deleted.
If you choose to continue using entries in a new transaction after changing the
Option in the Bank Transaction Entry window (except for a change from Enter Transaction to Enter Receipt or vice versa), analysis information entered for the checkbook account and all other distribution accounts that are linked to an account class will be deleted.
If you change the credit card assigned to a receipt, for which the checkbook is different from the one originally assigned to the receipt, analysis information that exists for the checkbook account will be deleted.
In the case of multicurrency transactions, the following changes will delete the existing analysis information for a transaction or receipt:
Change from originating to functional currency (if entering receipt).
Change in currency ID due to a change in the checkbook ID.
Change in exchange rate in the Exchange Rate Entry window.
Change in the rate type ID in the Exchange Rate Entry window. In this case, distributions are re-created if the rate type ID selected is from a different exchange rate table ID than the one originally assigned to the transaction.
Change in transaction date.
To enter analysis information for bank transactions and receipts:
Open the Analytical Bank Transaction Entry window. (Transactions >> Financial >> Bank Transactions >> Analytical Accounting button)
(Transactions >> Financial >> Bank Transactions >> Additional >> Analytical Transaction or CTRL+T)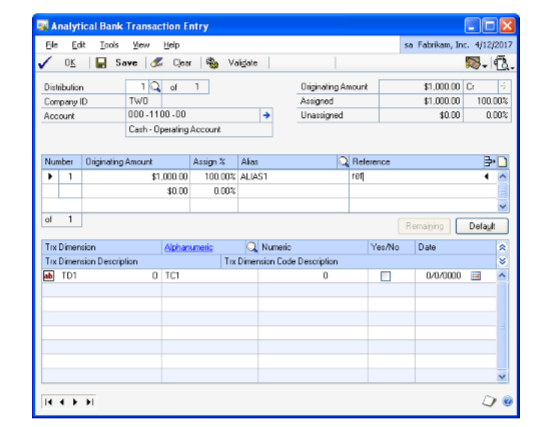
The Analytical Bank Transaction Entry window will only display distribution accounts of a transaction or receipt that are linked to an account class.
For example, if a check transaction has two distribution accounts of which only one is linked to an account class, then the distribution account linked to the account class will be displayed in the Analytical Bank Transaction Entry window. If there is more than one distribution account linked to an account class, they will be displayed in the Analytical Bank Transaction Entry window as per the distribution sequence. You can enter or select the distribution account you want to view.
You can also view a specific distribution account in the Bank Transaction Entry window linked to an account class, by selecting the account prior to opening the Analytical Bank Transaction Entry window.
Refer to Entering analysis information for General Ledger transactions for more information about entering analysis information.
Voiding transactions or receipts
When you void a transaction or receipt in the Bank Transaction Entry window, the analysis information entered for the document during transaction entry will be copied with the exception of the balance type. The balance type of each distribution account linked to an account class will be reversed.
You cannot modify the analysis information of the checkbook account and other distribution accounts prior to voiding. However, if you have made changes to distribution accounts other than the checkbook account prior to voiding that affects the analysis information entered previously for such accounts during transaction entry, such information will be deleted. You must re-enter analysis information for these accounts prior to voiding the transaction or receipt.
The changes made to a distribution line that would result in a deletion of analysis information include changing the account or amount or debit to credit or vice versa or positive amounts to negative or vice versa.
When you void a transaction or receipt, the analysis information entered prior to voiding will be validated. Refer Posting transactions with analysis information for more information about validation.
Entering analysis information for bank transfers
You can enter assignments, transaction dimension codes and reference information for bank transfers in the Analytical Bank Transfer Entry window.
Note
Be sure to follow the tab sequence while entering transactions in the Bank Transfer Entry window, to create analysis information. You may lose data if the tab sequence is not followed.
The Analytical Bank Transfer Entry window will only display checkbook accounts that are linked to an account class.
The Analytical Bank Transfer Entry window opens automatically when you press TAB from a field in the following instances:
- The Transfer To Checkbook ID field if either or both the Transfer From or Transfer To Checkbooks are linked to an account class and the Analytical Bank
Transfer Entry window has not been opened previously for such account. The Analytical Bank Transfer Entry window will open automatically in this instance only if both Checkbook IDs and the amount have been specified in the Bank Transfer Entry window.
The Transfer From or Transfer to Checkbook ID fields, if there is a change in the checkbook ID that results in a change in the distribution account.
The amount field, if there is a change in the bank transfer amount.
If you clear an unposted transfer from the Bank Transfer Entry window, the analysis information that exists for the transfer will be deleted.
In the case of multicurrency transactions, the following changes will delete the existing analysis information of a transfer:
The Transfer From Checkbook is changed to a functional currency checkbook.
Change in exchange rate in the Exchange Rate Entry window.
Change in the Rate Type ID in the Exchange Rate Entry window. In this case, distributions are re-created if the Rate Type ID selected is from a different exchange rate table ID than the one originally assigned to the transaction.
Change in transfer date.
To enter analysis information for bank transfers
Open the Analytical Bank Transfer Entry window. (Transactions >> Financial >>Bank Transfers >> Analytical Accounting button)
(Transactions >> Financial >>Bank Transfers >> CTRL+T or Additional >> Analytical Transaction)Refer Entering analysis information for General Ledger transactions for more information about entering analysis information.
Voiding bank transfers
When you void a bank transfer, the analysis information that was entered for the transfer will be copied, along with a change in the balance type. The balance type will be reversed. You cannot modify the analysis information for the transfer prior to voiding.
Entering analysis information for reconcile adjustments
You can enter analysis information for an adjustment in the Reconcile Bank
Adjustments window (Transactions >> Financial >> Reconcile >> Transactions >>
Adjustments >> Select an adjustment >> CTRL+T or Additional >> Analytical Transaction), if the checkbook account and/or adjustment account are linked to an account class. The Analytical Reconcile Entry window will only display accounts of an adjustment linked to an account class.
You can enter analysis information for one adjustment at a time. To create analysis information for a specific adjustment, select the adjustment prior to opening the Analytical Reconcile Entry window.
The Analytical Reconcile Entry window opens automatically when you press TAB from a field in the Reconcile Bank Adjustments window, in the following instances:
Either or both the distribution accounts of the adjustment are linked to an account class and the Analytical Reconcile Entry window has not been opened previously for such adjustment.
Change in distribution account of an adjustment
Change in adjustment amount
Analysis information entered for adjustments will be deleted if reconciliation information of the Checkbook is deleted from the Reconcile Bank Statements window. Also, if you delete a row in the Reconcile Bank Adjustments window, analysis information that you’ve entered for distribution accounts of that row will be deleted.
In the case of multicurrency transactions, the following changes will delete the analysis information entered for an adjustment:
Change in the Rate Type ID in the Exchange Rate Entry window. In this case, distributions are re-created if the Rate Type ID selected is from a different exchange rate table ID than the one originally assigned to the transaction.
Change in Exchange Rate in the Exchange Rate Entry window.
Change in Date.
Refer to Entering analysis information for General Ledger transactions for more information about entering analysis information.
Validating transactions and correcting errors
You can validate a transaction from the following windows by choosing Additional >> Run Validation or CTRL+R.
Bank Transaction Entry
Bank Transfer Entry
Reconcile Bank Adjustments
Refer to Validating transactions and correcting errors for more information about validation.
In the Reconcile Bank Adjustments window, you can validate the analysis information entered only for individual adjustments. To validate an adjustment, select the adjustment and choose CTRL+T or Additional >> Run Validation.
You can validate any analysis information entered before voiding. If errors are detected during validation, the Analytical Accounting Validation Log window will open displaying the errors.
You can select View >> Incomplete or Erroneous Distributions, to browse through the distribution accounts in the Analytical Transaction Entry window which are incomplete or have erroneous information.
To correct an Analytical Accounting error, double-click on the relevant error to open the relevant Analytical Transaction Entry window. The specific distribution in which the error exists is displayed which you can then correct.
If errors are detected in the analysis information you have entered for adjustments, you can save such information with errors. However, the checkbook cannot be reconciled till you have rectified these errors.
Posting transactions with analysis information
When you post a transaction or transfer or reconcile a checkbook, the analysis information you have entered will be validated.
Refer to Validating transactions and correcting errors for more information. In addition to Analytical Accounting information, Microsoft Dynamics GP data will also be validated before the transaction or transfer is posted or the checkbook is reconciled.
If errors are found while posting a transaction or transfer, the transaction or transfer will not be posted. The Analytical Accounting Validation Log window will open listing the Microsoft Dynamics GP errors first and then the Analytical Accounting errors.
To correct an Analytical Accounting error, double-click on the relevant error to open the relevant Analytical Transaction Entry window. The specific distribution in which the error exists is displayed which you can then correct.
If errors are detected while reconciling a checkbook, they will be listed in the Analytical Accounting Validation Log Report. You will have to select the appropriate adjustment in the Reconcile Bank Adjustments window and correct the errors before the checkbook can be reconciled.
We recommend that you resolve the Microsoft Dynamics GP errors first and then the Analytical Accounting errors.
The Analytical Posting Journal will be printed along with the Microsoft Dynamics GP Posting reports if specified under Posting Setup.
Entering analysis information for deposits
If distributions are created for realized gain or loss accounts when you post deposits from the Bank Deposit Entry window (Transactions >> Financial >> Bank Deposits), the Analytical Bank Deposit window will open automatically if any of these accounts are linked to an account class. Refer to Entering analysis information for bank transactions and receipts for more information about entering analysis information.
The Analytical Bank Deposit Entry window will only display distribution accounts that are linked to an account class.
After you have entered analysis information for the relevant accounts, a validation will take place when you choose Post. If there are errors in the analysis information, the Analytical Validation Log will open displaying the Analytical Accounting errors. Refer to Posting transactions with analysis information for more information.
The Analytical Posting Journal will print after you post the deposits, if you have selected the option in the Posting Setup.
Viewing analysis information in Bank Reconciliation
You can view analysis information you’ve entered for transactions in the Bank Transaction Entry, Bank Transfer Entry and Reconcile Bank Adjustments windows in the Analytical inquiry window.
You can open the Analytical inquiry window from the Bank Transaction Entry zoom or the Bank Transfer Entry zoom in the Checkbook Register Inquiry window.
To view analysis information in Bank Reconciliation:
- Open the Analytical Bank Transaction Entry Zoom or Bank Transfer Entry zoom window. (Inquiry >> Financial >> Checkbook Register >>Bank Transaction Entry Zoom or Bank Transfer Entry Zoom >> Additional >> Analytical Transaction or CTRL+T)
The Analytical Bank Recon Inquiry window displays all analysis information created for a distribution account.
- The first distribution account of the document linked to an account class is displayed. Enter or select a distribution number to view analysis information of other distribution accounts.
If you select a specific account in the Bank Transaction Entry Zoom, the Analytical Bank Recon Inquiry window will display analysis information relating to such account.
The Document Type and Number field will default from the Bank Transaction Entry or Bank Transfer Entry Zoom.
The Originating or Functional Amount field displays the distribution amount in the originating or functional currency based on the option you have chosen in the Currency View. Click the expansion button to view multicurrency information if the originating currency differs from the functional currency.
The Document Date field displays the transaction/ transfer date of the document from the Bank Transaction Entry or Bank Transfer Entry zoom.
The Company ID field displays the ID of the current company.
Click Expand to display all analysis information entered for the distribution account in the list window. This includes assignments, reference information entered per assignment, Transaction Dimensions and their codes.
Click Collapse to display only assignments and reference information entered per assignment for the distribution account.
You also can view all information entered for each assignment or just reference information that may exist. The plus or minus buttons available next to each assignment allow you to view all analysis information entered for an assignment or only reference information that may exist.
Chapter 12: Cashbook Bank Management Transactions
You can enter and view analysis information for payments, deposits, bank transfers, and cash receipts entered in Cashbook Bank Management. You can create assignments and enter transaction dimension codes for accounts that are linked to an account class.
This information is divided into the following sections:
Entering analysis information for payments and deposits
Entering analysis information for bank transfers
Entering analysis information for bank transfer charges
Entering analysis information for cash receipts
Entering analysis information for writeoffs, terms taken, and realized gain/loss
Entering analysis information for distributions
Posting transactions
Validating transactions and correcting errors
Voiding transactions
Viewing analysis information in Cashbook Bank Management
Entering analysis information for payments and deposits
You can enter analysis information for payments and deposits that are in a batch in Cashbook Bank Management. The Analytical Transaction Entry window will open automatically when you TAB out from the amount field in the Payments or Deposits window, if any of the accounts used in the transaction distributions are linked to an account class and if analysis information has not been entered for the transaction. You can also open the Analytical Transaction Entry window from the Distributions window for payments and deposits.
The Analytical Payment/Deposit Transaction Entry window will open automatically if you make the following changes in the Payments or Deposits window:
Amount If you change the amount, and the cheque or deposit contains only one transaction, the analysis information created earlier for the payment or receipt will be deleted. When you open the Analytical Payment/Deposit window after saving the changes, it will display the first distribution created for the transaction with the amount field displaying the new amount. If the cheque or deposit is made up of multiple lines of receipts that have been changed, the analysis information created for the line of receipt will be deleted. This would include the account to which the amount is debited or credited, the tax account, and the checkbook account. A single assignment equal to the new debit or credit amount will be created. Transaction dimensions and default transaction dimension codes specified for the account class to which the checkbook account is linked, will be loaded in the Analytical Payment/Deposit Transaction Entry window.
Distribution account The analysis information created for the distribution account will be deleted if there is any change in the distribution account.
Creditor or Debtor ID The analysis information created for the debtor or creditor control account will be deleted, even if the control account has not been changed. The Analytical Deposit window will display information relating to the new debtor or creditor control account.
Changing positive amount to negative amount or negative amount
to positive amount The analysis information created for the line or receipt affected by the change will be deleted. This would include the account to which the amount is debited or credited, the tax account, and the checkbook account. A single assignment equal to the new debit or credit amount will be created. Transaction dimensions and default transaction dimension codes specified for the account class to which the checkbook account is linked will be displayed in the Analytical Payment/Deposit Transaction Entry window.
Tax amount Analysis information entered for the tax amount will be deleted if any changes are made.
Tax schedule Analysis information entered for the tax schedule will be deleted if any changes are made.
To enter analysis information for payments and deposits:
- Open the Analytical Transaction Entry window.
(Transactions >> Financial >> Bank Management >> Batches >> Payments button >> CTRL+T or Additional >> Analytical Transaction)
(Transaction >> Financial >> Bank Management >> Batches >> Deposits button >> CTRL+T or Additional >> Analytical Transaction)
(Transaction >> Financial >> Bank Management >> Batches >> Payments/Deposits button >> Distribution button >> CTRL+T or Additional >> Analytical Transaction)
The information for the first distribution account that has been linked to an account class is displayed when you open the window. Information relevant to the account associated with the creditor, debtor or GL transaction selected in the scrolling window of the Payments/Deposits window will appear if the cheque comprises a single line or the deposit contains only a single receipt.
For multiple lines or receipts, you can create analysis information for a specific line or receipt displayed in the scrolling window.
You can enter analysis information for the remaining accounts by selecting the appropriate distribution in the Distribution lookup or by entering a distribution number in the Distribution field.
You can delete the analysis information that you have entered for a batch, cheque, or deposit before posting it. This will delete all data such as assignments, transaction dimension codes, and reference information that you entered for the transaction.
If you delete a specific row in the scrolling window of the Payment/Deposit window, all analysis information entered for the transaction will be deleted. In the Payment window, if you have not entered a cheque amount, then a single assignment equal to the revised amount will be created. The transaction dimensions and default transaction dimension codes specified for the account class that the checkbook account is linked to will be displayed in the Analytical Payment/Deposit Entry window.
If a tax schedule is deleted from an existing General Ledger payment or deposit, the analysis information created for the tax account will be deleted. If you delete the tax amount in the Tax Lookup window, the analysis information entered will also be deleted.
- You can print the Analytical Accounting Edit List from the Analytical Transaction Entry window by choosing the printer icon button.
You also can print the Analytical Accounting Edit List before you post a batch in the Batch Entry window by choosing the printer icon button. A validation will take place when you print the edit list. If there are any errors, the Analytical Error Report will be printed after the Analytical Accounting Edit list. The Analytical Accounting Edit list will print the payments and deposits along with the distributions, assignments, and codes.
Refer to Entering analysis information for General Ledger transactions for more information about entering analysis information.
Entering analysis information for bank transfers
You can enter analysis information for bank transfers in the Analytical Bank Transfer Entry window.
To enter analysis information for bank transfers:
- Open the Analytical Bank Transfer Entry window.
(Transactions >> Financial >> Bank Management >> Bank Transfers >>
CTRL+T or Additional >> Analytical Transaction Entry window)
(Transactions >> Financial >> Bank Management >> Bank Transfers >>Distribution button >> CTRL+T or Additional >> Analytical Transaction)
The Analytical Bank Transfer Entry window will display information relevant to the first distribution created for the transfer. If you selected a row in either of the scrolling windows, or placed the cursor on any field in the Bank Transfer Entry window, the Analytical Bank Transfer Entry window will display the information for the first distribution created for the transfer.
- Refer to Entering analysis information for General Ledger transactions for more information about entering analysis information.
In the Bank Transfer Entry window, if a change is made to the amount, the analysis information created for the account which has been affected by the change will be deleted. For example, if the Transfer From amount is changed, the analysis information you entered for the From Checkbook will be deleted.
If you delete a bank transfer, the analysis information created for the From and To Checkbook Accounts and the Bank Charges Account will be deleted.
If you delete a row in the scrolling window, the analysis information created for the transaction will also be deleted.
If you delete data related to bank charges in the Bank Transfer Charges window, the analysis information created for the bank charges account will also be deleted.
Entering analysis information for bank transfer charges
The Analytical Bank Transfer Charges window will open automatically when you press TAB from the Amount field in the Bank Transfer Charges window for the first time, if all the required information is entered. This will happen only if any of the accounts used in the transaction are linked to an account class and if analysis information has not been entered for the accounts.
You can open the Analytical Bank Transfer Charges window by choosing CTRL+T in the Bank Transfer Charges window (Transactions >> Financial >> Bank Management >> Bank Transfer >> Bank Transfers charges) to enter analysis information.
The Analytical Bank Transfer Charges window will open automatically if a change is made in the bank charges amount or bank charges account in the Bank Transfer Charges window.
Analysis information created for a bank charges account will be deleted if the amount of charges is altered in the Bank Transfer Charges window.
Refer to Entering analysis information for General Ledger transactions for more information about entering analysis information.
Entering analysis information for cash receipts
You can enter analysis information for cash receipts in the Analytical Cash Receipts
Entry window. This window will open automatically when you press TAB from the Amount field in the Cash Receipts window for the first time. This will happen only if any of the accounts in the transaction are linked to an account class and if analysis information has not been entered for the accounts.
You can open the Analytical Cash Receipts Entry window by choosing Transactions >> Financial >> Bank Management >> Cash Receipts >> CTRL+T or Additional >>Analytical Transaction.
You can also open the Analytical Cash Receipts Entry window from the
Distributions window for cash receipts (Transactions >> Financial >> Bank Management >> Cash Receipts >> Distributions >> Additional >> Analytical Transaction or CTRL+T).
You can use the browse button to view the other distributions and enter analysis information. You also can select a distribution in the Distribution Lookup or enter the distribution number in the Distribution field to view it in the scrolling window.
The Analytical Cash Receipts Entry window will display information for the account that has been linked to an account class. If more than one account in the transaction has been linked to an account class, then this window will display information for the first of such accounts.
Choose Save to save the transactions you have entered in the Analytical Cash Receipts Entry window.
If you clear a transaction in the Cash Receipts window, the analysis information entered for the transaction will be deleted.
If you close the Cash Receipts window without posting the transaction, the analysis information entered for the transaction will also be deleted.
Refer to Entering analysis information for General Ledger transactions for more information about entering analysis information.
Entering analysis information for writeoffs, terms taken, and realized gain/loss
You can enter analysis information for writeoffs, terms taken and realized gain/loss if the payment or receipt has been applied. You can open the Analytical Transaction Entry window from the Payment/Deposits window and Cash Receipts window by choosing CTRL+T or Additional >> Analytical Payment/Deposit Transaction Entry.
When a payment or receipt is applied in the Payment/Deposit window or the Cash Receipts window, analysis information can be entered for accounts relating to writeoffs, terms taken, and realized gain/loss if they are linked to an account class.
When you return to the Payment window after applying a payment, a verification will take place to check if any amount exists for writeoffs, terms taken, or realized gain/loss or tax distributions. If it does exist, and if the account to which the amount is to be debited or credited is linked to an account class, the Analytical Payment Transaction Entry window will open. This window will display information relating to the first of such accounts in case there is more than one account.
Analysis information that has been entered for the creditor’s control account before the terms taken, writeoffs or realized gain/loss is entered will be deleted. A single assignment for the revised distribution amount will be created. The transaction dimensions and default transaction dimension code for the account class that the creditor control account is linked to will be displayed in the Analytical Payment Transaction Entry window.
When you return to the Deposit window after applying a receipt, a verification will take place similar to payments. You can enter analysis information for terms taken, writeoffs, or realized gain/loss before saving the receipt.
Refer to Entering analysis information for General Ledger transactions for more information about entering analysis information.
Entering analysis information for distributions
You can enter analysis information for the distributions created for transactions in Cashbook Bank Management. The Analytical Accounting window can be opened from the Distributions windows that open from the following windows:
Payments Entry
Deposits Entry
Bank Transfer Entry
Bank Transfer Charges
Cash Receipts Entry
Refer to Entering analysis information for General Ledger transactions for more information about entering analysis information.
Posting transactions
A validation will take place when you post transactions in the following windows:
CBM Batch Entry
Bank Transfer Entry
Cash Receipts Entry
A transaction can be posted only after you close the Analytical Transaction Entry window.
After posting transactions, the Analytical Accounting posting journal is printed. If there are errors in the transactions, the Analytical Accounting error list is printed.
If you selected to print cash receipts in the Checkbook Setup window (Cards >> Financial >> Bank Management >> Setup >> Checkbooks), a validation will take place when you choose Post. If you have not selected to print cash receipts, a validation takes place when you choose Post. If errors are found, the Analytical Accounting Validation Log window will open listing the Microsoft Dynamics GP errors first and then the Analytical Accounting errors.
When you post a bank transfer, the bank charge distributions are validated first and if any errors are found, then the Analytical Accounting Validation Log window will open.
Validating transactions and correcting errors
You can validate analysis information for payments in the Payments window by choosing Additional >> Run Validation or by pressing CTRL+R. Validation can only be done for a single transaction at a time.
You can validate analysis information for deposits by selecting a receipt and choosing CTRL+R or Additional >> Run Validation.
Analysis information for bank charges can be validated when the Bank Charges window is open, by choosing CTRL+R.
You can validate analysis information for transactions in the Cash Receipts window by choosing Additional >> Run Validation or CTRL+R
Refer to Validating transactions and correcting errors for more information about validation.
Voiding transactions
When you void a transaction in the Transaction Reconcile or Transaction Inquiry windows, the analysis information entered for that transaction will be reversed. For example, you void a transaction CBPay001 in the Transaction Reconcile (Transactions >> Financial >> Bank Management >> Reconcile >> OK) or
Transaction Inquiry (Inquiry >> Financial >> Bank Management >> Transaction Inquiry) windows. This transaction will have assignments in the Analytical Transaction Entry window. When you void the transaction, a reverse entry will be created in Microsoft Dynamics GP and also reverse assignments will be created in Analytical Accounting. The Analytical Voiding posting journal will also be printed when you close the Bank Transaction Inquiry window.
This will happen only for transactions voided in the Payment Inquiry/Void or Deposit Inquiry/Void window.
Viewing analysis information in Cashbook Bank Management
You can view the analysis information that you have entered for transactions in Cashbook Bank Management in the Analytical Inquiry window.
The Analytical Inquiry window can be opened by choosing CTRL+T or Additional >> Analytical Transaction after zooming to a document or choosing void in the Transaction Inquiry or Transaction Reconcile window.
You can also open the Analytical Inquiry window for cash receipts by zooming on a cash receipt in the Deposit Inquiry window and choosing Additional >> Analytical Transaction.
To view analysis information in Cashbook Bank Management:
- Open the Analytical Inquiry window.
(Inquiry >> Financial >> Bank Management >> Transaction Inquiry >> Void >> CTRL+T)
The Analytical Inquiry window will display analysis information for the first distribution created for the transaction. Choose the browse button to view the remaining distributions or click the Distribution lookup. You can also view the other distributions by entering the number in the Distribution field. To view the analysis information for a particular receipt, you can select the receipt in the Deposit window and then open the Analytical Inquiry window.
If you are viewing a bank transfer, the Transfer From and Transfer to Checkbooks will be displayed. The bank transfer number relevant to the transaction that you are viewing will also be displayed. If you are viewing bank transfer charges, the bank transfer number, checkbook ID and charge number will be displayed.
If you are viewing a cash receipt, the receipt number will be displayed.
If a deposit contains multiple lines of receipts, you can view analysis information for a specific line of receipt. If the cursor is on a specific transaction in the Deposit Inquiry window, then information for the account associated with the debtor or creditor or the General Ledger transaction will be displayed.
The Analytical Inquiry window will display the analysis information for a distribution account in detail, when opened initially. The amount assigned in value and percentage terms, the transaction dimensions, transaction dimension codes and reference information will also be displayed.
Chapter 13: Electronic Bank Management
You can enter and view analysis information for bank transactions, bank transfers, writeoffs, and terms taken transactions entered in Electronic Bank Management.
This information is divided into the following sections:
Entering analysis information for bank transactions
Entering analysis information for matched transactions
Entering analysis information for writeoffs and terms taken
Entering analysis information for distributions
Entering analysis information for bank transfers
Posting transactions
Viewing analysis information in Electronic Bank Management
Entering analysis information for bank transactions
You can create assignments, enter transaction dimension codes, and reference information for bank transactions, if any of the accounts used in the transaction are linked to an account class, in the Analytical Bank Transaction Entry window.
The Analytical Bank Transaction Entry window will open automatically the first time when you save the transaction amount in the Bank Transaction Entry window and also in the following instances:
A new transaction is being created.
The account/s associated with the transaction are linked to an account class.
Analysis information has not been created for such accounts.
All required fields have been filled in the Bank Transaction Entry window.
The Analytical Bank Transaction Entry window will open automatically if you make the following changes in the Bank Transaction Entry window:
Change in the amount (in case of unmatched transactions).
Change in distribution account (in case of General Ledger payments and receipts).
Selecting a General Ledger distribution account after a matched General Ledger transaction is unmatched.
Change in Debtor or Creditor ID (in case of unmatched Payables Management and Receivables Management payments/receipts).
Change in tax schedule (in case of unmatched General Ledger payments and receipts).
Change in tax amount in the Tax Lookup window (in case of unmatched General Ledger payments and receipts).
In all these instances, the analysis information created for the original entry will be deleted.
The Analytical Accounting Transaction window will not open if the transaction amount is zero in the Bank Transaction Entry window, even if the accounts associated with the transaction are linked to an account class, as no distributions would be created.
If you delete a transaction with analysis information in the Bank Transaction Entry window, all the analysis information for the relevant transaction will also be deleted.
If you delete a tax schedule or alter the tax amount for a transaction with analysis information in the Bank Transaction Entry window, the analysis information for the tax accounts and the checkbook account will be deleted and a single assignment equal to the revised amount will be created.
To enter analysis information for bank transactions:
- Open the Analytical Bank Transaction Entry window. (Transactions >> Financial >> Bank Management >> Reconciliation >> Select Statement >> Transactions >> CTRL+T or Additional >> Analytical Transaction)
The Analytical Bank Transaction Entry window displays information for the first distribution account that has been linked to an account class. To view other distributions, enter or select a distribution number. You can also use the browse buttons to view the required distribution.
In the case of multicurrency transactions, the window will display the transaction amount of the account displayed, and the assignments created for the account in the originating currency.
Refer to Entering analysis information for General Ledger transactions for more information about entering analysis information.
Choose Save to save the information you have entered.
You can validate individual transactions with analysis information in the Bank Transaction Entry window by selecting a transaction and choosing CTRL+R. You can validate all the transactions with analysis information by choosing CTRL+R or Additional >> Run Validation. If no errors are detected during the validation process, the reconciliation is posted and the Analytical Accounting Posting Journal is printed. If errors are detected, the Analytical Validation Log is printed. Refer to Validating transactions and correcting errors for more information.
Entering analysis information for matched transactions
When you match transactions in the Match Transactions window (Transactions >> Financial >> Bank Management >> Reconciliation >> Transactions >> Match Trans), and choose OK, the Analytical Bank Transaction Entry window will open. The window will open only if the holding account is linked to an account class, and if the transaction has been fully matched.
The transaction dimensions and any existing default transaction dimension codes relevant to the holding account will be displayed.
Analysis information created for any account other than the checkbook account in the Bank Transactions window, that is not related to distributions created after matching transactions, is deleted when you close the Match Transactions window. Analysis information created for tax accounts in the Tax Lookup window will also be deleted.
You can view the analysis information created for a matched transaction before it is posted, in the Analytical Bank Transaction Entry window.
When you unmatch a matched transaction before posting the reconciliation, analysis information for the transaction apart from the analysis information for the checkbook account will be deleted on closing the Match Transaction window.
Analysis information for transactions that have been partially matched will be deleted. The information will only be deleted if the transaction is fully matched, or the transaction or tax amount is deleted or if the distribution or tax account is no longer linked to an account class.
If the holding account of the matched transactions is linked to an account class, and Auto Match is completed successfully, a message will appear that analysis information needs to be entered for the matched transactions. Refer to Entering analysis information for bank transactions for more information about entering analysis information. Analysis information that was created for transactions before Auto Match was run will be deleted after Auto Match is completed.
Entering analysis information for writeoffs and terms taken
If you apply a payment or receipt in the Bank Transaction Entry window, then analysis information must be created for accounts linked to an account class, for writeoffs and terms taken.
Analysis information will be created for writeoffs and terms taken when you close the Apply Payables/Sales documents window if any amount is entered, and if the accounts are linked to an account class.
Analysis information that exists for debtor/creditor control account before entering terms taken or writeoffs, will be deleted. A single assignment equal to the new distribution amount is created. The window will display the transaction dimensions and default transaction dimension codes for the account class that the creditor/ debtor control account is linked to.
Entering analysis information for distributions
You can enter analysis information for distributions in Electronic Bank Management. The Analytical Transaction Entry window will open from the Distributions windows that open from the following windows:
Bank Transactions Entry
Bank Transfers
You can press CTRL+T or choose Additional >> Analytical Transaction to open the Analytical Transaction Entry window. The window will only open if the account selected in the Distributions window is linked to an account class.
Refer to Entering analysis information for bank transactions for more information about entering analysis information.
Entering analysis information for bank transfers
You can enter analysis information for bank transfers if the accounts are linked to an account class, using the Analytical Bank Transfer Entry window. You can open the Analytical Bank Transfer Entry window by selecting an account in the scrolling window or placing the cursor on any field in the Bank Transfer Entry window (Transactions >> Financial >> Bank Management >> Bank Transfers) and pressing
CTRL+T or by choosing Additional >> Analytical Transaction. The Analytical Bank Transfer Entry window will display the first distribution account of the transaction that is linked to an account class.
In the case of multicurrency transactions, the window will display the transaction amount of the account displayed, and the assignments created for the account in the originating currency.
Refer to Entering analysis information for bank transactions for more information.
If there is a change in the amount of the bank transfer, the analysis information that exists for the account related to the transfer will be deleted. You must enter analysis information again for the transfer before it is posted.
You can the validate analysis information that you have created for bank transfers choosing CTRL+R or Additional >> Run Validation. If errors are found during the validation process, the Analytical Error window opens, displaying the error. Refer to Validating transactions and correcting errors for more information about validation.
Posting transactions
When you post a reconciliation from the Select Statement window (Transactions >> Financial >> Bank Management >> Reconciliation), analysis information created for transactions in the Bank Transaction Entry window is validated. If no errors are detected during the validation process, the reconciliation is posted and the Analytical Accounting Posting Journal is printed. If errors are detected, the Analytical Error Report is printed after the Analytical Accounting Edit List. The reconciliation can be posted only if no errors are found during the validation process.
Viewing analysis information in Electronic Bank Management
You can view analysis information created for bank transactions and bank transfers in the Analytical Inquiry window. The window can be opened from the Transaction Inquiry window only if you have selected a specific transaction.
To view analysis information for bank transactions and bank transfers:
Open the Analytical Bank Transfer Enquiry window. (Inquiry >> Financial >> Bank Management >> Reconcile Inquiry >> Transaction Inquiry >> CTRL+ T or Additional >> Analytical Transaction)
(Inquiry >> Financial >> Bank Management >> Bank Transfers >> CTRL+ T or Additional >> Analytical Transaction)The Analytical Inquiry window displays the analysis information related to the first distribution account of the transaction that has been linked to an account class. If you selected a matched transaction in the Transaction Inquiry window, the analysis information would related to the holding account and/or checkbook account if it is linked to an account class.
The analysis information for a distribution account is displayed in detail. This includes the amount assigned in value and percentage terms, transaction dimensions, transaction dimension codes and reference information.
Chapter 14: Direct Debits And Refunds Transactions
You can create analysis information for direct debits and direct debit refunds, when you process Direct Debits and Refunds transactions. This information is only for default transaction dimension codes that are assigned to Required, Fixed and Optional Transaction Dimensions of the account class that the transaction distribution accounts used in processing are linked to. For the transaction distributions that are created on processing, a single assignment equal to the distribution amount is created by default. The analysis information will be created during processing and you can modify default information in General Ledger.
In Direct Debits and Refunds, there will be no validation of analysis information. However, you will not be able to post a batch that originates from Direct Debit and Refunds from General Ledger if there are errors in the default analysis information, such as a transaction dimension code has not been specified for a Required transaction dimension. This batch will not update posting accounts from General Ledger until you enter a code for the transaction dimension.
This information is divided into the following sections:
Analysis information for direct debits and refunds
Posting through to General Ledger for transaction posting
Viewing analysis information for direct debits and refunds
Analysis information for direct debits and refunds
In the Select Direct Debits window (Transactions >> Sales >> Select Direct Debits), when you select a batch for direct debit and refunds and choose Process, the payments and debit memos are created and default transaction dimension codes loaded and assignments created for distribution accounts that are linked to an account class.
You can create multiple assignments or modify/enter transaction dimension codes for the distribution accounts linked to an account class in General Ledger after processing. Refer Entering analysis information for General Ledger transactions for more information.
Posting through to General Ledger for transaction posting
For Direct Debits and Refunds, the option Post through General Ledger files under Posting Setup (Administration >> Setup >> Posting >> Posting) is unavailable. Transactions posted from Direct Debits and Refunds must be posted from General Ledger.
Viewing analysis information for direct debits and refunds
You can view default Transaction Dimension codes and assignments of transaction distribution accounts created after processing direct debits and refunds from the Sales Distribution Inquiry Zoom window.
(Inquiry >> Sales >> Transaction by Customer or Transaction by Document >> Select a receivables document >> Document Number link)
Refer Viewing analysis information in Receivables Management for more information about viewing analysis information.
Chapter 15: Analysis information for U.S. Payroll transactions
You can enter and view analysis information for transactions entered in the U.S. Payroll series. You can create assignments and enter transaction dimensions and codes by assigning a default alias to each employee. The default transaction dimension codes associated with the alias is displayed for U.S. Payroll transactions. You also can assign a default alias to display transaction dimension information associated with the alias for a batch of U.S. Payroll transactions in the Mass Payroll Transactions Entry window. You can modify the analysis information before posting the transactions. Multilevel query and distribution queries can be used to view analysis information for the employees.
This information is divided into the following sections:
Understanding analysis information for payroll transactions
Defining default dimensions for payroll transactions
Entering analysis information for payroll transactions
Viewing analysis information for payroll transactions
Understanding analysis information for payroll transactions
You can enter and view analysis information for payroll transactions if you have registered Payroll in the Registration window (Administration >> Setup >> System
>> Registration), and enabled transaction dimensions for payroll in the Analytical Accounting Options window. Be sure to mark the Post in Detail option for the Payroll series in the Posting Setup window. Refer to Setting up posting options for Analytical Accounting for more information.
With Analytical Accounting for Payroll, you can:
Assign an alias to a combination of posting type, employee, department, position, and code in the Analytical Payroll Default Dimensions window.
View and modify the default analysis information for a payroll transaction before posting.
View the assignments in percentage or hours for transactions other than overhead transactions. In the case of overhead transactions, you can view this information in General Ledger.
Create and run queries using the Distribution Query wizard and the Multilevel Query wizard to view analysis information for selected employees.
Defining default dimensions for payroll transactions
You can assign an Analytical Accounting alias to a combination of posting type, employee, department, position and code for the default dimension in the Analytical Payroll Default Dimensions window. The default transaction dimension codes associated with the alias is displayed when you enter a transaction for the specific combination.
To define default dimensions for payroll transactions:
Open the Analytical Payroll Default Dimensions window. (Administration >> Setup >> Posting >> Payroll Accounts >> Analytical Accounting button)
(Administration >> Setup >> Posting >> Payroll Accounts >> Additional >>Payroll Defaults)
(Administration >> Setup >> Posting >> Analytical Accounting Default Dimensions button)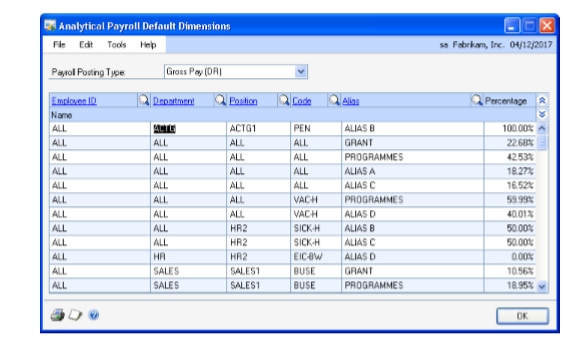
Select a payroll posting account type in the Payroll Posting Type field. The posting types available in the U.S. Payroll module are available for selection. Refer to U.S. Payroll documentation for more information.
Select the employee ID.
Select the department code in the Department field.
Select the position code in the Position field.
Select the pay code in the Code field.
Select an alias in the Alias field as the default alias for the employee ID and payroll combination defined in this window.
Enter a percentage for the alias in the Percentage field. You can enter a percentage value between 0 to 100%.
Choose OK to save the information and close the window.
Entering analysis information for payroll transactions
You can enter or modify analysis information assigned to U.S. payroll transactions.
For manual checks, as well as for Pay Code type of computer checks, you can view and change the default analysis information during transaction entry.
For Deduction and Benefit type of computer checks, you can edit the default analysis information only after you have performed the Calculate Checks process.
In the Payroll Mass Transaction Entry window, you can enter an alias to assign default analytical information to a selected range within a payroll batch.
To enter analysis information for payroll transactions:
Open the Analytical Payroll Transaction Entry window. (Transactions >> Payroll >> Transaction Entry >> Analytical Accounting button)
(Transactions >> Payroll >> Transaction Entry >> Additional >> Analytical Transaction)
(Transactions >> Payroll >> Transaction Entry >> Ctrl + T)
(Transactions >> Payroll >> Transaction Entry >> Select a transaction in the scrolling window >> Analytical Accounting button)
(Transactions >> Payroll >> Transaction Entry >> Select a transaction in the scrolling window >> Dimensions Button)
(Transactions >> Payroll >> Transaction Entry >> Select a transaction in the scrolling window >> Additional >> Analytical Transaction)
(Transactions >> Payroll >> Transaction Entry >> Select a transaction in the scrolling window >> Ctrl + T)
(Transactions >> Payroll >> Manual Check >> Distributions Button >>Analytical Accounting Button)
(Transactions >> Payroll >> Payroll Posting Edits >> Analytical Accounting Button)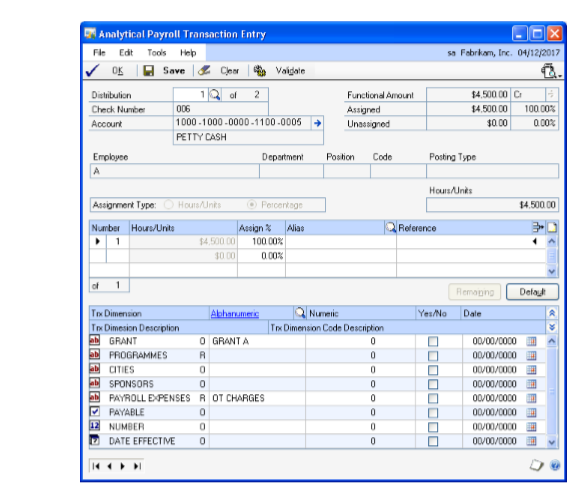
The Distribution field displays the distribution account selected in the Payroll Transaction Entry window. To view other distributions for the transaction, enter or select a distribution number. The field name depends upon the path from which you open this window.
The sequence of distributions in the Analytical Payroll Transaction Entry window may not correspond to the sequence in the Payroll Transaction Entry window because only accounts linked to an account class are displayed in the Analytical Payroll Transaction Entry window.
Functional Amount Displays the distribution amount in the functional currency.
Assigned Displays distribution amount, hours or units based on the pay type associated with the code.
Unassigned Displays the remaining distribution amount that is to be assigned in value and percentage.
Account The Account field displays the account related to the distribution. The expansion button will open the Microsoft Dynamics GP Account Entry window. The account description is also displayed.
The Employee, Department, Position, Code and Posting Type fields display the employee ID, department, position, pay code and the payroll posting type for the distribution.
Select Hours/Units or the Percentage as the assignment type to assign values to the distribution amount.
Hours/Units This option is automatically selected and available for pay types that are calculated on hourly or unit basis. If this option is marked, you can enter the Analytical Accounting distributions based on hours/units.
Percentage Select this option to enter the Analytical Accounting distributions based on percentages. This option is automatically selected for pay types other than hours or units.
Note
If the option hours/units is selected automatically for a distribution and you change the default assignment type to percentage, an assignment of 100% is created based on your setups in the linked accounts class.
In the assignment list view, an arrow in the Number field indicates that the analysis information displayed is for the selected assignment. Each assignment created for the distribution is displayed separately.
In the list window, enter the hours or units by value or by percentage depending on the assignment type selected.
Number Displays the assignment number.
Hours/Units Displays the hours or units for the selected assignment based on the default percentage set up in the Analytical Payroll Default Dimensions window. You can modify this information if required.
Assign% Displays the percentage based on your selections in the Analytical Payroll Default Dimensions window. You can modify the assignment percentage if required.
You can save analysis information for a distribution even if the assignment is not 100%. However, you can post a transaction with partial assignments only if you have opted to allow partial assignments during posting for the Payroll module. Refer to Setting up assignment options for more information.
Alias Displays the alias for each assignment based on the default alias defined in the Analytical Payroll Default Dimensions window. You can select a different alias if required.
Enter the reference information for the assignment in the Reference field.
The Trx Dimension column displays transaction dimensions of the account class that the distribution account is linked to. Only transaction dimensions that have been set as Required, Fixed, or Optional are displayed.
The Alphanumeric column displays the dimension codes assigned to the corresponding transaction dimension in the Alias Maintenance window and to the transaction dimensions of the account class of the distribution account in the Accounting Class Maintenance window.
Enter a transaction dimension code in the Numeric, Yes/No or Date field for a Numeric, Boolean or Date type Transaction Dimension.
Choose Delete Row to delete a single row in the assignment List View. You cannot choose this option if only a single assignment has been entered.
Choose Remaining to add one assignment for the remaining unassigned amount. The new assignment will ensure that the total assigned amount equals the distribution amount. For example, if the distribution amount is $100 and you have entered four assignments that total $75. When you choose Remaining, a fifth assignment for the remaining value, $25 is created. This button is not available if the distribution field is blank or has a zero value or if the distribution amount is fully assigned.
Choose Default to load the current setup information specified for the account class in the Accounting Class Maintenance window and create a single assignment. The following processes will occur:
Fixed, Required, and Optional Transaction Dimensions (including hidden transaction dimensions) will be installed.
All the assignments that you have created for the current distribution will be removed and create a single assignment that is equal to the distribution amount will be created.
If the analysis type is changed to or from Not Allowed, transaction dimensions will be added or removed.
Transaction dimensions that have been deleted will be removed.
Choose OK to save your changes and close the window. The analysis information that you have entered is validated when you choose OK.
Choose Validate to validate the analysis information of the distribution displayed in the window. If changes are made to the account class in the Analytical Accounting setup or errors are found during the validation process, the Analytical Accounting Validation Log window will open where you can view the errors or changes. Refer to Validating transactions and correcting errors for more information about validation.
Choose Print to print the error report. Choose OK to close the window and return to the Analytical Payroll Transaction Entry window.
Choose Clear to clear the values displayed in the Analytical Payroll Transaction Entry window.
Choose Validate to validate the analysis information of the distribution displayed in the window. If changes are made to the account class in the Analytical Accounting setup or errors are found during the validation process, the Analytical Accounting Validation Log window will open where you can view the errors or changes. Refer to Validating transactions and correcting errors for more information about validation.
Choose Save to save the default or modified analysis information you have entered.
Choose the printer icon button to print the Analytical Accounting edit list for the current distribution displayed or for all distributions of the transaction linked to an account class. The Analytical Accounting Validation Log report which describes the Analytical Accounting errors also is printed.
Viewing analysis information for payroll transactions
You can use the Analytical Payroll Transaction Entry Zoom window to view analysis information for payroll transactions generated from the U.S. Payroll module.
To view analysis information for payroll transactions:
Open the Analytical Payroll Transaction Entry Zoom window. (Inquiry >> Payroll >> Check History >> Distributions button >> Select a distribution account >> Analytical Accounting button)
(Inquiry >> Payroll >> Check History >> Select a transaction >> Additional >>Analytical Transaction)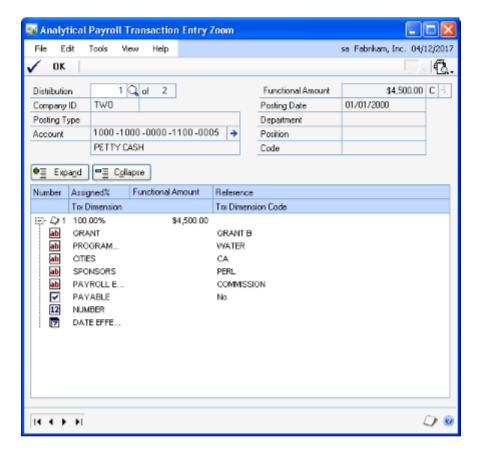
The Analytical Payroll Transaction Entry Zoom window displays all analysis information created for a distribution account. The first distribution account of the document linked to an account class is displayed. Enter or select a distribution number to view analysis information for other distribution accounts.
Choose the plus button (+) available next to each assignment to view all analysis information entered for an assignment or choose the minus button (-) to view only reference information that may exist.
Choose OK to close the window after viewing the information required.
See also
Microsoft Dynamics GP Analytical Accounting
Microsoft Dynamics GP Analytical Accounting Part 3: Routines, Inquiries and Reports
Microsoft Dynamics GP Analytical Accounting Glossary