Note
Access to this page requires authorization. You can try signing in or changing directories.
Access to this page requires authorization. You can try changing directories.
Important
ID-porten in Norway has changed. Microsoft updated the Norwegian Electronic VAT submission solution to the new ID-porten system from the 23.5 release.
Business Central provides features that allow you to calculate and report VAT returns to the Norwegian tax authorities.
This article shows the typical steps that you should follow when reporting Norwegian VAT.
This article assumes that VAT reporting is set up. Learn more in Set Up Calculations and Posting Methods for Value-Added Tax and Report VAT to Tax Authorities.
Set up Business Central to generate and submit electronic VAT returns
To submit VAT returns to Norwegian tax authorities, an administrator must create a connection to ID-Porten at Digitaliseringsdirektoratet.
Tip
We recommend that you always use Business Central in a browser to set up the connection to ID-Porten.
Register your company with ID-Porten
To register your company with ID-Porten, follow the steps provided by Samarbeidsportalen. After you register, note the following information. You'll need it later when you use the assisted setup guide to authorize Business Central to access ID-Porten.
- Valid redirection URIs
- Client ID
- Client secret
Important
It's important to safely store the client ID and client secret of the integration point.
Set up the integration point
After you register your company in ID-Porten, the next step is to create an integration point in your company's account in ID-Porten. Learn more in integration point.
Sign in to Skatteetaten.
On the navigation pane, choose Integrasjoner, and under Produksjon, choose Ver 2.
Choose New Integration to add a new integration point: https://sjolvbetjening.samarbeid.digdir.no/
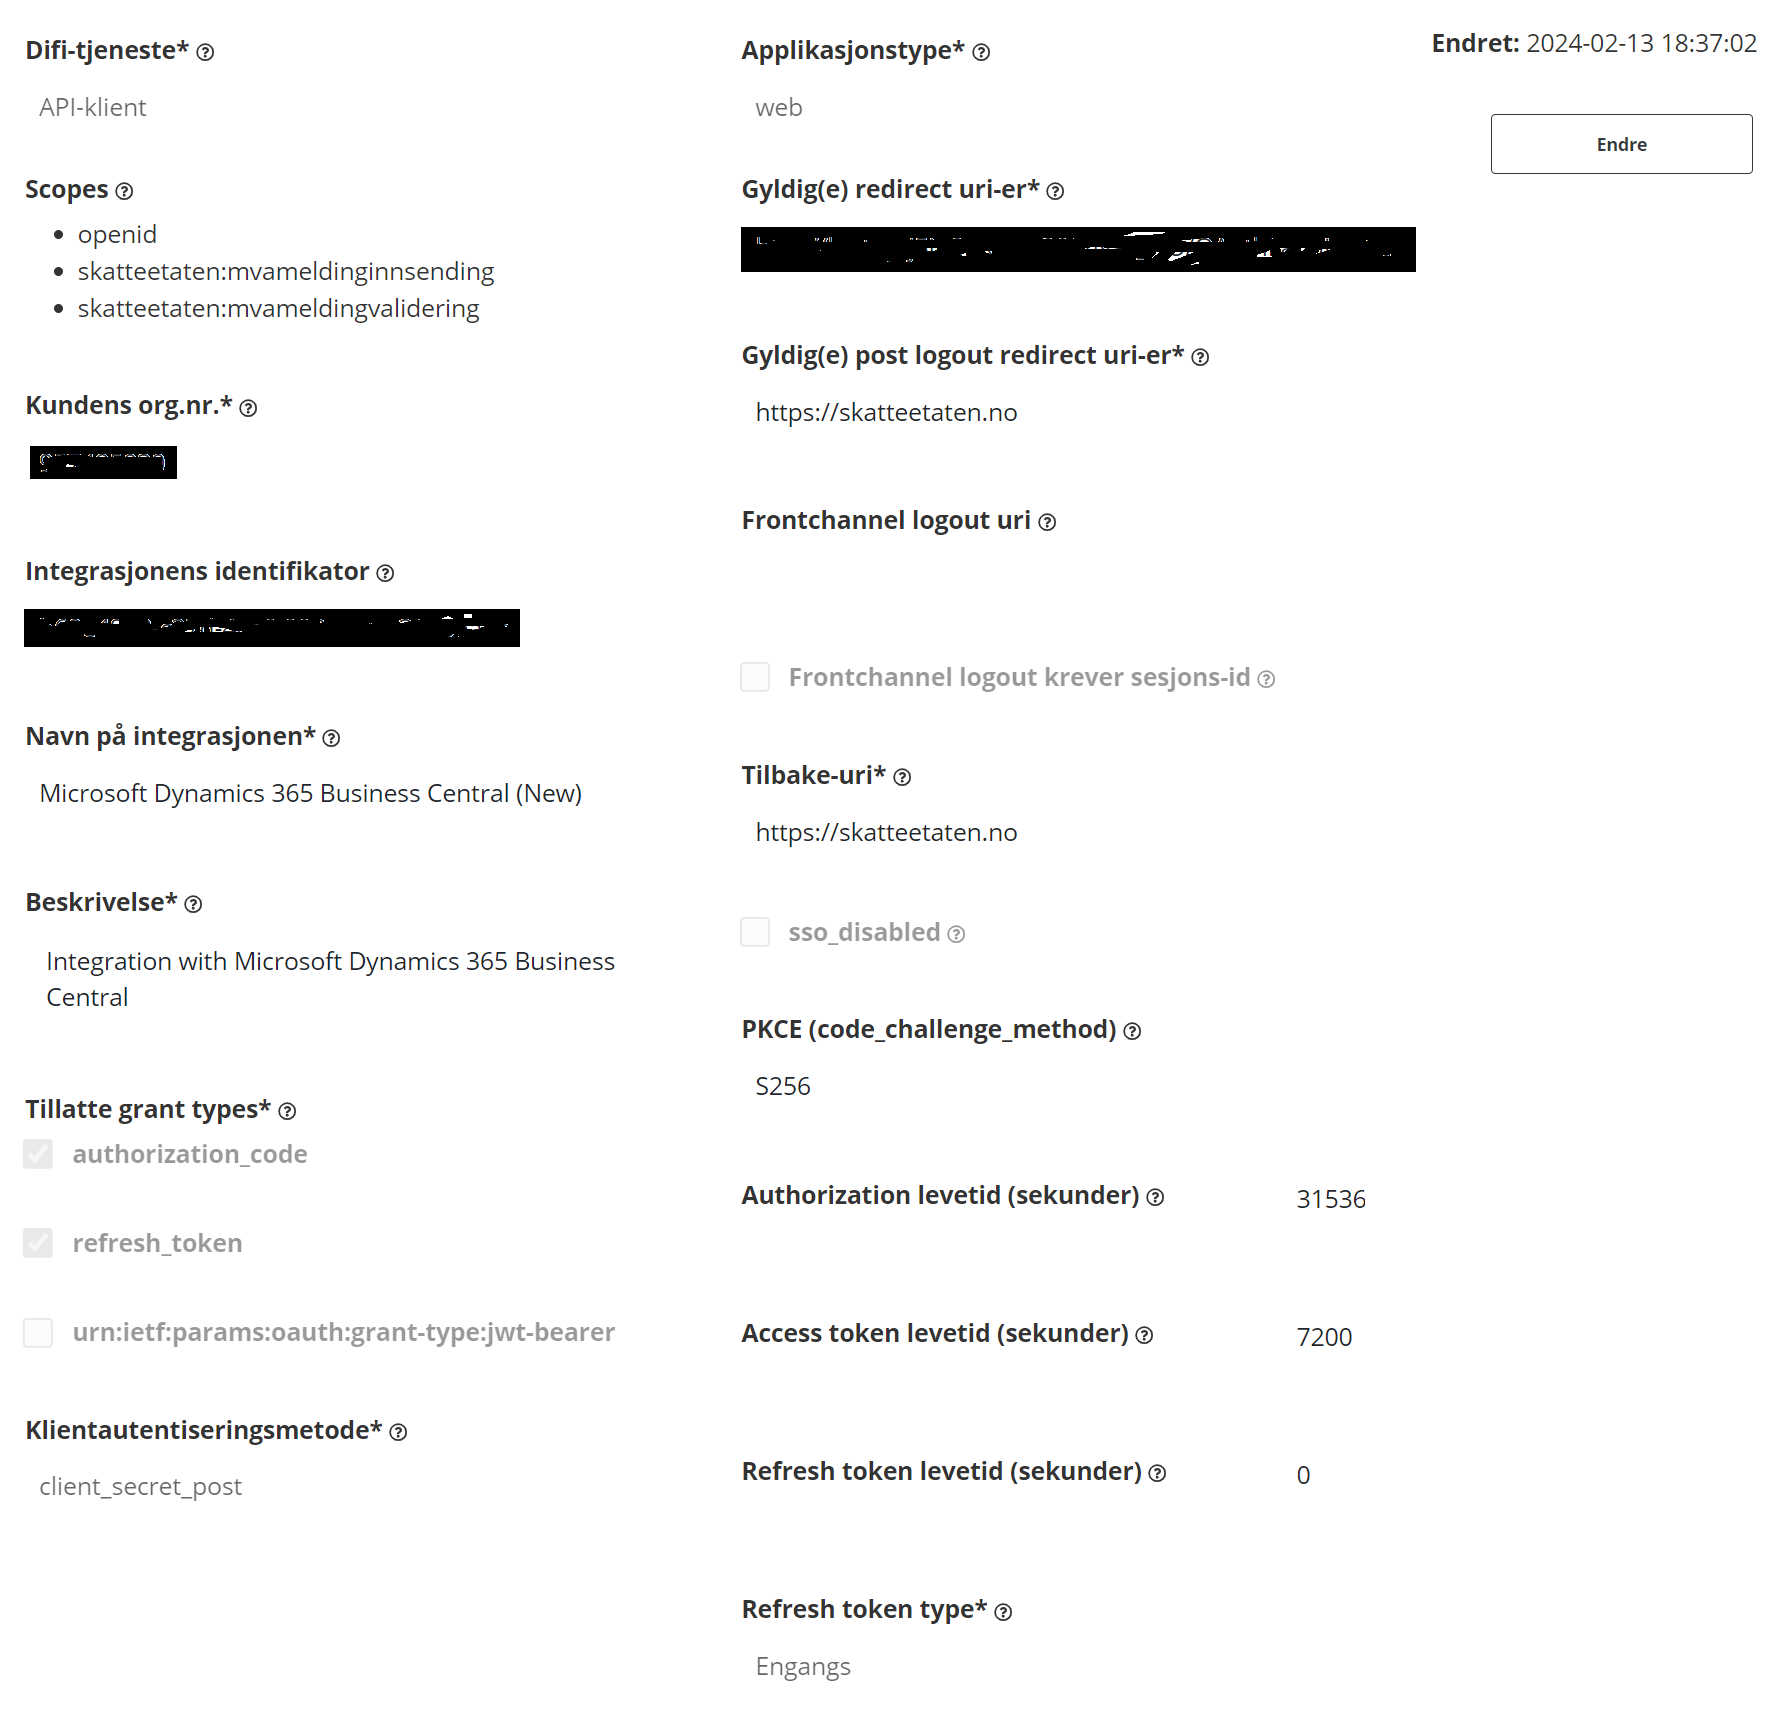
Fill in the fields as described in the following table.
Parameter name (Norwegian) Parameter description Parameter value Difi-tjeneste Select the service to be assigned correct scopes. Select API-klient. Scopes The application programming interfaces (APIs)/resources that the integration can access. Select the following scopes:
- openid
- skatteetaten:mvameldinginnsending
- skatteetaten:mvameldingvalidering
Kundens org.nr. The organization number of the service owner. You don't have to specify a value in this field. The required value is automatically set when the setup of the integration point is saved. Integrasjonens identifikator The unique identifier of the service. You don't have to specify a value in this field. The required value is automatically set when the setup of the integration point is saved. Navn på integrasjonen The name of the integration as it appears in the sign-in window. Specify Microsoft Dynamics 365 Business Central (New). Beskrivelse A brief description of the service (for example, "Meeting portal for NN municipality"). Specify Integration with Microsoft Dynamics 365 Business Central. Tillatte grant types A grant represents the user's consent to retrieve an access token. By selecting specific grants, you consent to the corresponding methods of retrieving an access token. Select the following grant types:
- authorization_code
- refresh_token
Klientautentiseringsmetode The method of authentication of your client. Specify client_secret_post. Applikasjonstype The application (or client) type is the type of runtime environment that the client is running under. OAuth2 chapter 2.1 lists the available options. The choice of client type is a security assessment that the customer performs. Select web. Gyldig(e) redirect uri-er This parameter applies only to personal sign-in integrations. It specifies the URIs that the client is allowed to go to after sign-in. The URI is a combination of your base URI and OAuthLanding.htm. This value differs depending on whether you use Business Central online or on-premises. For online, use the following URI, https://www.businesscentral.dynamics.com/OAuthLanding.htm. Here's an example of a URI for on-premises:https://<hostname>/OAuthLanding.htm.Gyldig(e) post logout redirect uri-er This parameter applies only to personal sign-in integrations. It specifies the URIs that the client is allowed to go to after sign out. Specify https://skatteetaten.no.Frontchannel logout uri The URI that the provider sends a request to upon sign out that another client triggers in the same session. If you don't set this parameter, you risk that users remain signed in to your service when they sign out of ID-porten. The value should be blank. Frontchannel logout krever sesjons-id This parameter applies only to personal sign-in integrations. It's a flag that determines whether the issuer and session ID parameters are passed together with frontchannel_logout_uri. Leave this checkbox cleared. Tilbake-uri This parameter applies only to personal sign-in integrations. It specifies the URI that a user is sent back to when they cancel sign-in. Specify https://skatteetaten.no.PKCE This parameter specifies code challenge method. Specify S256 Authorization levetid (sekunder) The lifetime of the registered authorization. In an OpenID Connect context, this authorization gives access to the "userinfo" endpoint. The value must be specified in seconds. Specify 31536000 (= one year). Access token levetid (sekunder) The lifetime of the issued access_token in seconds. Specify 7200 (= two hours). Refresh token levetid (sekunder) The lifetime of the issued refresh_token in seconds. Specify 0 (zero). Refresh token type - One-time – You get a new refresh_token at each refresh of access_token.
- Reusable – A refresh of access_token doesn't change refresh_token.
Specify Engangs.
Set up electronic VAT reporting
To make it easier to set up VAT reporting, Business Central provides the Set up an electronic VAT submission assisted setup guide.
Choose the
 icon, enter Assisted Setup, and then choose the related link.
Choose Set up an electronic VAT submission to start the assisted setup guide. The guide helps you complete the following steps:
Authorize Business Central to connect to ID-Porten. On the Electronic VAT Setup page, enter the Client ID, Client Secret, and Redirect URI from your company's registration for ID-Porten. Then, choose Open OAuth 2.0 setup page action. On the OAuth 2.0 Setup page, choose the Request Authorization Code action to receive the token you need to connect. You need the identification number, password, and pin for a user who is allowed to submit VAT returns. After you provide those credentials, choose MinID as the electronic ID.
Verify that you're using the correct VAT registration number for your company.
A message prompts you to open the Company Information page, where you can double-check the VAT registration number for your setup.
Update the rates for the VAT codes that require reporting.
Business Central provides 32 VAT codes, however, some VAT codes don't require that you report VAT. You can automatically update the rates for VAT codes. Also, VAT codes can vary, for example, for different industries or types of business. On the VAT Codes page, you can use the Edit List action and then assign or remove the codes and rates that are relevant for your business.
Note
The update assigns the rates that were valid in December, 2021. You're responsible for ensuring that those rates are still valid.
Define your VAT posting setup to ensure that VAT amounts are posted to the correct accounts. Learn more in Set Up Calculations and Posting Methods for Value-Added Tax.
Create a VAT statement to map the VAT business posting group with the VAT product posting group.
The mapping determines how you post and track VAT in Business Central. You assign the VAT codes to use for sales and purchasing.
Note
In addition to the settings described earlier, we automatically create a VAT report configuration for submitting returns and getting responses. You can view the configuration on the VAT Reports Configuration page.
Electronic VAT setup for existing users
Important
If you're an existing user, you need to manually change some information on the Electronic VAT Setup page.
To update the electronic VAT setup for the use of the new ID-porten system, follow these steps:
Choose the
icon, enter Electronic VAT Setup, and then choose the related link.On the Electronic VAT Setup page, select the General FastTab, and then update the following values:
- In the Authentication URL field, specify 'https://idporten.no'
- In the Login URL field, specify 'https://login.idporten.no'
Note
You can't open the sign in page from a bookmark or a link.
Close the page.
VAT report setup
- To set up a VAT report, choose the icon, enter VAT Report Setup, and then choose the related link.
- On the General FastTab, to let users modify VAT reports that were submitted to the tax authorities, select the Allow Modification field.
If the field isn't selected, users must create a corrective or supplementary VAT report instead.
On the General FastTab, select the Report VAT Base field if the VAT base must be calculated and shown to the user in the VAT reports.
On the General FastTab, select the Report VAT Note field to make the VAT Note field available for reporting from the VAT Return page.
On the Numbering FastTab, specify the number series to use for standard VAT reports.
This is the default number series that all VAT report use.
On the Return Period and VAT Group Management FastTabs, specify the relevant information.
Choose the OK button.
Create and submit a VAT return
Choose the
icon, enter VAT Returns, and then choose the related link.Choose the New action.
In the Version field, choose Elec VAT.
Optionally, in the KID field, specify a payment identification number.
Choose Suggest Lines to open the VAT Report Request Page page, where you specify criteria for generating lines for the report.
After you specify the criteria, choose OK.
On the VAT Settlement page, choose Release. Business Central now validates that the information can be submitted to the Norwegian tax authorities.
To submit the VAT return, choose Submit. The status of the VAT return changes to Submitted.
To view whether the tax authorities accepted your submission, choose Receive Response.
Note
The response from the tax authority isn't immediately available.
Note
If you selected the Report VAT Note option in the VAT Report Setup page, then the Note field is visible and editable in the VAT Return page. Users can specify any free text there. The value of the Note field is included in the submission message.
Troubleshoot your connection to ID-Porten
If you don't receive a response after you submit your return, such as within 24 hours, contact ID-Porten and ask them to verify that they received your return. To help them identify your return, you can send the value from the Message ID field. By default, the field is hidden, but you can use page inspection to get the value. Learn more in Inspecting Pages in Business Central.
You can also send a copy of the XML files for your submission and the response you received. To get the files, on the VAT Return page, choose the Download Submission Message and Download Response Message actions.
Close VAT periods
To align with legal requirements, VAT periods are to be closed after settling. Normally, a fiscal year consists of six VAT periods, numbered 1 to 6. When the VAT is settled, the period is closed for further posting.
Tip
Not all organizations use the standard six VAT periods. Which periods the current organization uses is defined in the VAT Period page.
You can view information about settled periods in the Settled VAT Period page. The closed periods are created by the report Calc. and Post VAT Settlement when you post VAT. If you want to post in the closed VAT period, you can open the period again by clearing the Closed field.
Tradesettlement report
Before January 2022, you used the Tradesettlement report to report VAT. This report is no longer described in this article, but you can read about it in the Dynamics NAV 2016 documentation archive.