Note
Access to this page requires authorization. You can try signing in or changing directories.
Access to this page requires authorization. You can try changing directories.
This article explains how to set up external gift cards in the Microsoft Dynamics 365 Commerce Store Commerce app, the call center, and the storefront.
Microsoft Dynamics 365 Commerce supports both internal and external gift cards. Internal gift cards are managed entirely in Dynamics 365 Commerce, whereas third parties administer external gift cards. If a retailer's operations are run entirely in Microsoft Dynamics, internal gift cards are sometimes the best solution. For complex enterprises that span multiple countries or regions, and multiple point of sale (POS) systems, it's often best to use a third party to manage gift card balances and enable gift cards to be used across those systems.
Similar to support for other card payment types, support for external gift cards must be built into the payment connector that you use. The out-of-box payment connector for Adyen supports external gift cards through Stored Value Solutions (SVS) and Givex in POS, the call center, and the e-commerce storefront.
External gift card setup
Note
Some setup steps assume that demo data is used. The steps might vary, depending on the dataset that is used.
Configure card types
To configure a card type, follow these steps:
In Dynamics 365 Commerce headquarters, search for Card Types, or go to Retail and Commerce > Channel setup > Payment methods > Card types
Select New, add the following values, and then select Save.
Field name Value Card ID "EXTGC" Card type name "External Gift Card" Card types "Gift card" Card issuer Enter any description.
Configure card numbers
To configure card numbers, follow these steps:
- In headquarters, on the Card types page, select the newly created gift card, and then select Card numbers.
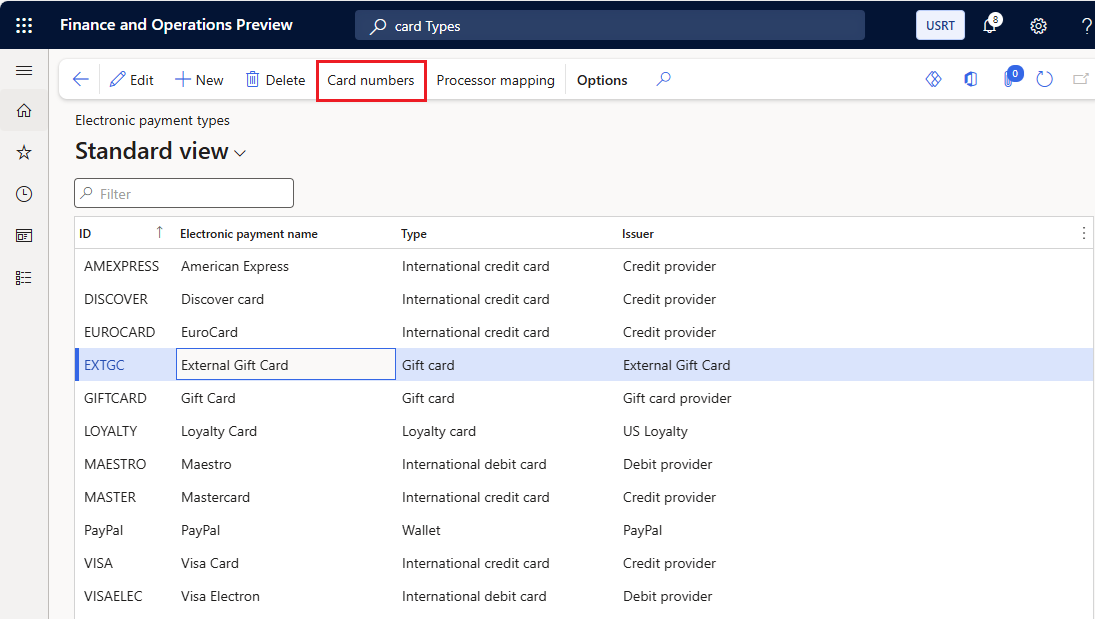
- Specify the range of card numbers that should be used for external gift cards, and then select Save.
In the following example, if the first four digits of a card number are 6036, the card is mapped to the gift card that you set up Configure card types.
| Field name | Value |
|---|---|
| Card number from | 6000 |
| Card number to | 6999 |
| Digits to identify | 4 |
Configure payment methods
To configure payment methods, follow these steps:
In headquarters, search for Payment methods, or go to Retail and Commerce > Channel setup > Payment methods > Payment methods .
Select New, and then follow these steps:
- In the Payment method field, enter any number that isn't yet used (for example, "12").
- In the Payment method name field, enter External Gift Card.
- In the Default function field, select Card.
- Select Save.
Store setup
To set up a store, follow these steps:
In headquarters, search for All stores to open the All stores page.
Select the San Francisco store in the list.
On the Action Pane, on the Set up tab, in the Set up group, select Payment methods.
Select New.
In the Payment method field, enter the payment method ID number you created ("12" for our example). The Payment method name and Function field values are then set automatically.
On the General FastTab, set the following fields:
- Set the Operation name field to Pay gift card.
- Set the Connector name field to Dynamics 365 Payment Connector for Adyen.
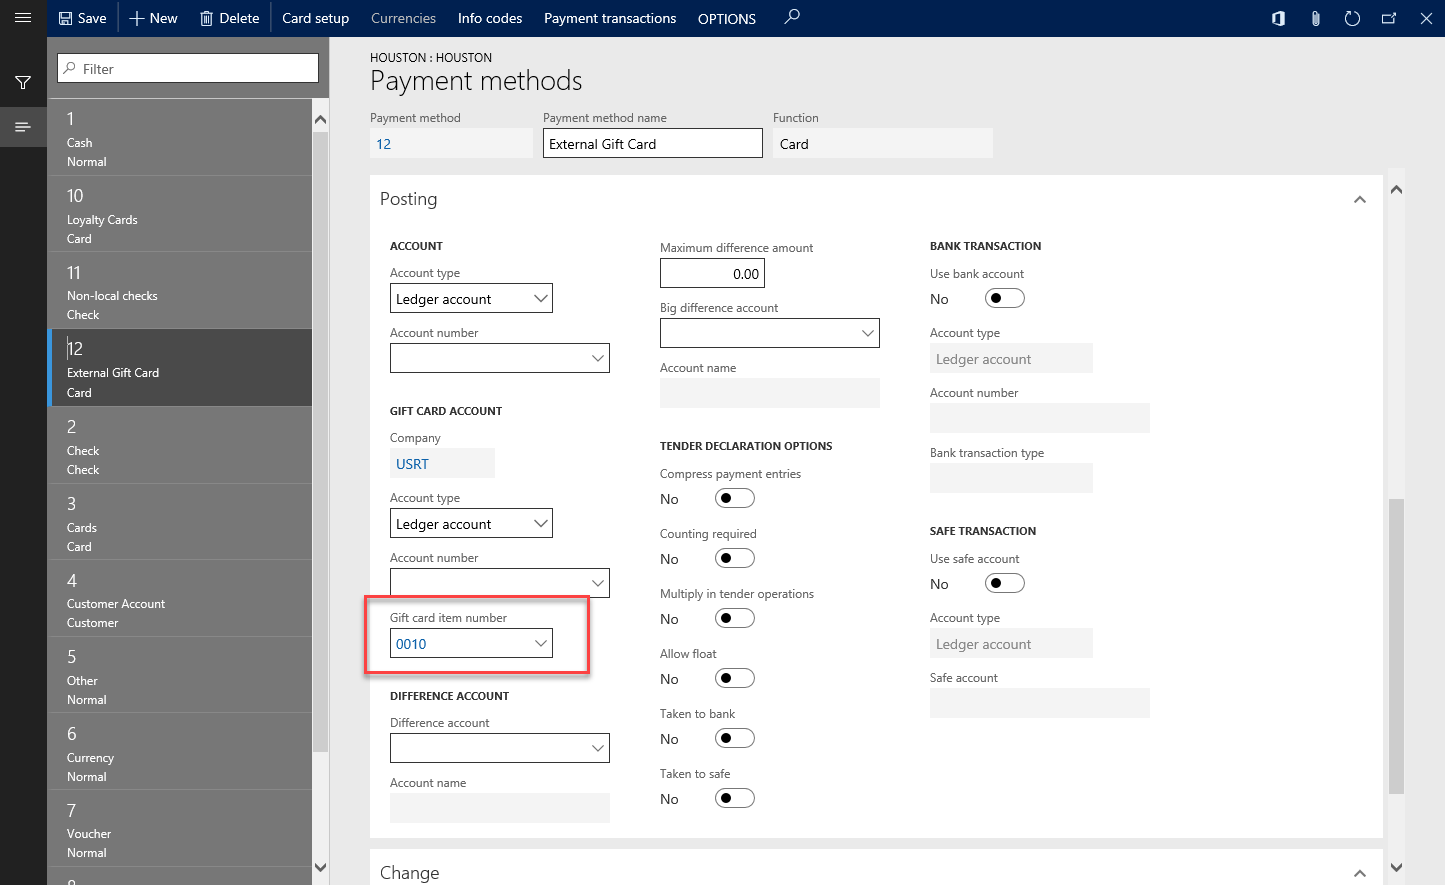
On the Posting FastTab, set the Gift card item number field value to a number created to represent an external gift card. For testing purposes, if you're using demo data you can set it to 0010. The Gift card item number value selected for external gift cards should be different from the number used to configure internal gift cards (as described in Set up gift cards). The system uses external and internal gift card values to determine the system processing route for the gift cards. Because external and internal gift cards are processed differently within the system (with external gift cards using the payment gateway), Gift card item number values for external gift cards shouldn't match any values in the Commerce parameters > Posting > Gift card > Gift card product value set.
Select Save.
Select Electronic payment setup, and then select New to map the gift card payment method to the newly created external gift card payment method for the San Francisco store.
You can choose to allow cashiers to add external gift card numbers either via the personal identification number (PIN) pad or directly on POS. You can specify the entry method using the Allow manual card numbers configuration located on the Electronic payment setup menu of the external gift card payment method associated with the store.
- If the configuration value is set to Yes, the cashier can either manually enter or scan a gift card on POS. If the gift card requires a PIN, then the PIN pad gets activated for the customer to add the PIN number.
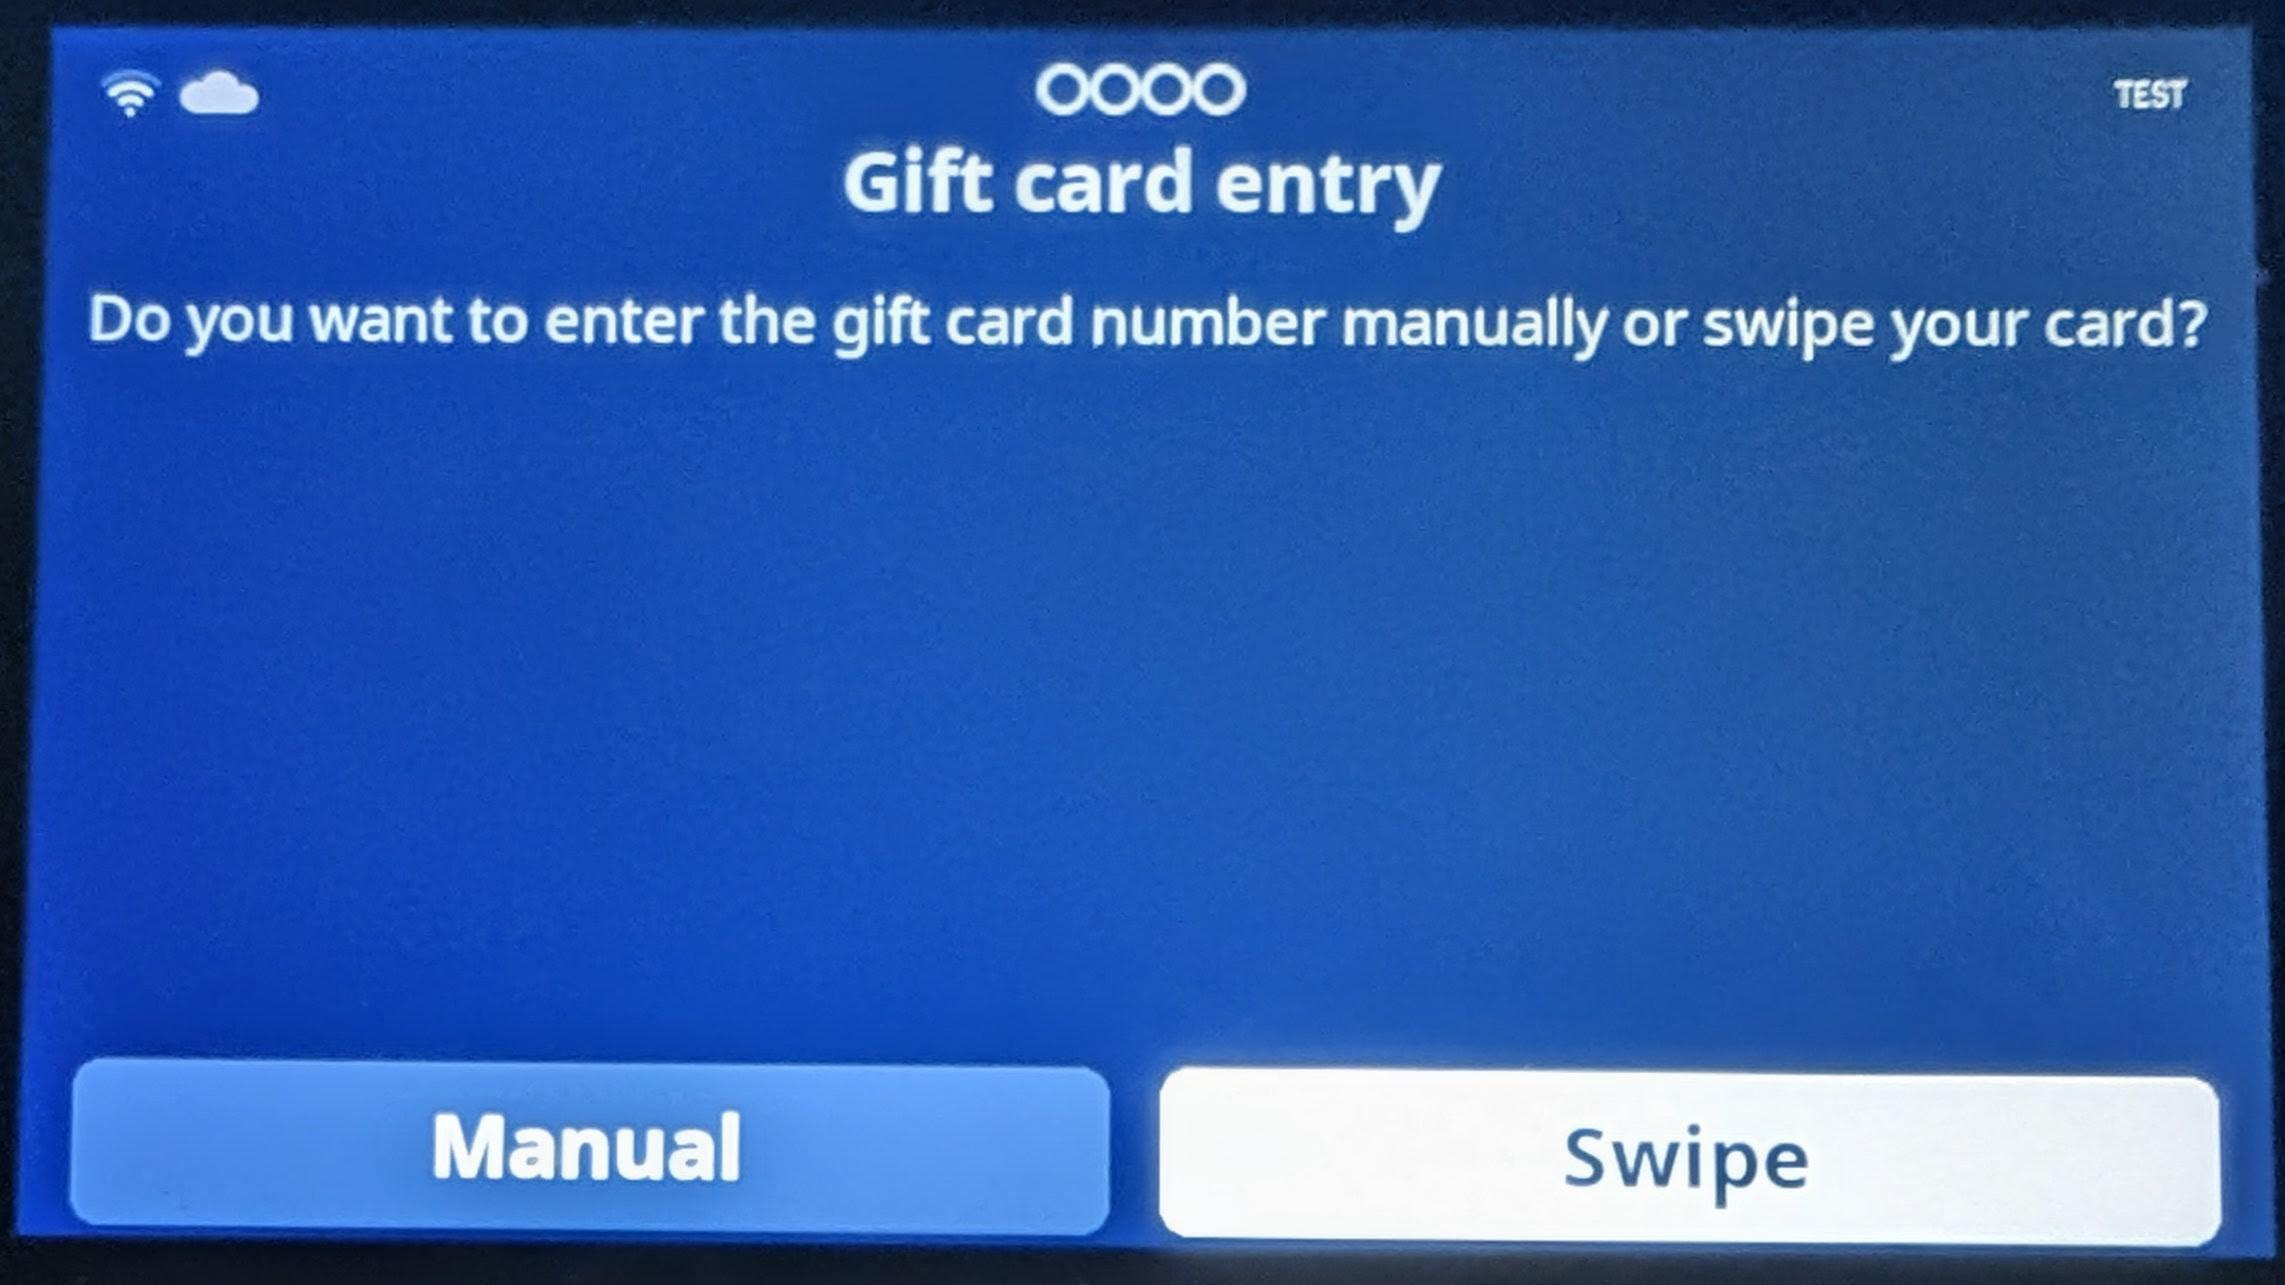
- If the configuration value is set to No, the cashier must use the PIN pad to enter the gift card number. While the cashier is using the PIN pad, the default method to add a gift card is by swiping the gift card. However, you can configure the Adyen connector to provide the option of manually keying in the gift card number using the PIN pad. To enable the manual entry on the PIN pad, go to the hardware profile associated with the register and under the EFT service FastTab, set the Terminal gift card entry property value to True for the Adyen payment connector. The following example image shows the gift card PIN pad entry experience.
POS setup
To set up POS, follow these steps:
In headquarters, search for Hardware profiles to open the POS hardware profile page.
In the left pane, select the hardware profile associated with the San Francisco store (for example, Virtual).
Select Edit.
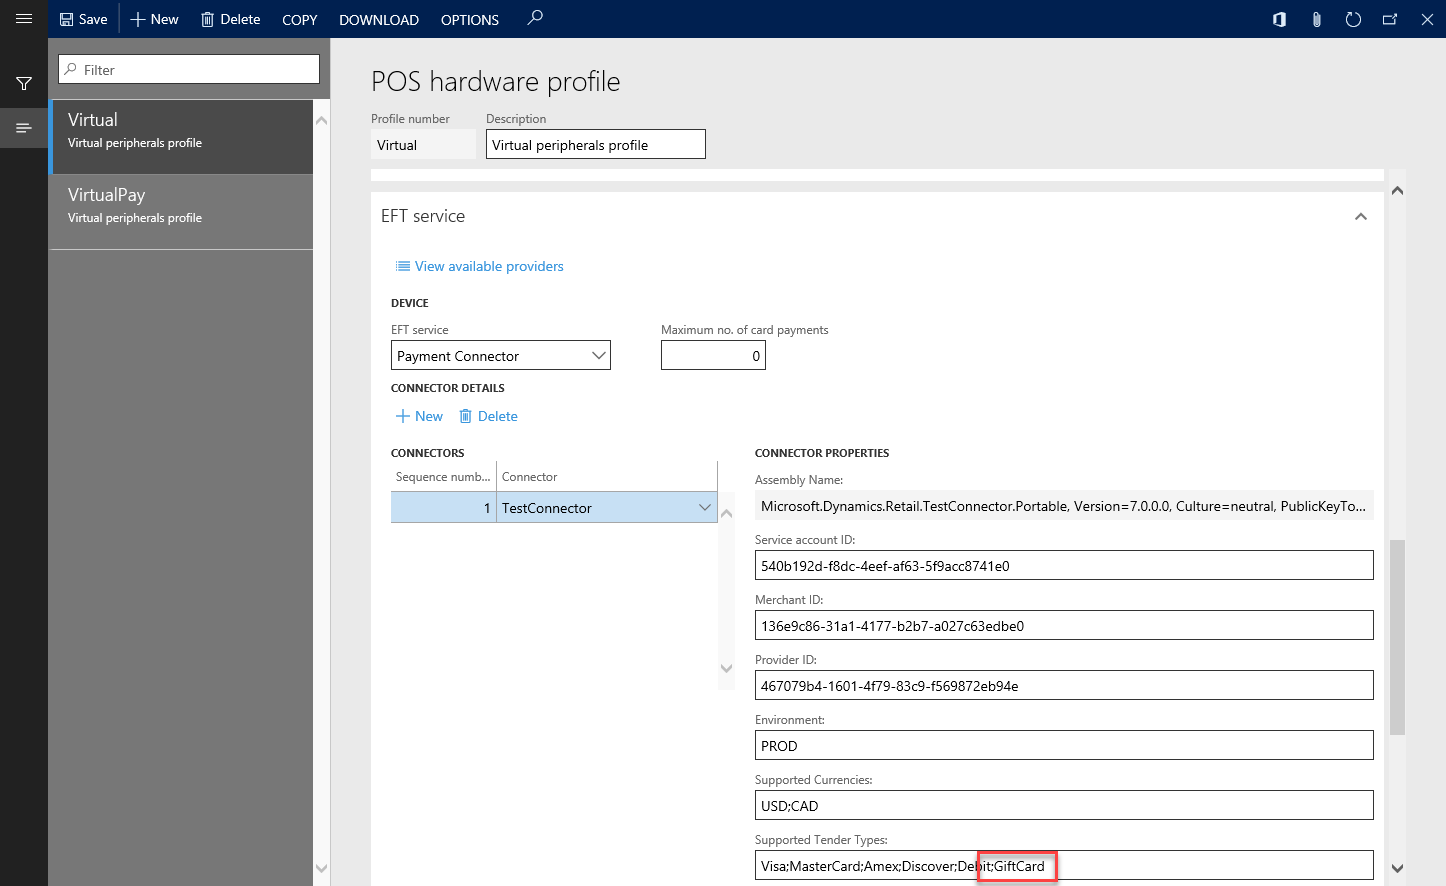
On the EFT service FastTab, in the Connectors grid, select Dynamics 365 Payment Connector for Adyen.
In the Supported Tender Types field, enter "GiftCard". If other tender types are present, add a semicolon (";") before "Giftcard" as shown in the following example image.
Set the Gift card provider value to svs or givex, depending on the gift card provider you use.
Select Save.
Note
You can also use the New button to create multiple payment connectors. In this way, you can take advantage of the solution's support for multiple connectors. You can then have different payment connectors for different payment methods. For example, all credit cards can be processed through one connector, but gift cards can be processed through a different connector.
Select when the balance is made available on the gift cards
By default, the balance on gift cards is added immediately after a cashier performs a relevant gift card operation on the transaction, before the customer completes payment. If the customer changes their mind, the cashier must void the gift card operation, which results in unnecessary API calls to the gift card processor. These unnecessary API calls introduce business risk because it may take several seconds for the balance to be reverted.
Starting with Commerce version 10.0.45, you can turn on the Enable gift card balance post-payment completion feature to delay the balance addition until after payment is successfully received. Enabling this feature ensures that:
- No API calls are made to issue or void gift cards if the customer cancels before payment.
- Gift card balances are only updated post-payment, reducing operational risk and improving reliability.
To enable this feature functionality, follow these steps
- In Commerce headquarters, go to System administration > Workspaces > Feature management.
- Locate and select the Enable gift card balance post-payment completion feature.
- Select Enable now.
- To apply the changes, run the 1110 - Global configuration job.
Note
If you're using payment terminals with integrated printing capabilities and you want to allow multiple gift card activations in a single transaction, in the Custom settings property of the Adyen connector setup, add "BypassPrintBehaviorOnFundingGiftCards:true". Without this property configuration, the payment terminal tries to print a receipt after each gift card operation, which blocks the activation/balance addition process after the first gift card is processed.
Important
Microsoft strongly recommends that you enable this feature to streamline gift card operations and minimize risk.
The following steps show the sequence of actions a user experiences when the feature is enabled.
- User initiates either the Issue gift card action or the Add money to gift card action.
- User manually enters the gift card number (optional). If the manual gift card entry option is enabled, the user has the option to manually enter the gift card number. However, entering the gift card number is optional at this point.
- If the gift card number is entered manually, then during the gift card activation the customer just has to enter the PIN on the payment terminal.
- If the gift card number isn't entered manually at this stage, then the user has to swipe the gift card after payment is completed.
- User specifies the amount. This action adds a gift card line to the transaction. However, the gift card isn't yet updated with this amount.
- User adds more gift cards or regular items, if needed.
- User takes payment. As soon as the required payment is captured, the system triggers an automatic checkout, and this action activates the payment terminal for the customer to provide their PIN number or swipe their gift card as needed.
- If the gift card action is successful, then the transaction is completed.
- If the gift card action fails, then the system shows an error message below the failed gift card line stating "The gift card action cannot be completed. Please void this item.". After the cashier receives the message, they can attempt the checkout again. If the error was transient (for example, a network issue), a subsequent gift card action might succeed. But if there's a permanent issue (for example, the gift card is invalid), then the cashier must void the gift card line and try with another gift card.
Update the button grid
To update the button grid, follow these steps:
In headquarters, go to the Button grid page.
In the navigation bar on the left side of the page, search for F2S1M, and select the filtered option.
On the Action Pane, select Designer to download the button designer application.
When the grid designer appears, right-click on an empty (gray) area, and then select New button.
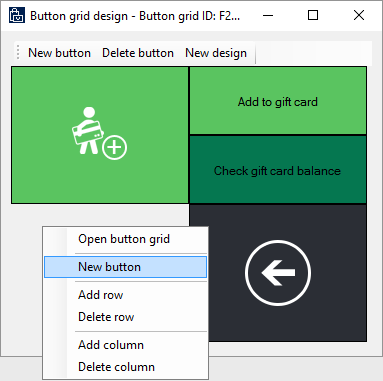
Right-click the new button, and then select Button properties.
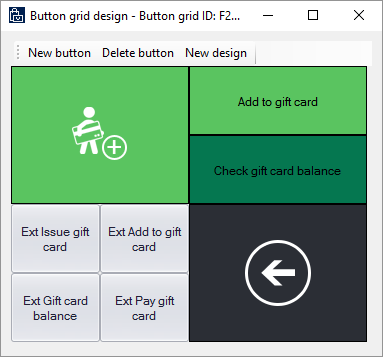
Set the Action, Payment type, and Text on button properties according to the following matrix.
Action Payment type Text on button Issue gift card External Gift Card Ext Issue gift card Add to gift card External Gift Card Ext Add to gift card Gift card balance External Gift Card Ext Gift card balance Pay gift card External Gift Card Ext Pay gift card When configured, your button layout should resemble the following example image.
Close the designer.
Search for Distribution Schedule.
In the navigation bar on the left side of the page, search for 1090, 1115, and 1070.
On the Action Pane, select Run now.
Check the status of the job by searching for Download sessions.
Wait until Applied appears next to all the jobs, and then close the browser.
Note
- If you're using Retail Commerce Scale Unit (RCSU) that is located in the store, you must perform an Internet Information Services (IIS) reset to clear the cache. You can perform an IIS reset through the IIS application, or open a Command Prompt window as an administrator and enter
iisreset. Otherwise, wait for the RCSU to be updated. - Existing buttons on the version F2S1m button grid (or version FnS1M for layout) can be similarly configured for internal gift cards. The existing issue gift card (sometimes depicted with the card and plus symbol button in the existing layout) requires that the button properties have the Action property set (for example, to Issue gift card) and the Payment type property set (for example, to Gift card for internal gift cards). Similarly, for the preconfigured Add to gift card and Check gift card balance buttons, the gift card Payment type properties should be set if the buttons are intended to handle internal gift cards.
- If you're using Retail Commerce Scale Unit (RCSU) that is located in the store, you must perform an Internet Information Services (IIS) reset to clear the cache. You can perform an IIS reset through the IIS application, or open a Command Prompt window as an administrator and enter
Configure and test Store Commerce
To configure and test Store Commerce, follow these steps:
- Start the Store Commerce application.
- Sign in by using the standard credentials.
- When prompted, select Perform a nondrawer operation.
- On the main screen, select Select hardware station.
- On the bar on the right side of the page, select Manage.
- Turn on Virtual Peripherals, and then select OK.
- In the Available paired stations field, select Virtual Peripherals.
- When prompted to either open a new shift or perform nondrawer operations, open a new shift.
- On the main screen, select Current transaction.
- Select Gift cards.
- Select Ext Issue gift card.
- Enter a number that starts with 9, and then provide an amount.
- After items are added to the cart, you can pay by using cash or a card.
External gift cards for the call center and storefront
Note
External gift card support for call center and storefront is enabled in the Feature management workspace. Enable Omni-channel payments, then enable Enable advanced external gift card. For additional steps required to set up external gift cards in the storefront, see E-commerce digital gift cards.
Adyen external gift card setup
For an example that shows how to set up payment services, see the documentation for the Adyen payment connector.
For the call center and storefront, the Adyen connector supports the following gift cards.
| Brand | Gift card type | Supported | Activation |
|---|---|---|---|
| SVS | Physical | Yes | Manually |
| SVS | Yes | Programmatically | |
| Givex | Physical | Yes | Manually |
Note
Only gift cards of type "Email" can be issued in an online order at this time. In the out-of-box Adyen connector, gift cards aren't configured by default. To specify the gift card provider in the merchant properties of the payment connector, follow the instructions in the documentation for the Adyen payment connector.
Tokenization
The out-of-box implementation and Payments software development kit (SDK) support for external gift cards in the call center and storefront requires tokenization. When external gift cards are processed, tokens are used to refer to the actual gift card number. Tokenization is important for third party implementations because without tokens, external gift card processing may not function correctly. For example, if a gift card payment is captured when added to an order but an issue occurs during order creation, the gift card payment is reversed using references (tokens) to the transaction itself, not using the actual gift card number.
Purchases and refunds
When an external gift card is used for a purchase, the tender line for the gift card is saved as a prepayment. Therefore, the funds for the purchase are captured when the order is created.
External gift cards aren't eligible for refunds. In part, this limitation is in place to prevent a refund from being given for a gift card discarded by the user. If an unprocessed order includes an external gift card as payment, and the customer wants to cancel the order, you must issue a new gift card or some other form of credit to the customer.
Gift cards lines that are issued as part of an order can be canceled before fulfillment.
Issuing gift cards through fulfillment
Physical gift cards and virtual gift cards have distinct fulfillment methods.
Physical gift cards are gift cards that are mapped to a mode of delivery of the Shipping type. They must be issued directly through the gift card provider as part of order processing. The gift card number must then be mapped to the order line as part of the pick list registration process. Next, the masked gift card number is saved back to the order line. The gift card that is issued is then activated as part of order invoicing.
Virtual gift cards are issued as part of order invoicing. When a gift card line is marked as Packed, it becomes eligible to be issued. Virtual gift cards are issued as part of invoicing. When invoicing occurs, the gift card number is obtained from the provider through the payment connector. The number for the activated gift card is then sent to the gift card recipient via email. When invoicing occurs, the masked gift card number is then saved back to the order line.
Use modes of delivery for gift card products in the call center and e-commerce
In the call center and storefront channels, unlike in POS, a dedication operation isn't used to issue gift cards. Instead, gift cards are issued by adding a line item to a transaction. Specifically, gift card products for e-commerce and the call center can be either mapped to product variants or modeled as standard products.
If product variants are used, the person who creates the gift card order is prompted to select the variant. The relevant mode of delivery is then available for that product variant.
Modes of delivery must support the type of gift card. For example, a gift card product variant of the Physical style must be mapped to a mode of delivery that is related to shipping. A gift card product variant of the Email style must be mapped to an electronic mode of delivery. The electronic mode of delivery is defined on the Customer orders tab of the Commerce parameters page.
Note
Currently, Commerce only supports digital gift cards. For information about setting up digital gift cards, see E-commerce digital gift cards.
Setup for the call center and storefront
Payment services setup
In the back office, on the Payment services page, configure the payment services account for the call center. Each payment connector requires different setup steps. The payment service that the call center uses is marked as Default.
Call center setup
To set up call center, follow these steps:
Search for All call centers to open the call centers page.
Select the Fashion call center store in the list.
On the Action Pane, on the Set up tab, in the Set up group, select Payment methods.
Select New.
In the Payment method field, enter 12. The Payment method name and Function fields are then set automatically.
On the General FastTab, set the following fields:
- In the Operation name field, select Pay gift card.
- In the Connector name field, select TestConnector.
Note
If the Connector name field is disabled, save the record, and then on the Action Pane, select Electronic payment setup. Select +New to add a payment type, configure the payment type, and then select Save. The connector field should now be selectable.
On the Posting FastTab, set the Gift card item number field to 0010.
Select Save.
Select Card setup, and then select New to map the gift card payment method to the newly created external gift card payment method for the Fashion call center.
Online store setup
To set up an online store, follow these steps:
Search for Online stores to open the online stores page.
Select the Fabrikam extended online store in the list.
On the Action Pane, on the Set up tab, in the Set up group, select Payment methods.
Select New.
In the Payment method field, enter 12. The Payment method name and Function fields are then set automatically.
On the General FastTab, set the following fields:
- In the Operation name field, select Pay gift card.
- In the Connector name field, select TestConnector.
On the Posting FastTab, set the Gift card item number field to 0010.
Select Save.
Select Card setup, and then select New to map the gift card payment method to the newly created external gift card payment method for the Fabrikam extended online store.
Online store payments setup
To configure the payment accounts for your online store to use Adyen for external gift card processing, see Configure the Adyen connector for online stores.
Test connector external gift card setup
To set up external gift cards for the test connector, on the Payment services page, select Dyn Online, and then, in the Supported Tender Types field, add GiftCard after Debit. Then select Credit card types, and assign a payment journal to the gift card payment method.
Gift card product setup
The following procedure shows how to set up an external gift card by using product masters. Product masters aren't required for external gift cards. However, they can be helpful when both physical and virtual gift cards are used.
To set up a gift card product, follow these steps:
Search for Style groups to open the Style groups page.
Select New.
Enter a name (for example, Gift) and a description (for example, Gift card style group).
Add styles to suit the types of gift cards that are available. For example, add Physical and Email styles.
Save your changes.
Search for Product masters to open the Product masters page.
Select New.
Enter a product number (for example, Gift), and assign a retail category.
In the Product dimension group field, select Style.
Select OK.
In the product master, select the style group that you created earlier (Gift).
On the Action Pane, on the Product tab, in the Set up group, select Dimension groups, and then assign a storage dimension group and a tracking dimension group.
Select Save.
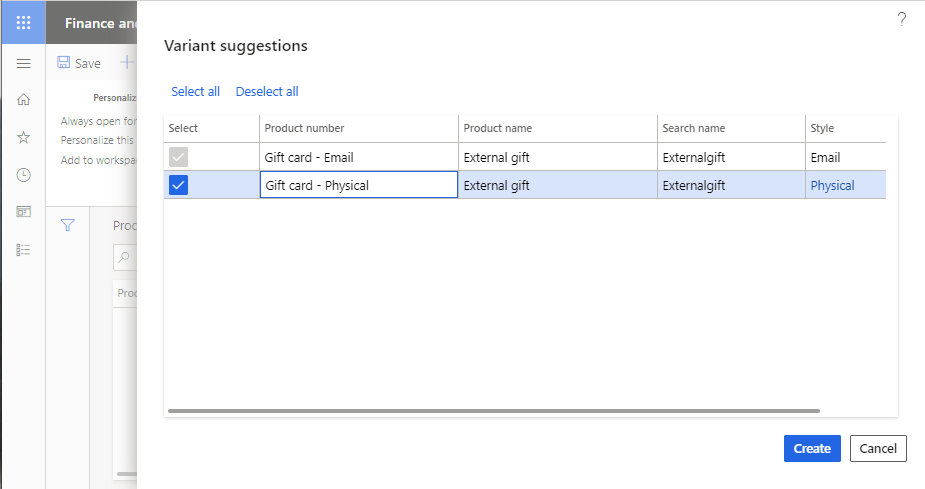
Select Product variants, select Variant suggestions, and edit the gift card variant numbers as you require.
Select Create.
Select Release products, select Next two times, select a company (for example, USRT), and then select Next. Finally select Next to release the product master.
Search for Modes of delivery to open the Modes of delivery page.
Select the Electronic mode of delivery, and add the Email gift card variant. Make sure that applicable call centers and online channels are included.
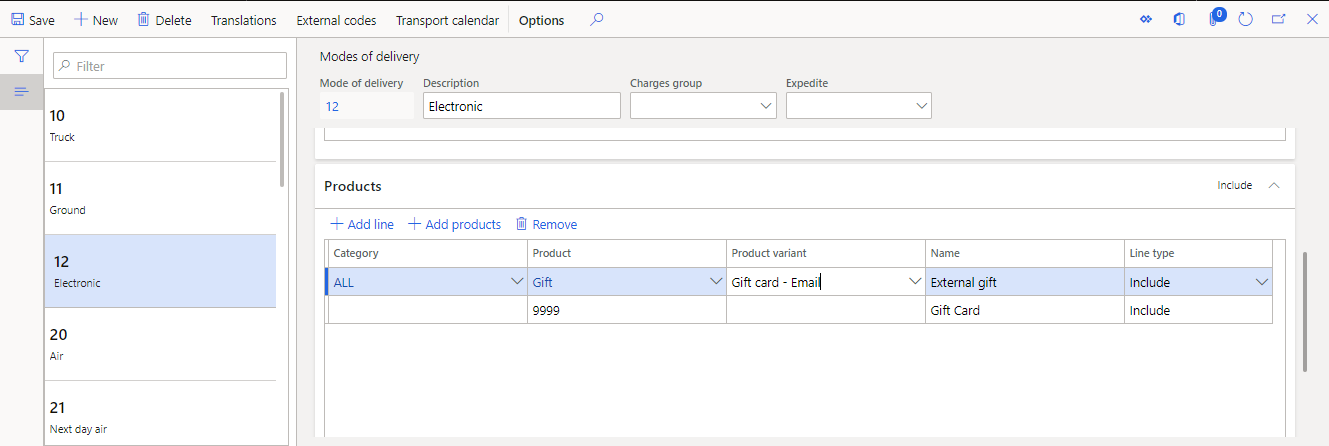
Select Save.
Search for Process delivery modes to open the Process delivery modes dialog box.
Select OK.
Note
Gift cards aren't currently supported for Store Commerce customer order creation or for in-store pickup. Gift cards being issued as part of e-commerce orders may only use Email modes of delivery. Those gift cards can't have physical modes of delivery mapped to them.
Search for Released products by category to open the Released product details page.
Select the external gift card item.
Set the following values.
FastTab Field Value General Item model group MA_Retail Purchase Purchase order unit ea Sell Sales order unit ea Sell Allow price adjust Yes Manage inventory Inventory unit ea Manage costs Posting item group Any Select Save.
For the storefront, the gift card must also be included in the storefront's assortment. For more information, see Assortment management.
Note
The gift card product used for external gift card setup in POS shouldn't use product masters with item variants. Gift cards based on item variants may still be used for payments, balance inquiries, and cash out in POS, but gift card products associated with the POS for issuance must be standard products.
Set up notification emails for virtual gift cards
For information about email setup, see Configure email functionality.
For information about how to set up email notifications for Commerce, see Set up an email notification profile.
For gift cards that are issued via email, the value of the Retail email notification type field is Issue gift card.
Call center setup
To set up call center, follow these steps:
Search for All call centers to open the Call center page.
In the list, select a call center.
On the Action Pane, on the Channel tab, in the Users group, select Channel users.
Add a user, select Save, and then close the Channel users page.
Important
Users must be call center users when they access the Customer service page and create orders. Otherwise, call center capabilities isn't available.
Back on the Call center page, on the Action Pane, on the Set up tab, in the Set up group, select Payment methods.
Select New.
In the Payment method field, enter 12. The Payment method name and Function fields should then be set automatically.
On the General FastTab, select the connector that should be used for the external gift card.
Select Card setup, and then select New to map the gift card payment method to the external gift card payment method.
On the Posting FastTab, specify general ledger accounts for the external gift cards. In demo data, 112140 can be used as the general ledger account number.
Select Save.
Select Card setup.
Select New, select the external gift card that you created earlier, and then select Save.
Close the Card setup page, and refresh the Payment methods page.
Select the external gift card payment method, and then, on the General FastTab, in the Gift card account section, in the Connector name field, assign the TestConnector connector.
On the Posting FastTab, assign the gift card item number.
Select Save.
Select Card setup.
The Card setup page for the internal gift card now includes two additional configuration fields: Check expiration date and PIN required. Set these fields as required by the external gift card provider.
Issue external gift cards in the call center
To issue external gift cards in the call center, follow these steps:
As a call center user, search for Customer service to open the Customer service page.
Add a customer by using the Search function.
Select New sales order.
Select Header, and add a valid mode of delivery.
Select Lines.
In the Item number field, specify the gift card item number.
In the Variant number field, specify the variant number if you're using a product master.
In the Unit price field, specify the unit price for the gift card.
Note
If modes of delivery are mapped to variants, and if Electronic modes of delivery are specified for any gift cards, the gift card type should automatically be set to Email on the Packing tab.
On the Line details FastTab, on the Packing tab, follow one of these steps:
- For virtual gift cards, set the Buyer name, Buyer email, Recipient name, Recipient email, and Gift message fields.
- For physical gift cards, set the Buyer name, Recipient name, and Gift message fields.
On the Price and discount tab, in the Reason code field, specify the reason for the price override.
Select Complete, add a payment, and submit the order.
For physical external gift cards, complete the following steps to register the gift card number:
- Select Pick and pack > Generate picking list.
- Select Quantity=All and then select OK. A dialog warning about posting the doc without printing is displayed. Select OK.
- Select Pick and pack > Picking list registration. Under the Lines menu, select Register gift card number. Under the Register gift card number property menu, enter the number in the Number field, and then select OK.
Note
If the error message "Credit card process failed, due to 'Declined'" is displayed, the gift card is already activated. You should select a different card number.
When the registration process is completed, return to the sales order. The Gift card number and Expiration fields are displayed with the added information under the Lines details > Packaging section.
Pay using external gift cards in the call center
To pay using external gift cards in the call center, follow these steps:
As a call center user, create an order, and select Complete.
On the Payments FastTab, select Add.
Select the external gift card payment method, and enter the number and PIN, if applicable. For the test connector, 61234 can be used as the number, and the PIN isn't validated.
Use a percentage amount or a payment amount to define the payment amount.
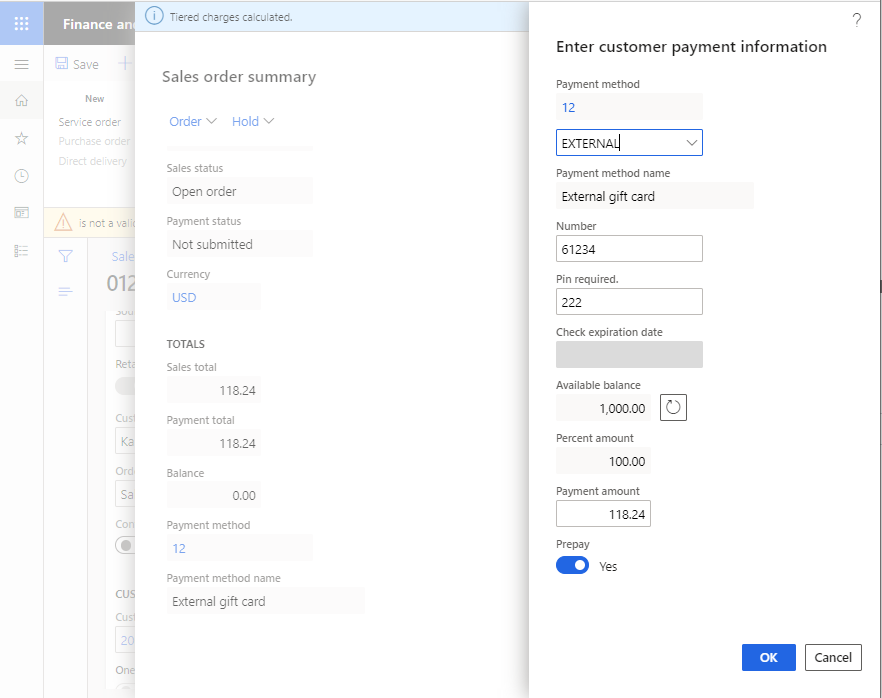
Select OK.
Select Submit to complete the order.