Note
Access to this page requires authorization. You can try signing in or changing directories.
Access to this page requires authorization. You can try changing directories.
Note
The Retail Interest Group by Dynamics 365 Commerce has moved from Yammer to Viva Engage. If you don't have access to the new Viva Engage community, fill out this form (https://aka.ms/JoinD365commerceVivaEngageCommunity) to be added and stay engaged in the latest discussions.
This article describes how to create an email notification profile in Microsoft Dynamics 365 Commerce.
When you create channels, you can set up an email notification profile. The email notification profile defines the events of a sales transaction (such as order created, order packed, and order invoiced events) for which you send notifications to your customers.
For additional email configuration information, see Configure and send email.
Create an email template
Before you can enable an email notification type, create an organization email template in Commerce headquarters for each notification type you want to support. This template defines the email subject, sender, default language, and email body for each supported language.
To create an email template, follow these steps:
- In the navigation pane, go to Modules > Retail and commerce > Headquarters setup > Parameters > Organization email templates.
- On the action pane, select New.
- In the Email ID field, enter an ID to help identify this template.
- In the Sends name field, enter the sender's name.
- In the Email Description, enter a meaningful description.
- In the Sender email, enter the sender's email address.
- In the General section, select a default language for the email template. The default language is used when no localized template exists for the specified language.
- Expand the Email message content section and select New to create the template content. For each content item, select the language and provide the email subject line. If the email has a body, ensure that the Has body box is checked.
- On the action pane, select Email message to provide an email body template.
The following image shows some example email template settings.

For more information about creating email templates, see Create email templates for transactional events.
Create an email notification profile
To create an email notification profile in headquarters, follow these steps:
- In the navigation pane, go to Modules > Retail and commerce > Headquarters setup > Commerce email notification profile.
- On the action pane, select New.
- In the Email notification profile field, enter a name to identify the profile.
- In the Description field, enter a relevant description.
- Set the Active switch to Yes.
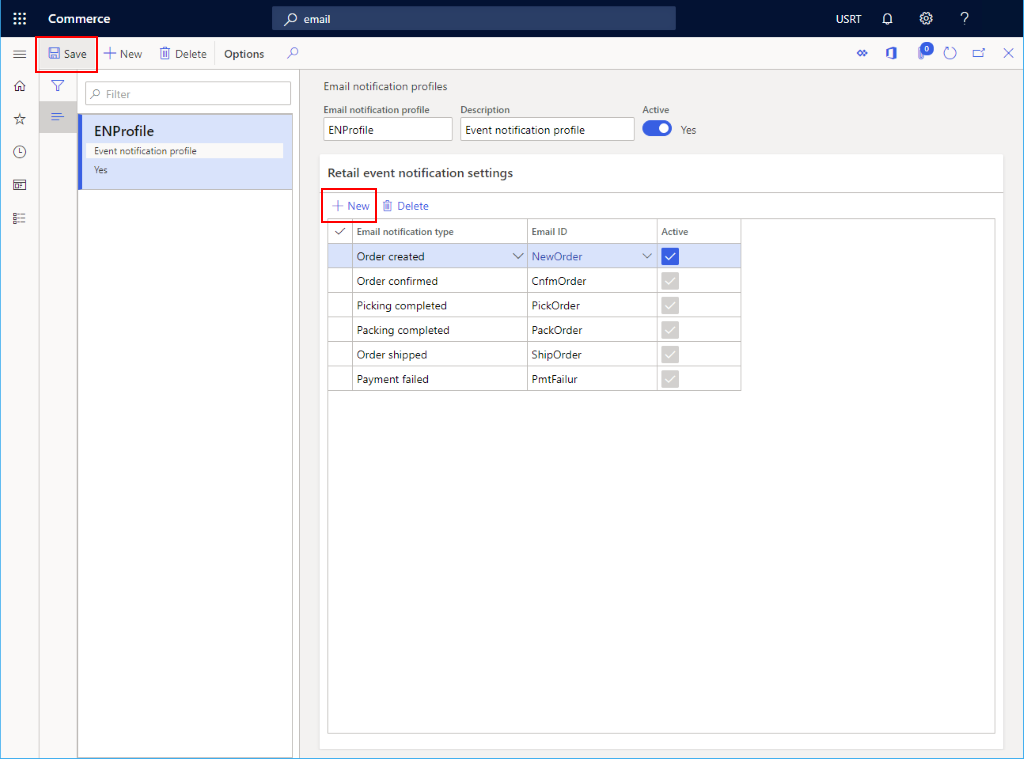
Add a notification type
To create an email event, follow these steps:
- In the navigation pane, go to Modules > Retail and commerce > Headquarters setup > Commerce email notification profile.
- Under Retail email notification settings, select New.
- Select the appropriate Email notification type from the drop-down list. The
RetailEventNotificationTypeenum defines the options in the drop-down list. To add an option to the drop-down list, extend the enum. - Select the email template you created from the Email ID drop-down list.
- Select the Active checkbox.
- On the action pane, select Save.
The following image shows some example event notification settings.
Associate the email notification profile with a channel
You can activate the email notification profile by associating it with a brick-and-mortar store channel, online channel, or call center channel. To associate the email notification profile with a channel, in headquarters, go to the channel form and select the desired email notification profile.
Note
You can also define the email notification profile in headquarters at Commerce parameters > General, but Microsoft recommends that you define the email notification profile at the individual channel level.
Enable the optimized order notifications processing feature
When you enable the Optimized order notifications processing feature, the system runs the email notification process job in parallel and processes more emails at the same time.
To enable the optimized order notifications processing feature in headquarters, follow these steps:
- Go to System administration > Workspaces > Feature management.
- On the Not enabled tab, in the Feature name list, find and select the Optimized order notifications processing feature.
- In the lower-right corner, select Enable now. After the feature turns on, it appears in the list on the All tab, with a status of Enabled.
Schedule a recurring email notification process job
To send email notifications, the Process retail order email notification job must be running.
To set up a batch job in headquarters for sending transactional emails, follow these steps:
- Go to Retail and Commerce > Retail and Commerce IT > Email and notifications > Send email notification.
- In the Process retail order email notification dialog, select Recurrence.
- In the Define recurrence dialog, select No end date.
- Under Recurrence pattern, select Minutes, and then set the Count field to 1. These settings ensure that the system processes email notifications as quickly as possible.
- Select OK to return to the Process retail order email notification dialog.
- Select OK to complete the job setup.
Enable optimized email notification processing
The Optimized order notifications processing feature enables optimized processing of email order notifications. When you enable this feature, several tasks run in parallel to send order notification emails, resulting in higher job throughput.
To enable optimized email notification processing, go to Workspaces > Feature Management and enable the Optimized order notifications processing feature.
Note
If your Commerce headquarters version is older than 10.0.31, you must cancel the currently running Process retail email order notification batch job. Go to System Administration > Inquiries > Batch jobs and delete the batch job. To recreate the batch job, follow the instructions in Schedule a recurring email notification process job.
Schedule a clean-up batch job for email notification logs
To set up a clean-up batch job in headquarters for cleaning up email notification logs, follow these steps:
- Go to Retail and Commerce > Retail and Commerce IT > Email and notifications > Clean up email notification logs.
- In the Clean up email notification logs dialog, configure the following parameters:
- Also delete unsent emails - When you set this parameter to Yes, the clean-up batch job deletes emails that aren't sent successfully.
- Retention days - Specify the number of days that emails should be kept. The clean-up batch job deletes only emails that are older than the number of days specified.
- To set up a recurring job that checks and cleans up the email notification logs older than the specified number of retention days, select Recurrence.
- In the Define recurrence dialog, configure the recurrence pattern.
- For example, to define a recurrence frequency of three months, under Recurrence pattern, select Months, and then for Count enter the number "3". This configuration makes the batch job check and clean up logs every three months.
- To keep the clean-up batch job running indefinitely, select No end date.
- Select OK to return to the Clean up email notification logs dialog.
- Select OK to complete the job setup.
Once the batch job starts, it continues to create subtasks to delete email notification logs based on the parameters until no logs are left to delete. Each subtask can delete up to 2,000 logs. To change the maximum number of logs that each subtask can delete, go to Retail and Commerce > Headquarters setup > Parameters > Commerce shared parameters > Configuration parameters in headquarters. For the NotificationLog_NumOfRowsToBeCleaned parameter, enter a new maximum number.
Next steps
Before you can send emails, you must configure your outgoing mail service. For more information, see Configure and send email.
Troubleshooting
Check the email notification log
To check the email notification log, follow these steps:
- Go to
https://<environment-URL>/?mi=RetailEventNotificationLog. - If the log doesn't show the email, the system didn't process the email notification. Verify that you correctly created the Email notification profile.
- Go to Modules > Retail and commerce > Headquarters setup > Commerce email notification profile.
- In the Retail event notification settings section, verify the email notification type is active.
- Select Email ID. In the email template, verify that the sender email, default language code, and email message content are configured correctly.
- Verify that the Process retail order email notification job is scheduled.
- Go to Retail and commerce > Inquiries and reports > Batch jobs.
- Find the Process retail order email notification batch job.
- Verify that the batch job is executing.
Check email sending failures
To check email sending failures, follow these steps:
- Go to System administration > Setup > Email > Email history.
- For any emails where the email status value is Failed, review the error message on the Failure details tab and determine whether corrective actions should be taken. For more information, see Common issues with sending email.