Note
Access to this page requires authorization. You can try signing in or changing directories.
Access to this page requires authorization. You can try changing directories.
Note
The Retail Interest Group by Dynamics 365 Commerce has moved from Yammer to Viva Engage. If you don't have access to the new Viva Engage community, fill out this form (https://aka.ms/JoinD365commerceVivaEngageCommunity) to be added and stay engaged in the latest discussions.
This article describes how to set up an e-commerce online development environment to debug against a Microsoft Dynamics 365 Commerce cloud development environment.
You can configure an e-commerce development environment to debug your live e-commerce website or to test e-commerce configuration changes against various Commerce cloud environments, such as "Dev," "Test," "UAT," or "Prod." This environment is useful for testing and debugging e-commerce modules and data actions against Retail Server extensions. After you configure it, modules and data actions that use Retail Server APIs directly call the Retail Server in the Commerce cloud environment. Otherwise, you need mock data.
Install the Commerce online SDK
To get started, install the Dynamics 365 Commerce online software development kit (SDK). You can install the online SDK in any Windows 10 environment. You can even install it directly on a Commerce development virtual machine (VM). For setup instructions, see Setup a development environment.
Debug against a Retail Server in a Commerce cloud environment
The online SDK uses Node.js as the JavaScript runtime to render modules and e-commerce pages in a development environment. To configure a local development environment so that it points to a Commerce cloud environment, set the MsDyn365Commerce_BASEURL variable in the .env file to the URL of the Retail Server in the Commerce cloud environment. For information about how to set up the .env file, see Configure a development environment (.env) file. You must also specify the channel ID, MSDyn365Commerce_CHANNELID, and the channel operating unit number (OUN), MSDyn365Commerce_OUN.
Note
Catalogs aren't supported in e-commerce. Therefore, the MSDyn365Commerce_CATALOGID variable is always set to 0 (zero).
Retrieve the URL of a Retail Server in a Commerce development environment
To get the Retail Server URL when you debug against a Commerce development environment, go to Microsoft Lifecycle Services (LCS), and select the project and the environment. Then, in the upper-right corner of the page, select Login > Retail Server URL, as shown in the following illustration.
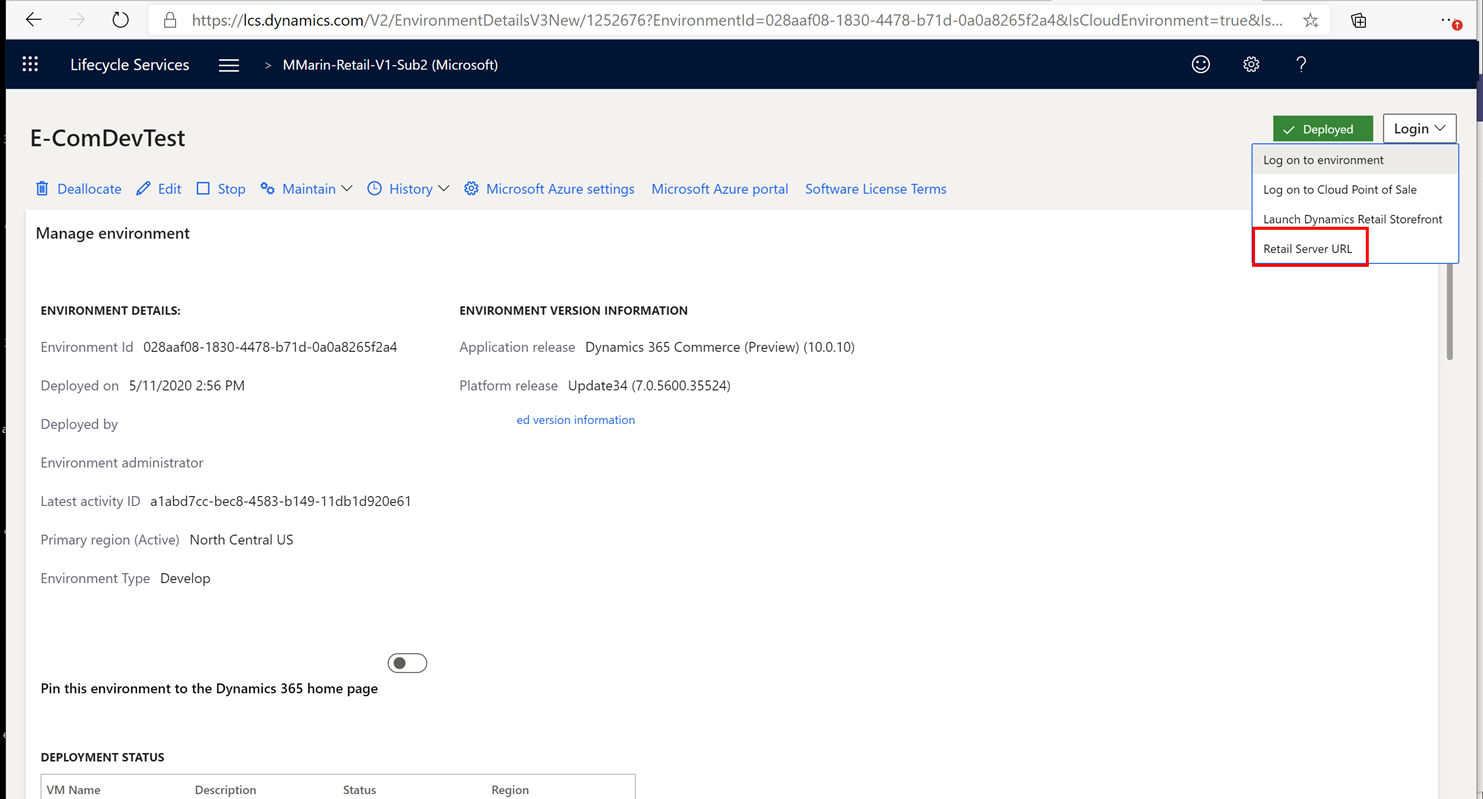
A new tab opens, and the URL resembles the following example:
https://e-comdevtestf1d01de665c744a7devret.cloud.retail.dynamics.com/Commerce
Copy this URL, except the last part (Commerce), into the .env file as the value of the MsDyn365Commerce_BASEURL variable. Set the MSDyn365Commerce_CHANNELID and MSDyn365Commerce_OUN variables based on the desired online channel in the environment. For information about how to get these values, see Configure a development environment (.env) file.
The following example shows configured variables that use the previously mentioned example URL.
MSDyn365Commerce_BASEURL=https://e-comdevtestf1d01de665c744a7devret.cloud.retail.dynamics.com/
MSDyn365Commerce_CHANNELID=68719478279
MSDyn365Commerce_CATALOGID=0
MSDyn365Commerce_OUN=128
...
To ensure that the server picks up these new values after you save the .env file, restart the Node.js server by using the yarn start command. As you build modules and debug data actions, calls are now made directly to the Retail Server that you specify in the .env file.
Debug against a production e-commerce site
The Commerce online SDK lets you point your development environment to a production e-commerce site to retrieve page definitions that the local Node.js environment can render. Therefore, you can see how your local e-commerce changes (modules, data actions, and themes) render before you upload the configuration package to a live environment. You can debug, make further changes, and see how those changes look on a production page.
On a production site, Commerce site builder is used to build e-commerce pages that are stored as JavaScript Object Notation (JSON) files in the Commerce content management system. When you configure an e-commerce development environment's MSDyn365_HOST variable in the .env file so that it points to a production e-commerce site, the JSON file is retrieved. The local Node.js server uses the local online SDK and customizations in that local environment to render the page. Therefore, you can test e-commerce changes on your live e-commerce site pages without deploying and potentially destabilizing your production environment.
To support this scenario, configure the MSDyn365_HOST variable in the .env file to point to your e-commerce domain name. When you complete this step, run the "yarn start" command and navigate to https://localhost:4000 to view your online website rendered on the local Node.js server. The Dynamics 365 Commerce content management system provides the live page. All data action Retail Server calls route to the Tier 1 environment, as specified in the .env file.
The following example .env file shows the MSDyn365_HOST variable set to www.fabrikam.com. This value doesn't include the https:// part of the URL.
MSDyn365_HOST=www.fabrikam.com
MSDyn365Commerce_BASEURL=https://e-comdevtestf1d01de665c744a7devret.cloud.retail.dynamics.com/
MSDyn365Commerce_CHANNELID=68719478279
MSDyn365Commerce_CATALOGID=0
MSDyn365Commerce_OUN=128
...
Note
If you configure multiple e-commerce sites for a single domain name, don't include the site name in the MSDyn365_HOST name you provide in the .env file. Instead, use the site names when you navigate the development environment in the local browser. For example, if you have two sites, www.fabrikam.com/site1 and www.fabrikam.com/site2, configure the .env file as shown in the example (www.fabrikam.com), and navigate to https://localhost:4000/site1 or https://localhost:4000/site2 respectively in the development environment.
Debug a product details page
To open a specific product details page (PDP), use the product ID to manually construct a URL by using the pattern https://localhost:4000/SITE_NAME/PRODUCT_NUMBER.p. For example, https://localhost:4000/site1/68719498121.p, where "site1" is the site name and "68719498121" is the product ID. To get the product ID, you can navigate directly to a product on the live web site and copy the product ID from the URL. Or in Commerce headquarters, you can navigate to a released product and select the Record info link under the Options tab, and then copy the Record-ID.
Troubleshooting
CORS errors
You might get CORS (cross origin) errors when calling Retail Server APIs from your browser. These errors might surface in the browser network trace as (failed) net::ERR_FAILED. To fix these errors, change the AllowedOrigins setting in the Retail service web.config to allow the call to go through, as shown in the following example.
...
<add key="AllowedOrigins" value="*" />
<!-- <add key="AllowedOrigins" value="https://usnconeboxax1pos.cloud.onebox.dynamics.com;https://usnconeboxax1ecom.cloud.onebox.dynamics.com" /> -->
...
Mixed content errors
When the Retail Server is configured with HTTP instead of HTTPS, you might receive "Mixed Content" errors when rendering e-commerce content. Ensure the Retail Server is configured with an HTTPS endpoint to avoid this type of error.
Retail calls fail with 404 error
A 404 error occurs if the channel ID and organizational unit number (OUN) are incorrect. To avoid those errors, make sure the channel ID and OUN are correct in the .env file. For more information, see Configure a development environment (.env) file.
Additional resources
Get started with e-commerce online extensibility development
System requirements for a Dynamics 365 Commerce online extensibility development environment
Set up a development environment
Configure a development environment (.env) file
Set up Azure DevOps code sharing and create a build pipeline