Note
Access to this page requires authorization. You can try signing in or changing directories.
Access to this page requires authorization. You can try changing directories.
[This article is prerelease documentation and is subject to change.]
You can create and manage surveys that go out to the customers after a call or conversation ends. When you create a survey in Copilot Service admin center, the application automatically provisions an AI agent (agent) survey that can be used to collect customer feedback. Contact centers can improve their quality of service based on the survey responses.
Important
- This is a preview feature.
- Preview features aren’t meant for production use and might have restricted functionality. These features are subject to supplemental terms of use, and are available before an official release so that customers can get early access and provide feedback.
Note
Copilot Studio bot is renamed as Copilot agent (agent or AI agent). Human agent is now renamed as customer service representative (service representative or representative). You might come across references to the old and new terms while we update the product UI, documentation, and training content.
The survey appears for the customer after the representative ends the conversation or call.
With survey agents, you can:
- Gather customer feedback and configure contextual actions depending on the feedback.
- Unify and centralize the process of configuring surveys across digital messaging, voice, and custom channels.
- Use predefined templates to create surveys.
- Allow supervisors to view and review feedback summarized into actionable insights.
Note
- The survey agent is generally available for the voice channel and in preview for all other channels.
- When you copy an environment, while the survey agents are copied, they won't work as expected in the target environment. We recommend that you create new survey agents in the target environment.
How it works
- Create a survey agent in Copilot Service admin center.
- Edit the survey agent in Copilot Studio.
- Add the survey agent to the appropriate channel.
- Experience the survey runtime behavior in Copilot Service workspace.
Prerequisites
- Copilot Studio and the channels in Dynamics 365 Contact Center or Dynamics 365 Customer Service are available in the same environment.
- Omnichannel administrator role.
Create a survey
- In the site map of Copilot Service admin center, go to Customer settings in Customer Support, and select Manage for Customer feedback (preview).
- On the Customer feedback (preview) page, select New.
- On the Add new customer feedback survey wizard, select one of the following templates, and then select Next:
- Customer Satisfaction (CSAT) Survey: Use to ask questions, such as, “On a scale of 1-5, how would you rate your overall satisfaction with the service you received?”
- Net Promoter Score (NPS) Survey: Use to measure customer loyalty, such as, “On a scale of 0 to 10, how likely are you to recommend our product/service/company?”
- Customer Effort Score (CES): Use to quantify the ease with which customers can complete their desired actions or resolve issues when interacting with a company’s products or services. Frame questions, such as, “Were we able to resolve your issue?"
- Blank Template: Use it to start a survey from scratch.
- On the Properties page, do the following:
- Name: Enter a name based on the survey template that you selected.
- Select primary language: Select a primary language from the supported languages list. The languages that are supported in Copilot Studio only appear.
- Select the Enable for Voice Channels toggle if you want to use the survey for voice conversations.
- Select Next, and on the page that appears, review your choices.
- Select Save survey. The Survey Created page displays the summary and link to the survey where it's hosted. The application creates a survey agent with the same name as the survey and is hosted at the same link.
- Select Close. The survey is listed on the Customer feedback (preview) page and its status displays as In Progress.
Complete the configuration in Copilot Studio
After you create the survey in the admin center, it needs to be published. If you're creating the survey for the first time using Copilot Studio, the Dataverse connection must be set up before you publish the survey.
- Select the survey that you created. The survey opens in Copilot Studio page on a new tab.
- Update the survey to suit your business needs.
- Select Publish. After a couple of minutes, the survey status is updated as Ready on the Copilot Service admin center Customer feedback (preview) page. For any publishing issues, see the troubleshooting article.
Verify the Dataverse connection
Make sure that the Dataverse connection is established for Copilot Studio so that you can publish the survey agent.
- Sign into Power Apps, and then go to Solutions.
- On the Solutions page, select Default Solution under Unmanaged.
- On the page that appears, search for Connection references under Objects, and then select Microsoft Dataverse connection reference for MCS Survey.
- On the edit pane that appears, select a connection in the Connection box or select New connection. A new tab opens to create a connection.
- Complete the steps to create a Microsoft Dataverse connection and select it in the Connection box.
Learn more in Set up a Dataverse connection.
Configure multilingual survey agents
In Dynamics 365 Contact Center, you can set the primary language only for the survey. You can configure multilingual surveys in Copilot Studio. Learn more in Configure and create multilingual agents
Multilingual survey agents work only when you set up an IVR agent that identifies the customer language.
Considerations for multilingual survey agents
Add all other supported languages as a secondary language with the locale codes that you expect the survey agent to handle.
In the IVR agent, configure a topic with an on redirect trigger and set the following global variable: va_CustomerLocale.
Set the Global.va_CustomerLocale variable in the topic for verifying the customer language.
In your survey agent, make sure that the Global.va_CustomerLocale variable is set in the Set Global Variables topic.
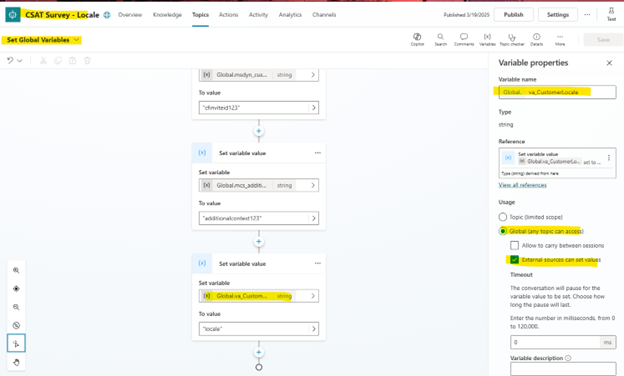
If you don't see the User.Language variable in the Conversation Start topic, set it as follows and save and publish.

    Switch(
    Lower(Global.va_CustomerLocale),
        "en-us", Locale.English,
        "en-au", Locale.English_AU,
        "en-gb", Locale.English_UK,
        "es-es", Locale.Spanish,
        "es-us", Locale.Spanish_US,
        "tr-tr", Locale.Turkish,
        "fr-fr", Locale.French,
        "fr-ca", Locale.French_Canada,
        "de-de", Locale.German,
        "it-it", Locale.Italian,
        "pt-pt", Locale.Portuguese_Brazilian,
        "zh-cn", Locale.Chinese_Simplified,
        "zh-tw", Locale.Chinese_Traditional,
        "cs-cz", Locale.Czech,
        "da-DK", Locale.Danish,
        "fi-fi", Locale.Finnish,
        "el-gr", Locale.Greek,
        "hi-in", Locale.Hindi,
        "id-id", Locale.Indonesian,
        "nb-no", Locale.Norwegian,
        "pl-pl", Locale.Polish,
        "ru-ru", Locale.Russian,
        "sv-se", Locale.Swedish,
        "th-th", Locale.Thai,
        "ja-jp", Locale.Japanese,
        "ko-kr", Locale.Korean,
        System.User.Language // Default
    )
Manage the surveys
The surveys that you create using the Customer feedback (preview) option only appear on the Customer feedback (preview) page. You can't manage surveys created using other methods, such as Customer Voice.
Manage your surveys on the Customer feedback (preview) page.
- Edit: Select a survey, and then select Edit. You can edit the survey name only.
- Demo link: Select a link to preview the survey and see how it appears in runtime.
- Status: Indicates whether a survey is ready or in progress.
- Voice Enabled: Indicates whether a survey is enabled for the voice channel.
Manage the survey agents in Copilot Studio
You can edit your survey agents to fulfill your business needs as follows:
- Customize agent messages
- Add branching logic
- Add more actions
- Add extra topic questions
Edit the Conversation Start system topic only. All other system topics are disabled and must not be used.
To add another question and store the data in Dataverse, the response variable name must start with “MCS_”.
To add another context to pass to the survey agent, make sure that the context variable name is set to "mcs_additionalcontext" and set the value as JSON key value pair.
Note
We recommend that you don't delete the survey agent from Copilot Studio.
Set up custom hosting
You can host surveys on a link other than the default one.
In Copilot Service admin center, select the survey that you want to custom host.
Select the survey and select Edit.
In Survey URL, enter the custom host page URL where you want to display the survey.
Do the following for a seamless hosting experience:
- Extract the query parameters from the custom host URL and enter in the code snippet.
- In the cshtml file, use following code.
    @{
        var environment = Request.Query["Environment"];

        var bot = Request.Query["Bot"];

        var surveyVersion = Request.Query["SurveyVersion"];

        var regardingLiveWorkItemId = Request.Query["RegardingLiveWorkItemId"];

        var surveyId = Request.Query["SurveyId"];

        var invitationId = Request.Query["InvitationId"];
    }
Copy the following code snippet and paste it to your HTML website.
    <!DOCTYPE html>
    <html>
    <body>
    <iframe src="https://powerva.microsoft.com/environments/@environment/bots/@bot/webchat?__version__=2&SurveyVersion=@surveyVersion&RegardingLiveWorkItemId=@regardingLiveWorkItemId&SurveyId=@surveyId&InvitationId=@invitationId" frameborder="0" style="width: 300px; height: 500px;"></iframe>
    </body>
    </html>
Style the iframe to match your website.
Enable the post-conversation survey for digital messaging channels
- Perform the steps 1 through 3 in Configure the post-conversation survey.
- Select Powered by Microsoft Copilot Studio (preview). Select a survey from the list. Only those surveys that you create using the customer feedback option and in published state are displayed for you to select.
- Perform the rest of the steps in Configure the post-conversation survey.
Enable the post-call survey for the voice channel
- In Copilot Service admin center, go to the voice workstream and select Edit.
- On the Behaviors tab, scroll to the bottom of the page and enable the toggle for Post-call survey.
- In Customer feedback survey, select a survey from the list. Only those surveys that you create using the customer feedback option and in published state are displayed for you to select.
- Verify that the post-call survey option listed on the Language tab of the workstream is disabled. The survey option needs to be disabled for the new experience to work as expected.
- Save the changes.
View the survey results
The survey results are stored in Dataverse tables. To view the survey responses, in Power Apps, go to Tables, and select Customer feedback survey response.
The CSAT scores are displayed in the Omnichannel historical analytics report.
Configure case resolution survey
You can configure the system to send a survey through email after the service representative resolves a case.
Follow these steps to configure post-case resolution surveys in Copilot Service admin center:
- In the site map, under Customer Support > Case settings, select Manage for Post case resolution survey (preview). The post case resolution surveys are triggered through Power Automate flows. The Enable survey invite flow dialog appears.
- Select Turn on. The Power Automate flows page opens on a new tab.
- Search for and enable the Send a Microsoft Copilot Survey bot when a case is resolved in Dynamics 365 flow.
- Alternatively, you can enable the cloud flow in Power Apps > Solutions > Default Solution under Unmanaged, and search for Send a Microsoft Copilot Survey bot when a case is resolved in Dynamics 365.
- Go back to the admin center, and in Post case resolution survey (preview), do the following actions:
- Turn on the Enable case resolution survey toggle. The Microsoft Copilot Studio survey and Email template areas appear.
- Select Microsoft Copilot Studio survey, and on the Survey pane that appears, select a survey in Default survey, and then save and close.
- The email template to send the survey link to customers is selected by default. You can create and set an email template of your choice. Learn more in Create email templates.
- Save the corresponding changes.