Note
Access to this page requires authorization. You can try signing in or changing directories.
Access to this page requires authorization. You can try changing directories.
By using Copilot Studio, you can create an agent that communicates with customers in different languages. You can configure multilingual agents to automatically detect the desired language based on the agent user's web browser settings and respond in the same language, providing a more personalized and engaging experience for customers.
When you create an agent, you specify its primary language.
After you add secondary languages to an agent, you're responsible for providing the translations for messages in topics you create. For agents that use generative orchestration, generated messages are translated automatically.
When a customer starts a session with a published agent, the agent selects one of its languages to match the language specified in the client or browser of the customer. If the agent can't detect the language, or if it detects a language that it doesn't support, the agent defaults to its primary language.
You can design an agent to change the language it uses during a conversation (see Make an agent switch to another language). You can also set up an agent that uses generative orchestration to dynamically switch languages to follow the language used in the current conversation turn (see Set up an agent for dynamic language switching).
For the list of supported languages, see Language support.
Note
Classic chatbots support only one language. For more information about converting a classic chatbot to an agent, see Upgrade to Copilot Studio unified authoring.
Add languages to an agent
Go to the Settings page for the agent, and select Languages.
Select Add language.
In the Add languages panel, select the languages you want to add to the agent, and select Add.
Review the list of languages, and close the Settings page.
Manage localization for a multilingual agent
In Copilot Studio, you perform all topic and content editing in the agent's primary language. This section explains how to download strings from your agent and translate them into your agent's secondary languages. After you upload the translated strings, you can switch the language in the test panel and verify that conversations in the secondary languages also flow as expected.
Prepare localized content
When you first download the localization file for a secondary language, all strings are in the agent's primary language. After you download a localization file, use it with your preferred localization process.
Go to the Settings page for your agent, and select Languages.
On the Languages page, in the list of secondary languages, select Upload for the language you want to update.
In the Update localizations panel, select either the JSON or ResX format to download the current localization file for that language.
Note
The downloaded file contains the latest localization content for the agent. To download previous versions of the localization file, open the agent's solution.
Open the downloaded file and replace the primary language strings with the appropriate translated text.
Return to the Update localizations panel, select Browse, and upload the translated file.
Close the Update localizations panel and the Settings page.
Update localized content
If you change the primary language strings, you must also update the content in the secondary languages. This process includes both new content and modified content. Incremental changes aren't automatically translated. You must download the secondary language JSON or ResX file, and update the untranslated strings by using your preferred localization process.
The following scenario is typical of the workflow for translated content. You previously translated your primary language (en-US) into a secondary language (fr-FR), and you added and modified content in the primary language. When you download the localization file for the secondary language, any new strings are in the primary language (en-US) and strings that were previously translated remain in the secondary language (fr-FR). However, previously translated strings whose original text was modified since you last uploaded the localization file still appear as they were last translated into the secondary language. Because the string IDs don't change, the secondary-language strings and primary-language strings might become out of sync after changes happen in the primary language. Make sure comparing the new localization file against the version you uploaded last—to identify primary-language string changes—is part of your localization process.
Make dynamic content from Adaptive Cards available for localization
Localization files don't include mixed-type strings from Adaptive Cards. If you need to localize an Adaptive Card where a string can include both static text and variables (dynamic content), use the following workaround. The procedure shows you how to use a Set text variable node to store the full string with the static text and variables in an intermediate variable. Then you reference only that intermediate variable in your Adaptive Card. When you download a localization file for your agent, the value of your intermediate variable, with the static text and the variable references, is available for localization as part of a setVariable action.
To make an Adaptive Card's dynamic content localizable:
Add a Set variable value node before your Adaptive Card. This step creates a YAML representation that you can update by using the code editor to convert the node into a Set text variable node. You can't create Set text variable nodes directly from the authoring canvas.
In the Set variable value node, create a new variable but don't set the value yet.
Open the code editor for your topic.
In the code editor, locate the part that represents your Set variable value node and replace
kind: SetVariablewithkind: SetTextVariable. This change converts your Set variable value node into a Set text variable node.Close the code editor.
Select the bottom field of the Set text variable node and enter the full string with the static text and variables you want to show on your Adaptive Card. Insert a variable in the same way you insert a variable in a message.
Update your Adaptive Card with a reference to this new variable.
Save your topic. You can now download the localization file and verify that it includes the dynamic content for your Adaptive Cards.
Learn more in Localize Adaptive Card content.
Test a multilingual agent
Open the test panel.
Select the three dots (…) at the top of the test panel, and select the language you want. The test panel reloads itself, this time using the selected language. The authoring canvas stays in the primary language and you can't save changes you make to a topic until you switch back to the primary language.
To test the agent, enter a message in the selected language.
You can also set your browser language to one of your agent's languages, and go to the prebuilt demo website. The demo website opens in the specified language, and the agent chats in that language.
Make an agent switch to another language
When authoring, you can configure the agent to switch to another language in the middle of a conversation. The logic can reside in any topic in the agent. However, the best practice is to switch the language right after a Question node, which ensures that all the following messages until the next Question node are in the same language.
To change the agent's current language, set the User.Language system variable to one of your agent's secondary languages. This selection changes the language spoken by your agent immediately.
Set up an agent for dynamic language switching
Note
This feature is only available for agents with generative orchestration turned on.
You can configure an agent to detect the language a customer uses and respond in the same language. With this configuration, the agent can switch languages multiple times over the course of a single conversation. The following scenario shows how to set up an agent to switch between Dutch and English. You can extend it for any combination of the languages your agent supports.
Warning
This dynamic language-switching method isn't compatible with browser-based language detection. Once the topic that dynamically detects the user language sets the User.Language variable, browser‑based language detection no longer takes effect for that user, even if the topic is later turned off or deleted. If you want to experiment or validate both approaches, use a separate test agent. After you test dynamic language switching, you must clear the persisted user language state before attempting to test browser-based language detection.
This scenario uses a topic with a Message received topic trigger. This topic trigger lets your agent examine every message it receives. This topic uses a custom prompt to detect the language and a condition to set the agent language system variable.
Verify that your agent is configured to support all the languages you want.
Replace the default trigger type for the topic with A message is received.
Add a prompt to your topic:
Select the Add node icon
 below the Trigger node.
Select Add a tool > New prompt.
In the prompt editor, enter a representative name for your prompt, such as "Detect language."
In the Instructions pane, enter "Determine which language this message is written in: ".
At the bottom of the Instructions pane, select Add content and select Text. A window appears inviting you to enter a name and a sample message.
For Name, enter "Message." For Sample data, enter "Message from the user," and select Close.
In the Model response pane, switch the Output format to JSON.
Select Test. Your prompt shows a JSON literal, with a single property identifying the language as English.
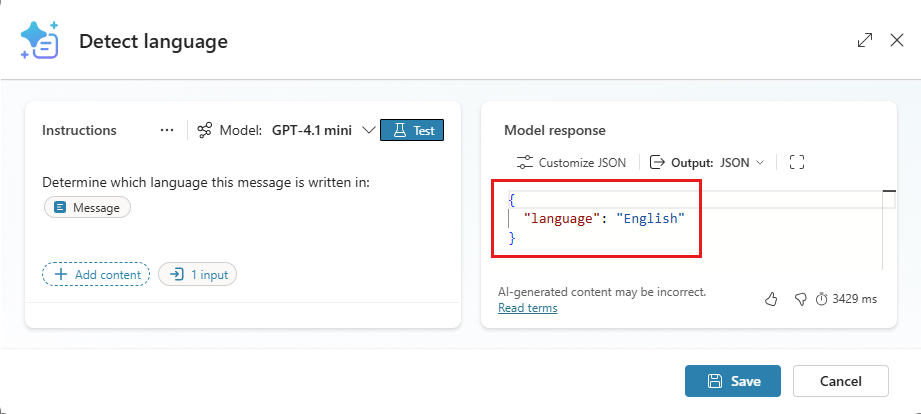
Select Save. A Prompt node appears on the canvas.
Configure the Prompt node:
- For Input, select the system variable
Activity.Text(the text of the incoming message). - For Output, create a new variable called
DetectedLanguage.
- For Input, select the system variable
Branch your logic based on the detected language:
Add a condition below the Prompt node.
Base your condition on the custom variable
DetectedLanguage.structuredOutput.language, which holds the name of the detected language.Add a condition branch for each language you need to detect.
Under each branch, add a Set variable value node to set the
User.Languagesystem variable accordingly. The following image shows a topic with a condition to switch between Dutch and English.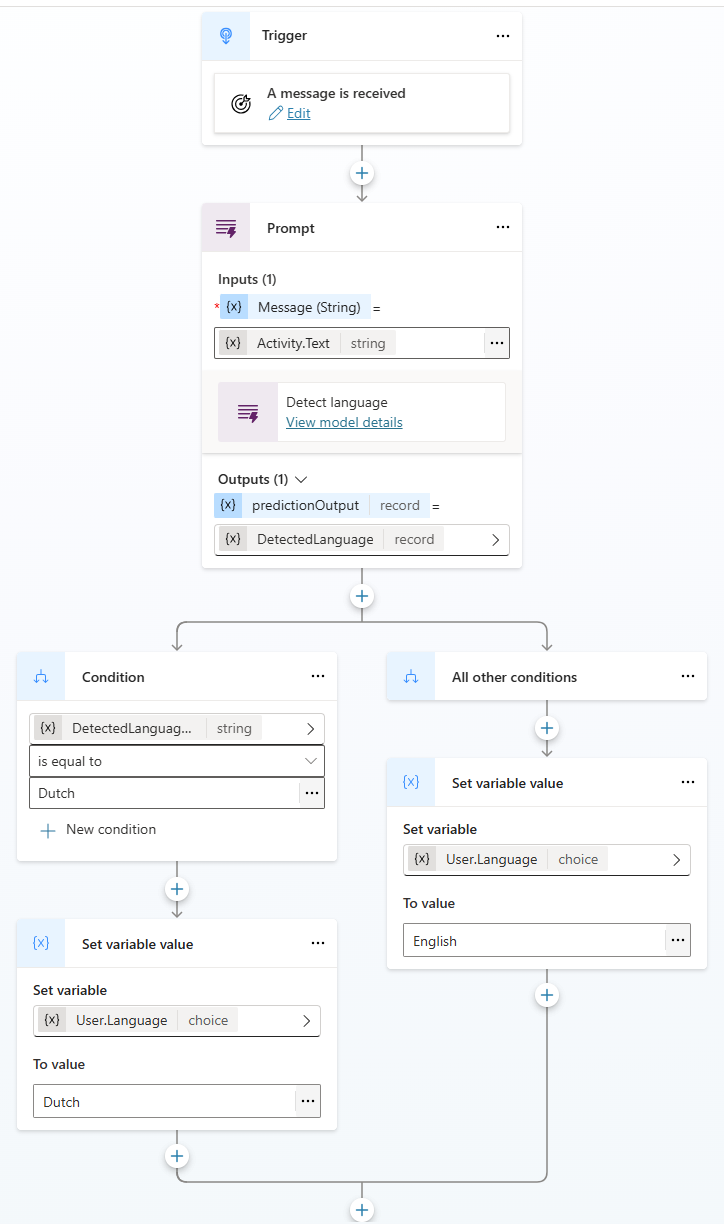
Restore browser-based language detection
When an agent configured for dynamic language switching sets the User.Language system variable, the selected language persists as an override for the agent user. The user's preferred language is determined in the following priority order:
- Language preference explicitly set by the user and persisted as an override for this user (highest priority).
- Incoming message from the user in a language matching one of the agent's supported languages (
Activity.Locale). - The primary language of the agent (fallback).
To clear the persisted language after testing dynamic language switching:
- Send
/debug clearstateto the agent. This command clears the language override from the user state.
Troubleshoot a multilingual agent
This section provides tips to help you understand unexpected multilingual agent behavior.
Multilingual agent behavior for languages that aren't configured
If a user configures their browser for a language that you didn't configure for the agent, the agent falls back to its primary language.
You specify the primary language for an agent when you create the agent. You can't change the primary language after creation but you can change the region for the agent's primary language, if more than one region is available.
Multilingual agent behavior for missing translations
If you add messages to an agent in its primary language but don't upload the translations for the new messages, the agent shows the untranslated changes in its primary language. Always make sure the translations are up-to-date after making changes to an agent.
Localization files don't include mixed-typed strings from Adaptive Cards. If you need to localize Adaptive Cards where a string can include both static text and variables (dynamic content), you must use a workaround. Learn how to store a mixed-typed string in a text variable before using it in an Adaptive Card.
Errors when publishing a multilingual agent
When you try to publish a multilingual agent, you might see the "Validation for the bot failed" error message with the raw response error code, SynonymsNotUnique. This error means your localization file contains either duplicate synonyms or a synonym that matches a DisplayName value. You typically encounter this error when a node contains an Entity.Definition.'closedListItem' where either of the following scenarios occurred:
- One of the
Synonymselements isn't unique. - One of the
Synonymselements has the same value as theDisplayNameelement.
All Synonyms for the same entity must be unique and have a different name than the DisplayName element.
To correct the error, review the JSON or ResX file for your secondary language, and identify any instances where this condition might be present.