Connect to Delta tables in Azure Data Lake Storage
Connect to data in Delta tables and bring it into Dynamics 365 Customer Insights - Data.
Key reasons to connect to data stored in Delta format:
- Directly import Delta formatted data to save time and effort.
- Eliminate the compute and storage costs associated with transforming and storing a copy of your lakehouse data.
- Automatically improve the reliability of data ingestion to Customer Insights - Data provided by Delta versioning.
Supported Databricks features and versions
Customer Insights - Data supports Databricks features with a 'minReaderVersion' of 2 or earlier. Databricks features that require Databricks reader version 3 or later aren't supported. The table shows the supported and unsupported Databricks features.
| Supported features | Unsupported features |
|---|---|
| Basic functionality | Deletion vectors |
| Change data feed | Liquid clustering |
| Check constraints | Table features write |
| Column mapping | TimestampNTZ |
| Generate columns | Type widening |
| Identity columns | Variant |
| Row tracking | |
| Table features read | |
| UniForm |
Learn more: How does Databricks manage Delta Lake feature compatibility?.
Prerequisites
The Azure Data Lake Storage must be in the same tenant and Azure region as Customer Insights - Data.
To connect to storage protected by firewalls, Set up Azure private links.
The Customer Insights - Data service principal must have Storage Blob Data Contributor permissions to access the storage account. For more information, see Grant permissions to the service principal to access the storage account.
The user that sets up or updates the data source needs at least Storage Blob Data Reader permissions on the Azure Data Lake Storage account.
Data stored in online services might be stored in a different location than where data is processed or stored. By importing or connecting to data stored in online services, you agree that data can be transferred. Learn more at the Microsoft Trust Center.
Customer Insights - Data supports Databricks reader version 2. Delta tables using features that require Databricks reader version 3 or above aren't supported. Learn more: Supported Databricks features.
The Delta tables must be in a folder in the storage container and can't be in the container root directory. For example:
storageaccountcontainer/
    DeltaDataRoot/
       ADeltaTable/
             _delta_log/
                 0000.json
                 0001.json
             part-0001-snappy.parquet
             part-0002-snappy.parquet
- Data in your Azure Data Lake Storage must be in Delta tables. Customer Insights - Data relies on the version property in the table's history to identify the latest changes for incremental processing.
Connect to Delta data from Azure Data Lake Storage
Data connection names, data paths such as folders within a container, and table names must use names that begin with a letter. Names can only contain letters, numbers, and underscore (_). Special characters aren't supported.
Go to Data > Data sources.
Select Add a data source.
Select Azure Data Lake Delta tables.

Enter a Data source name and an optional Description. The name is referenced in downstream processes and it's not possible to change it after creating the data source.
Choose one of the following options for Connect your storage using.
- Azure subscription: Select the Subscription and then the Resource group and Storage account.
- Azure resource: Enter the Resource Id.
Choose the name of the Container that contains the folder of your data.
Optionally, if you want to ingest data from a storage account through an Azure Private Link, select Enable Private Link. For more information, go to Private Links.
Navigate to the folder that contains the data in Delta tables and select it. Then, select Next. A list of available tables displays.
Select the tables you want to include.
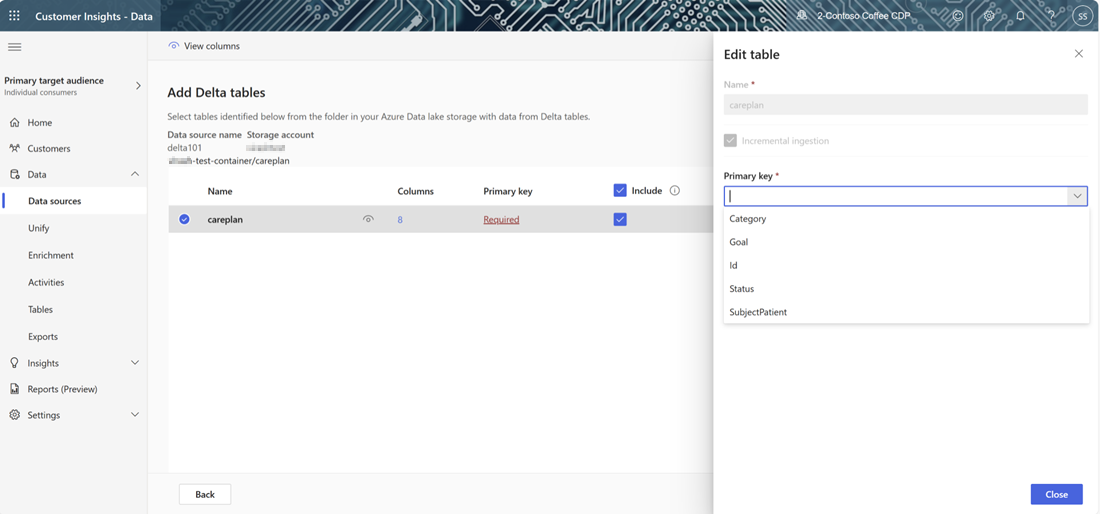
For selected tables where a primary key isn't defined, Required displays under Primary key. For each of these tables:
- Select Required. The Edit table panel displays.
- Choose the Primary key. The primary key is an attribute unique to the table. For an attribute to be a valid primary key, it shouldn't include duplicate values, missing values, or null values. String, integer, and GUID data type attributes are supported as primary keys.
- Select Close to save and close the panel.
To enable data profiling on any of the columns, select the number of Columns for the table. The Manage attributes page displays.
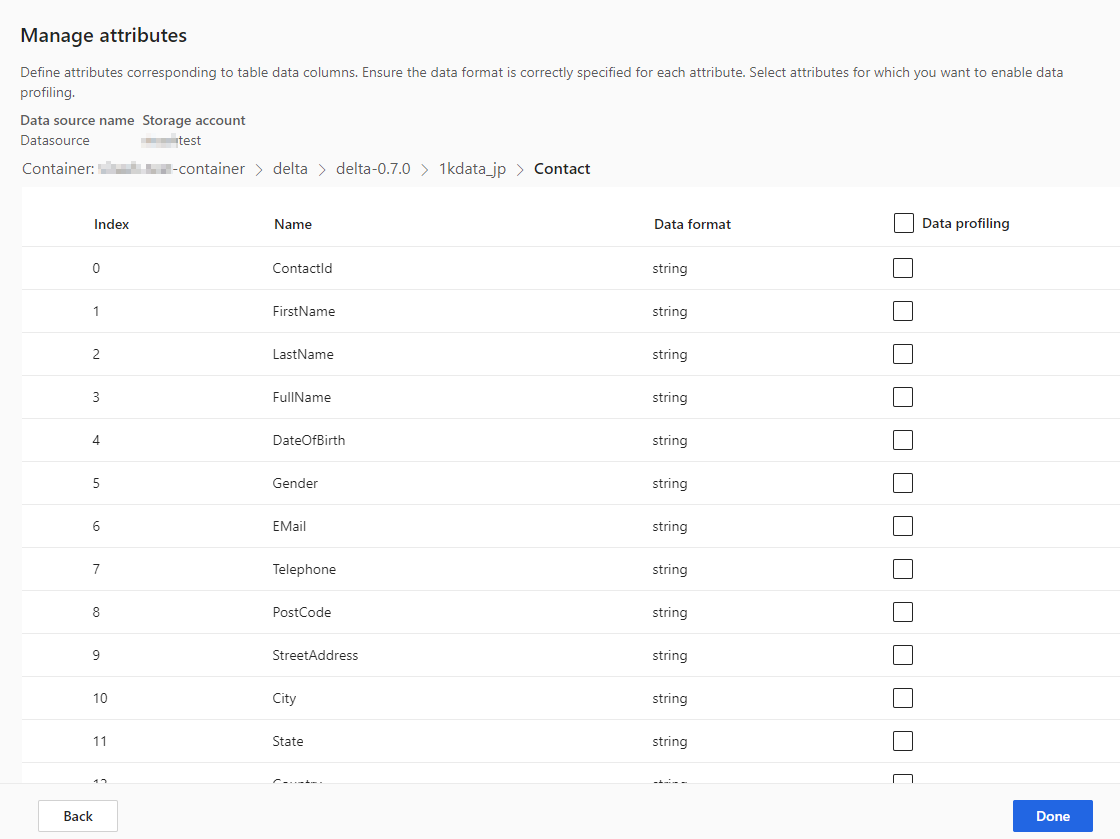
- Select Data profiling for the whole table or for specific columns. By default, no table is enabled for data profiling.
- Select Done.
Select Save. The Data sources page opens showing the new data source in Refreshing status.
Tip
There are statuses for tasks and processes. Most processes depend on other upstream processes, such as data sources and data profiling refreshes.
Select the status to open the Progress details pane and view the progress of the tasks. To cancel the job, select Cancel job at the bottom of the pane.
Under each task, you can select See details for more progress information, such as processing time, the last processing date, and any applicable errors and warnings associated with the task or process. Select the View system status at the bottom of the panel to see other processes in the system.

Loading data can take time. After a successful refresh, the ingested data can be reviewed from the Tables page.
Once you've saved the data source, you can't go back and add more tables. To add other tables, create another data source to bring the tables into Customer Insights - Data.
Manage schema changes
When a column is added or removed from the schema of a Delta folders data source, the system runs a complete refresh of the data. Full refreshes take longer to process all the data than incremental refreshes.
Add a column
When a column is added to the data source, the information automatically appends to the data in Customer Insights - Data once a refresh occurs. If unification is already configured for the table, the new column must be added to the unification process.
From the Customer data step, select Select tables and columns and select the new column.
In the Unified data view step, make sure the column isn't excluded from the customer profile. Select Excluded and readd the column.
In the Run updates to the unified profile step, select Unify customer profiles and dependencies.
Change or remove a column
When a column is removed from a data source, the system checks for dependencies in other processes. If there's a dependency on the columns, the system stops the refresh and provides an error indicating the dependencies must be removed. These dependencies display in a notification to help you locate and remove them.
Validate a schema change
After the data source refreshes, go to the Data > Tables page. Select the table for the data source and verify the schema.
Delta lake time travel and data refreshes
Delta lake time travel is the ability to query through table versions based on a timestamp or version number. Changes to Delta folders are versioned, and Customer Insights - Data uses the Delta folder versions to keep track of what data to process. In a regular delta table refresh, data is pulled from all the data table versions since the last refresh. As long as all versions are present, Customer Insights - Data can process just the changed elements and deliver faster results. Learn more about time travel.
For example, if Customer Insights – Data last synchronized with version 23 of your Delta folder data, it expects to find version 23 and possibly subsequent versions available. If the expected data versions aren't available, data synchronization fails and requires a manual full data refresh. Data synchronization can fail if your Delta folder data was deleted and then recreated. Or if Customer Insights - Data couldn't connect to your Delta folders for an extended period while the versions advanced.
To avoid the need for a full data refresh, we recommend you maintain a reasonable history backlog, such as 15 days.
Manually run a full data refresh on a Delta table folder
A full refresh takes all the data from a table in Delta format and reloads it from the Delta table version zero (0). Changes to the Delta folder schema trigger an automatic full refresh. To manually trigger a full refresh, perform the following steps.
Go to Data > Data sources.
Select the Azure Data Lake Delta tables data source.
Select the table you want to refresh. The Edit table pane displays.

Select Run one-time full refresh.
Select Save to run the refresh. The Data sources page opens showing the data source in Refreshing status, but only the selected table is refreshing.
Repeat the process for other tables, if applicable.
Data synchronization failure
Data synchronization can fail if your Delta folder data was deleted and then recreated. Or if Customer Insights - Data couldn't connect to your Delta folders for an extended period while the versions advanced. To minimize the impact where an intermittent data pipeline failure creates the need for a full refresh, we recommend you maintain a reasonable history backlog, such as 15 days.