Note
Access to this page requires authorization. You can try signing in or changing directories.
Access to this page requires authorization. You can try changing directories.
In real-time journeys, consent is collected, managed, and enforced at a contact point level (that is, an email address, phone number, or a custom channel address). When a message is sent to contacts, leads, or Customer Insights - Data profiles, the Customer Insights - Journeys app checks the consent for the specific contact point to which the message is being sent and for the specific purpose or topic of the message before sending the message.
If you're collecting consent using Customer Insights - Journeys forms, contact point consent records are automatically created for you. However, if you're managing consent in an external system or have custom built user experiences (such as landing pages or preference centers) where you're collecting consent from your customers, you may need to create or update contact point consent records in the consent center (the msdynmkt_contactpointconsent4 table) to send messages from the system.
Which scenarios require contact point consent records in the system?
You should always record consent in the system for proper auditing purposes. In some cases, you can run a journey (for example, a journey that sends an email for a nonrestrictive purpose) without having any explicit opt-in consent records in the system. However, there are certain cases in which a consent record is always required to be present in the system:
- Emails sent under a restrictive enforcement model: If the email consent enforcement model is set to restrictive, the system requires an explicit opt-in record in the consent center that's sending an email message. If an explicit opt-in record isn't found, the email message won't be sent.
- Update opt-outs for non-restrictive enforcement model-based purpose: If you've set the email enforcement model to non-restrictive, you should ensure that any opt-outs that are recorded in any external systems (outside of those collected from Customer Insights - Journeys forms or preference center experiences) are reflected appropriately in the consent center to ensure that real-time journeys can stop sending messages to that contact point.
- SMS or custom channel journeys for commercial purposes: The enforcement model flexibility doesn’t yet extend to SMS or custom channels. So, if a journey is created for SMS or a custom channel for a commercial purpose type, the system requires explicit opt-in consent records to send the message.
When should you use a cloud flow?
Load consent can help load consent records from contacts, leads, and subscription or marketing lists easily into the consent center. But if you have continuously running automations or processes that create new contact or lead records, running load consent manually can be operationally taxing.
In these cases, you can use a cloud flow to automate creating and updating contact point consent records in the consent center.
Here are some common scenarios where a cloud flow helps create contact point consent records:
- Contact or leads created through bulk import, Dataverse APIs, or a custom flow on a continuous basis: If you regularly create contacts and leads using any method other than Customer Insights - Journeys forms, you might need to create or update contact point consent records in the consent center. The most common way users create contacts or leads in the system is by using the Excel import functionality. The same guidance applies to contacts or leads created using Dataverse APIs or custom cloud flows.
- When you use Customer Insights - Data profiles and segments in Customer Insights - Journeys: As with every other journey in the system, when you use Customer Insights – Data profiles and segments in Customer Insights – Journeys, consent is always checked against the contact point where the messages are sent. So, you might need contact point consent records in the consent center to send messages using these journeys.
- Using an external consent management system: If you're managing consent in an external system, for the different cases of restrictive or nonrestrictive enforcement models, and SMS or custom channel journeys described above, you need to create or update consent records in the consent center.
Building the cloud flow
We'll now look at a sample cloud flow to understand the various steps that are needed to build a cloud flow for creating and updating contact point consent records.
In this example, Contoso has a landing page on their website that their customers fill out to sign up to receive Contoso’s services. When customers fill out the form, Contoso uses a cloud flow to automatically create contact records in their Dataverse environment. Contoso uses real-time journeys and wants to capture the consent for each contact that gets created from a landing page submission.
We get the email address of the contact and verify if a contact point consent record with the same email address exists in contact point consent (msdynmkt_contactpointconsent4) table.
If we don't find a contact point consent record for the email address, then the flow creates a new contact point consent record for the email address with an “opt-in” status. If we find existing consent records, then the flow updates those with the latest consent value.
Here's a high-level view of the steps that the flow includes:

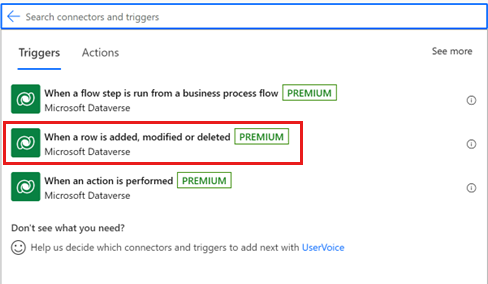
Add action trigger “When a row is added, modified, or deleted.”
Set change type to “Added or Modified” and the table name to “Contacts.” This action triggers the cloud flow whenever a new contact record is added, or an existing record is modified.
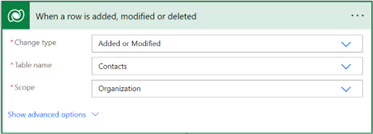
Note
This example assumes that there's a single business unit in the organization and doesn’t cover the scenario for multiple business units.
Add an action to “Initialize a variable” to set the consent value that you'd like the contact point consent record to have. We recommend using the
donotemailanddonotbulkemailfield values here and only set the contact point consent to opt-in if both fields are false (false representsAllowed for Email and Bulk Email). Otherwise, set the contact point consent record toopt-out.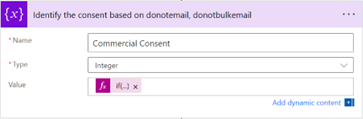
Here's the logic that can be used for the computation:
if(and(equals(triggerBody()?['donotemail'], false), equals(triggerBody()?['donotbulkemail'], false)),534120001,534120002)In this case, the formula is checking if two fields in the trigger body (
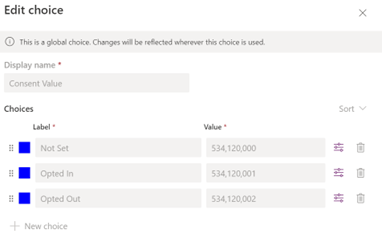
donotemailanddonotbulkemail) are both false. If they're both false, the formula returns the value534120001. If they aren't both false, the formula returns the value534120002.534120001is the consent status value for opt-in.534120002is the consent status value for opt-out.
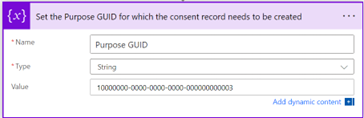
Add an action to “Initialize a variable” to set the GUID of the purpose for which the contact point consent record needs to be created or updated.
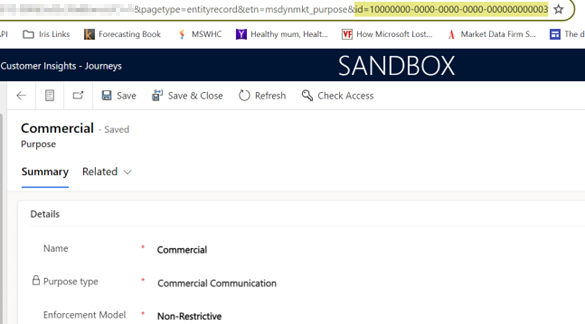
You can find the GUID of the purpose by navigating to the Purpose. Go to the compliance profile, then to the Consent Purposes tab and select the Purpose. The GUID for the purpose is present at the end of the URL.
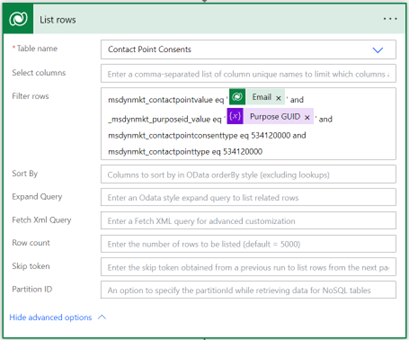
Next, add an action to “List rows” to find out if there are existing records present in the contact point consent table for the email address and the purpose combination.
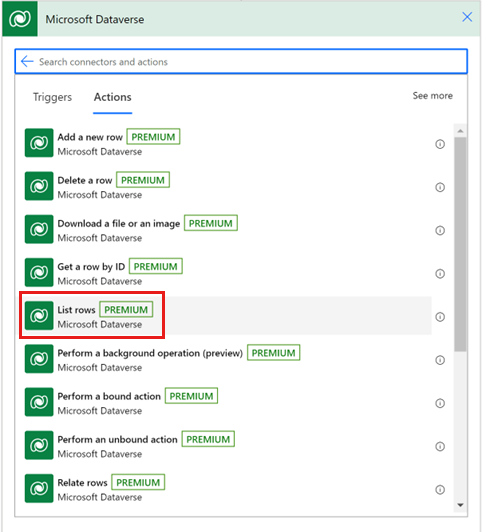
Here, we're looking for contact point consent records that have the same email address as that of the contact and are for the purpose for which we want to create or update the consent record.
- The
msdynmkt_contactpointconsenttypeattribute specifies whether the record is a Purpose consent record or a Topic consent record. The value534120000is for purpose and534120001represents topic. - The
msdynmkt_contactpointtypeattribute specifies the channel: email, SMS, or custom channel. In this case,534120000represents email as we're dealing with email consent records here.
Note
When selecting table name “Contact Point Consent” from the dropdown list, you find four different records with the same name. Choose the last one.
Make sure you're using consent table msdynmkt_contactpointconsent4s. To verify the table name, select the three dots (…) on top right of the action and select Peek code.
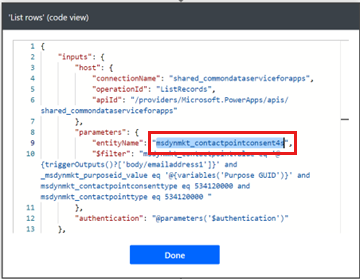
- The
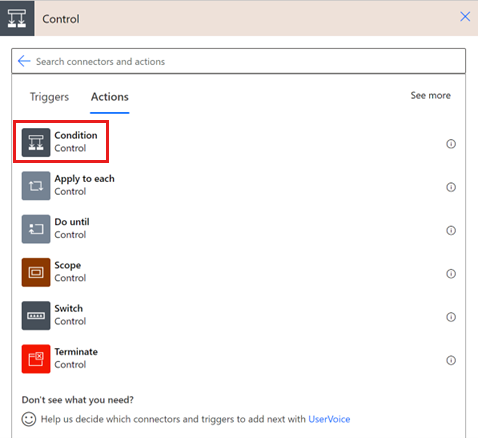
Add a “Condition” action to validate if the consent record exists or not.
Here's the expression that you can use here by referring to the dynamic content of “value” from the list rows step:
empty(outputs('List_rows')?['body/value'])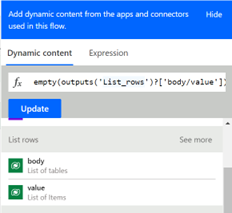
This condition returns true if there were no consent records were found matching from the “List rows” step previously.
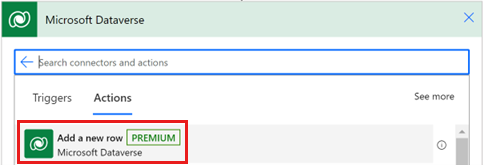
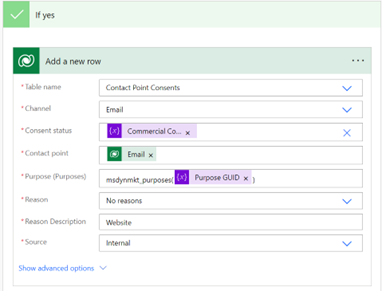
If no existing consent records are found, then create the contact point consent record as follows:
Select the “Add a new row” action.
Create the new row with the values shown below:
Table name: Contact Point Consents (Again, remember to select
msdynmkt_contactpointconsent4shere.)Channel: Email
Consent status: Should be the variable that we set in the previous step (Commercial Consent)
Contact point: The email address of the contact record that got created or updated
Purpose:
msdynmkt_purposes(Purpose GUID variable from the previous step)Reason: No reasons
Reason Description: Here, you can provide any description of your choice. You can use this to uniquely identify which records were created using your cloud flow.
Source: Internal
Consent Type: Purpose
If a consent record is found in the system, the “Condition” step would result in false and you can update all the records that were found by running an “Apply to each” action and perform an “Update a row” action for each of the rows of the “List rows” step.
Here, select the “value” of the “List rows” step as the output of the previous step.
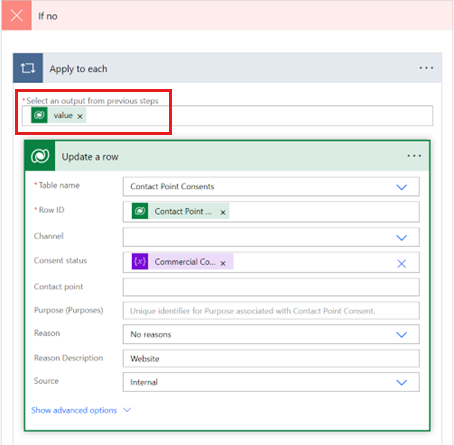
- Table name: Contact Point Consents (Again, remember to select
msdynmkt_contactpointconsent4shere.) - Row ID: Select “Contact Point Consent” from the dynamic content window
- Consent status: Should be the variable that we set in the previous step (Commercial Consent)
- Reason: No reasons
- Reason Description: Here, you can provide any description of your choice. You can use this to uniquely identify which records were created using your cloud flow.
- Source: Internal
- Consent Type: Purpose
You can leave the other fields blank/unmapped.
- Table name: Contact Point Consents (Again, remember to select
Creating topic consent records
Topics are always created under a purpose, and the system checks consent for the parent purpose before checking consent for the topic. If the parent purpose's consent is set to opted-out, the topic is also treated as opted-out, so its consent status doesn't matter.
If your workflow requires creating consent records for a topic, use the base flow described above and extend it.
The flow above creates and updates purpose consent records. Add steps to create and update topic consent records in addition to purpose consent records. For the system to treat topic consent as opted-in, the parent purpose's consent must also be opted-in. Make sure your flow creates and updates consent records for both the purpose and the topic so the system works as expected.
To create the topic consent record, set the Consent type value to Topic, and enter the GUID for the topic in the Topic (Topics) field using this format: msdynmkt_topics(GUID of the topic)
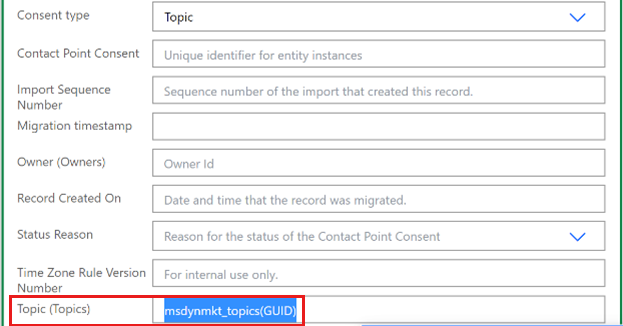
Note
The remaining fields aren't required, but fill them based on your use case.
Caveats and considerations
Monitoring and error handling
When you follow the above solution recommendation, consider setting up cloud flow monitoring for queues and failures. You might need to reconcile and resubmit failures. For more information, see:
- View analytics for Power Automate cloud flows
- Get notified about flow failures, customize columns for tables, and more!
Synchronizing consent with a third-party system
If you sync changes made in the consent center with an external system, you can trigger a circular loop like this:
- Changes in the external system trigger a consent record update in Dynamics 365. Consent updates in Dynamics 365 trigger an update back in the external system, and the loop continues.
To avoid this, use the “Reason description” field. Specify a unique value for the reason description in each flow that syncs consent between Dynamics 365 and the external system. Then, check for these specific values in each flow to break the circular loop.
Managing ALM for the cloud flow
If you have multiple environments (dev, test/QA, production, and so on) and need your cloud flow to stay consistent across environments, create the cloud flow in a solution. For more information, see Create a cloud flow in a solution.