Note
Access to this page requires authorization. You can try signing in or changing directories.
Access to this page requires authorization. You can try changing directories.
Applies to: Dynamics 365 Contact Center—standalone and Dynamics 365 Customer Service only
Note
Follow the steps provided in this article for single-session apps only or to use auto search on non-anchor tabs. For multi-sessions apps, use the knowledge search control on the app side pane.
Add a Knowledge Base Search control to Dynamics 365 for Customer Engagement forms to make it easy for users in your organization to find knowledge articles so they can answer common customer questions and resolve their issues right from the records, without having to switch to a different application.
You can configure the Knowledge Base Search control to:
Show automatic suggestions in search results based on certain fields, or based on text analytics. The text analytics feature in only available for Dynamics 365 for Customer Engagement.
Define filters that users can use on search results.
Choose from a set of predefined contextual actions the users can take on an article.
Add the control on any section of any entity that is enabled for knowledge management, including the timeline, and custom entities. The control is enabled in the case entity out of the box, and is added to the following forms:
- Case main form - In the Activity wall section.
- Case for interactive experience main form – In the Related section.
Note
The Knowledge Base Search control can be used on Microsoft Dynamics 365 for tablets and phones. However, some actions like Pop Out, Email Link, and Email Content aren't supported.
Microsoft Dynamics 365 Customer Service supports the native knowledge management, and this option is available for the Dynamics 365 Customer Service app users.
Prerequisites
Before you add the Knowledge Base Search control, make sure to:
Set up knowledge management in Dynamics 365 for Customer Engagement. More information: Set up knowledge management
Select the entity you want to enable knowledge management on while setting up knowledge management.
Note
All customization tasks for the Customer Service Hub must be done in Microsoft Dataverse.
Add the Knowledge Base Search control to main forms
Depending on which experience you're using, you can add the knowledge base search control to main forms by using one of the following methods:
Power Apps experience
Make sure that you have the System Administrator or System Customizer security role or equivalent before you begin.
Go to Power Apps, and then on the left pane, select Data > Tables.
Ensure you have the Customer Service App installed, and then in the upper-right corner of the window, change Default to All.
Select the entity for which Knowledge is enabled. To search for the entity, in the Search field, enter the entity name.
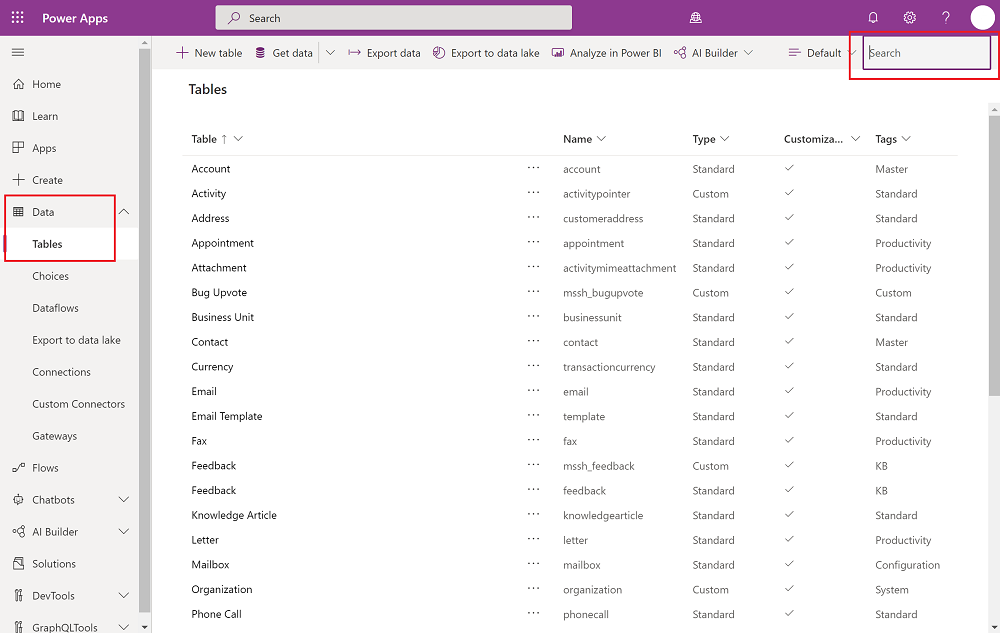
Select the entity name, select the Forms tab, and then open the form where you want to add the knowledge control. To add the control, create a section and then add a knowledge search control within it. Select +Component to add a new component, select Related Data, and then Knowledge Search.
Note
If the option to add Knowledge Base Search is disabled, it could be because knowledge management isn't set up or isn't enabled for the entity for which you're adding the search control. Also, this control won't be enabled for reference panels until a later date.
After you add your new section, select Save and Publish. You might need to refresh the screen to see the new section.
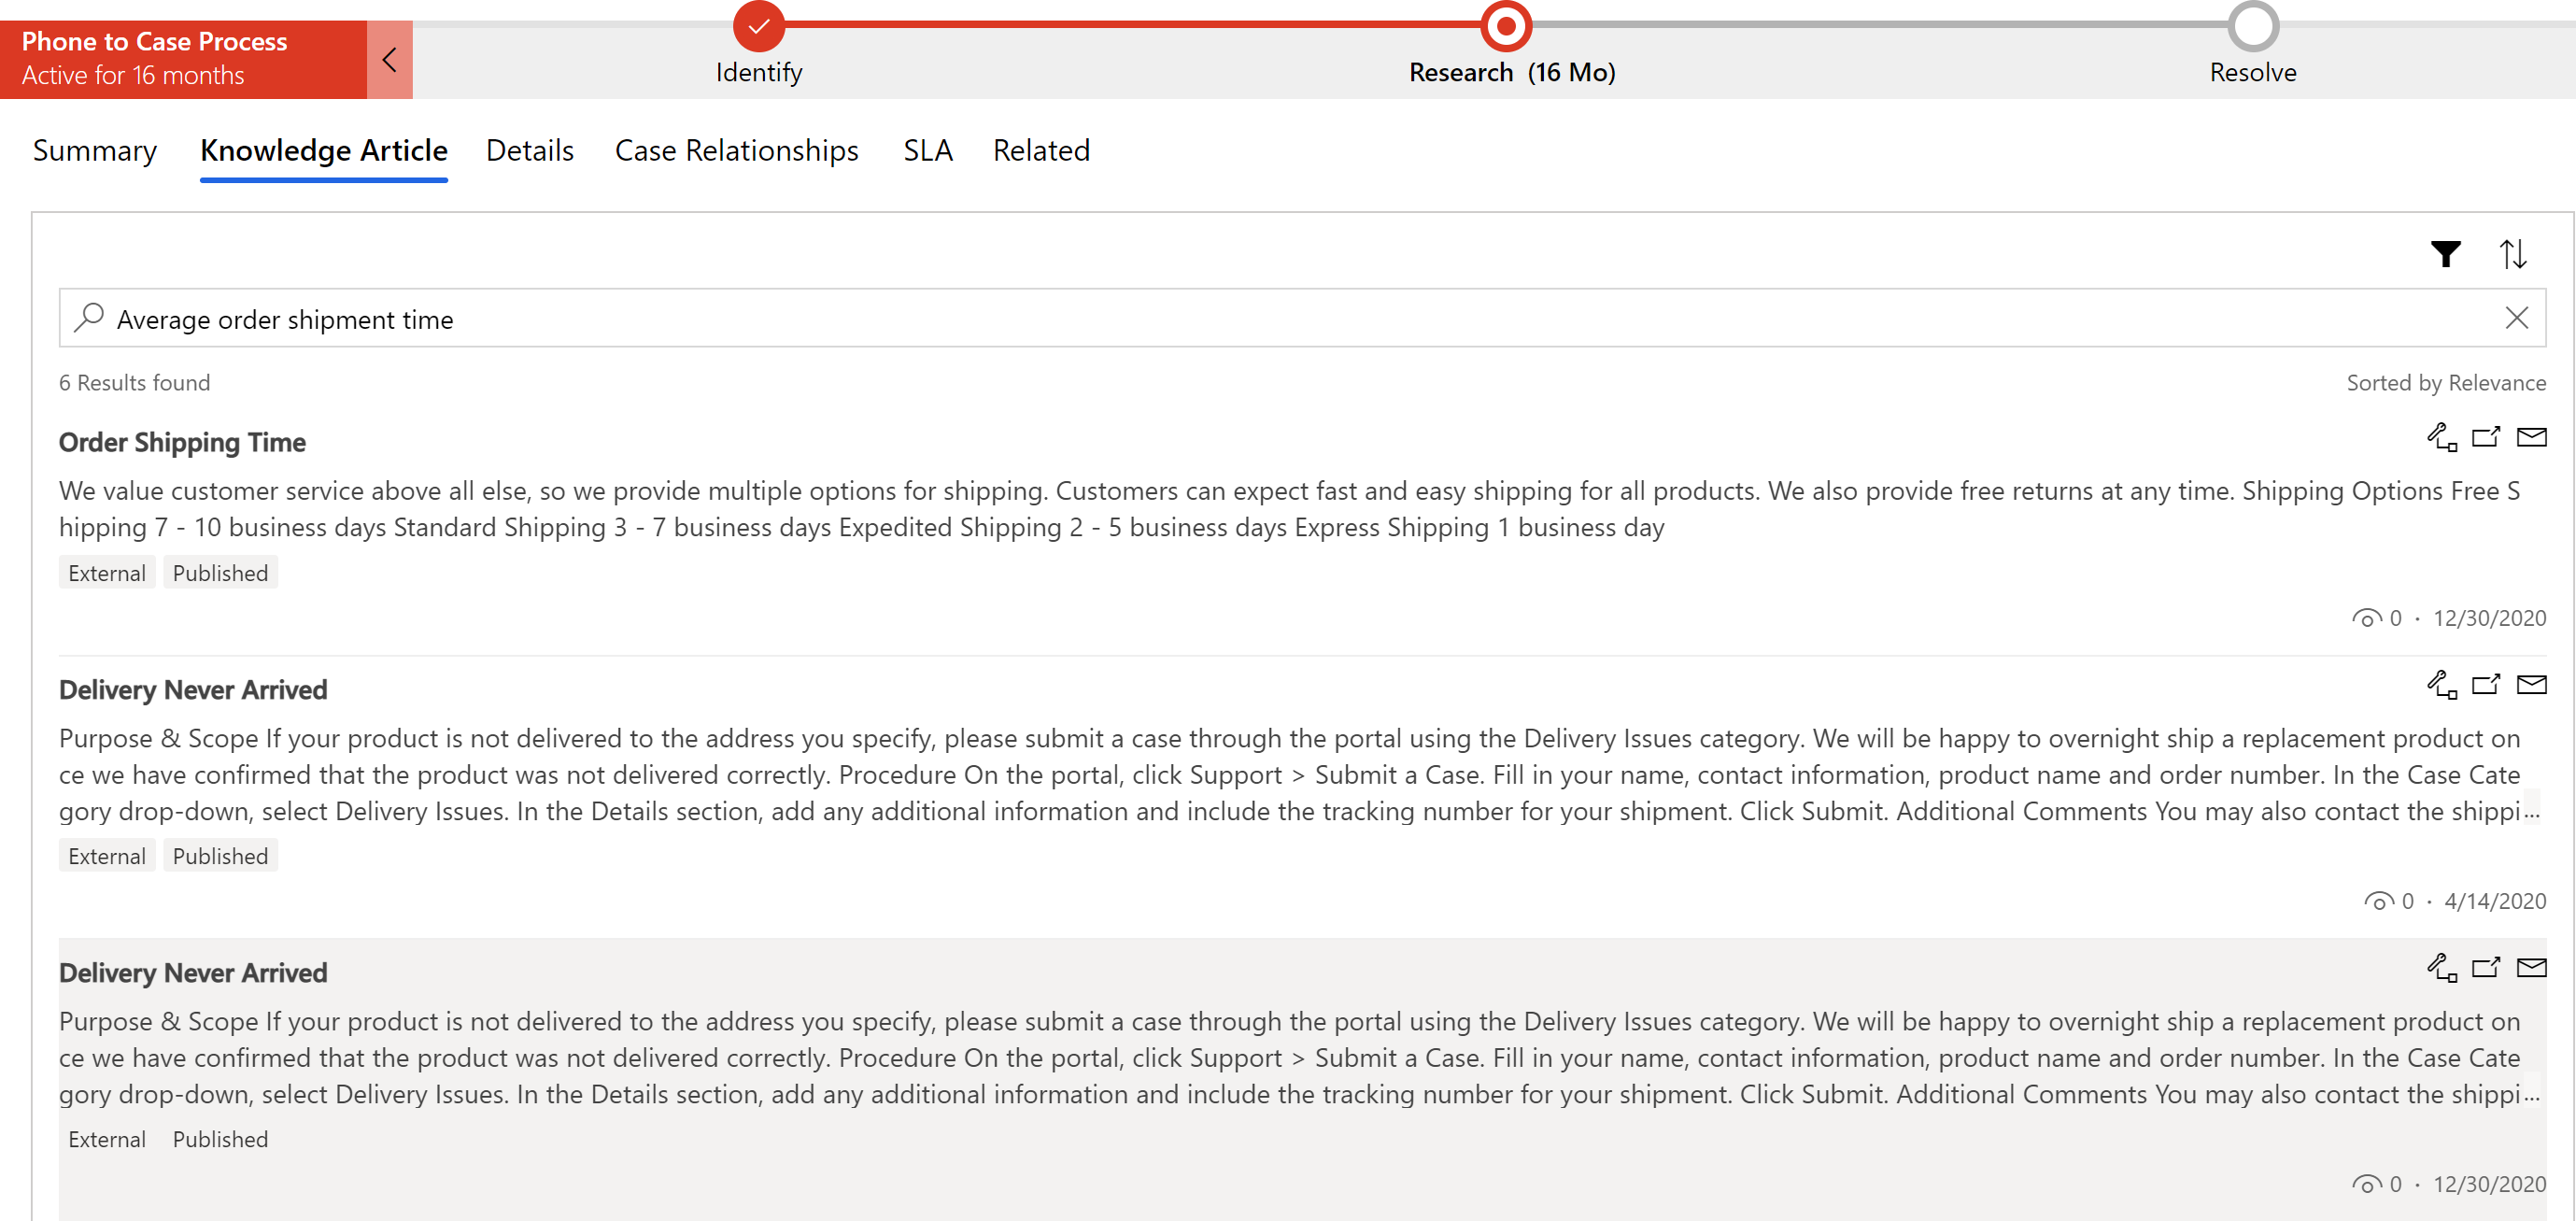
The knowledge properties now display in the standard view at runtime.
The following table describes the properties you can configure.
| Property | Description |
|---|---|
| Reference name | Required: The unique name for the tab. This name is used when referencing it in scripts. The name must follow these rules:
|
| Label | Required: The localizable label for the tab visible to users. The label must follow these rules:
|
| Results shown on page | Select the number of articles to be displayed in the search results. Note: What you specify in this field isn't applicable if at least one search provider is configured. For each configured search provider, three articles are displayed in the search results. More information: Set up external search providers If Relevance Search is enabled, the number of results that are displayed might differ from what you set due to the default Relevant Search setting. Your system administrator must disable Relevance Search or enable Simple Relevance Search for this property to work correctly. (Simple Relevance Search queries only articles, excluding attachments and notes.) For more information, see Understand knowledge base search mechanisms. |
| Automatic search > Provide search results using | After you open the entity form, automatic search is performed by using the field you specify in the field below. If you enabled automatic suggestions, select the field for the entity that Dynamics 365 Customer Service uses to suggest article results in the Give knowledge base (KB) suggestions drop-down list. For example, if you're adding the search control to the Account entity and want Dynamics 365 Customer Service to automatically show search results that contain the account name, select Account Name in the drop-down list. Note: This drop-down list can include all fields that are text, multi-line text, or lookup type fields. |
| Actions | Link article: Lets users link a knowledge article to the record they're viewing the knowledge article search results in. Unlink article: Lets users unlink a knowledge article from a primary record. Copy URL: Lets users copy the external URL of the article so they can share it over channels like chat or email. In the native Dynamics 365 customer engagement knowledge management solution, the Copy URL option is available only for published articles. Open in new tab: Opens a knowledge article in a new tab within the same browser window. Link article and email URL: Lets users associate an article with the primary record and share the article URL with the customer through email. Link article and send article content: Lets users associate an article with a primary record and share the contents of the article with the customer through email. |
| Select default email recipient | Select who the email will be sent to when a customer service representative (service representative or representative) sends the article link in email. This drop-down list includes all fields for the entity that are enabled for email (for example Customer, Contact, or Responsible contact). When the representative chooses to send a link to the article to the customer, the To field is automatically populated with the value of the field that you select here. If you leave it blank, in the email recipient display, it will show as blank and you need to fill it in manually. |
| Show article rating | Shows the rating on an article. |
| Show status filter | Allows the user to filter knowledge articles based on article status: Draft, Approved, or Published. |
| Show article language filter | Allows the user to filter knowledge article search results based on the language they choose. If you want users to see search results only for articles in a specific language, in the Set Default Language drop-down list, select a language. By default, User's Default Language is selected:
|
| Edit default filter selection | Allows you to change the default display for filtered articles, whether you want to show Draft, Approved, or Published articles. |
| Add refinement rules | Refinement rules function the same as automatic filtering in the web client experience. This feature opens a pop-out window where you can define more precise search results. Refinement rules help ensure that your representatives receive only the most relevant knowledge articles. As an administrator, you can configure rules so that knowledge articles are filtered based on source entity data without manual input from your representatives. For example, if you set up refinement rules on the subject of a case, the knowledge articles that have the same subject as the case will be filtered in and will be shown to the representatives. Other articles are automatically filtered out. Refinement rules can be extended to automatically filter knowledge articles on any lookup field that's present on source entities. Note: Polymorphic lookups aren't supported. Representatives also have an option to turn off the filtering and search the entire knowledge base. |
Web client experience
Make sure that you have the System Administrator or System Customizer security role or equivalent permissions.
Go to Settings > Customizations.
Choose Customize the System.
In the solution explorer, choose the entity you want to add the search control to, and under Communication & Collaboration, make sure the Knowledge Management check box is selected.
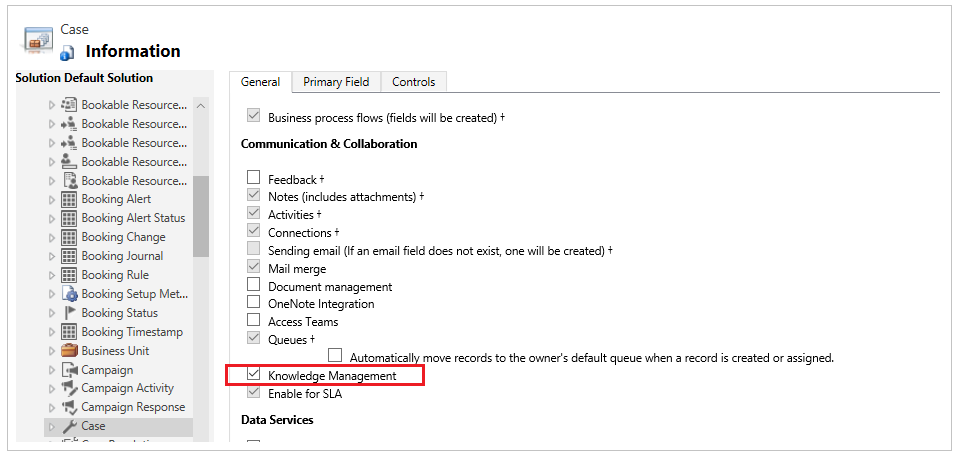
Select the Save icon to save the setting for the entity.
Expand the entity you're adding the search control to, and select Forms.
Choose the entity form of type Main.

Select the area where you want to place the search control, and on the Insert tab, select Knowledge Base Search.
If the option to add Knowledge Base Search is disabled, it could be because knowledge management isn't set up or isn't enabled for the entity you're adding the search control to.
In the Set Properties dialog box, on the Display tab, specify fields as described in the following table, and then select Set to apply the settings.
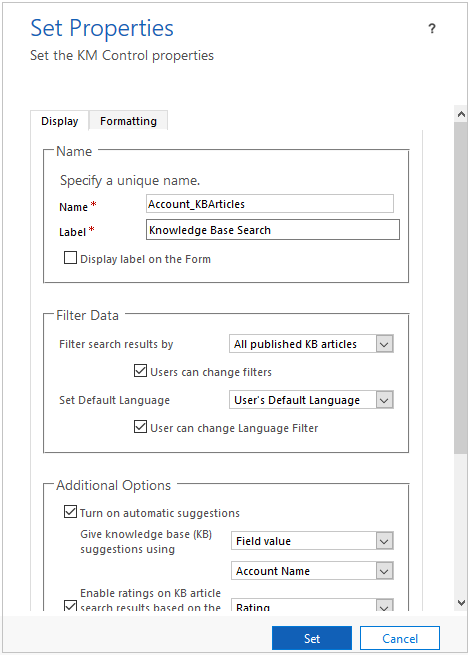
| Tab | Property | Description |
|---|---|---|
| Display | Name | Required: The unique name for the tab that is used when referencing it in scripts. The name can contain only alphanumeric characters and underscores. |
| Label | Required: The localizable label for the tab visible to users. | |
| Filter Search results by | In the Filter search results by drop-down list, select the set of article states that you want Dynamics 365 Customer Service to search in:
|
|
| Set Default Language | If you want users to see search results only for articles in a specific language, in the Set Default Language drop-down list, select a language. By default, User's Default Language is selected:
|
|
| Additional Options | If you want Dynamics 365 Customer Service to suggest articles automatically based on the value in certain fields of the entity, select Turn on automatic suggestions. If you've enabled automatic suggestions, select the field for the entity that Dynamics 365 Customer Service uses to suggest article results in the Give knowledge base (KB) suggestions drop-down list. For example, if you're adding the search control to the Account entity and want Dynamics 365 Customer Service to automatically show search results that contain the account name, select Account Name in the drop-down list. Note: This drop-down list can include all fields that are text, multi-line text, or lookup type fields. If you want the article rating to appear for each article in the search results, select the Enable ratings on KB article search results based on the specified field check box, and then select the field from the drop-down list. |
|
| Select Primary customer | In Select primary customer, select who the email is sent to when a customer service rep sends the article link in email. This drop-down list includes all fields for the entity that are enabled for email, for example Customer, Contact, or Responsible contact. When the customer service rep chooses to send a link to the article to the customer, the To field is automatically populated with the value of the field that you select here. |
|
| Number of results | Select how many articles to show in the search results at first. Note: If Relevance Search is enabled, the number of results that are displayed might differ from what you set due to the default Relevant Search setting. Your system administrator must disable Relevance Search or enable Simple Relevance Search for this property to work correctly. (Simple Relevance Search queries only articles, excluding attachments and notes.) For more information, go to Understand knowledge base search mechanisms. |
|
| Actions | Select whether you want to make all the default actions available to reps or only selected ones. If you choose Show Selected Actions, select the actions you want to show. The following actions are available:
|
|
| Formatting | Layout | Choose the type of layout to determine the number of columns the control should occupy. |
| Row Layout | Select the maximum number of rows per page. | |
Configure automatic filtering for the web client
Improve knowledge article suggestions and search results by enabling automatic filtering. Automatic filtering ensures your representatives receive only the most relevant knowledge articles. As an administrator, you can configure Knowledge Base Search control to automatically filter knowledge articles based on case data without any manual input from the representatives.
For example, if you set up automatic filtering of knowledge articles on the subject of the case, the knowledge articles that have the same subject as the case will be filtered in and will be shown to the representatives. Other articles are filtered out automatically.
This feature can be extended to automatically filter knowledge articles on any lookup field that's present on both Case and Knowledge Article entities. Representatives also have an option to turn off automatic filtering and search the entire knowledge base. Administrators can configure this option in the Knowledge Base Search control.
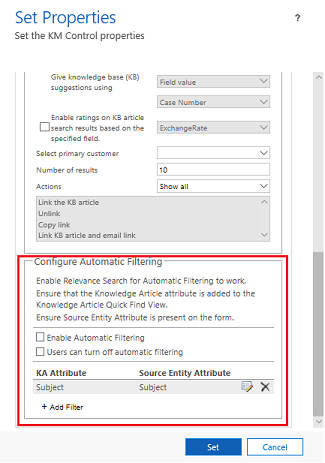
Open the Knowledge Base Search control and edit its properties to configure automatic filtering. In the Set Properties dialog box, on the Display tab, specify the following fields in the Configure Automatic Filtering section.
Select the Enable Automatic Filtering check box to enable automatic filtering.
Select the Users can turn off automatic filtering check box if you want to provide your representatives the option to turn off automatic filtering and search the entire knowledge base. This enables the Auto filter results option for representatives on knowledge search control.
Select Add Filter to define filtering of knowledge articles on case subject or any other lookup field.
Select Set to save the properties.
Note
Ensure that Relevance search is enabled for automatic filtering to work. The Knowledge Article attribute must be added to the Knowledge Article Quick Find View. Ensure that the Source Entity Attribute is present on the form.
To learn more about how to use the automatic filtering option, go to View auto-filtered results
Add a knowledge article subgrid to a form
You can add a customized knowledge article subgrid to a form. To learn more about the components of a subgrid form, go to Add and configure a subgrid component on a form.
To add a subgrid
Sign in to the Dynamics 365 application, and then select Settings > Advanced Settings.
Select Customizations from the drop-down list, and then select Customize the System.
In the Solution Default Solution list, select the entity to which you want to add a subgrid, and then select Forms.
In the form designer, select Insert > Sub-Grid.
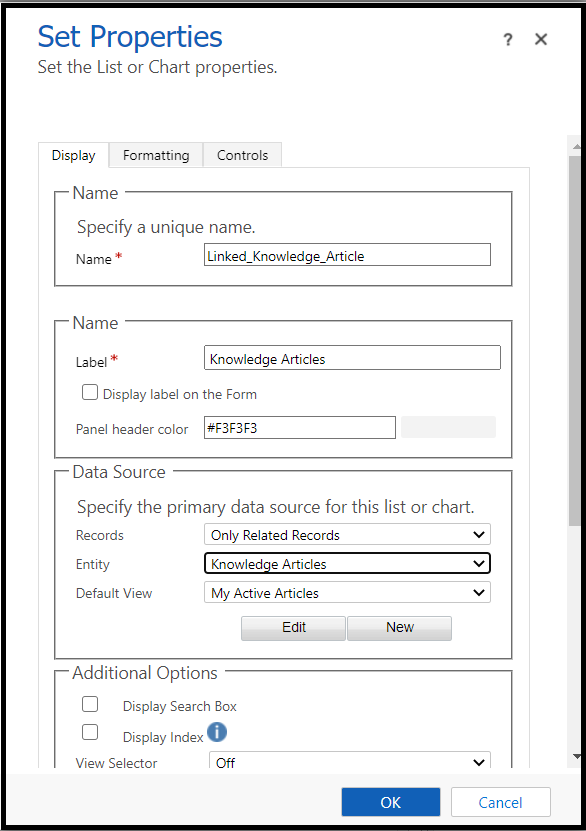
In the Set Properties dialog box, provide a unique name for your subgrid.
Ensure that the Entity value is set to Knowledge Articles.
Retain the default values for all the other fields, and then select OK.
Save your knowledge subgrid, and then select Publish.
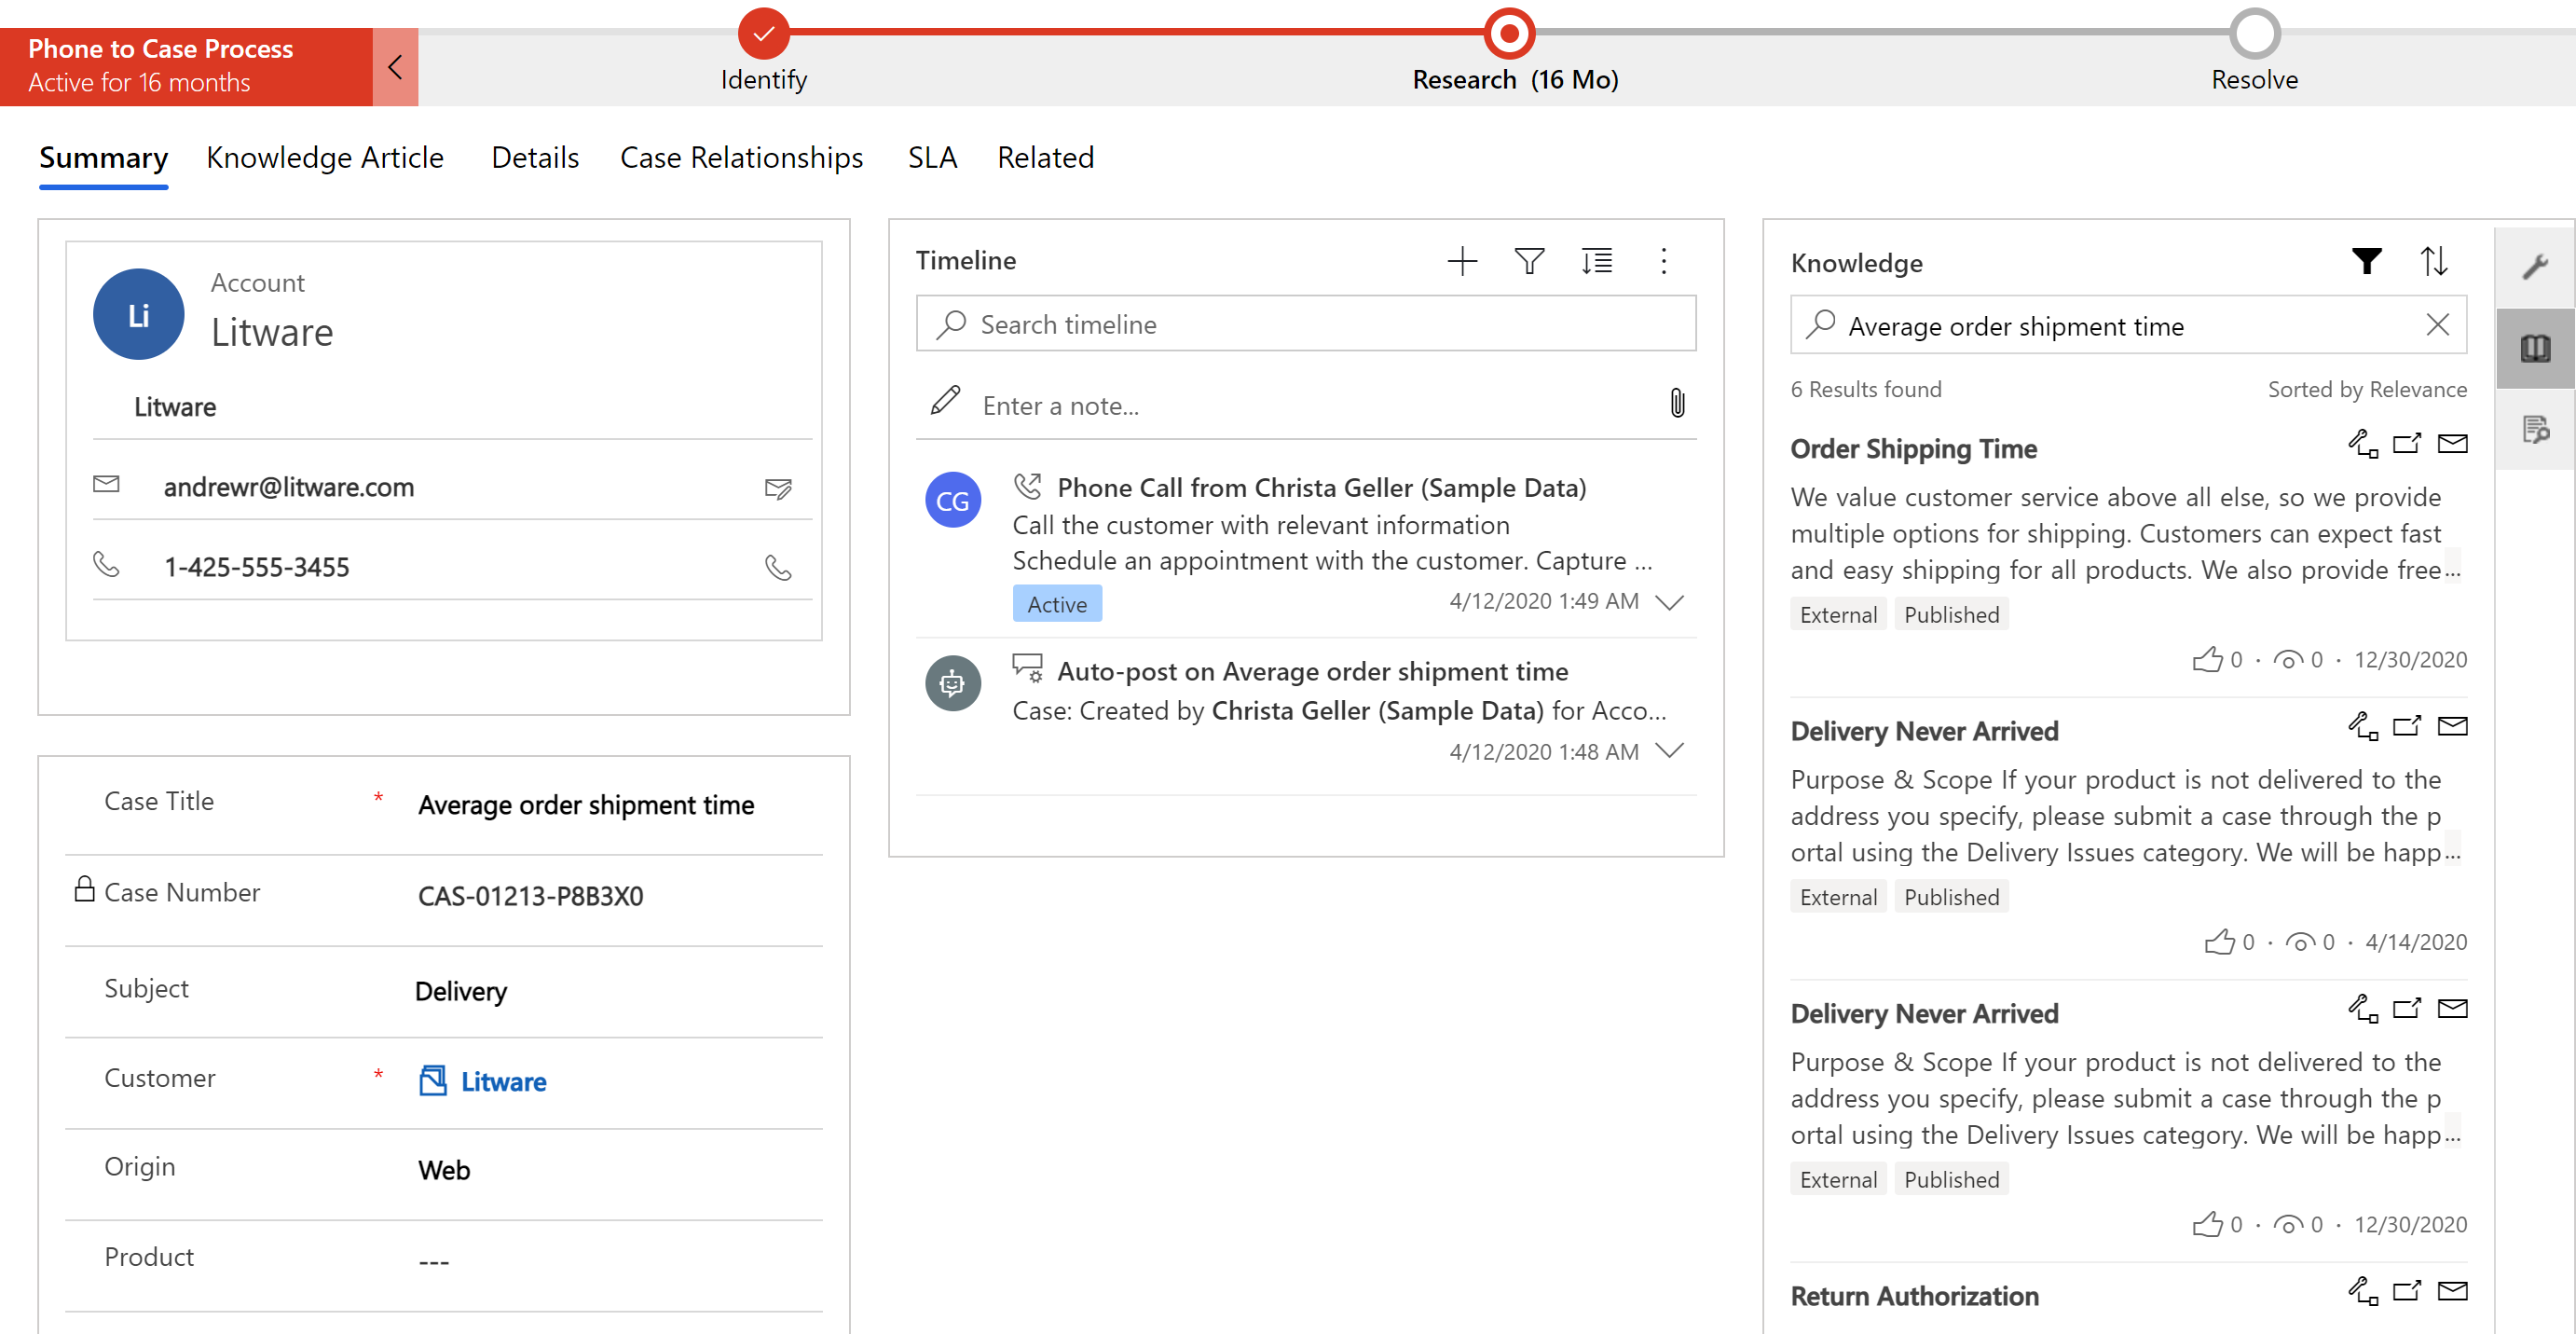
The linked knowledge article subgrid that you add will be visible to the customer service representative on the entity form during runtime.
The Knowledge Search tab is available by default on the app side pane. You can use the knowledge search control either on the app side pane or embed it in the form through customization but make sure that you don't enable both simultaneously. Otherwise, when you try to access the embedded control, the "Error loading the control" message will appear.
Related information
Reduce call handling times with Knowledge articles in the Customer Service Hub
Set up knowledge management using embedded knowledge search
Understand knowledge base search mechanisms
Linked knowledge articles subgrid