Note
Access to this page requires authorization. You can try signing in or changing directories.
Access to this page requires authorization. You can try changing directories.
Tip
If you’d like to try Dynamics 365 Customer Service for free, you can sign up for a 30-day trial.
You can automatically create or update system or custom records from incoming activities, such as emails, social activities, and custom activities. In this section, you'll learn about creating rules for automatically creating records for cases from incoming emails.
Note
Modern automatic record creation and update rules isn't supported on on-premises environments.
Set up rules for creating or updating records automatically
Every organization has multiple applications to capture customer interactions. The ability to channel external data into Microsoft Dataverse records can significantly improve the efficiency of your sales, marketing, and service teams, and increase the quality of your data. You can now direct this data from various applications and external sources into Dataverse with the help of record creation and update rules.
A record creation and update rule consist of rule items. The rule items define the conditions to create or update records, and also define the actions or steps to be taken on the records.
When a case record is created through an automatic record creation rule, and the rule owner is a team, the owner of the case record will be the team's administrator user.
Activities and entities supported by rules for creating or updating records automatically
By default, Dynamics 365 Customer Service supports creating records from the following activities:
- Social activity
- Task
- Phone call
- Appointment
- Service activity
- Custom activity
These activities can be converted to any default (system) entity records or custom entity records. For example, you could create a lead, opportunity (system record), or incident (custom record) from an incoming email.
Prerequisites
Make sure that the following prerequisites are met:
- Permissions, roles, and the Power Automate license to create automatic record creation rules.
- Information on the queues for which you want to create the rules.
Configure rules for creating or updating records automatically
You can configure a rule that when active will be run for incoming emails. By using the feature to create rules, you can define the conditions for when a rule can be run.
You can configure the rules in the Copilot Service admin center app.
In the site map, select Case Settings in Customer Support. The Case Settings page appears.
In the Automatic record creation and update rules section, select Manage. The All Record Creation and Update Rules page is displayed.
Select New. The New Record Creation and Update Rule page is displayed.
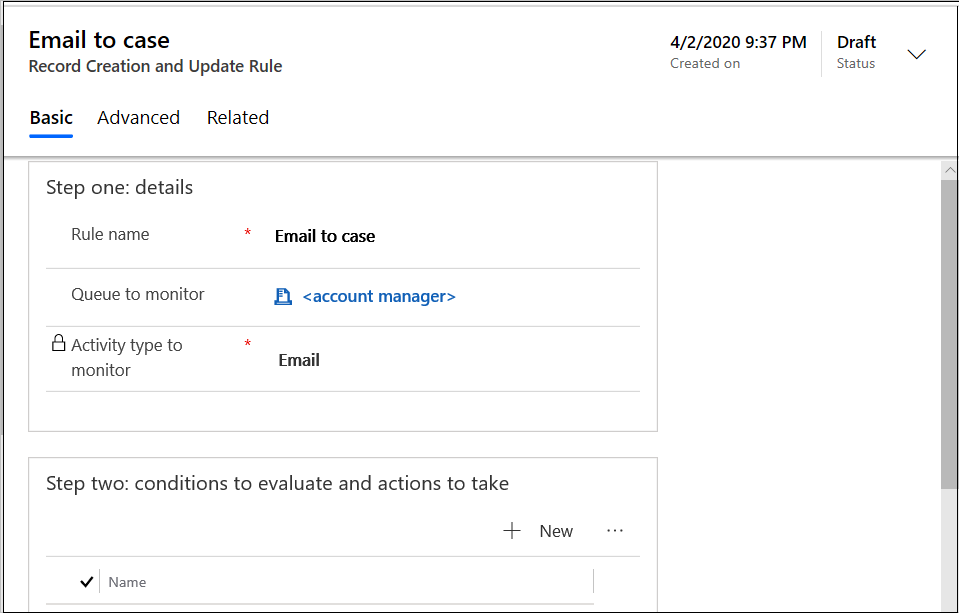
On the Basic tab, in Step one details, enter the following details:
- Rule name: Enter a name for the rule.
- Queue to monitor: Select a queue on which the rule will be activated. For email activity, you must select a queue to be able to activate the rule.
- Activity type to monitor: Select Email in the list.
Select Save. The Step two: conditions to evaluate and actions to take area is enabled.

In Step two: conditions to evaluate and actions to take, select New. The Condition builder page is displayed.
Note
You must add a minimum of one condition for the rule to run successfully.
Perform the following steps:
a. In Condition > Condition name, enter an intuitive name.
b. In Condition that must pass to continue (pass if blank), select Add.
c. Use the following options to define the criteria for the rule to be evaluated:
i. Add row
ii. Add group
iii. Add related entity
In Actions to take > Record to create, make sure the value is Case. A case will be created if the conditions specified are met for the email activity.
In Configure in Microsoft Power Automate, select Save and open in Power Automate. The Power Automate application opens in a new tab where you can configure criteria that must be evaluated for the email activity. To learn more about using Power Automate, see the documentation for Power Automate.
Select Save & Close. The condition builder is closed.
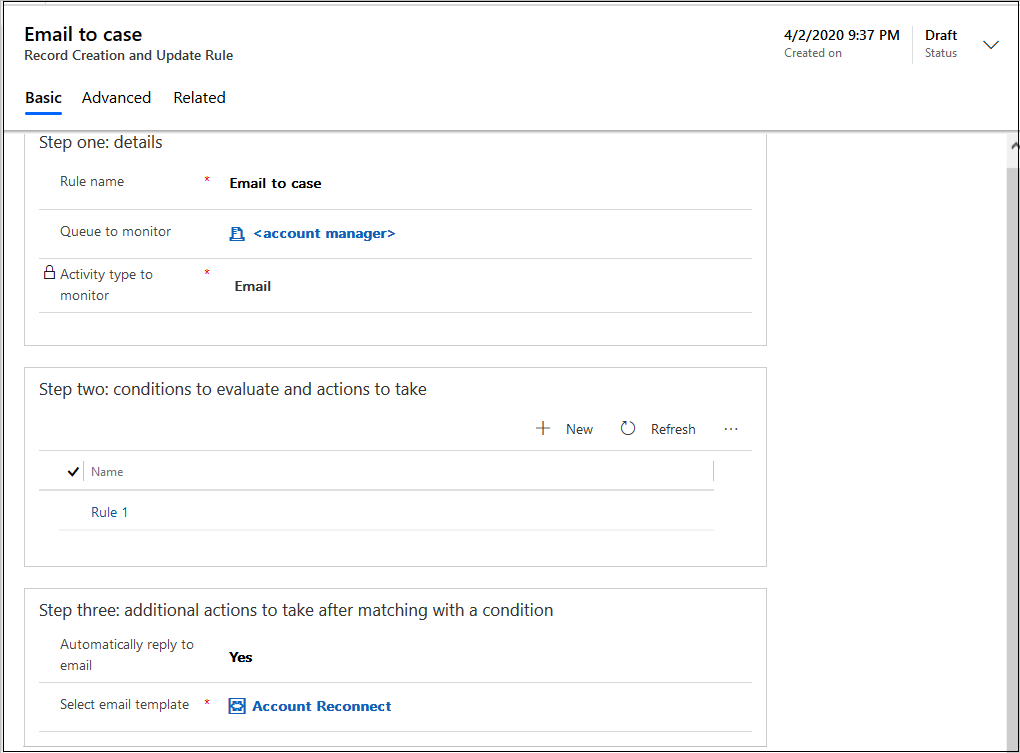
In Step three: additional actions to take after matching with a condition, select an option based on your requirement for Automatically reply to email.
If you select Yes, select an email template in the Select email template list box.

Note
The rule will be in the draft status until you activate it.
How do record creation and update rules work with queues
In a record creation and update rule, when you specify a queue for a source type, any incoming activity from that source is added as a queue item for that specified queue. That is, if a rule for a particular source activity and queue combination is active, the rule processes the incoming activity on that queue to create or update records. When an email is processed by an automatic record creation rule, a queue item is created. If the email has the queue's email in the blind carbon copy (Bcc) or carbon copy (Cc), a queue item is created from server-side sync. By default, two queue items are created if the email has the queue's email in both the "To" and "Bcc" or "Cc" fields. To control the creation of the queue items, you can set the CreateQueueItemForSynchronizingMailbox toggle in your organization's configuration settings. Learn more in Create queue items from synchronized email messages.
For an email source type, you must specify a queue. For all other source types including custom activities, it is optional.
Note
When an automatic record creation rule is applied to an Email queue item, it gets deactivated.
Configure advanced settings for rules
On the Advanced tab of the Record creation and update rule page for a rule, you can configure actions that can be automatically performed before the conditions for the rule are evaluated.
On the Automatic record creation and update rules page, select the rule in the list that you want to update. The <rule_name> page appears.
Select the Advanced tab, and do the following in Before evaluating conditions:
Allow emails from unknown senders: Set it to yes, if you want records to be created when email messages arrive from senders whose email addresses aren't present in any contact or account records.
This option, with the Automatically create records in Dynamics 365 for Customer Engagement option in the rule owner's Personal Options, determines whether a case and contact record is created. To learn more, see Set personal options.
Manage unknown senders by: Select one of the following options:
- Creating a new contact automatically: Specify if you want a contact to be created automatically.
- Mapping in Power Automate manually: Specify if you want to evaluate and set up the resolution for the contact in Power Automate.
Important
If you select to map the contact manually, make sure that you create a mapping in Power Automate for the customer field. Learn more in Manually map a contact in Power Automate.
Require a valid entitlement on the connected case: If you select Yes, a case is created only if an active entitlement exists for the customer.
If the sender of the email is a contact with a parent account, a record is created if the contact’s parent account has a valid entitlement, and the contact is listed in the Contacts section of the entitlement or if the Contacts section is empty (which means the entitlement is applicable to all contacts for the customer).
Wait for a specific amount of time after the connected case has been resolved: Select Yes, and then select a time value in the Select the amount of time box that appears. No new case is created until the specified period of time lapses, after a related case is resolved.
If you have set the value to Yes and specify one hour, and a case exists for a printer issue, when an email comes for the same printer issue, another case won't be created until one hour lapses after the existing printer issue case is resolved.
The resolved case won't be re-opened automatically when the incoming email is associated with it. However, you can configure flows using Power Automate, to re-open a resolved case when an incoming email is associated with the resolved case.
If set to No, no case is created if a related case exists.
Note
If you want a case to be created without any time lapse, then set Wait for a specific amount of time after the connected case has been resolved to Yes and don't select any time duration in the Select the amount of time box.
In Advanced settings, by default the user who is creating the rule is listed in the Owner whose permissions the rule uses to run box. You can add more users or change the default value.
Select Save or Save & Close.
Change the order of rule items to be evaluated
The rules are run in the order they're listed in the rule items list. If the incoming activity matches the condition specified in the rule item one, the case is created and the rest of the rule items aren't evaluated. You can reorder the rule items when more than one rule item exists for a rule.
Manually map a contact in Power Automate
Perform the following steps to manually map a contact in Power Automate:
- In the app in Customer Service, go to the automatic record creation and update rule feature, and then select the rule that you want to edit.
- In the Step two: conditions to evaluate and actions to take area, select the rule item for which you want to manually map the contact in Power Automate.
- On the page that appears, on the Condition builder tab, select Save and open Power Automate. The Power Automate workflow opens on a new tab.
Accept the default connection settings, and select Continue.
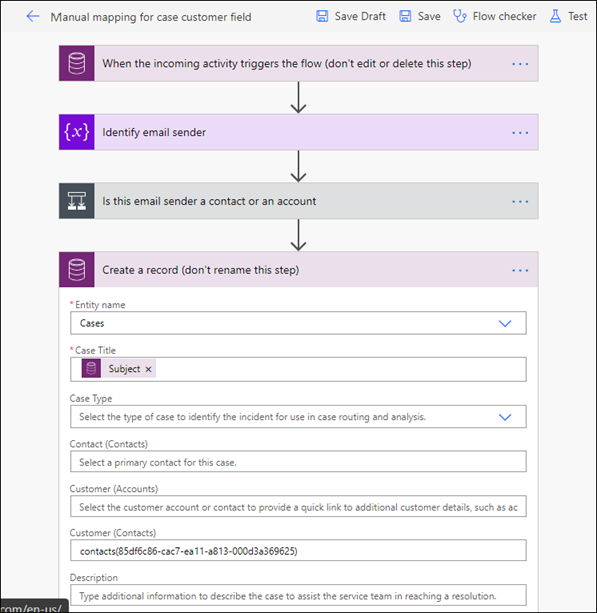
On the page that's displayed, in the Is this email sender a contact or an account step, for the If no option, select the ellipses for Terminate when no valid customer found, and select Delete.
Select OK on the confirmation dialog.
In the Create a record (don't rename this step) step of the workflow, specify the required value in the Customer (Contacts) box.
Make sure that you remove the default mappings from Contact (Contacts) and Customer (Accounts).

Important
If you want to map an account, make sure that you remove the default mappings from the Contact (Contacts) and Customer (Contacts) boxes and specify only an account in the Customer (Accounts) box for the workflow to run without errors.
Save and close.
Process emails from known senders only
To process emails from known senders only, do the following steps in Power Automate for the associated rule item:
On the Power Automate workflow page, accept the default connection settings, and select Continue.
On the page that's displayed, in the Is this email sender a contact or an account step, for the If no option, make sure that the Terminate when no valid customer found option is available.
Save the changes.
The emails from known senders only are processed.
Create contacts for unknown senders
The steps in this section are applicable only when you select the option to manually map in Power Automate in the Manage unknown senders by field on the Advanced tab of the record creation and update rule.
The option to create the contact is based on the email recipient's permission. If the email recipient doesn't have permission to create a contact and you prefer to not give them this permission, you can configure an environment variable to use the permissions of the rule owner. Learn more in Create contacts for unknown senders using rule owner context.
To create a contact for unknown senders of email, configure the following options in Power Automate for the associated rule item:
In the Is this email sender a contact or an account step, for the If no option, delete the Terminate when no valid customer found action.
Select Add an action, and in the Choose an operation box, search for "Add a new row", and select it.
In Table name, select Contacts.
In Email, search for "From" in Dynamic content, and select it.
Select Add an action again, and in Choose an operation search for "Set variable", and select it.
In Name, select Customer from email sender.
In Value, search for "OData Id" in Dynamic content, and select it. "OData Id" is derived when you create a new contact record.
In the Create a record (don't rename this step) option, search for Contact (Contacts), and use the following expression:
if(equals(triggerOutputs()?['body/_emailsender_type'], 'contacts'), if(contains(variables('Customer from email sender'), triggerOutputs()?['body/_emailsender_value']) , string(''), concat('contacts(',triggerOutputs()?['body/_emailsender_value'], ')')), string(''))
Save the changes.
Create contacts for unknown senders using rule owner context
By default, a contact for unknown email sender is created with the email recipient's context. To switch to use the rule owner permissions to create the new contact, you can configure the msdyn_ArcCreateContactWithRuleOwner environment variable as follows:
Go to the Power Apps portal.
Select the required environment, and then select Solutions in the left pane.
On the Solutions page, select Default Solution.
Search for Environment variables, and select the msdyn_ArcCreateContactWithRuleOwner environment variable.
On the edit page that appears, set the Current Value as 1 to override the default value.
Save and publish the customization.
Activate a rule for creating or updating records automatically
For any record creation and update rule to apply to a matching incoming activity, after you add the rule items, you must activate the rule.
Manage automatic record creation and update rule from a queue form
You can create or manage an automatic record creation and update rule from a queue form. Learn more in Create or change a queue.
Manage activity monitor to review and track rules
You can review and track the health of the automatic record creation rules and resolve issues around them. Learn more in Manage activity monitor to review and track rules.
Troubleshoot cases
Issue converting an email to a case
Related information
Create and manage queues
Create rules to automatically route cases
FAQ on activity monitor