Create and manage capacity profiles
Applies to: Dynamics 365 Contact Center—embedded, Dynamics 365 Contact Center—standalone, and Dynamics 365 Customer Service
You can create capacity profiles and assign them to your customer service representatives (service representative or representative) to define the types and amount of work they can take. Capacity profiles contain information, such as the amount of work, concurrent or daily capacity, and whether other channels are affected.
- Capacity management helps administrators create various capacity profiles and associate users with matching profiles. You can assign multiple capacity profiles to users.
- The administrator can block the assignment of extra work to the service representatives when they're working on certain channels, such as phone calls.
- The supervisor can override the representative's configured capacity and assign work to user manually.
- The representative's capacity might display a negative value when the representative manually picks a work item or is assigned a conversation forcibly that results in negative capacity. This is applicable for both capacity profiles and unit-based capacity.
- In the assignment rule, you can create a rule to find the representative whose capacity profile matches that of the work item.
- We recommend that you configure either capacity profiles or capacity units in your organization, but not both.
- The capacity isn't considered when the representative takes part in consult or monitors a conversation.
You might find it helpful to configure profile-based capacity in the following scenarios:
- Your representatives vary in experience and skill set.
- Representatives need an upper limit on the amount of work assigned to them.
- Work items are of different complexity and assigned from different channels.
- Assignment in one channel impacts the assignments of another channel. For example, you can't assign another work to representatives who are on phone calls.
Important
This feature is intended to help customer service managers or supervisors enhance their team’s performance and improve customer satisfaction. This feature is not intended for use in making—and shouldn't be used to make—decisions that affect the employment of an employee or group of employees, including compensation, rewards, seniority, or other rights or entitlements. Customers are solely responsible for using Dynamics 365, this feature, and any associated feature or service in compliance with all applicable laws, including laws relating to accessing individual employee analytics and monitoring, recording, and storing communications with end users. This also includes adequately notifying end users that their communications with representatives may be monitored, recorded, or stored and, as required by applicable laws, obtaining consent from end users before using the feature with them. Customers are also encouraged to have a mechanism in place to inform their representatives that their communications with end users may be monitored, recorded, or stored.
Create a capacity profile and assign to users
Create a capacity profile, and use it in a workstream for routing work items.
For a capacity profile, you can add or remove users and edit any setting except reset frequency. If you no longer require the profile, you can delete it.
In the site map of Customer Service admin center, select User management in Customer support. The User management page appears.
Select the Manage option for Capacity profile.
On the Capacity profiles page, select Create new.
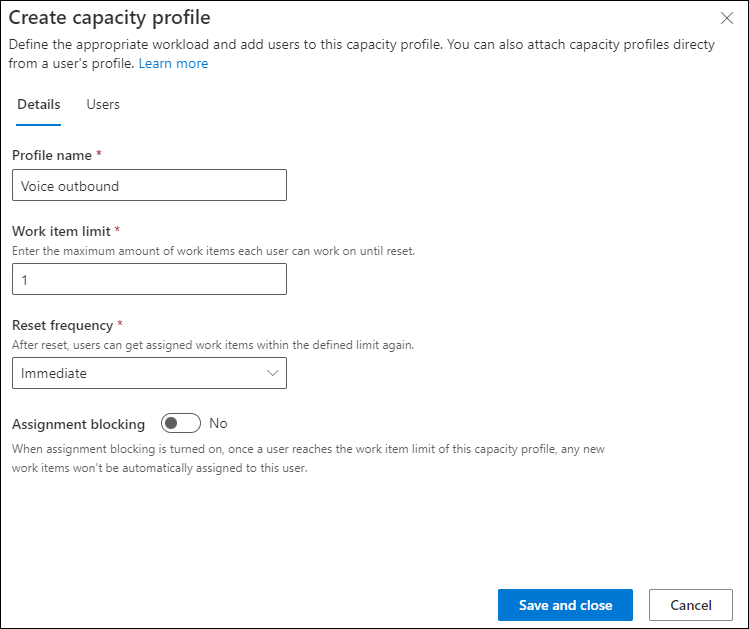
On the Details tab of the Create capacity profile dialog box, enter the following details:
Profile name: Name for the capacity profile.
Work item limit: Number of units of the work type that you can assign to the representative.
Reset frequency: Period after which capacity consumption is reset for representatives. Select one of the following options:
- Immediate: Capacity is reset immediately.
- End of day: Capacity is reset after the representative's shift ends even if the representative doesn't close all the assigned conversations. The open conversations aren't counted in the work item limit and the representative is assigned new work items in their next shift.
Once configured, you have to recreate the capacity profile if you want to change the reset frequency.
Assignment blocking: Set the toggle to Yes. When the work item limit is met, the representative isn't assigned a new work item automatically.

On the Users tab, select Add user, and in the Users list, select the users. Alternatively, use the Search option to search for and add the user.
Important
Users must be configured as a bookable resource to be assigned the capacity profile. More information: Manage users.
Select Add user. The capacity profile is assigned to the user.
Configure representative-specific work limits in capacity profiles
Representatives in your contact center might need different work item limits for the work associated with the same capacity profile based on their experience and expertise. You can allocate different limits to representatives through capacity profiles.
For selective representatives, you can define a work item limit that's different from the default limit by using the custom limit option in the capacity profiles.
To set the custom limits, do the following steps:
- In Customer Service admin center, select User management under Customer support, and on the page that appears, select Manage for Enhanced user management.
- In Contact center users, select the representatives for whom you want to allocate a custom limit, and then select Update user attributes > Update capacity profiles.
- On the Update Capacity profiles pane, in Capacity profiles, select a profile, and in Custom limit, enter a value according to your business need.
- Select Add to all. The capacity profile with the custom limit is added to the users in the list.
- Repeat the step 3 to update more profiles if you need to.
- Save and close. The custom limit is denoted with an arrows icon to help visually differentiate among users with default and custom limits.
- Inform the affected representatives to refresh their browser to update their presence. The system assigns the work items based on the representatives updated capacity and presence.
- To reset the custom limit, set the custom limit field to empty and save the changes.
The configuration updates can take up to 15 minutes to sync.
You can customize the Agents report in the Omnichannel real-time analytics dashboard to see the custom limits.
How representative-specific limits work
Typically, the work assignment takes place according to the individual representative's default work item limit in the capacity profiles.
However, if you configure custom limits through capacity profiles, then representatives receive work items according to the custom limit. More details are as follows:
The custom limit might be lower or higher than the default limit and remains applicable for the selected representatives until you manually reset it to the default limit.
The system applies the custom limit to new work assignments only. If the custom limit is lower than the used limit, the system doesn't reassign the currently assigned work items for the representatives.
The other representatives with the same capacity profile for whom the custom limit isn't configured have the default limit. Any change in the default limit affects these representatives. However, the representatives with custom limit remain unaffected.
An example of the custom limit is as follows:
Ana, a representative at Contoso Coffee, is an expert in handling Return queries for Café A 100 machine. Henry, who has joined Contoso recently, is learning the nuances of Café A 100 machine. Eugene, the admin at Contoso has configured a capacity profile for “Return orders” with a default limit of two conversations per day. Eugene assigns the “Return orders” profile with the default limit to Henry. Eugene allocates a custom limit of five to Ana in the “Return orders” profile. Ana receives maximum of five conversations per day from the “Return orders” profile while Henry receives a maximum of two conversations only in a day for the same profile.
Update work limits using OData
Alternatively, you can use an OData call to update the custom limits by specifying a value for the msdyn_maxunits field in the msdyn_bookableresourcecapacityprofile entity. To reset the custom limit, specify the value as null for the msdyn_maxunits field.
A sample code block to update the custom limit as 5 is as follows.
var data = {msdyn_maxunits: 5} // the value denotes the custom limit
 Xrm.WebApi.updateRecord("msdyn_bookableresourcecapacityprofile", "<Bookable Resource Capacity Profile ID>", data).then (
    function success(result) {
        console.log("Differentiated units updated");
    },
    function (error) {
        console.log(error.message);
        // handle error conditions
    }
);
Set capacity profiles for workstreams
After you create the capacity profiles, configure the following settings to assign work items to representatives at runtime:
- Set the capacity profile in the work distribution settings. The system applies the profile to all the work items routed through the workstream. More information: Configure work distribution
- Set the capacity profile in a classification ruleset for the workstream as a rule output. Append the new capacity profile to the work item. During assignment, unified routing looks for the representative who has available capacity in both the profiles, the default profile from the workstream and the appended profile from the classification. More information: Create classification rulesets based on capacity profiles
You need not define assignment rules specific to capacity profiles at queue level to find representatives with matching capacity profiles. If capacity profile is attached to a work item, then the system ensures that the assigned representative has the matching capacity profile.
Release capacity for representatives
For the system to efficiently manage representatives workload, you must automatically release the representative's capacity when representatives complete their assigned work items. If you manually assign the case to another representative or team using the Assign option on the case form, capacity isn't updated for the representatives. Based on system settings, the representative's capacity is released in the following manner:
Conversation: When the representatives end the conversation and close their session.
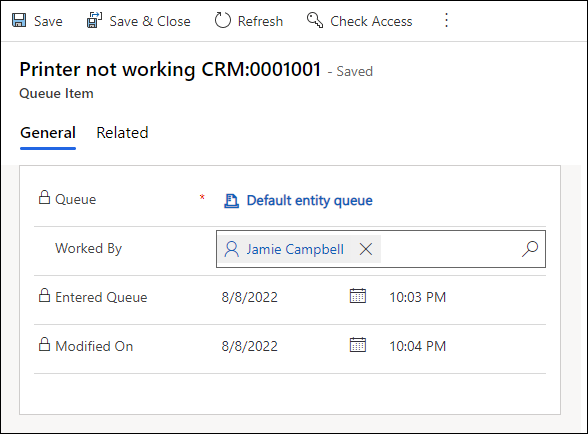
Case: When the representative resolves the case. Capacity is also released automatically when the representative cancels the case or removes their assignment by clearing their name from the Worked By field on the Queue Item details dialog.
All records and activities: Capacity isn't released automatically for activities, such as email, that's configured for record routing. To release the representative capacity, do one of the following steps:
- Deactivate the assigned queue item; the associated work item is closed.
- If you need to keep the record open, go to the queue item dialog and remove the representative name from the Worked By field. The automatic assignment tries to reassign the item to the representative in the queue.

Escalation profiles
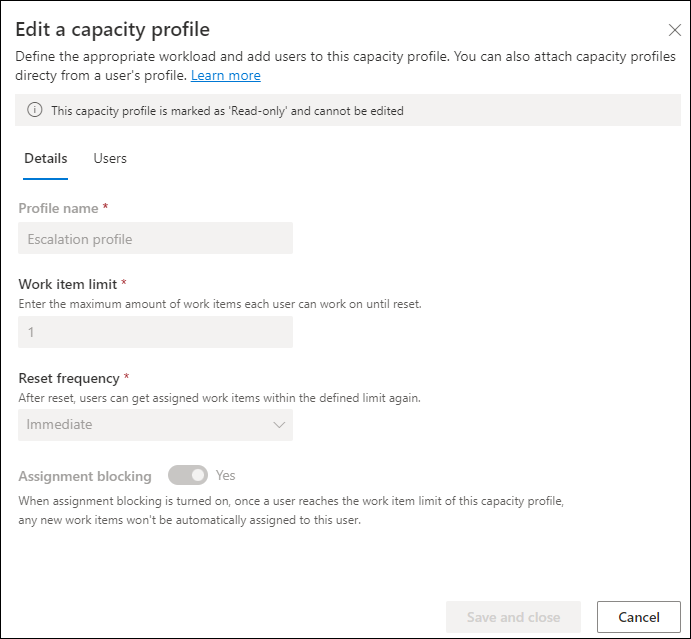
The escalation profile is used when a chat conversation is escalated to a voice or video call. This profile is available out of the box and can't be edited. When a representative escalates a chat to a voice or video call, a new session starts and an escalation profile is attached to the work item, so that the representative doesn’t receive a new chat or voice call until the current call with the customer is over. If the representative transfers the video or voice call to another representative, the escalation profile becomes applicable to the new representative.

How to set multiple capacity profiles in a single workstream
Let us take a scenario where you want to route cases as follows:
- Representatives can work on maximum two high priority cases per day.
- Representatives can work on maximum four cases of normal priority.
- But the representative should never be assigned more than five cases per day of high priority and normal priority.
Create the following profiles:
- High-priority profile: Two cases per day, reset at the end of day
- Normal-priority profile: Four cases per day, reset at the end of day
- Total-capacity profile: Five cases per day, reset at the end of day
In the workstream, set the "Total-capacity profile" as the default profile.
Use the classification rules to set the capacity profiles for the work items as "High-priority profile" or "Normal-priority profile" according to the priority of the case.
Ensure that the representatives have all the three profiles.
Runtime behavior of multiple capacity profiles in a single workstream
When a work item is labeled with multiple capacity profiles, the assignment strategy considers the representative who matches all the required capacity profiles.
- When the high priority work item comes, it's labeled with "Total-capacity profile" and "High-priority profile".
- The representative who has capacity in both these profiles only is selected. When the work item is assigned, capacity is consumed from both the profiles.
- Similarly, for normal priority cases, the capacity is consumed from both "Total-capacity profile" and "Normal-priority profile".
Related information
Create workstreams
Manage users in Omnichannel for Customer Service
Map role personas
Manage historical data of capacity updates for agents