Create and manage operating hours
Applies to: Dynamics 365 Contact Center—embedded, Dynamics 365 Contact Center—standalone, and Dynamics 365 Customer Service
Operating hours define the hours when your organization's customer support team is active and available to serve customers. By setting up operating hours, you help your customers and your organization work together to resolve issues.
The operating hour schedules cater to the following scenarios:
- Display the nonavailability of customer support on public holidays that are otherwise operating hours.
- Accommodate change of calendar timings for daylight saving time twice a year for timezones that implemented the daylight saving time.
- Set up separate schedules for agents, bots, and queues to cater to different business scenarios and product lines seamlessly for any channel.
- Define schedules to transition customer queues from bots to agents.
- Customize the display and other settings of the chat widget during nonbusiness hours.
After you define the business hours for your organization and set up automated messages for your customers, when customers interact through a channel during nonbusiness hours, they see or hear the messages that you set. For example, you can display an offline message on the chat widget as "Our agents are not available. Our business hours are between 8:00 am and 5:00 pm." Similarly, for social channels, you can configure the operating hours at the queue level. When customers contact your agents through any of the social channels outside the business hours, they receive responses that you set.
In the Customer Service admin center or Contact Center admin center app, after you create an operating hour record, you can do the following steps, depending on your requirement:
- Queues: Configure the operating hour on the main page of the queue.
- Chat widget: Add the operating hour record on the Chat widget tab.
- SMS channels: Add the operating hour record on the Behaviors tab of the channel instance that can be accessed through the corresponding workstream.
When operating hours are in effect, work items during non-business hours are handled based on the overflow conditions for before a work item is queued
Create a record to define operating hours
You can define operating hours in Customer Service admin center or Contact Center admin center.
In the site map of the admin center, select Calendars in Operations. The Calendar page appears.
In the Operating Hours section, select Manage.
The Active Operating Hours view is displayed. You can switch between various system views using the drop-down list.
Select New. The New Operating Hour page is displayed.
On the General tab, provide the following information:
- Name: Enter a name for the operating hour record.
- Owner: Accept the default value or search to specify a different owner.
- Description: Enter an optional description of the operating hour record.
Select Save. The Working Hours tab is displayed. By default, the calendar displays the work hours defined as 8:00 am to 5:00 pm.
On the Working Hours tab, select New > Working hours in the calendar.
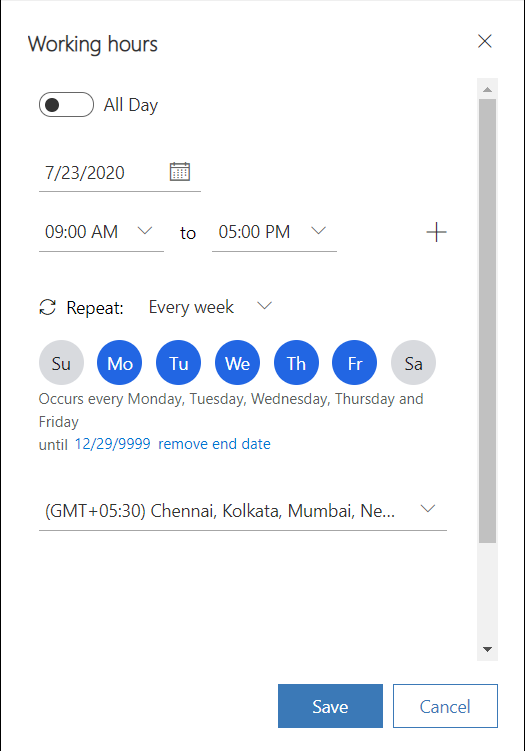
In the Working hours panel, set the following options to define the working hours schedule.
- All Day: Specify Yes, if the chat widget should be available 24/7.
- Calendar: Specify the period for the schedule. The option to choose dates is available only when All Day is Yes.
- Time: Select the start and end time for the schedule.
- Repeat: Select a recurrence option.
- choose an end date: Optionally, specify an end date.
- Time zone: Select an applicable time zone. The daylight saving timings are taken into account, if applicable for the selected time zone.

Select Save. You are returned to the Working Hours tab.
Define a holiday on the calendar
To set unavailability of customer support for a public holiday, on the calendar view, select New > Holiday.
Select the date or date range, and specify a reason.
Save the settings.
Select Save on the navigation bar.
Edit or delete the work hour settings
You can edit or delete the operating hours schedule in an existing record.
Go to the record in which you want to modify the schedule.
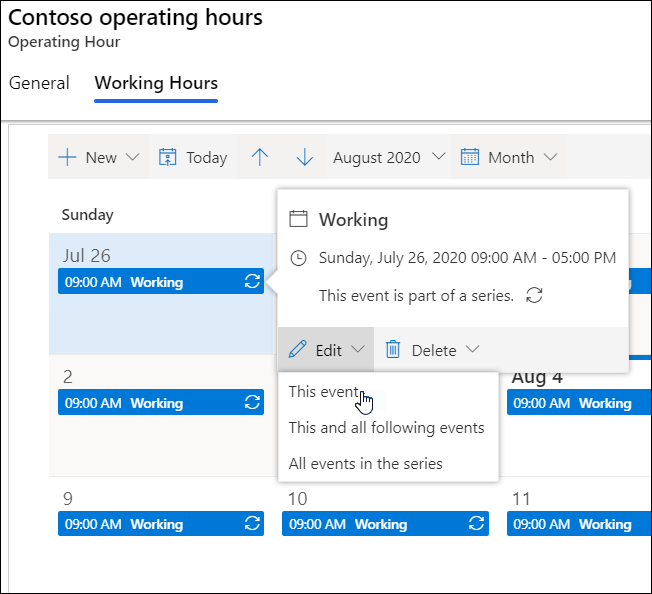
Select an event on the calendar.
On the menu that appears, select Edit, and select one of the options:
- This event
- This and all following events
- All events in the series
If you want to delete an event, select Delete.

Add operating hours to a chat widget
Do the following to specify operating hours for a chat widget:
Open the Chat channel settings widget, and select the chat widget tab.
Toggle the Show widget during operation hours to On.
In the Operating hours name field, browse, and select the operating hour record. The chat widget is displayed during the hours specified in the selected operating hour record.
Select Show widget outside of operation hours to display the widget outside work hours.
Save the changes.
Add operating hours to a queue
You can add operating hours to a queue that can later be configured for a social channel. If operation hours aren't configured, the queues are available round the clock.
Do the following to specify operating hours for a queue:
In the site map of the admin app, select Queues in Customer Support. The Queues page appears.
In the Advanced Queues section, select Manage. The Queues view is displayed.
Open the queue for which you want to specify the operating hours.
On the Operation hours tab, select Set operation hours.
In the Set operation hours page, search, and select the operating hour record that you want to specify.
Save the changes.
Limitation
You can't migrate the Calendar entity by using the export and import options and need to set up the work hours manually.
Related information
Manage overflow of queues
Automated messages
Add a chat widget
Configure a preconversation survey
Create quick replies
Create chat authentication settings
Embed chat widget in Power Apps portals