Note
Access to this page requires authorization. You can try signing in or changing directories.
Access to this page requires authorization. You can try changing directories.
Applies to: Dynamics 365 Contact Center—standalone and Dynamics 365 Customer Service only
Note
Case is applicable to Customer Service only.
As a customer service representative (service representative or representative), you can chat in Microsoft Teams from within Copilot Service workspace, Contact Center workspace, Customer Service Hub, and any custom app. While working on customer records, you can start a new chat or connect an existing chat to a record, and thus collaborate efficiently without switching context or leaving the application. Connecting all the associated chats to a record can help you maintain all the conversations related to the record in one place.
Note
Your administrator needs to enable this feature before you can use it, and you must have certain permissions to access Teams data. Learn more in Configure Teams chat
Representative overview of key features for Teams chat
The following image displays the key features of the representative Teams chat experience.
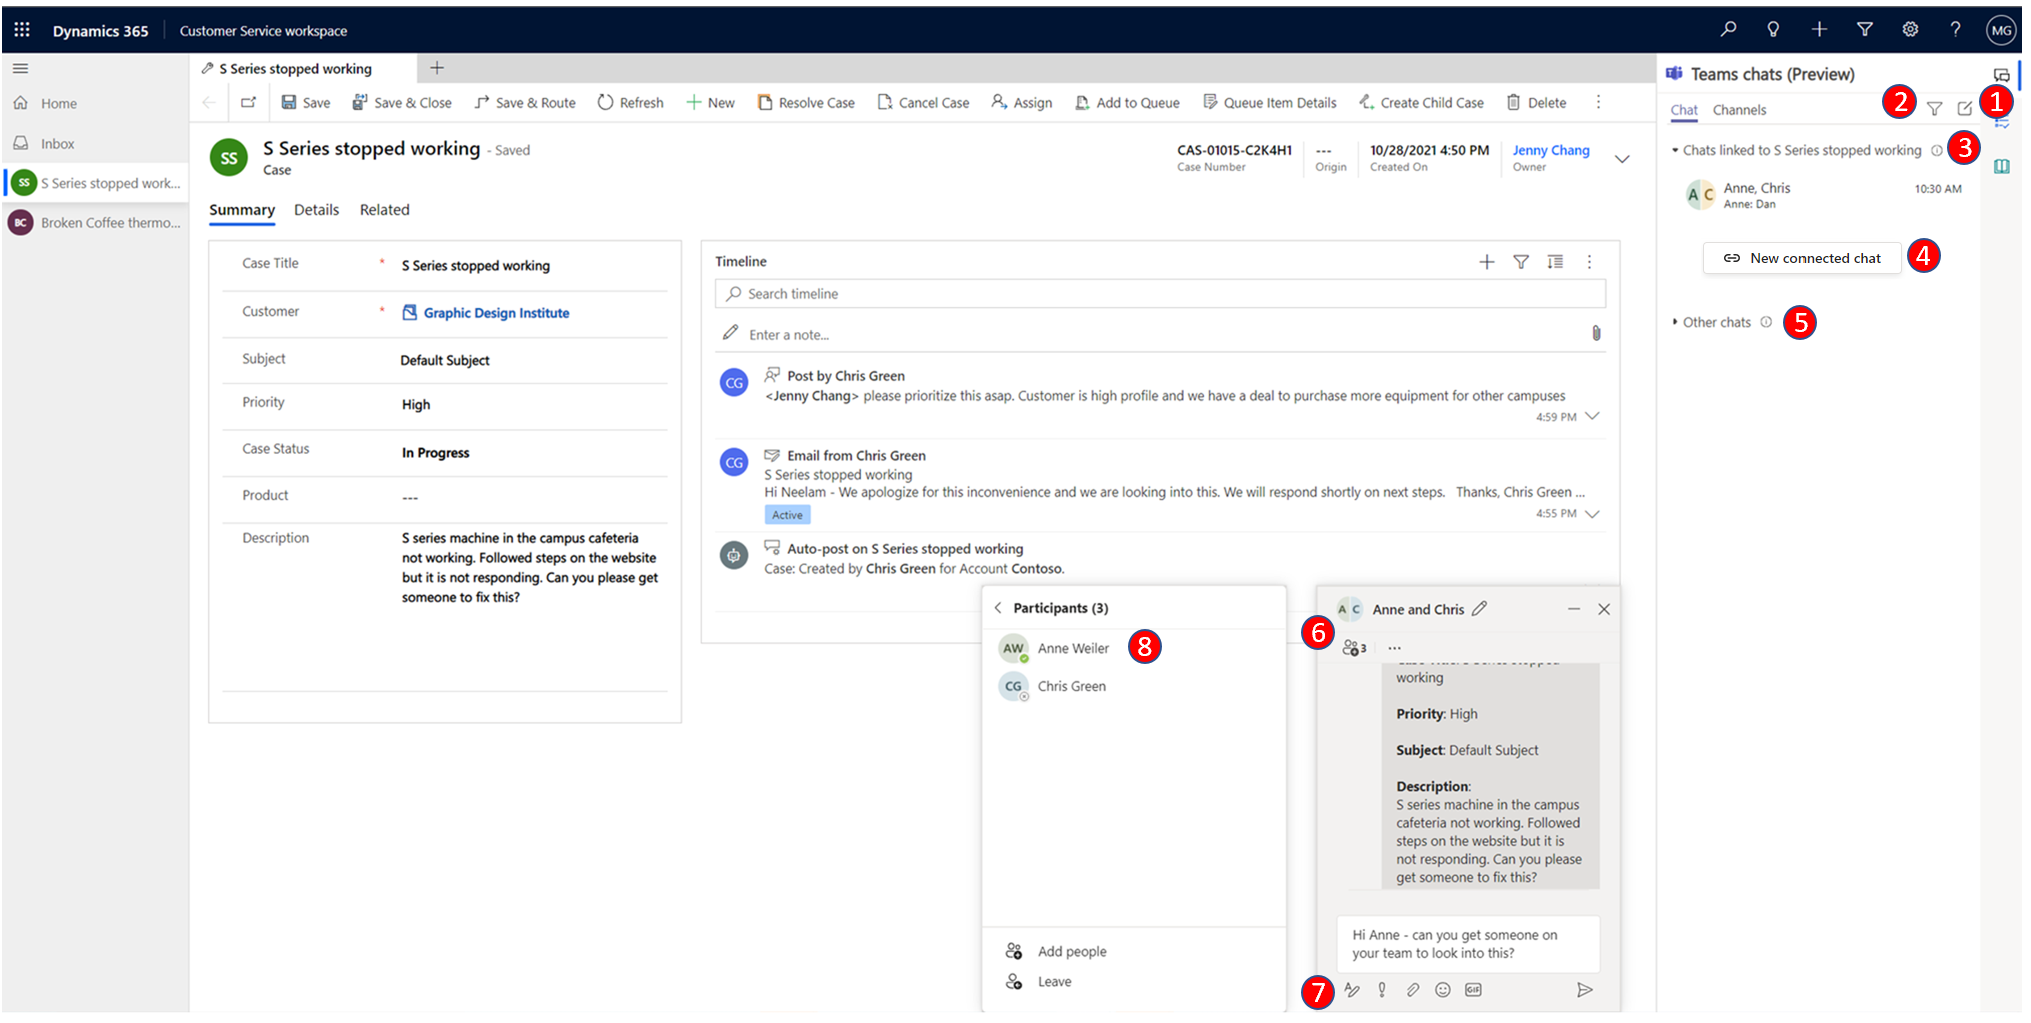
The following legend describes the numbered callouts in the above image.
| Number | Feature | Description |
|---|---|---|
| 1 | New chat | Create chats that aren't associated with any records. |
| 2 | Filter | Filter chats by name. |
| 3 | Chats connected to other records | Chats that are associated with other records that the current user is a part of. Users can prioritize responses to these chats over other chats. |
| 4 | New connected chat | Start a new chat that's connected with the record. Only chat participants can view These chats. |
| 5 | Other chats | Chats that aren't connected to any records or started from Teams. |
| 6 | Chat control | Allows users to multi-task across chats. |
| 7 | Basic Teams functions | Format, use emojis or .GIFs, set delivery options, and attach files. |
| 8 | Add/remove participants | Select who participates in the chat and who doesn't. |
Open Teams chats that are related to a record
You can open any application record and select the Teams chats and channels integration icon. The Teams chats panel opens with the following sections in the Chat tab:
- Chats connected to the record: Lists Teams chats that either you’ve connected to the selected record or someone else has connected a chat with you as a participant.
- Suggested contacts: Lists suggested contacts depending on the users who are working on the record. Learn more in Use suggested contacts to collaborate with the right coworkers.
- Other chats/All recents: Lists your top 50 chat conversations on Teams. You can select any existing conversation and connect it to a record.
Start a new connected chat
You can start a new connected chat or convert an existing Teams chat into a connected chat to associate the chat with a record. Standard record types, including case, conversation, account, contacts, knowledge article, and email, are available out of the box, or your administrator can add your desired record type.
Your administrator can configure an optional message that you can send when using the chat to start a collaboration. This message helps you to share succinct, read-only context with your collaborators on Teams.
If you're using Teams for the first time within Copilot Service workspace, Contact Center workspace, or Customer Service Hub, you can select the blue bubble, and then follow the interface guidance.
Open any record, and then select the Teams chats and channels integration icon. The Teams chats panel opens.
- You can access the embedded chat from Customer Service Hub and custom apps. When you select the Teams chat
 icon, the chat pane opens as an app in the right-side pane.
 - If you're in a multisession app, such as Copilot Service workspace or Contact Center workspace, you can access the chat pane directly from the productivity pane.
Note
Case is applicable to Customer Service only.
- You can also access the chat pane from the home session in Copilot Service workspace or Contact Center workspace. When using the chat pane from the home session, you see two sections: Chats connected to records and Other chats (if enabled by your administrator).
- You can access the embedded chat from Customer Service Hub and custom apps. When you select the Teams chat
Use one of the following methods:
a. To start a new connected chat with a participant, select New connected chat in the Chats connected to record section. Type one or more names of the participants you want to chat with. You can start with just one collaborator and then progressively add more as needed (see step 6). Every new connected chat starts fresh, without bringing context from one-to-one chats or other chats you had with the participants. Therefore, it's important to name your chats appropriately to match the context of the record and conversation. Learn more in step 3.
b. To start a connected chat with a suggested contact directly on the chat list, select the contact with whom you want to chat.Note
You can only connect group chats to records. Direct, one-to-one chats can't be connected, and instead displays an option to start a new connected chat with that contact.
The chat name uses the record name or the participants’ name, depending on the configuration that your administrator set up. To set the chat name as the record name, you can ask your administrator to turn on the Auto-name chats setting. You can modify the chat name. Provide a meaningful name to the chat so that you can identify the chat, even on Teams. The name also helps your collaborators on Teams to easily identify chats that are associated with records.
Your administrator can configure an optional note that you can send when using the chat to start a collaboration. The introduction note uses selected data fields from the associated record. This note helps you to share succinct, read-only context with your collaborators on Teams. The note also includes a link to view the associated records. If your collaborators have a license and access to the record, they can view the full record details in a browser tab.
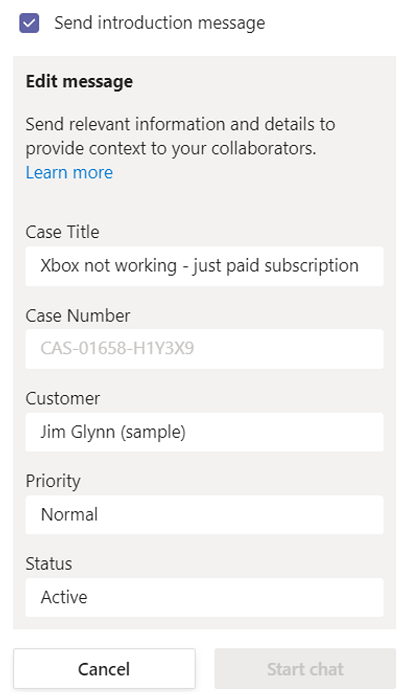
To convert an existing group chat into a connected chat, select a chat from the All recents section. Select the More Commands ellipsis (…), and then select Connect chats to record.
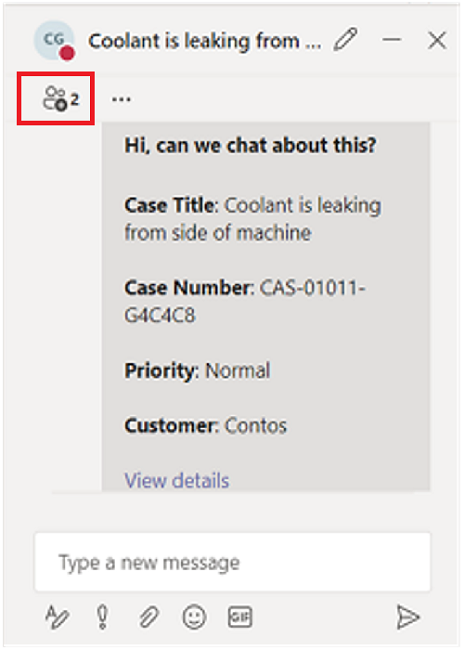
(Optional) You can add more participants to the chat directly from the chat control by selecting the View and add participants.
Connect or disconnect an existing chat from a record
You can connect a chat to a single record or multiple records. For example, if you have a chat about a case that turns into a work order, you can also connect the chat to the work order. If you decide later that you don't want the chat to be connected to the case, you can disconnect it if your administrator grants you permission to do so.
To connect a chat to a record, select ellipses next to the chat, and then select Connect to this case.
To disconnect a chat from a record, select ellipses next to the chat, and then select Disconnect from this case.
Note
Cases are supported in Copilot Service workspace and Customer Service Hub only.
Understand how disconnected chat rights are assigned
As a representative, you have the following three options for getting rights to disconnect chats, all of which your administrator controls.
- You're the record owner, and your administrator enables this capability.
- You're the most recent user to connect the chat to the record, and your administrator enables this capability.
- Your administrator assigns the right to disconnect chats to you if you need the ability to disconnect chats from records.
If your administrator didn't assign any of the preceding rights to you or your role, you can't disconnect a chat that you or other users connected to records. If you need the ability to disconnect chats from records, ask your administrator to assign the rights to you.
Use suggested contacts
The suggested contacts list displays users who are connected or interacted with the record. Suggested contacts might include a team administrator or members who logged an activity in the record timeline, and so forth. There are two different types of suggestions: AI-based and rules-based. Learn more in Use suggested contacts to collaborate with the right coworkers.
Connect a Teams channel to a record
The Channels tab lists the channels that either you’ve connected to the selected record or someone else connected a channel where you’re a participant. If you connected a record to a channel using basic or enhanced collaboration experience, that channel is also listed in this tab.
You can connect relevant Teams channels to a record, so that all the members can easily access the connected channels from the record and follow the conversation.
- Open any record, and select the Teams chat
 icon.
icon.
The Teams chats pane opens. - Select the Channel tab. The tab lists the channels that are already connected to a record.
- Select the Connect a channel icon in the upper-right corner of the Teams chats pane.
The Collaborate with Microsoft Teams dialog opens. - To start a new connected channel, select Create a new connection.
- To connect an existing channel, select the channel from the list, and then select Start collaboration.
Join a chat
As a representative, you can view and easily join chats that are connected to a record you have write access to, even if you weren’t originally a participant in the chat. Some scenarios where this feature can be useful include:
- Case transfers: If you onboarded to a case that another representative previously handled, you can join the chat to better understand the context of the case, and then continue to collaborate with your relevant colleagues.
- Case escalations: If a case needs attention from someone with specific knowledge, the subject-matter expert who reviews it can participate in the relevant conversations.
Note
- Cases are supported in Copilot Service workspace and Customer Service Hub only.
- You can only join connected chats. To do so, you must have write access to the record, and your administrator must turn on the Join Chat capability for the record type for which you want to join an existing connected chat.
To join a connected chat:
Open the record for which you want to join the chat.
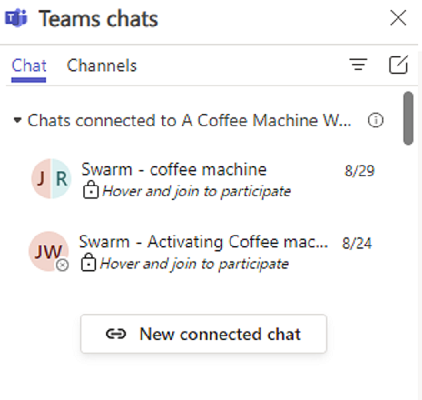
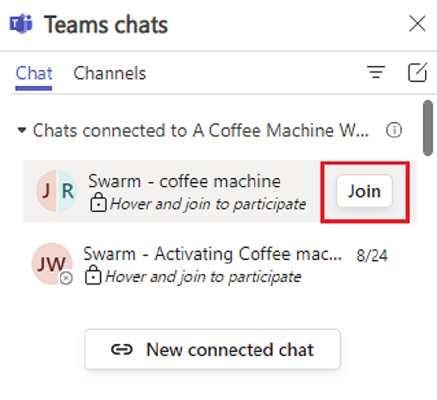
In the Teams chats page, go to any of the connected chats you want to join. A lock icon is displayed with text that says "Hover and join to participate." When you hover over the lock icon, if you have write access to the associated record, a Join button is displayed.
Note
If you don't see the text that allows you to hover and join a chat, there are three possible reasons this situation happens:
- Your administrator didn't enable Join chat capability for the entity.
- You have read-only access to the record.
- Both scenarios in 1 and 2 apply.
In any of these scenarios, you can ask a member of the chat to manually add you, or you can ask your administrator to turn on the Join chat setting for that record type.
Select Join.
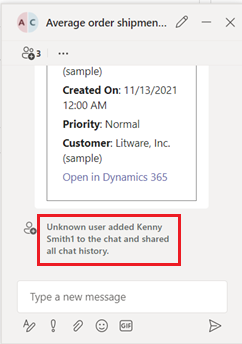
The Teams popup chat shows that you were added to the chat, and you have access to the entire chat history. Other chat members also receive the system message that you were added to the chat.
Note
When a user is added using Join chat, any users who are chatting directly from apps see a system message that says an unknown user added the new user to the chat and shared the chat history. This issue is specific to the embedded chat experience, and we're working to resolve it.
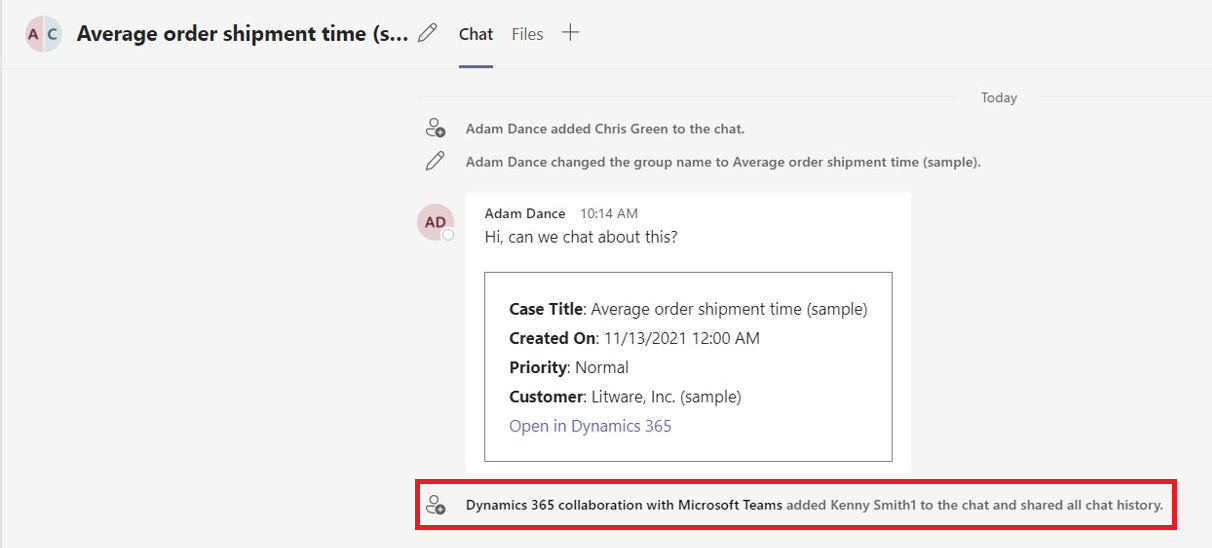
If you're using the Microsoft Teams app, when you join a chat, the following message is displayed: Dynamics 365 collaboration with Microsoft Teams added <user name> to the chat and shared all chat history.
View Teams chats in the timeline for a record (preview)
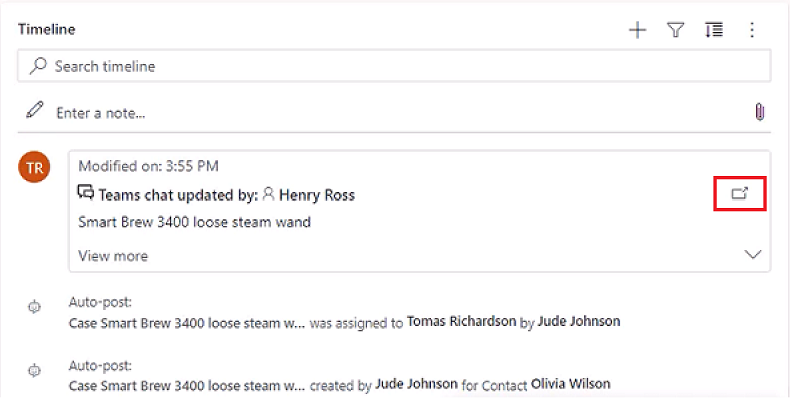
As a representative, when you start a connected chat or connect an existing chat to a record, you can see the chat appear as a new activity in the timeline. The timeline entry shows details about who connected the chat and when they connected it. It also shows the last person to send a message in the chat, and when they sent it. If the Join chat setting is turned on in your organization, representatives can also directly join the chat or be added as a chat participant and see the full exchange.
Note
Your administrator must enable this feature before you can use it.
Go to the record for which you want to view the timeline or start a chat. In the timeline, you can view all chats that are associated with the record.
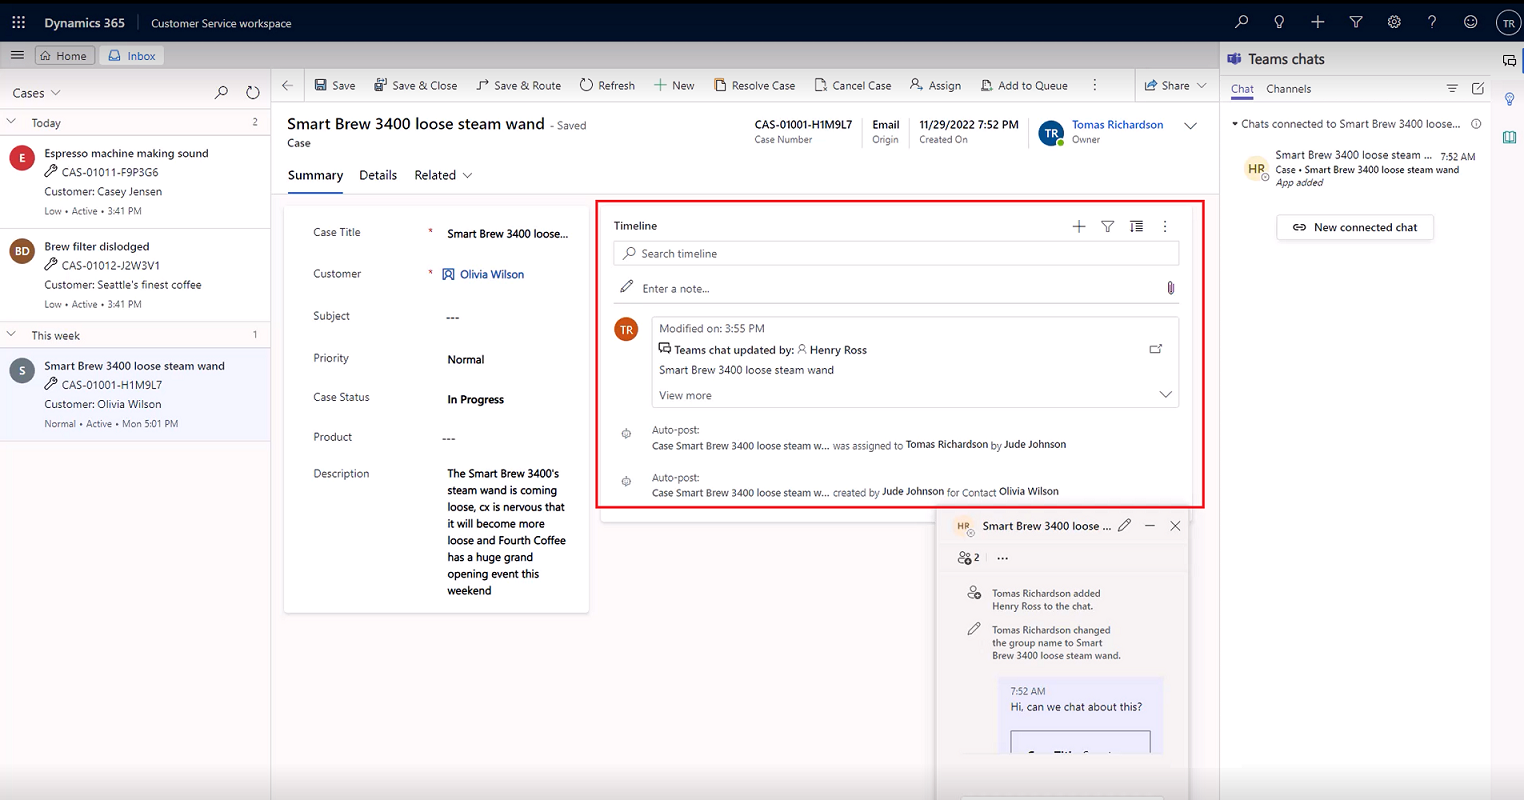
Do any of the following actions:
To view changes you made in a Teams chat, manually refresh the timeline: Select the ellipsis in the right-hand corner, and then select Refresh timeline.
To view details about who initially connected the chat, select View more in the timeline post.
If you aren't a participant in a chat and your administrator enabled the Join chat setting for the record, you can join the chat from the timeline by selecting the join icon.
Dynamics 365 links are unfurled in Teams chat
When you paste a link to a record into a Microsoft Teams chat, meeting, or channel, participants see an adaptive card with details about the shared link. Links to canvas apps show the app name and record name. Model-driven app links to records show the table type. When you paste the link, you can delete the card in the message compose window before sending the message if you don’t want to send the link as a card.
Note
If you don't have access to the app or record for which you paste a link, no app or record details appear in the unfurled card.