Note
Access to this page requires authorization. You can try signing in or changing directories.
Access to this page requires authorization. You can try changing directories.
Use queues to organize, prioritize, and monitor the progress of your work. In Dynamics 365 Customer Service, queues are containers used to store anything that needs to be completed or requires an action, such as completing a task or closing a case. Learn more about creating and managing queues in Create and manage queues.
The option for customer service representatives to manage their queues and items is also available in Dynamics 365 Customer Engagement (on-premises) 9.1. Learn more in New features in Dynamics 365 Customer Engagement (on-premises).
Pick queue items
Use the view list and queue list to filter and find items in queues.
In the Copilot Service workspace or Customer Service Hub, select Queues.
Select a view, and then select a filter to see the items you want.

The following options are available for view lists:
- All Items in Selected Queues: Displays all the cases from a selected queue.
- Cases Available to Work On: Displays cases that no one else is working on.
- Cases I'm Working On: Cases that you're currently working on.
- Items available to work on: Activities and cases no one else is working on.
- Items I am working on: Items that you're currently working on.
In the queue list, choose one of the following options to filter cases based on queues:
- <Individual queues>
- All Queues
- All Public Queues
- Queues I'm a member of
Select the checkbox next to the required item, and then select Pick from the command menu. The Pick dialog appears.

Select Pick. The item is assigned to you and removed from the queue if you had selected Yes for the Also remove the item(s) from the Queue dropdown. If the item is in an advanced queue and is tracked through unified routing, the following actions occur:
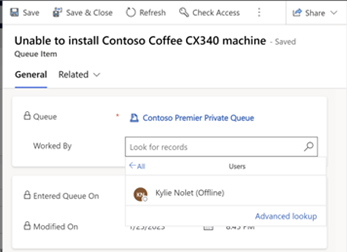
The Worked By attribute of the queue item will be updated with your user ID. The unified routing system takes this as an indicator of work assignment. To manually add another user or team, select the lookup for the Worked By field from Queue Item details and then select the user. If the queue item is assigned to a private queue, the lookup displays only the members of that queue.
Your capacity is updated. If the work item indicates capacity consumed in units, the corresponding units will be reduced from your total available capacity. If capacity profile is configured for the work item, your available capacity units in that profile are deducted by one.
Your work schedule, assignment rules, skills, presence, or capacity constraints aren't evaluated during a manual pick. For example, even if you don't have enough capacity available as requested by the work item, you'll still be able to pick the work item. This ability to manually override pre-configured capacity is to ensure that you're able to pick up work beyond your normal capacity during contingencies. Learn more in Capacity profiles.
Your presence will be updated. If you have further capacity left, your presence will be set to Busy. If you have no capacity left, your presence will be set to Do not disturb.
Note
Remove the items from the queue can't be set for work items in an advanced queue. Advanced queues are used in unified routing to which work items are routed through workstreams.

Release an item or case that you’re working on
In the View list, select one of the views that show the items or cases that you’re working on.
Select the case or item that you want to release, and on the command bar select Release.
When you release an item, your name is removed from the Worked By field, and the item is no longer assigned to you; it’s assigned to the queue owner.
Route an activity or case to another queue or assign to a different user or team
Select the case that you want to move to another queue, and on then, select Route.
To move an activity or case to a different queue, select one of the following:
- Route, and then select a queue
- User/Team and then select the user or team. When you assign the activity or case to someone else to work on, the Worked By field is set to that user or team. You also have the option to remove the item from the queue.
If the item is in the advanced queue and tracked through unified routing, the following actions occur:
- Your capacity is updated based on whether capacity profile or capacity units are configured.
- Your presence is set to "Busy" or "Available" based on your available capacity.
Remove a record from a queue
- In the View list, select one of the views that show the items you want to remove.
- Select the activity or case, and on the command bar, select Remove.
Assign an activity to a user or queue
If you want another person in your organization to work on an activity, you can assign the activity to that person or move it to another queue.
Assign to another user or team
Go to Activities.
Select the activity you want, and on the command bar and then select Assign.
In the Assign To field select User or team, and then select the user or team you want to assign the activity to.
If you don’t see the user or team you're looking for, select Lookup, and then select Look Up More Records. From the Look for dropdown list, select User or Team. In the Search box, type the name, select the search button, select the name, and then select Add.
Select Assign.
Add to queue
- Go to Activities.
- Select the activity you want, and then select Add to Queue.
- The Queue field displays the queue the activity belongs to. The queue lookup displays only the queues that the activity can be added to.
- Select the queue you want to route the activity to, and then select Add.
Pick a view for your queues
- Go to Activities.
- Select the activity you want, and then select Add to Queue.
- In the Queue field, select Search, and then select Advanced lookup.
- On the Choose queue dialog, select the Business Queues(default) dropdown menu to see the complete list of queues views available to you.
The table lists the views with their descriptions.
| View | Description |
|---|---|
| Queues Lookup View, All Queues | Lists all queues. |
| Business Queues | Default view. Lists all the queues that aren't marked as default queues by users or teams. |
| Private Queues Lookup View, Local User Queues | Lists all the private and active queues. |
| Entity Queues | Lists all active queues that are created for records, such as case or email. |
| My Active Queues | Lists active queues owned by the currently signed-in user. |
| Omnichannel queues | Lists the active queues pertaining to Omnichannel for Customer Service or unified routing. |
| Omnichannel queues for Entity | Lists the active queues pertaining to Omnichannel for Customer Service or unified routing and are created for records, such as case or email. |
| Omnichannel queues for messaging | Lists the active queues pertaining to Omnichannel for Customer Service or unified routing and are created for messaging (chat). |
| Active Queues | Lists the queues that are in the active state. |
| Inactive Queues | Lists the queues that are in the inactive state. |
| Queues: Primary Email (Pending Approval) | Lists the queues for which the primary email address is in pending approval state. |
You can also select a view for your queues by navigating through Queues. You must select an item and then select Route to add the required view for your queues.