Use bulk deletion to remove large amounts of data
Note
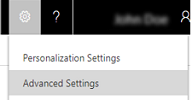
If you have enabled Unified Interface only mode, before using the procedures in this article do the following:
- Select Settings (
 ) on the navigation bar.
 - Select Advanced Settings.

The bulk deletion feature helps you to maintain data quality and manage the consumption of system storage by deleting data that you no longer need.
For example, you can delete the following data in bulk:
Stale data.
Data that is irrelevant to the business.
Unneeded test or sample data.
Data that is incorrectly imported from other systems.
With bulk deletion you can perform the following operations:
Delete data across multiple entities.
Delete records for a specified entity.
Receive email notifications when a bulk deletion finishes.
Delete data periodically.
Schedule the start time of a recurring bulk delete.
Retrieve the information about the failures that occurred during a bulk deletion.
Delete bulk data
Go to Settings > Data Management.
Choose Bulk Record Deletion.
Choose New to run the Bulk Deletion Wizard to create a bulk deletion job with the records you want to delete.
For information about how to implement bulk delete in code, see Delete data in bulk.