Note
Access to this page requires authorization. You can try signing in or changing directories.
Access to this page requires authorization. You can try changing directories.
A bookable resource in Dynamics 365 Field Service is anything that needs to be scheduled. Most often, that's people, equipment, and facilities.
Each resource can have properties that distinguish it from others. For example characteristics (skills or certifications), categories, or locations.
Prerequisites
- You have a Field Service - Administrator or System Administrator security role assigned.
Create frontline workers
Frontline workers are people in your organization who are primarily scheduled for onsite jobs. They use the Dynamics 365 Field Service mobile app to view and update the details of their work orders. Frontline workers are bookable resources. You can quickly create frontline workers from the Get started page.
Tip
If you have a trial version, set up your frontline workers and your other bookable resources using the Create other bookable resources steps.
Create other bookable resources
In Field Service, change to the Resources area and go to Resource > Resources and select New.
On the General tab:
Choose a Resource Type. A classification that describes who or what the resource is and how the resource relates to your organization. Depending on the value you choose, there are other related details to define.
- User: A person in your organization who needs access to the system. For more information, see Set up frontline workers.
- Account or Contact: The resource isn't directly a part of your organization but you want to schedule it. For example, a vendor company that doesn't have access to your system but provides services on your behalf.
- Equipment: A piece of equipment that you want to schedule. For example, a truck or a machine.
- Crew: A group of resources that gets scheduled together. For example, two or more people or a person and a vehicle. For more information, see Group resources in crews.
- Facility: A physical space that needs to be scheduled, such as a building or room. For more information, see Schedule a facility and associated resources.
- Pool: A group of similar resources. Pools are scheduled when you want to pick the actual resource at a later stage. For example, a group of cars. For more information, see Schedule resource pools.
Enter the Name of the resource how it appears on the schedule board and set the Time Zone.
On the Scheduling tab:
Set the Start Location and End Location to define where the resource starts and ends their working day. The system uses these values for scheduling and routing.
- Location agnostic: The home location of this resource isn't relevant for the business scenario. Travel time isn't calculated or taken in to account to get to their first booking or from their last booking.
- Resource Address: The resource starts and/or ends their day at a unique location. The system derives the exact location from the latitude and longitude values on the related user, account, or contact record.
- Organizational Unit: The resource starts and/or ends the day at an organizational unit. Typically, that's a company location like a branch office or an assembly point. The exact location is derived from the latitude and longitude values on the selected organizational unit. If the resource type is facility, the organizational unit acts as the location of the facility.
Choose which Organizational Unit the resource belongs to.
Choose if the resource can Display On Schedule Board. For more information about showing resources on the schedule board, see Experience the schedule board in Universal Resource Scheduling.
Set Enable for Availability Search to define if the schedule assistant can return the resource if it matches the criteria.
On the Field Service tab:
Set an Hourly Rate to define the cost of the resource. It's used to calculate pay for time worked.
Choose a Warehouse to set a default from where the resource gets their parts.
For Time Off Approval Required, choose if someone needs to approve a resource's time off. A time off request blocks the configured time frame and you can't book the resource during that time.
Save the record.
Add work hours
You can define work hours for each resource. If you don't change them, it uses the default work hours. The schedule board differentiates work hours and nonwork hours with colors. The schedule assistant returns only resources that have capacity in their designated work hours.
Open a resource record and select the Work Hours tab. Select New > Working hours.
Set the start and end time of the resource's work hours and choose a repeat pattern. Use the Custom repeat pattern for recurring working hours, where resources can have different working hours on different days of the week.
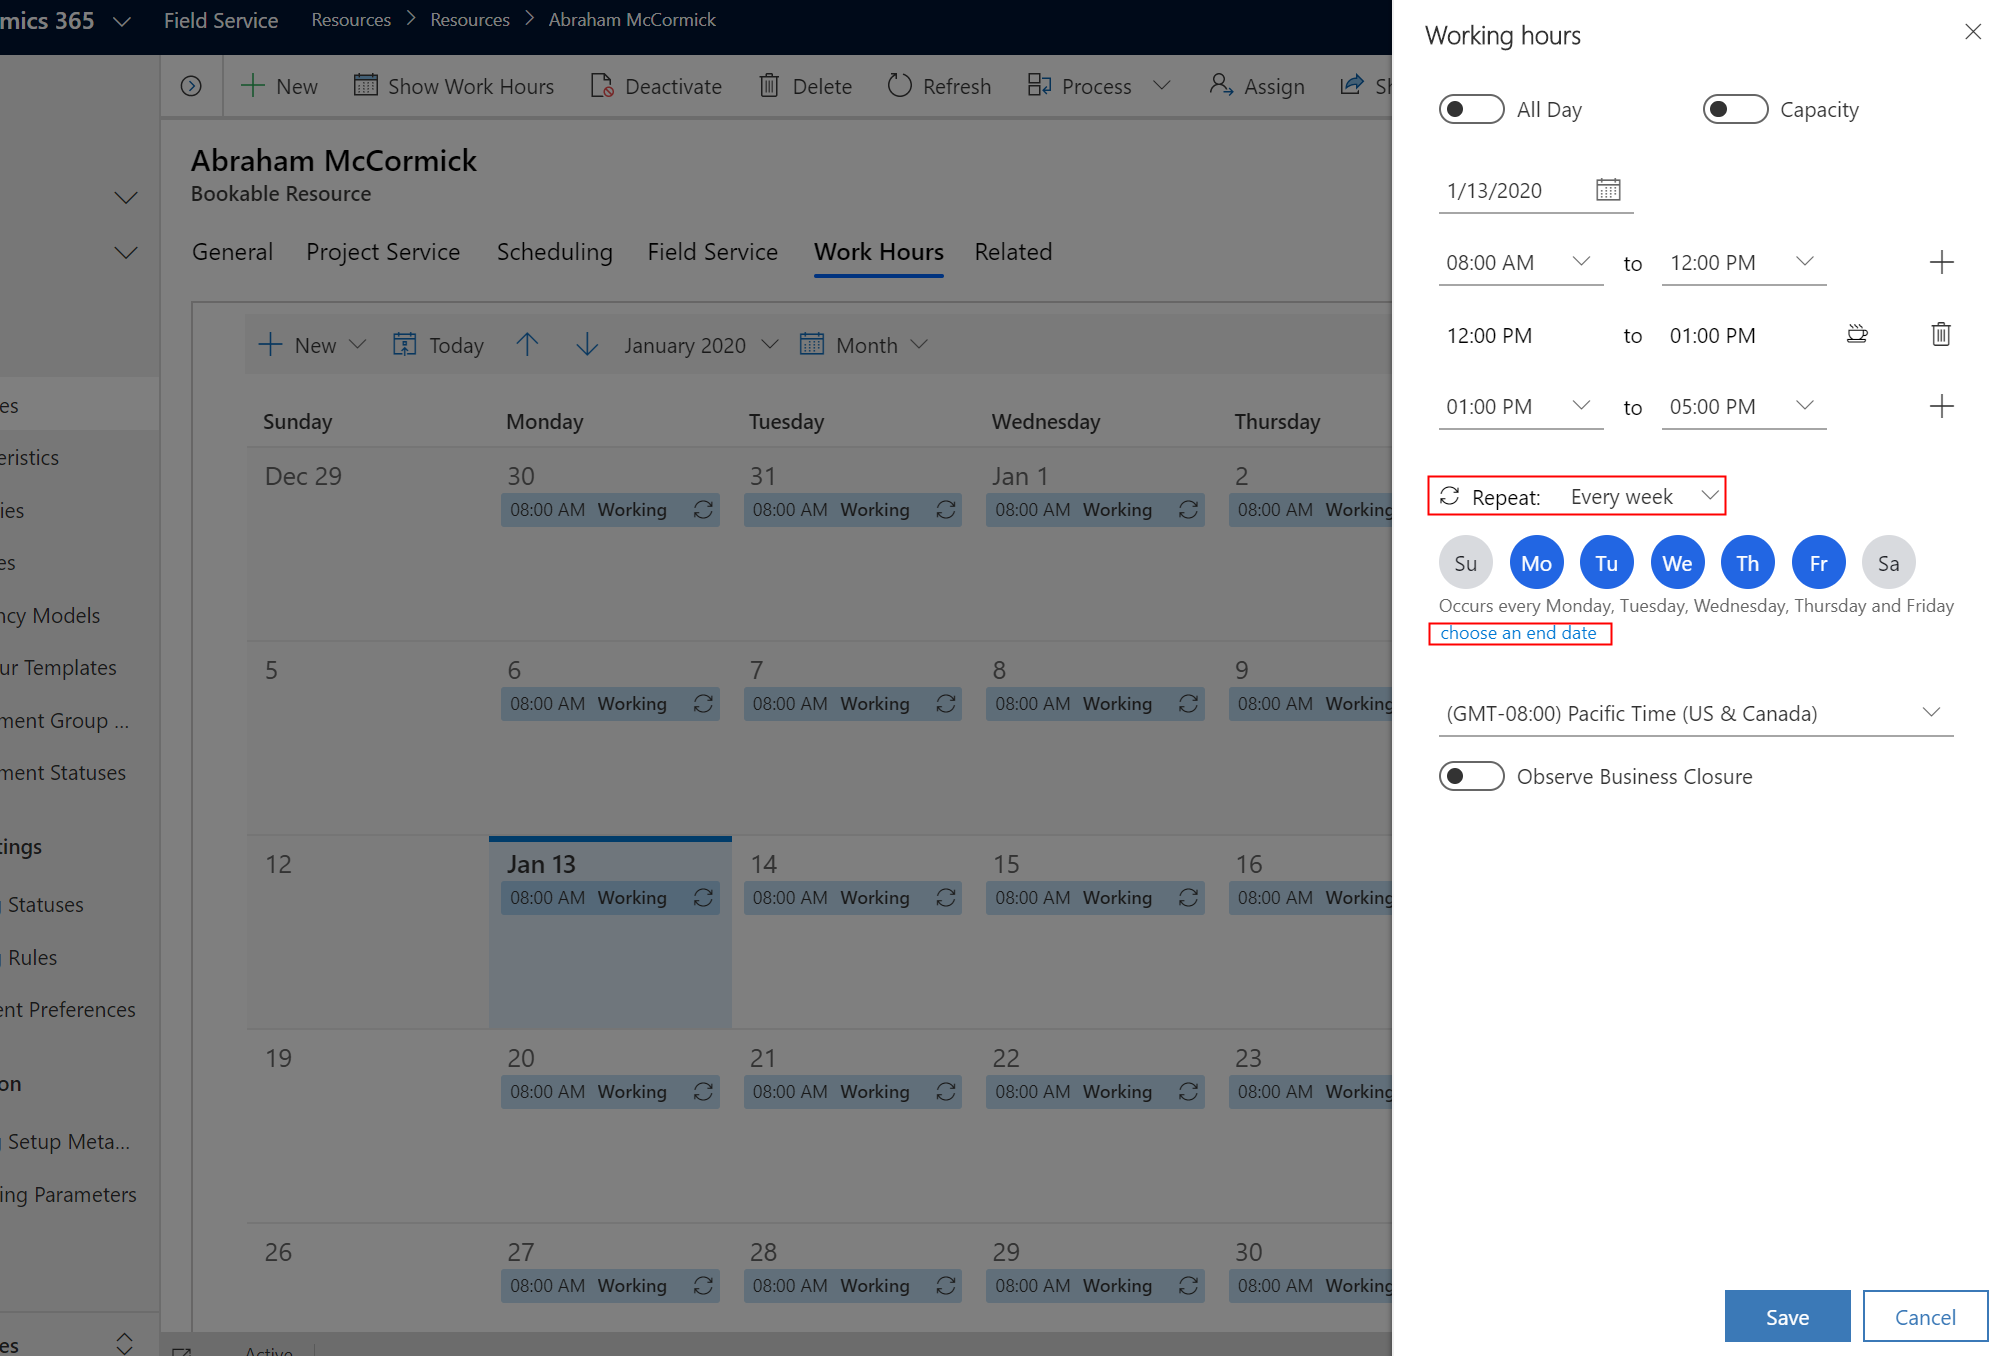
Enable Capacity to define the number of times the resource can be booked during their work hours. For example, setting the capacity to 5 means that when booking a resource with the schedule assistant, the resource shows as available and can be overbooked up to the capacity limit (in this case, five times). 1 is set by default. Changing the value to 0 stops showing the resource as available in a resource search.
To split each working hour entry evenly into two working hour entries, so that each split entry can have a different capacity, select the vertical ellipsis ⋮ > Add split. The Add split option only shows when you enable Capacity.
To add a break, select the vertical ellipsis ⋮ > Add break. A break of 30 minutes is added. To change the break time, adjust the start or end time of one of the working hours.
Set the time zone for the resource work hours.
Save the work hours to update the work hours calendar.
To edit work hour calendars with code, go to Edit work hour calendars by using APIs.
Add characteristics, territories, and categories
The most common attributes that distinguish resources are characteristics, territories, and categories.
Add characteristics
Characteristics represent a resource's skills and certifications. For example, a specific skill like a CPR certification; more general, like accounting or web development experience; or as simple as security clearance for a specific building.
A resource can have multiple characteristics. Create the characteristic, map it to a resource, and provide a proficiency rating.
Open a resource record and select Related > Resource Characteristics.
Select New Bookable Resource Characteristics.
Select a Characteristic from the lookup.
(Optional) Select a Rating Value for skill proficiency. Depending on the proficiency model of the characteristic, it could be a 1-to-10 rating, or even represent the score on a certification exam.
Select Save and Close.
Add categories
Resource categories are groups of resources that help distinguish them. For example, a resource's role or job title.
A resource can have multiple categories. Create a resource category and map it to a resource.
Open a resource record and select Related > Resource Category Associations.
Select New Resource Category Assn.
Select a Resource Category from the lookup.
Select Save and Close.
Add territories
Territories represent geographic regions. Common examples include a city, county, or a general region.
A resource can be part of multiple territories, but requirements map to a single territory. Create territories and map them to a resource.
Open a resource record and select Related > Resource Territories.
Select New Resource Territory.
Select a Territory from the lookup.
Select Save and Close.
Define resource location
To enable features like routing, travel estimations, or the map view of the schedule board, the system needs to know the location of a resource. The location of a resource is their work location or the location of the mobile device. If no other value is available, the system uses the start and end location defined on the resource record.
Open a resource record and select Scheduling.
Set the Start Location and End Location for the resource. Choose Resource Address or Organizational Unit Address, depending where they start or end their work day.
Open the related resource record (user, account, contact) and select Geo Code to ensure it has a geocoded address and valid latitude/longitude values. The system uses the start and end location of a resource as the resource's location during break hours if a break is configured in their work hours.
For example, a bookable resource has resource type set to Contact; the related contact record needs valid latitude and longitude values.
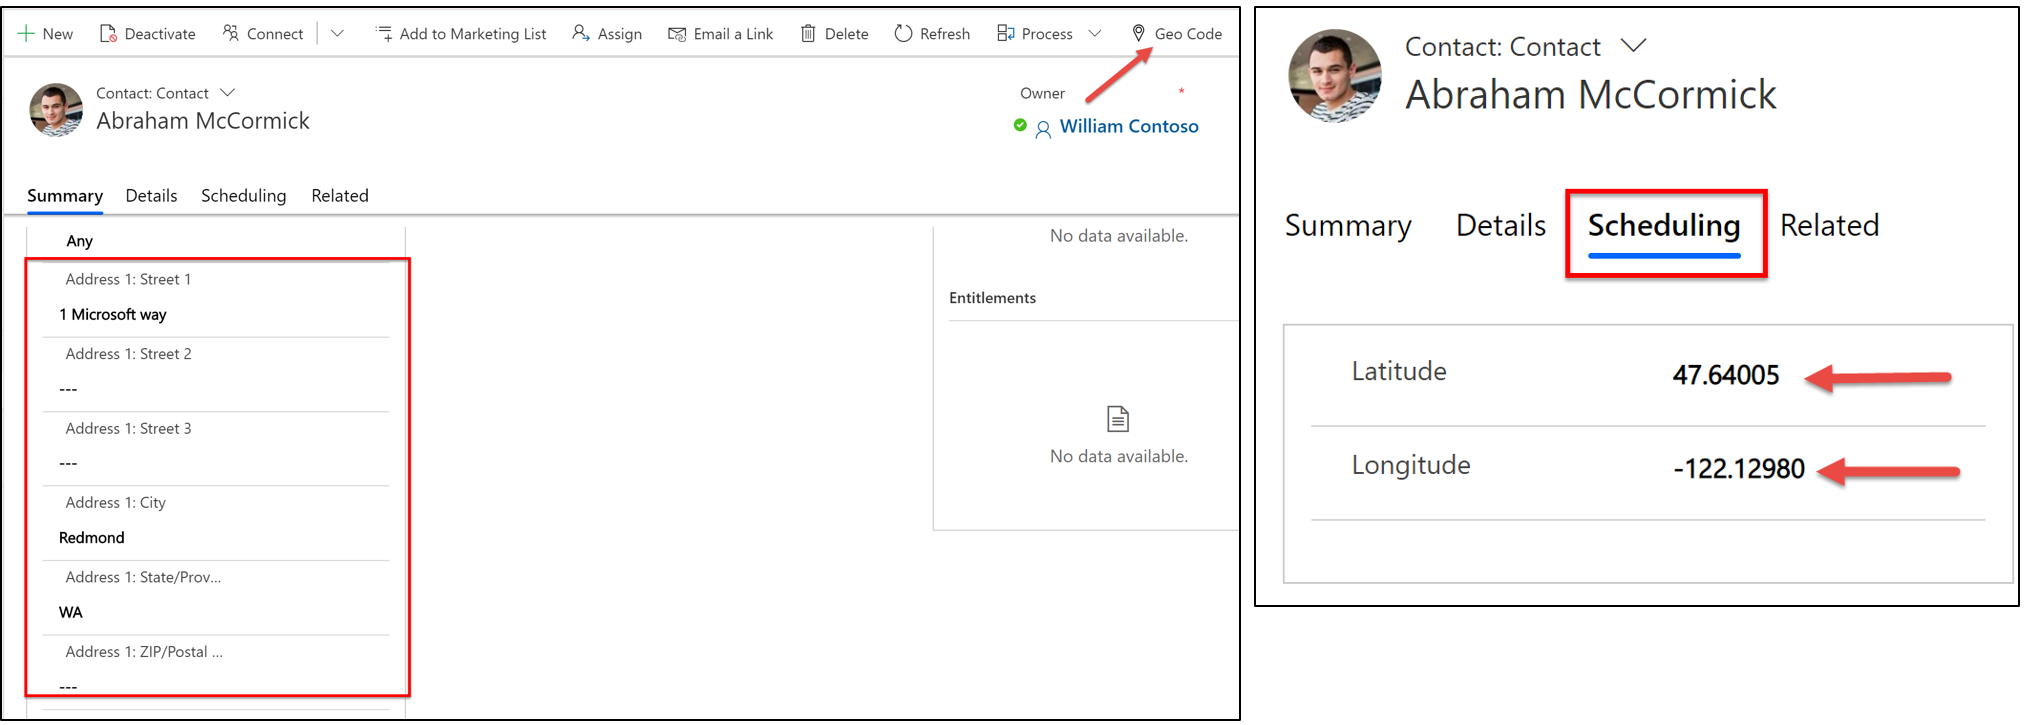
Confirm geocoding works. Open the Schedule Board and verify that the resource appears on the map. Select a resource to highlight their location on the map.